> ## Documentation Index
> Fetch the complete documentation index at: https://help.semji.com/llms.txt
> Use this file to discover all available pages before exploring further.
# WordPress integration: connect your CMS to publish from Semji
> Connect WordPress to publish from Semji without copy-pasting. You decide what agents can read, create, or modify.
## At a glance
* **What you can do**: give Semji's agents controlled access to your WordPress content: posts, pages, and custom post types, with taxonomies, ACF fields, and SEO titles and meta descriptions (Yoast SEO, Rank Math, or SEOPress).
* **Who it's for**: workspace owners and WordPress administrators.
* **Compatibility**: WordPress 5.6 and newer.
## Prerequisites
* WordPress 5.6 or newer. Application passwords, which are used for the connection, have existed since this version.
* A live, public site served over HTTPS. A local or internal-network site cannot be connected.
* The WordPress REST API reachable. It's on by default, but a security plugin may have disabled it.
* A WordPress account allowed to manage posts, Author role at minimum. Choose Editor if agents should be able to update posts written by others.
* If a firewall, WAF, or anti-bot protection (Cloudflare, Akamai, Sucuri, …) sits in front of your site, it must allow Semji's IP addresses. See [Firewalls, Cloudflare, and IP allowlisting](#firewalls-cloudflare-and-ip-allowlisting).
* You are a workspace owner in Semji. The connection is shared with the whole workspace.
Availability of the WordPress integration depends on your Semji plan. If the Connect button opens an upgrade dialog instead of the connection form, contact your account manager.
## How to connect your WordPress site
An application password is a dedicated password WordPress generates for an outside service, here Semji. It's tied only to this connection, and you can revoke it at any time without touching the account's normal password.
In wp-admin, open the account Semji will use, via Users → Profile or Users → All Users. Scroll down to the Application Passwords section, enter a name such as Semji, and click Add New Application Password.
WordPress shows this password only once, in the form `xxxx xxxx xxxx xxxx xxxx xxxx`. Copy it right away. You can paste it into Semji with or without the spaces.
Don't see the Application Passwords section? That's because your site isn't on HTTPS, is running a WordPress version older than 5.6, or a security plugin has disabled the feature.
You must be a workspace owner, since the connection applies to the whole team. In Semji, open Settings → Integrations, go to the CMS tab, and click Connect on the WordPress row.
Fill in the three fields:
* **Site URL**: your site's exact address over HTTPS, e.g. `https://your-site.com`. Enter the address your site actually uses: if it switches from example.com to [www.example.com](http://www.example.com), enter the www version. Semji does not follow redirects.
* **Email or username**: the WordPress login or email address of the user who owns the application password. WordPress accepts either: it matches the username first, then falls back to the email address.
* **Application password**: the one generated in the previous step.
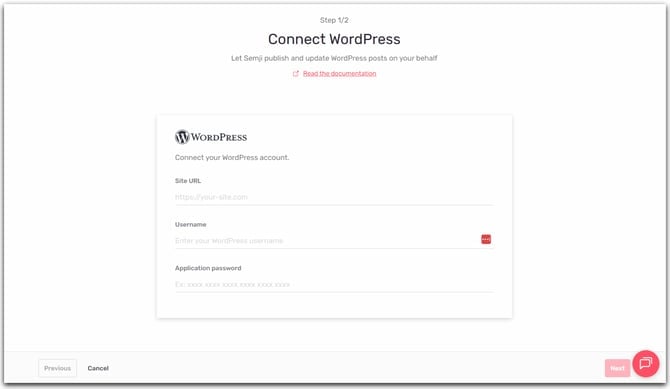 Click Next. Semji tests the connection live by calling `GET /wp-json/wp/v2/users/me` on your site with these credentials, and detects which SEO plugin your site runs.
Choose what AI agents can do on your site. All six tools are enabled by default: Create posts, Read posts, List post types, List posts, List taxonomy terms, and Update posts. You can change this selection at any time later.
Update posts also covers the SEO title and meta description, which may need a prerequisite configuration on your WordPress site depending on your SEO plugin. See [Enable SEO title and meta description updates](#enable-seo-title-and-meta-description-updates). And if your content types use ACF fields, expose them to the REST API so agents can read and fill them. See [Expose ACF fields to Semji](#expose-acf-fields-to-semji).
Click Next. Semji tests the connection live by calling `GET /wp-json/wp/v2/users/me` on your site with these credentials, and detects which SEO plugin your site runs.
Choose what AI agents can do on your site. All six tools are enabled by default: Create posts, Read posts, List post types, List posts, List taxonomy terms, and Update posts. You can change this selection at any time later.
Update posts also covers the SEO title and meta description, which may need a prerequisite configuration on your WordPress site depending on your SEO plugin. See [Enable SEO title and meta description updates](#enable-seo-title-and-meta-description-updates). And if your content types use ACF fields, expose them to the REST API so agents can read and fill them. See [Expose ACF fields to Semji](#expose-acf-fields-to-semji).
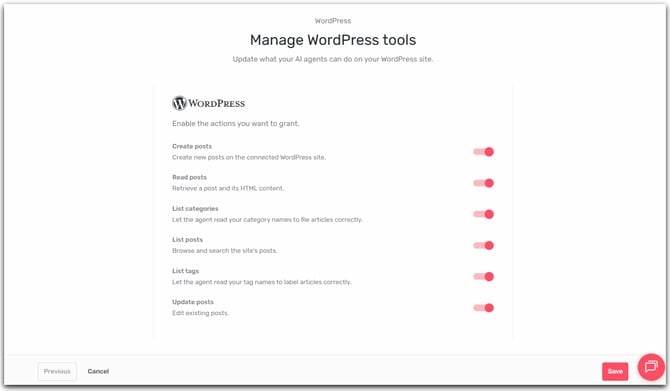 Click Save. The WordPress row now shows as connected.
 ## What Semji can do once connected
| Tool | What it does |
| - | - |
| List post types | Discover the site's content types (built-in posts and pages plus custom post types like FAQ or news) with the taxonomies attached to each, so agents publish in the right place |
| List posts | Search and list posts of any content type, with status filters and pagination |
| Read posts | Fetch a post's full content: raw editor source, SEO title and meta description, taxonomy terms, and ACF fields when the site exposes them |
| Create posts | Create new posts on any content type, always as a draft unless you explicitly ask an agent to publish, with categories, tags, custom taxonomy terms, and ACF fields |
| Update posts | Update only the fields you change: title, content, status, slug, featured image, categories, tags, custom taxonomy terms, ACF fields, SEO title, and meta description. The SEO fields go through your SEO plugin and may require a [prerequisite configuration](#enable-seo-title-and-meta-description-updates) |
| List taxonomy terms | Search and list the terms of any taxonomy (categories with their hierarchy, tags, or custom taxonomies like authors or thematics), so agents resolve term names to IDs before filing an article |
## Supported SEO plugins
Semji detects your SEO plugin automatically. There is no provider to pick. Detection reads the namespaces advertised by your REST API index (`/wp-json/`), and falls back to inspecting the SEO fields exposed on your posts when a security plugin filters the index. The SEO title and meta description are then read and written through the detected plugin's own fields:
| SEO plugin | SEO title field | Meta description field |
| - | - | - |
| Yoast SEO | `_yoast_wpseo_title` | `_yoast_wpseo_metadesc` |
| Rank Math | `rank_math_title` | `rank_math_description` |
| SEOPress | `_seopress_titles_title` | `_seopress_titles_desc` |
**All in One SEO is not supported.** It stores its metadata in a custom database table instead of standard post fields, so it cannot be updated through the WordPress REST API. On AIOSEO sites, SEO updates report an explicit warning while the rest of the post update still applies. Everything else in the integration works normally.
If several SEO plugins are active at the same time (typically during a migration), Semji picks the first supported one in this order: Yoast SEO, then Rank Math, then SEOPress. Deactivate the plugin you no longer use so updates target the one that actually renders your pages.
## Enable SEO title and meta description updates
Whether a prerequisite is needed depends on your SEO plugin and its version:
* **Yoast SEO 28.1 and newer**: nothing to do. Recent Yoast versions expose their SEO title and meta description fields to the REST API out of the box, and Semji can update them right away.
* **Older Yoast SEO, Rank Math, and SEOPress**: these store the SEO title and meta description in protected custom fields that the REST API does not accept writes on by default. A small PHP snippet must register the fields with the REST API first.
There are two equivalent ways to install the snippet: entirely from the WordPress admin with a snippet plugin (no server access needed), or as a must-use plugin file dropped on the server. Pick one. The same snippet covers all three supported SEO plugins and every public post type (posts, pages, and custom post types alike), so it keeps working if you later switch SEO plugins or add content types.
Writes remain protected by WordPress permissions: only users allowed to edit posts (the `edit_posts` capability) can modify the fields. That is the same permission level as editing the post itself.
Use a snippet plugin such as [Code Snippets](https://wordpress.org/plugins/code-snippets/). It stores the code in the database and runs it on every load, so nothing touches the server's filesystem.
In wp-admin, go to Plugins → Add New Plugin, search for Code Snippets, then install and activate it.
In the new Snippets menu, click Add New, give the snippet a name such as `Semji SEO fields REST support`, and paste the code below. It starts without the opening ` ['_yoast_wpseo_title', '_yoast_wpseo_metadesc'],
'RANK_MATH_VERSION' => ['rank_math_title', 'rank_math_description'],
'SEOPRESS_VERSION' => ['_seopress_titles_title', '_seopress_titles_desc'],
];
foreach ($seo_meta_keys_by_plugin_constant as $plugin_constant => $seo_meta_keys) {
if (!defined($plugin_constant)) {
continue;
}
foreach (get_post_types(['public' => true], 'names') as $post_type) {
foreach ($seo_meta_keys as $meta_key) {
register_post_meta($post_type, $meta_key, [
'type' => 'string',
'single' => true,
'show_in_rest' => true,
'auth_callback' => static function () {
return current_user_can('edit_posts');
},
]);
}
}
}
}, 20);
```
The snippet detects which of the three plugins is active and only registers that plugin's fields, so it keeps working if you later switch SEO plugins.
Keep the scope on Run snippet everywhere. REST API requests must load it too, so do not restrict it to the admin area. Then click Save Changes and Activate.
Deactivating the snippet removes the capability.
A must-use plugin is a single PHP file dropped into `wp-content/mu-plugins/`. WordPress loads must-use plugins automatically: there is nothing to activate, and removing the file removes the capability.
On your server, create the directory `wp-content/mu-plugins/` if it does not exist yet, then create a file named `semji-seo-fields.php` inside it.
```php semji-seo-fields.php theme={null}
['_yoast_wpseo_title', '_yoast_wpseo_metadesc'],
'RANK_MATH_VERSION' => ['rank_math_title', 'rank_math_description'],
'SEOPRESS_VERSION' => ['_seopress_titles_title', '_seopress_titles_desc'],
];
foreach ($seo_meta_keys_by_plugin_constant as $plugin_constant => $seo_meta_keys) {
if (!defined($plugin_constant)) {
continue;
}
foreach (get_post_types(['public' => true], 'names') as $post_type) {
foreach ($seo_meta_keys as $meta_key) {
register_post_meta($post_type, $meta_key, [
'type' => 'string',
'single' => true,
'show_in_rest' => true,
'auth_callback' => static function () {
return current_user_can('edit_posts');
},
]);
}
}
}
}, 20);
```
### Verify the fields are exposed
Whichever option you chose, call your REST API with the same credentials Semji uses, on any post ID, checking your plugin's meta description field (here Rank Math, swap in the field from the [table above](#supported-seo-plugins) for Yoast SEO or SEOPress):
```bash theme={null}
curl -s -u 'USERNAME:APP_PASSWORD' \
'https://your-site.com/wp-json/wp/v2/posts/123' | jq '.meta.rank_math_description'
```
A string, even an empty one (`""`), means the field is exposed and Semji can update it. `null` means the code is not running yet.
Without this prerequisite configuration, the SEO part of an Update posts call is skipped. The rest of the post update still applies, and the agent receives an explicit warning naming your SEO plugin and the missing field. Agents will tell you the field is not exposed rather than pretend the update succeeded. Everything else in the integration works normally.
## Expose ACF fields to Semji
Many WordPress sites structure their content with [Advanced Custom Fields](https://www.advancedcustomfields.com/) (ACF), for example a FAQ custom post type whose question and answer live in dedicated fields rather than in the post body. Semji's agents handle those fields natively: Read posts returns a post's ACF values, and Create posts and Update posts fill them.
This only works for fields visible through the REST API, and **ACF does not expose field groups by default**. Out of the box the `acf` key is absent from your site's REST responses, so agents cannot see the fields, let alone fill them, and will tell you so during a publication.
Unlike the SEO fields above, no PHP snippet is needed: ACF (free and Pro, version 5.11 or newer) ships native REST API support behind a single setting. The Secure Custom Fields fork offers the same setting.
### Enable "Show in REST API" on the field group
The setting lives on the field group, not on each individual field:
In wp-admin, go to ACF → Field Groups and open the group attached to your content type (e.g. FAQ).
In the field group's Settings panel, turn on Show in REST API, then save the group.
Do the same for every field group agents should be able to read and fill.
For a custom post type, the type itself must also be visible in the REST API, otherwise agents cannot even list it. If it was created through ACF's Post Types UI, enable Show in REST API in the post type's Advanced settings. If it is registered in code, pass `'show_in_rest' => true` to `register_post_type()`.
### Verify the ACF fields are exposed
Call your REST API with the same credentials Semji uses, on any existing item. Swap `faq` for the rest base of your content type (`posts` for built-in posts):
```bash theme={null}
curl -s -u 'USERNAME:APP_PASSWORD' \
'https://your-site.com/wp-json/wp/v2/faq/123' | jq '.acf'
```
An object listing your fields, even with empty values, means they are exposed and agents can read and fill them. `null` means the field group is not exposed yet.
### Help agents fill the fields correctly
The REST API carries only field names and values. The labels and instructions you see in wp-admin stay invisible to agents. Agents discover a type's fields by reading an existing item, so a few habits make the fills reliable:
* **Use descriptive field names.** An agent understands `answer_short`, it can only guess at `field_2`.
* **Keep at least one well-filled item** of each content type. Agents read it to learn which field holds what, and the expected value shape (plain text vs HTML, media ID for an image field, …).
* **Brief the agent.** When field names are ambiguous, say what each field is for in your instructions, and the agent will map its content accordingly.
## Manage or disconnect
From Settings → Integrations → CMS, the WordPress row offers:
* **Manage tools**: enable or disable each of the six tools.
* **Disconnect**: remove the integration for the whole workspace.
## Firewalls, Cloudflare, and IP allowlisting
Semji calls your site's REST API directly. If a firewall or protection like Cloudflare sits in front of your WordPress, it must let these calls through, or the connection fails.
Semji's servers reach the internet through a fixed set of outbound IP addresses. If a firewall, WAF, or anti-bot protection (Cloudflare, Akamai, Sucuri, …) sits in front of your site, it can block Semji's requests — typically with a `403 Forbidden` — before they ever reach your CMS, even when your credentials are correct.
Allow the following Semji IP addresses:
```text theme={null}
63.34.75.122
63.35.78.179
54.228.104.165
18.200.156.37
34.248.117.83
52.213.28.177
```
On Cloudflare, create a WAF custom rule with the Skip action, matching requests where the source IP is one of the addresses above and the path starts with `/wp-json/`.
A firewall block looks just like a credentials error. When a protection layer answers "403 Forbidden" on `/wp-json/`, Semji shows an invalid-credentials error even though your username and password are correct. If you're sure of the credentials, check the firewall first.
## Troubleshooting
Your site answered `401` or `403`. Possible causes: the login (email or username) or application password is wrong or was revoked, application passwords are disabled on the site, or a firewall (Cloudflare, Wordfence) is blocking Semji before it even reaches WordPress. See the firewall section.
Semji couldn't reach your site. The most common causes:
* The address redirects. Semji does not follow redirects, so enter the final address, for example the www version or the https version.
* The REST API isn't reachable: `/wp-json/` returns a 404, often because of a plugin or a permalink setting.
* The site is unreachable: a DNS problem, host down, or a non-public site.
* The site responds too slowly: the response must arrive within 10 seconds.
* "Please enter a valid URL." The text you entered isn't a web address.
* "The site URL must start with https\://." HTTP sites cannot be connected.
* "The site URL points to a private or reserved address, which is not allowed." Local or internal sites are rejected, the site must be public.
* "WordPress authentication failed. Please check the credentials in the integration settings." The application password was revoked or changed since connection. Reconnect with a fresh one.
* "No WordPress integration configured for this workspace." The integration was disconnected. A workspace owner must reconnect it.
* "The post was updated, but its SEO metadata was NOT: no supported SEO plugin (Yoast SEO, Rank Math or SEOPress) was detected…" Semji found none of the three on the site. Activate one of them, or if one is already active, apply the [prerequisite configuration](#enable-seo-title-and-meta-description-updates) so its fields are visible through the REST API.
* "The SEO metadata was NOT saved: this WordPress site runs … but does not expose its … field(s) for writing through the REST API…" The site does not accept REST API writes on your SEO plugin's fields yet. Apply the prerequisite configuration described in [Enable SEO title and meta description updates](#enable-seo-title-and-meta-description-updates). The rest of the post update was applied.
The field group is not exposed to the REST API, so the `acf` key is absent from your site's REST responses and agents cannot read or write those fields. Enable Show in REST API on the field group. See [Expose ACF fields to Semji](#expose-acf-fields-to-semji). If the content type itself does not show up when the agent lists post types, the post type also needs to be visible in the REST API (same section).
## Related
* [CMS Publisher: publish your content to your CMS without leaving Semji](/en/connect-your-tools/cms-publisher)
* [Sync drafts to your CMS](/guides/sync-drafts-to-cms): API-based publishing flow, if you prefer to drive the sync yourself.
This documentation is built and hosted on [Mintlify](https://mintlify.com), a developer documentation platform.
## What Semji can do once connected
| Tool | What it does |
| - | - |
| List post types | Discover the site's content types (built-in posts and pages plus custom post types like FAQ or news) with the taxonomies attached to each, so agents publish in the right place |
| List posts | Search and list posts of any content type, with status filters and pagination |
| Read posts | Fetch a post's full content: raw editor source, SEO title and meta description, taxonomy terms, and ACF fields when the site exposes them |
| Create posts | Create new posts on any content type, always as a draft unless you explicitly ask an agent to publish, with categories, tags, custom taxonomy terms, and ACF fields |
| Update posts | Update only the fields you change: title, content, status, slug, featured image, categories, tags, custom taxonomy terms, ACF fields, SEO title, and meta description. The SEO fields go through your SEO plugin and may require a [prerequisite configuration](#enable-seo-title-and-meta-description-updates) |
| List taxonomy terms | Search and list the terms of any taxonomy (categories with their hierarchy, tags, or custom taxonomies like authors or thematics), so agents resolve term names to IDs before filing an article |
## Supported SEO plugins
Semji detects your SEO plugin automatically. There is no provider to pick. Detection reads the namespaces advertised by your REST API index (`/wp-json/`), and falls back to inspecting the SEO fields exposed on your posts when a security plugin filters the index. The SEO title and meta description are then read and written through the detected plugin's own fields:
| SEO plugin | SEO title field | Meta description field |
| - | - | - |
| Yoast SEO | `_yoast_wpseo_title` | `_yoast_wpseo_metadesc` |
| Rank Math | `rank_math_title` | `rank_math_description` |
| SEOPress | `_seopress_titles_title` | `_seopress_titles_desc` |
**All in One SEO is not supported.** It stores its metadata in a custom database table instead of standard post fields, so it cannot be updated through the WordPress REST API. On AIOSEO sites, SEO updates report an explicit warning while the rest of the post update still applies. Everything else in the integration works normally.
If several SEO plugins are active at the same time (typically during a migration), Semji picks the first supported one in this order: Yoast SEO, then Rank Math, then SEOPress. Deactivate the plugin you no longer use so updates target the one that actually renders your pages.
## Enable SEO title and meta description updates
Whether a prerequisite is needed depends on your SEO plugin and its version:
* **Yoast SEO 28.1 and newer**: nothing to do. Recent Yoast versions expose their SEO title and meta description fields to the REST API out of the box, and Semji can update them right away.
* **Older Yoast SEO, Rank Math, and SEOPress**: these store the SEO title and meta description in protected custom fields that the REST API does not accept writes on by default. A small PHP snippet must register the fields with the REST API first.
There are two equivalent ways to install the snippet: entirely from the WordPress admin with a snippet plugin (no server access needed), or as a must-use plugin file dropped on the server. Pick one. The same snippet covers all three supported SEO plugins and every public post type (posts, pages, and custom post types alike), so it keeps working if you later switch SEO plugins or add content types.
Writes remain protected by WordPress permissions: only users allowed to edit posts (the `edit_posts` capability) can modify the fields. That is the same permission level as editing the post itself.
Use a snippet plugin such as [Code Snippets](https://wordpress.org/plugins/code-snippets/). It stores the code in the database and runs it on every load, so nothing touches the server's filesystem.
In wp-admin, go to Plugins → Add New Plugin, search for Code Snippets, then install and activate it.
In the new Snippets menu, click Add New, give the snippet a name such as `Semji SEO fields REST support`, and paste the code below. It starts without the opening ` ['_yoast_wpseo_title', '_yoast_wpseo_metadesc'],
'RANK_MATH_VERSION' => ['rank_math_title', 'rank_math_description'],
'SEOPRESS_VERSION' => ['_seopress_titles_title', '_seopress_titles_desc'],
];
foreach ($seo_meta_keys_by_plugin_constant as $plugin_constant => $seo_meta_keys) {
if (!defined($plugin_constant)) {
continue;
}
foreach (get_post_types(['public' => true], 'names') as $post_type) {
foreach ($seo_meta_keys as $meta_key) {
register_post_meta($post_type, $meta_key, [
'type' => 'string',
'single' => true,
'show_in_rest' => true,
'auth_callback' => static function () {
return current_user_can('edit_posts');
},
]);
}
}
}
}, 20);
```
The snippet detects which of the three plugins is active and only registers that plugin's fields, so it keeps working if you later switch SEO plugins.
Keep the scope on Run snippet everywhere. REST API requests must load it too, so do not restrict it to the admin area. Then click Save Changes and Activate.
Deactivating the snippet removes the capability.
A must-use plugin is a single PHP file dropped into `wp-content/mu-plugins/`. WordPress loads must-use plugins automatically: there is nothing to activate, and removing the file removes the capability.
On your server, create the directory `wp-content/mu-plugins/` if it does not exist yet, then create a file named `semji-seo-fields.php` inside it.
```php semji-seo-fields.php theme={null}
['_yoast_wpseo_title', '_yoast_wpseo_metadesc'],
'RANK_MATH_VERSION' => ['rank_math_title', 'rank_math_description'],
'SEOPRESS_VERSION' => ['_seopress_titles_title', '_seopress_titles_desc'],
];
foreach ($seo_meta_keys_by_plugin_constant as $plugin_constant => $seo_meta_keys) {
if (!defined($plugin_constant)) {
continue;
}
foreach (get_post_types(['public' => true], 'names') as $post_type) {
foreach ($seo_meta_keys as $meta_key) {
register_post_meta($post_type, $meta_key, [
'type' => 'string',
'single' => true,
'show_in_rest' => true,
'auth_callback' => static function () {
return current_user_can('edit_posts');
},
]);
}
}
}
}, 20);
```
### Verify the fields are exposed
Whichever option you chose, call your REST API with the same credentials Semji uses, on any post ID, checking your plugin's meta description field (here Rank Math, swap in the field from the [table above](#supported-seo-plugins) for Yoast SEO or SEOPress):
```bash theme={null}
curl -s -u 'USERNAME:APP_PASSWORD' \
'https://your-site.com/wp-json/wp/v2/posts/123' | jq '.meta.rank_math_description'
```
A string, even an empty one (`""`), means the field is exposed and Semji can update it. `null` means the code is not running yet.
Without this prerequisite configuration, the SEO part of an Update posts call is skipped. The rest of the post update still applies, and the agent receives an explicit warning naming your SEO plugin and the missing field. Agents will tell you the field is not exposed rather than pretend the update succeeded. Everything else in the integration works normally.
## Expose ACF fields to Semji
Many WordPress sites structure their content with [Advanced Custom Fields](https://www.advancedcustomfields.com/) (ACF), for example a FAQ custom post type whose question and answer live in dedicated fields rather than in the post body. Semji's agents handle those fields natively: Read posts returns a post's ACF values, and Create posts and Update posts fill them.
This only works for fields visible through the REST API, and **ACF does not expose field groups by default**. Out of the box the `acf` key is absent from your site's REST responses, so agents cannot see the fields, let alone fill them, and will tell you so during a publication.
Unlike the SEO fields above, no PHP snippet is needed: ACF (free and Pro, version 5.11 or newer) ships native REST API support behind a single setting. The Secure Custom Fields fork offers the same setting.
### Enable "Show in REST API" on the field group
The setting lives on the field group, not on each individual field:
In wp-admin, go to ACF → Field Groups and open the group attached to your content type (e.g. FAQ).
In the field group's Settings panel, turn on Show in REST API, then save the group.
Do the same for every field group agents should be able to read and fill.
For a custom post type, the type itself must also be visible in the REST API, otherwise agents cannot even list it. If it was created through ACF's Post Types UI, enable Show in REST API in the post type's Advanced settings. If it is registered in code, pass `'show_in_rest' => true` to `register_post_type()`.
### Verify the ACF fields are exposed
Call your REST API with the same credentials Semji uses, on any existing item. Swap `faq` for the rest base of your content type (`posts` for built-in posts):
```bash theme={null}
curl -s -u 'USERNAME:APP_PASSWORD' \
'https://your-site.com/wp-json/wp/v2/faq/123' | jq '.acf'
```
An object listing your fields, even with empty values, means they are exposed and agents can read and fill them. `null` means the field group is not exposed yet.
### Help agents fill the fields correctly
The REST API carries only field names and values. The labels and instructions you see in wp-admin stay invisible to agents. Agents discover a type's fields by reading an existing item, so a few habits make the fills reliable:
* **Use descriptive field names.** An agent understands `answer_short`, it can only guess at `field_2`.
* **Keep at least one well-filled item** of each content type. Agents read it to learn which field holds what, and the expected value shape (plain text vs HTML, media ID for an image field, …).
* **Brief the agent.** When field names are ambiguous, say what each field is for in your instructions, and the agent will map its content accordingly.
## Manage or disconnect
From Settings → Integrations → CMS, the WordPress row offers:
* **Manage tools**: enable or disable each of the six tools.
* **Disconnect**: remove the integration for the whole workspace.
## Firewalls, Cloudflare, and IP allowlisting
Semji calls your site's REST API directly. If a firewall or protection like Cloudflare sits in front of your WordPress, it must let these calls through, or the connection fails.
Semji's servers reach the internet through a fixed set of outbound IP addresses. If a firewall, WAF, or anti-bot protection (Cloudflare, Akamai, Sucuri, …) sits in front of your site, it can block Semji's requests — typically with a `403 Forbidden` — before they ever reach your CMS, even when your credentials are correct.
Allow the following Semji IP addresses:
```text theme={null}
63.34.75.122
63.35.78.179
54.228.104.165
18.200.156.37
34.248.117.83
52.213.28.177
```
On Cloudflare, create a WAF custom rule with the Skip action, matching requests where the source IP is one of the addresses above and the path starts with `/wp-json/`.
A firewall block looks just like a credentials error. When a protection layer answers "403 Forbidden" on `/wp-json/`, Semji shows an invalid-credentials error even though your username and password are correct. If you're sure of the credentials, check the firewall first.
## Troubleshooting
Your site answered `401` or `403`. Possible causes: the login (email or username) or application password is wrong or was revoked, application passwords are disabled on the site, or a firewall (Cloudflare, Wordfence) is blocking Semji before it even reaches WordPress. See the firewall section.
Semji couldn't reach your site. The most common causes:
* The address redirects. Semji does not follow redirects, so enter the final address, for example the www version or the https version.
* The REST API isn't reachable: `/wp-json/` returns a 404, often because of a plugin or a permalink setting.
* The site is unreachable: a DNS problem, host down, or a non-public site.
* The site responds too slowly: the response must arrive within 10 seconds.
* "Please enter a valid URL." The text you entered isn't a web address.
* "The site URL must start with https\://." HTTP sites cannot be connected.
* "The site URL points to a private or reserved address, which is not allowed." Local or internal sites are rejected, the site must be public.
* "WordPress authentication failed. Please check the credentials in the integration settings." The application password was revoked or changed since connection. Reconnect with a fresh one.
* "No WordPress integration configured for this workspace." The integration was disconnected. A workspace owner must reconnect it.
* "The post was updated, but its SEO metadata was NOT: no supported SEO plugin (Yoast SEO, Rank Math or SEOPress) was detected…" Semji found none of the three on the site. Activate one of them, or if one is already active, apply the [prerequisite configuration](#enable-seo-title-and-meta-description-updates) so its fields are visible through the REST API.
* "The SEO metadata was NOT saved: this WordPress site runs … but does not expose its … field(s) for writing through the REST API…" The site does not accept REST API writes on your SEO plugin's fields yet. Apply the prerequisite configuration described in [Enable SEO title and meta description updates](#enable-seo-title-and-meta-description-updates). The rest of the post update was applied.
The field group is not exposed to the REST API, so the `acf` key is absent from your site's REST responses and agents cannot read or write those fields. Enable Show in REST API on the field group. See [Expose ACF fields to Semji](#expose-acf-fields-to-semji). If the content type itself does not show up when the agent lists post types, the post type also needs to be visible in the REST API (same section).
## Related
* [CMS Publisher: publish your content to your CMS without leaving Semji](/en/connect-your-tools/cms-publisher)
* [Sync drafts to your CMS](/guides/sync-drafts-to-cms): API-based publishing flow, if you prefer to drive the sync yourself.
This documentation is built and hosted on [Mintlify](https://mintlify.com), a developer documentation platform.