

 Home
Home Getting Started
 Help Center
 Developer
 Status
At a glance
- What you can do: give Semji’s agents controlled access to your Drupal content.
- Who it’s for: workspace owners and Drupal administrators.
- Compatibility: Drupal 8.7 and newer, the version that brought JSON:API into Drupal core.
Prerequisites
- Drupal 8.7 or newer, live, public, and served over HTTPS.
- The JSON:API and HTTP Basic Authentication (basic_auth) modules enabled. Both ship with Drupal.
- JSON:API set to read-write: check “Accept all JSON:API create, read, update, and delete operations” under
/admin/config/services/jsonapi. It’s read-only by default, which makes it the most common blocker. - A Drupal account dedicated to Semji, with the permissions listed in Permissions for the API account. A plain editor role is not enough, see that section for why.
- To let agents write meta descriptions: the Metatag module, plus a Meta tags field on each content type concerned. See Meta descriptions.
- If a firewall, WAF, or anti-bot protection (Cloudflare, Akamai, Sucuri, …) sits in front of your site, it must allow Semji’s IP addresses. See Firewalls and IP allowlisting.
- You are a workspace owner in Semji. The connection is shared with the whole workspace.
Availability of the Drupal integration depends on your Semji plan. If the Connect button opens an upgrade dialog instead of the connection form, contact your account manager.
How to connect your Drupal site
1
Prepare your Drupal site
Three settings to handle on the Drupal side before connecting Semji.Enable the modules. On the modules page (Extend menu, /admin/modules), enable JSON:API and HTTP Basic Authentication. Both come with Drupal.Allow writing. In Configuration → Web services → JSON:API (/admin/config/services/jsonapi), select “Accept all JSON:API create, read, update, and delete operations”. Without this, Semji can read your content but cannot create or edit it.Create a role and an account for Semji. Under People → Roles, create a role (e.g. Semji API) and grant it the permissions listed in Permissions for the API account. Then, under People (/admin/people), create a dedicated account, e.g. semji-api, with a strong password, and assign it that role.Do not reuse a plain editor role: it lacks the permission Semji needs to set the publication status, and every write fails with a
403.Add a Meta tags field, only if you want meta descriptions. See Meta descriptions for the full procedure.2
Connect from Semji
You must be a workspace owner, since the connection applies to the whole team. In Semji, open Settings → Integrations, go to the CMS tab, and click Connect on the Drupal row.Fill in the three fields:
-
Site URL: your site’s exact address over HTTPS, e.g.
https://your-site.com. Enter the address your site actually uses: if it switches from example.com to www.example.com, enter the www version. Semji does not follow redirects. - Username: the Drupal login of the API account created in step 1.
-
Password: that account’s password.
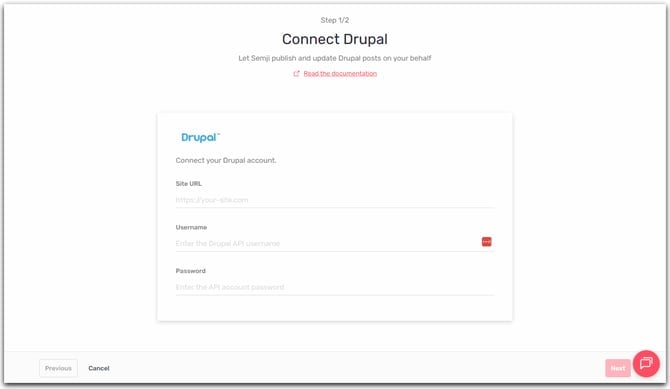
GET /jsonapi on your site and verifying that Drupal authenticates the account.3
Pick the Drupal tools
Choose what AI agents can do on your site. All three groups are enabled by default:
- Read: browse, read, and inspect the site’s content and structure.
- Write: create and update content.
- Delete: delete content. Note that this action is irreversible.
4
Save
Click Save. The Drupal row now shows as connected.
Permissions for the API account
Grant these to the role you created for Semji. Replacearticle with each content type agents will work on.
About administer node fields
This one is optional but recommended. With it, Semji reads your content types’ field definitions directly and knows exactly which field holds what. Without it, Semji falls back to inspecting an existing piece of content to infer the structure. That works, but it is less precise and needs at least one existing item per content type.
Drupal flags this permission as restricted, because the same permission also allows adding and deleting fields through the admin UI. If your security policy rules that out, leave it off: the integration works without it.
Meta descriptions
Drupal core has no meta description field. Semji writes meta descriptions through the Metatag contributed module, which most Drupal SEO setups already use.1
Install and enable Metatag
Install the module the way you normally install contributed modules, then enable it under Extend.
2
Add a Meta tags field to each content type
Go to Structure → Content types → your type → Manage fields → Create a new field, and pick the Meta tags field type. Any label and machine name work: Semji identifies the field by its type, not its name.
If a content type has no Meta tags field, agents write the content normally and tell you the meta description could not be saved. They never fall back to pasting it into the body.
What Semji can do once connected
Content defaults
Out of the box, Semji targets thearticle content type with the basic_html text format. On sites using Content Moderation, Semji writes the published and draft moderation states instead of the raw status field. Contact Semji support if your site needs different defaults (another content type, text format, or custom moderation state names).
Manage or disconnect
From Settings → Integrations → CMS, the Drupal row offers:- Manage tools: enable or disable each tool group.
- Disconnect: remove the integration for the whole workspace.
Firewalls and IP allowlisting
Semji calls your site’s JSON:API directly. If a firewall or protection like Cloudflare sits in front of your Drupal, it must let these calls through, or the connection fails. Semji’s servers reach the internet through a fixed set of outbound IP addresses. If a firewall, WAF, or anti-bot protection (Cloudflare, Akamai, Sucuri, …) sits in front of your site, it can block Semji’s requests — typically with a403 Forbidden — before they ever reach your CMS, even when your credentials are correct.
Allow the following Semji IP addresses:
/jsonapi/.
Troubleshooting
Invalid Drupal credentials. Check the username and the password.
Invalid Drupal credentials. Check the username and the password.
Drupal refused the connection. Possible causes: the username or password is wrong, the basic_auth module isn’t enabled (Drupal then treats the request as an anonymous visitor), or a firewall is blocking the request before it reaches Drupal.
Could not connect to the Drupal site. Check the credentials, the site URL, and that the JSON:API and Basic Auth modules are enabled.
Could not connect to the Drupal site. Check the credentials, the site URL, and that the JSON:API and Basic Auth modules are enabled.
Semji couldn’t reach your site. The most common causes:
- The JSON:API module is disabled: /jsonapi returns a 404.
- The address redirects. Semji does not follow redirects, so enter the final address, for example the www version.
- The site is unreachable: a DNS problem, host down, or a non-public site.
- A firewall shows an anti-bot verification page that Semji can’t get past.
- The site responds too slowly: the response must arrive within 10 seconds.
Drupal JSON:API is configured to accept only read operations.
Drupal JSON:API is configured to accept only read operations.
Publishing fails with a read-only error. An administrator must enable “Accept all JSON:API create, read, update, and delete operations” under /admin/config/services/jsonapi.
Drupal authentication or permission error: the API account cannot create or update this content.
Drupal authentication or permission error: the API account cannot create or update this content.
An agent reports a permission error. The account created for Semji lacks the needed rights on this content type. On Paragraphs sites, also check its Paragraphs permissions (Paragraphs Type Permissions for the API account).
Every write fails, but the credentials and JSON:API settings are correct
Every write fails, but the credentials and JSON:API settings are correct
Check whether the account has
administer nodes. Drupal reserves writing the status field to that permission, and Semji always states the publication status explicitly, so an account without it fails on every create and update, even though reading works fine and the connection test passes. See Permissions for the API account.The connection test fails while the site looks fine in a browser
The connection test fails while the site looks fine in a browser
If your site is in maintenance mode, Drupal answers
503 on /jsonapi for every account without the “Use the site in maintenance mode” permission, which the API account normally does not have. You can browse the site yourself because your admin session bypasses it. Turn maintenance mode off under Configuration → Development → Maintenance mode, or grant that permission to the Semji role.An agent says the meta description was not saved
An agent says the meta description was not saved
Two distinct cases:
- No meta description field on this content type: install Metatag and add a Meta tags field, as described in Meta descriptions.
- Drupal accepted the write but stored nothing: Semji could not read your field definitions and guessed the wrong format. Grant
administer node fieldsto the API account, or set that one meta description by hand.
Errors shown before you even submit the form
Errors shown before you even submit the form
- “Please enter a valid URL.” The text you entered isn’t a web address.
- “The site URL must start with https://.” HTTP sites cannot be connected.
- “The site URL points to a private or reserved address, which is not allowed.” Local or internal sites are rejected, the site must be public.
Related
- CMS Publisher: publish your content to your CMS without leaving Semji
- Sync drafts to your CMS: API-based publishing flow, if you prefer to drive the sync yourself.