# Why and how to exclude keywords from Semji recommendations?
Source: https://help.semji.com/en/admin-and-settings/why-and-how-to-exclude-keywords-from-semji-recommendations
In the settings, you can easily exclude specific keywords from Semji recommendations
### Why exclude keywords from Semji recommendations?
Semji provides you with optimization recommendations related to the main query you want to work on. If you know which terms you do not want to see in the recommendations (for exemple, a competitor's name), you can easily exclude them from Semji recommendations.
This feature allows you to avoid disabling the keyword several times in the editor itself and saves you time by not showing you keywords you do not want to work on.
> *Note: When excluding your keywords, check that you are not deleting keywords that are important and relevant to you.*
###
How to exclude keywords from Semji recommendations?
**Here are the steps to quickly exclude keywords from Semji recommendations:**
> *Note: You can exclude as many keywords as you want. When you exclude a term in Semji, its variants are automatically taken into account. For example, excluding “strategy” also includes “strategies”, so you don't have to specify each variation manually.*
1. Go to Semji's "Settings";
2. Click on "Excluded terms" in the workspace settings;
3\. Select the exclusion zone:
* Search intents
* Questions
* Related Terms
* AI+Content
* AI+ Agents
> **Note:** Regarding the exclusion of terms for the AI+ Agents feature, this applies only to content generated by the agent.
4\. Enter the various terms you no longer want to see in the recommendations or AI generations, then click on save.
The different terms from this list will no longer be suggested in the various recommendations and AI generations
> *Note: This action is reversible. You can remove the term from the excluded terms list. It will then be available again in the associated recommendations and AI generations*
>
>
# Agent basics
Source: https://help.semji.com/en/ai-agents/agent-basics
Get started with AI+ Agents and learn what they can do for you.
* [AI+ Agents](/en/ai-agents/overview)
* [Getting Started & Guides](/en/ai-agents/getting-started-and-guides)
* [Bulk Agent in the planning: run an AI agent on all your content in one click and track progress in real time](/en/ai-agents/bulk-agent-planning)
* [Tools Guide: Understanding what your agents can use](/en/ai-agents/ai-agent-complete-guide-of-tools)
* [Tutorial: Creating and configuring a custom agent](/en/ai-agents/create-and-configure-your-custom-ai-agent)
* [Getting Started Guide: Improving your content quality with AI+ Agents](/en/ai-agents/guide-optimize-your-seo-geo-content-with-ai-agents)
# Content Master agent: your end-to-end AI editorial advisor
Source: https://help.semji.com/en/ai-agents/agent-content-master
Analyze your content, identify editorial priorities, and get targeted, directly actionable outputs in conversational mode.
### In summary
**What you can do:** Launch a guided editorial work session on any piece of content, covering writing, rewriting, SEO/GEO optimization, E-E-A-T auditing and internal linking, and get an output calibrated to your specific need.
**Who it's for:** Content managers, writers, and anyone involved in content production or optimization.
**Why it's useful:** The agent listens to your need before producing anything. It adapts to the task type and delivers a result you can apply directly, without a generic wall of text to rework.
### What it changes for you
**The problem:** When facing content that needs improvement, it's not always clear where to start. Traditional AI tools produce long, generic outputs that are hard to use directly. Each editorial task requires a different approach, whether it's writing, optimization, auditing or internal linking, and switching between multiple agents or interfaces slows down production.
**The solution:** Content Master is a conversational agent that analyzes your content before producing anything. It identifies your current Content Score, page type, and detected opportunities, then suggests contextualized next steps. You express your need, it adapts and delivers an output calibrated to the nature of the task.
**The impact:**
* **Directly actionable outputs:** ready-to-use text for writing tasks, prioritized recommendations for analysis, executive summaries for audits.
* **Full editorial coverage:** one agent for all your editorial tasks: writing, rewriting, SEO/GEO optimization, E-E-A-T auditing and internal linking.
* **Intelligent follow-through:** the agent proactively suggests new directions at the end of each session, based on what it observed during the work.
* **Immediate time savings:** no more switching between tools or building prompts from scratch every time.
### How to use the Content Master agent
#### 1) Access the template from the Discover gallery
In the Semji content editor, click **"Agents"** in the left sidebar, then click **"Discover"** to open the pre-configured agent gallery.
Find the **"Content Master"** template and click it to open it.
#### 2) Add custom instructions (optional)
Before the agent analyzes your content, you can provide specific guidelines for it to follow throughout the session. These instructions apply to all outputs produced during your conversation.
**Examples of useful instructions:**
* "Always use an expert, authoritative tone — no casual language"
* "Never remove existing data points or statistics from the text"
* "Follow our editorial style guide: short paragraphs, no technical jargon"
* "Target an audience of marketing directors, not writers"
* "Always preserve legally validated claims and mandatory disclaimers"
> **Tip ✅:** If you regularly use Content Master on the same type of content, keep your instructions in a shared document so you can copy them easily at the start of each session.
#### 3) Let the agent analyze your content
Once your instructions are set, click **"Save & Run"** to start the agent . It reads your content and SEO context (primary keyword, Content Score, page type), then surfaces contextualized work directions: detected opportunities, priority improvement areas, and recommended task types.
#### 4) Express your need in conversational mode
Tell the agent what you want to do. The more specific your request, the more targeted the output.
**Example requests:**
* "Rewrite the introduction with a stronger focus on search intent"
* "Run an E-E-A-T audit on this article and identify missing trust signals"
* "Optimize this content for GEO and AI Overviews"
* "Suggest internal linking opportunities toward my category pages"
* "Rewrite the first three paragraphs to improve readability"
> **Tip ✅:** Be precise about the expected output type (ready-to-use text, recommendation list, diagnostic) so the agent can calibrate its response accordingly.
⏱️ **Duration:** 30–90 seconds depending on task complexity
**ℹ️ Cost:** 10 AI credits per run, 10 AI credits per follow-up message
#### 5) Apply the output and use the intelligent follow-ups
The agent adapts its output to the task type:
* **Writing or rewriting:** text ready to paste directly into the editor
* **Audit or analysis:** structured diagnostic with prioritized recommendations
* **SEO/GEO optimization:** before/after suggestions ready to apply
At the end of the session, the agent proactively suggests follow-up directions based on what it observed during the work. You can continue the conversation to refine a passage, request an alternative, or tackle a new task without starting over.
### Learn more
Content Master covers the full range of editorial tasks end-to-end. For more specialized needs, our other pre-configured agents go even deeper on specific dimensions.
**Continue your optimization with our other available agents:**
**👉 [E-E-A-T Auditor agent: strengthening the credibility and authority of your content](/en/ai-agents/agent-auditeur-eeat)**
**👉 [Product Page Specialist agent: optimizing your e-commerce product pages for SEO](/en/ai-agents/specialiste-fiche-produit)**
**👉 [Top 3 Hunter agent: aligning your content with what actually ranks](/en/ai-agents/agent-chasseur-top-3)**
**👉 [Guide: optimize your SEO/GEO content with AI+ Agents](/en/ai-agents/guide-optimize-your-seo-geo-content-with-ai-agents)**
# Tools Guide: Understanding what your agents can use
Source: https://help.semji.com/en/ai-agents/ai-agent-complete-guide-of-tools
Understand how the tools work and when to use them
AI+ Agents are assistants integrated into the Semji editor to automate SEO and GEO tasks. In addition to ready-made agents, you can create a custom agent by combining several tools according to your goal.
Expand a tool to see what it does, when to use it and a concrete example.
**What it does**
Explores the Google SERP for your main keyword and provides an enriched view of the competition, including notably:
* Organic results (Top pages)
* PAA (People Also Ask)
* Ads
**When to use it**
* Competitive analysis (who is visible, with which angles)
* Identification of the content gap (missing topics / questions)
* Study of search intents
* Analyze the SERP (PAA, ad messages, highlighted formats)
**Use case**
Agent Expert News — Objective: identify three topics to investigate within the content, run Google searches, analyze the important URLs, and then recommend updates to incorporate.
**What it does**
Retrieves the content of a URL in Markdown format (text + structure) to analyze a page in depth.
**When to use it**
* Detailed analysis of a specific competitor
* Content comparison (structure, depth, angles)
* Verification of E-E-A-T signals (sources, author, credibility)
**Use case**
Agent Editorial Assistant TOP3 SEO — Objective: analyze the Top 3 (Google search + content analysis of the URLs) to produce prioritized editorial recommendations.
👉 [Top 3 Hunter agent: align your content with what actually ranks](/en/ai-agents/agent-chasseur-top-3)
**What it does**
Accesses Semji SEO recommendations from the Focus Keyword analysis. The tool returns, in particular:
* Focus Keyword + search volume
* Current Content Score
* Search intents
* Recommended length (vs current length)
* Associated terms (required occurrences vs. current + status)
* Questions (with status)
* Recommended incoming internal links (URL, title, status)
* Recommended outbound internal links (URL, title, anchor, status)
* Top 10 Google competitors (position, title, URL, page type + detailed outline)
* Search intent of the SERP
**When to use it**
* Complete SEO audit (status report)
* Identification of missing intents / questions
* Improving the Content Score
* Structured comparison with the Top 10
**Use case**
Semantic cocoon agent — Objective: generate a complete silo (intent pyramid) + internal linking rules + editorial calendar, based on Semji (SEO) data + SERP + page analysis.
👉 [SEO architect Agent: Building a silo content strategy](/en/ai-agents/seo-architect-agent-building-a-silo-content-strategy)
**What it does**
Accesses GEO data from the ChatGPT analysis. The tool returns, in particular:
* Focus prompt related to the analysis
* Full ChatGPT/AI Overview response
* Associated terms
* Cited sources (URL, title, position)
* Mentions (brands / competitors)
**When to use it**
* GEO audit of a piece of content
* Analysis "why I am / am not cited"
* Comparative analysis via cited sources
* Prioritization of actions to gain citability
**Use case**
GEO Expert Agent — Objective: diagnose citation/position, compare against higher-ranked sources, and produce prioritized (before/after) recommendations to target top rankings.
👉 [GEO Expert Agent: Optimizing your visibility on ChatGPT and AI](/en/ai-agents/ai-agent-optimize-your-visibility-in-chatgpt-responses)
**What it does**
Retrieves the complete HTML code of a web page for in-depth technical analysis. Unlike the "Get web page content" tool which returns content in Markdown format, this tool provides access to the full source code, including:
* Schema.org tags (JSON-LD structured data)
* Technical meta tags (title, description, robots, canonical)
* HTML5 semantic structure (article, section, nav, header)
* Accessibility attributes (alt, lang, aria)
* Tracking scripts (Google Analytics, Facebook Pixel)
**When to use it**
* Structured data audit for schema.org (Product, Article, FAQPage, VideoObject)
* Heading hierarchy verification (H1, H2, H3)
* Accessibility analysis (missing alt attributes, semantic structure)
* Meta tag configuration check
* Tag management plan verification (pixels, analytics scripts)
**Use case**
🛒 E-commerce Schema.org Audit Agent — Goal: analyze product pages and recommend structured data optimizations to improve rich snippets.
The agent examines the complete HTML and detects:
* ✅ A Breadcrumb schema is properly in place
* ❌ The Product schema is missing
* 💡 Recommendation: add a Product schema with essential properties (name, image, description, price, availability)
**What it does**
Accesses GEO data from Google AI Overview analysis. This tool helps optimize your content to appear in Google's AI-generated responses, a rapidly growing strategic traffic channel. The tool returns:
* The complete AI Overview response generated by Google
* Identified related terms
* Cited sources (URL, title, position)
* Brand mentions present in the response
**When to use it**
* GEO audit specific to Google AI Overview
* "Why am I / am I not cited" analysis in AI Overviews
* Comparison with better-positioned sources
* Action prioritization to improve citability in Google's generative responses
**What it does**
Performs a read-only semantic search across your organization's Knowledge Base and returns the most relevant excerpts to use as context for the agent (product documentation, internal references, business documents). This tool never modifies your documents: it only reads them to inform the agent's reasoning.
**When to use it**
* Ground the agent's answers in your own references (internal guides, talking points, product documentation) instead of relying only on its general knowledge
* Ensure consistency with validated internal sources
* Reduce the risk of inaccuracies on topics specific to your company or industry
This tool can only return results if your organization's Knowledge Base already contains documents. If it is empty or sparsely populated, import your references before enabling this tool on an agent.
**What it does**
Applies the Brand Voice configured in Semji: the agent adapts its output to your brand's tone, style and vocabulary instead of generating neutral content.
**When to use it**
* Delegate writing to an agent while keeping a voice consistent with your other content
* Avoid systematically reviewing tone and style on agent-generated content
* Keep output consistent across multiple contributors or agents
Creating and managing your Brand Voice (from URLs, files or text) is done separately, in your organization's configuration.
**What it does**
Gives the agent direct access to your editorial planning, with the ability to:
* List, filter and search content
* Create content from scratch, with a focus keyword set at creation
* Optimize existing content by importing a URL into a draft
* Change a content's workflow status (except the "Published" status)
* Assign content to a team member
* Set a due date
* Move content into a folder
* Automatically trigger an SEO analysis when content is created (with the option to skip it)
This tool is intentionally non-destructive: the agent cannot delete, publish or duplicate content, nor create, rename or delete folders. It also cannot change the focus keyword of existing content. High-volume operations remain capped (draft creation and multi-edit operations are limited per run): this tool is not designed for unlimited bulk actions.
**When to use it**
* Let an agent keep your planning up to date as it works (creating content, updating status, assigning, setting due dates)
* Automate the import and creation of drafts to optimize
* Keep a clear boundary on what the agent can and cannot change in your planning
**What it does**
Lets the agent set its own work plan before carrying out a complex task: it breaks the task down into steps, then checks off its progress as it executes. You can see at any time where the agent stands and what is left to do.
This is not time-based scheduling: this tool does not let you set up a recurring run (e.g. "every Monday") or a delayed one (e.g. "run again in two weeks"). The plan is built and tracked during the agent's execution, not before it.
**When to use it**
* Hand off a multi-step task (such as content localization) to the agent while keeping visibility into its progress
* Track the progress of a long-running task without needing to check in on the agent
### How to combine tools
You can use multiple tools together for comprehensive analyses.
#### SEO combination example
**Search on Google** identifies the Top 3 for your keyword, then **Get the content of a web page** retrieves detailed content from these 3 pages. The agent compares and analyzes according to your instructions.
#### SEO + GEO combination example
**Retrieve SEO recommendations** analyzes current content optimization, while **Retrieve ChatGPT/GEO recommendations** analyzes visibility in AI responses. The agent provides a complete SEO and GEO audit with priority recommendations.
If you only need the list of competitors without analyzing their content, use only "Search on Google". For a complete optimization audit, combine "Retrieve SEO recommendations" and "Retrieve ChatGPT/GEO recommendations".
# Bulk Agent in the planning: run an AI agent on all your content in one click and track progress in real time
Source: https://help.semji.com/en/ai-agents/bulk-agent-planning
Select multiple drafts in your editorial planning and apply an AI agent to the entire selection in a single action. No more processing content one by one.
### At a glance
* **What you can do**: launch an AI agent on a selection of drafts in bulk from the planning, and monitor every action in real time without leaving your workspace
* **Who it's for**: content managers, SEO leads, and teams handling large volumes of content
* **Why it matters**: process large volumes of content without repetitive manual intervention, with full visibility into the progress of every agent action in real time, directly from your planning view
### What changes for you
Until now, running an AI agent on your content meant opening each draft individually in the editor, configuring the agent, waiting for results, and moving on to the next one. For catalogs of dozens or hundreds of pages, this process created a real bottleneck. And even when workarounds existed, there was no visibility into what was happening once the work was launched.
**Before:** optimizing 50 pieces of content with an AI agent meant opening each draft individually, launching the agent, waiting for results, and starting over. Hours spent on low-value tasks, with no visibility into what had actually been processed.
**Now:** select your 50 drafts in the planning, choose your agent, click "Start." The AI works in the background. Each draft displays its status in real time. You can leave the page and come back later — the state is always up to date.
> **Good to know ℹ️**: the Bulk Agent is available to all Semji users with access to AI+ Agents.
### What you'll get
Once the Bulk Agent is launched, each selected draft is processed by the chosen agent and displays its status directly in the planning list view.
* Changes are applied directly to each draft (enabled by default) or submitted for review depending on your configuration
* Each draft displays a real-time status indicator: 🔵 in progress, 🟢 completed, 🔴 failed
* A dedicated "Agent activity" filter lets you instantly find all processed, in-progress, or failed content
* The **Agents → Activities** screen centralizes the full history of all your agent executions
### How to use it (step by step)
#### 1) Open the planning in list view and select your drafts
From the planning list view, check the drafts you want to process using the checkboxes. You can select one, several, or use "Select all" to process an entire folder or filtered selection.
#### 2) Click "AI Agent" in the bulk action bar
The bulk action bar appears as soon as at least one draft is selected. Click **"AI Agent"** to open the configuration modal.
#### 3) Choose your agent and configure the launch
In the modal, select the agent you want to apply from those available in your workspace. The list is searchable. Then configure the two key options:
**Agent selection:** choose from all agents configured in your workspace (SEO Expert, Content Localizer, Internal Linking assistant, Legal compliance expert...).
**"Allow draft editing" option:** enabled by default, it lets the agent apply its changes directly to the draft. Disable it for "review only" mode, where suggestions are submitted without being automatically applied.
> **Warning ⚠️**: two prerequisites are checked before launch. First, make sure you have enough AI credits to cover all selected drafts — the "Start" button is blocked if your balance is insufficient. Second, drafts must have been analyzed beforehand. Drafts without an analysis are automatically excluded, with a message showing how many are affected. You can run the missing analyses from the bulk action bar, then relaunch the Bulk Agent.
#### 4) Launch and let the AI do the work
Click **"Start"**. Execution begins in the background. A confirmation notification appears. You don't need to stay on the page — the agent keeps working while you move on to something else.
#### 5) Track progress in real time
Each processed draft displays a status indicator directly in the planning list view, updated automatically without page refresh.
| Status | What it means |
| - | - |
| 🔵 In progress | The agent is currently working on this content |
| 🟢 Completed | The action completed successfully. Timestamp shown on hover |
| 🔴 Failed | The agent could not complete the action. Click the indicator to see the error detail and relaunch |
Click any indicator to access the action detail: agent used, launch date and time, execution duration, result, and available actions (relaunch, view applied changes...).
Use the **"Agent activity"** filter in the planning to display only content with an in-progress, completed, or failed action.
Find all your agent executions in **Agents → Activities**: a consolidated view, independent from the planning, for a full overview or to find an action launched several days ago.
### Tips for best results
Always test on a small sample before scaling up. 5 to 10 representative drafts are enough to confirm the agent produces the expected results. Adjust instructions if needed, then increase the volume gradually.
Make sure your drafts have been analyzed before launching. This is the most commonly overlooked prerequisite: without an analysis, the draft is automatically excluded. Consider filtering by analysis status in the planning before making your selection.
Use planning folders and filters to precisely target your scope. Filtering by topic cluster, market, or editorial status before selecting drafts prevents accidentally processing out-of-scope content.
> **Pro tip 💡**: the Bulk Agent is especially powerful for large-scale cross-cutting operations: legal compliance checks across a catalog, multi-country localization, internal linking reinforcement across an entire category. Combine it with the "Agent activity" filter to track progress without leaving your planning.
### Go further
Check **Agents → Activities** regularly to review past executions, identify which agents produce the best results on your content, and refine instructions accordingly. This consolidated view gives you full visibility into all your agent activity, independent of the planning view.
If a draft fails, the red indicator lets you relaunch in one click from the planning or from Agents → Activities, with no need to reconfigure the entire launch.
**Useful links:**
* **[\[Link to the AI+ Agents getting started guide\]](/en/ai-agents/guide-optimize-your-seo-geo-content-with-ai-agents)**
* **[\[Link to Create and configure a custom AI agent\]](/en/ai-agents/create-and-configure-your-custom-ai-agent)**
# Tutorial: Creating and configuring a custom agent
Source: https://help.semji.com/en/ai-agents/create-and-configure-your-custom-ai-agent
Your custom AI assistant, no code and no technical skills required
### In summary
**What you can do:** Create a 100% custom agent by defining your own instructions and combining powerful tools to meet your exact, specific needs.
**Who it’s for:** SEO Managers, Content Managers, and advanced users who have specific needs not covered by preconfigured agents.
**Why it’s useful:** Go beyond the limits of preconfigured agents and build tailor-made AI workflows to address all your specific requirements.
### What this changes for you
**The problem:** Preconfigured agents cover the most common use cases, but every company has specific needs. You might need to analyze your competitors according to your own criteria, check the consistency of your brand voice, generate schema markup tailored to your industry, or identify SEO cannibalization according to your methodology.
**The solution:** The Custom Agent allows you to create your own AI assistant by precisely defining what it should do. You write your instructions in natural language, select the tools it needs, and the agent executes your workflow automatically.
**The impact:**
* **Total adaptability:** Create agents that match your specific business needs exactly
* **No technical skills required:** Write your instructions in French as if briefing a colleague
* **Powerful tools available:** Explore the Google SERP and retrieve the content of any web page
* **Scalability:** Modify your agents on the fly as your needs evolve
### How to create your custom agent
#### Step 1: Access the custom agent
In the Semji editor, click on **"Agents"** in the right sidebar, then select the **"Custom Agent"** template.
#### Step 2: Define your agent
##### Name
Give a clear, descriptive name that explains exactly what your agent does.
**Example names:**
* "Top 3 content gap analyzer"
* "Complete E-E-A-T checker"
* "Article schema markup generator"
* "SEO cannibalization detector"
* "Detailed competitor comparator"
##### Description
Explain in one sentence what your agent does. This description helps your colleagues quickly understand its purpose.
**Examples of good descriptions:**
* "Analyze the editorial content of the TOP 3 results in the SERP to identify topics missing from my strategy"
* "Check that my content meets E-E-A-T criteria (Experience, Expertise, Authoritativeness, Trustworthiness)"
* "Automatically generate the schema markup tailored to my type of content"
* "Detect if my primary keyword is already covered on other pages of my site"
##### Instructions
This is the most important step: you will write the detailed instructions that the agent must follow to accomplish its task.
**How to write good instructions:**
**1. Structure your request**
Organize your instructions into clear sections:
* Objective: what the agent must accomplish
* Methodology: how it should proceed
* Output format: how it should present the results
**2. Be precise and detailed**
The more precise your instructions are, the better the results will be.
❌ **Bad example:** "Analyze my competitors"
✅ **Good example:** "Analyze the content of the TOP 3 results in the SERP for my target keyword. For each competitor, identify: the topics covered, the H2/H3 structure, the secondary keywords used, and the differentiating elements. Then compare with my current content to identify the gaps."
**3. Indicate the desired output format**
Specify how the agent should present its results.
**Example formats:**
* Comparison table
* Bulleted list with recommendations
* Structured report with scores
* Priority action checklist
**4. Provide examples if necessary**
If your need is complex, give concrete examples of what you expect.
##### Magic Button: "Improve the instructions": to write better instructions (even if you're a beginner)
If you're not comfortable with prompting, the Magic button (also called "Improve the instructions") can help you structure your instructions properly.
The goal isn't just to have ideas, but to transform a "simple" request into clear instructions that the agent can use.
**What it's concretely used for:**
* Clarify the objective (what you expect exactly)
* Add a methodology (the steps the agent must follow)
* Specify the output format (table, checklist, action plan, etc.)
* Avoid vague instructions that produce inconsistent results
**How to use it:**
1. Write your instructions specifying your needs and requirements.
2. Click on the **"Improve the instructions"** button.
3. Review the proposal and adjust it if necessary.
#### Step 3: Select your tools
The custom agent has 4 powerful tools that you can combine according to your needs.
##### Tool 1: Search on Google
Explore the Google SERP for your main keyword and retrieve, for each result (organic, ads, and PAA) from the top 10, the URL, title, meta description, and position, in order to analyze the competition, content gaps, cannibalization, and search intents.
##### Tool 2: Get the content of a web page
Retrieves in markdown all the textual content of a URL (text, H1–H3 structure, lists, tables, internal/external links), without images, code, or \`\` tags, to analyze a competitor, compare content, check the structure of a high-performing page, or conduct an E-E-A-T analysis.
##### Tool 3: Retrieve SEO recommendations
Access Semji's SEO recommendations for your main keyword (volume, Content Score, search intents, recommended length, related terms, questions, internal links, TOP 10 competitors, SERP intent) to audit your content, fill missing intents, improve the Content Score and optimize terms and questions.
##### Tool 4: Retrieve ChatGPT/GEO recommendations
Access GEO data from ChatGPT analysis (prompt, complete response, associated terms, cited sources, brands and competitors mentioned) to audit your visibility in AI responses, identify cited sources, optimize your content to be mentioned, and compare your presence with that of competitors.
##### Tool 5: Analyze the HTML
Analyze a page's HTML code (beyond the “text” content) to identify structural or technical elements useful for your analysis.
##### Tool 6: Retrieve AI Overview recommendations
Fetch recommendations / analysis elements related to AI Overview to complement your GEO audits and your optimizations for visibility in AI responses.
Find the detailed guide to the tools here: **[AI+ Agent : complete tools guide](/en/ai-agents/ai-agent-complete-guide-of-tools)**
#### Step 4: Save and test
Click **"Create".** Your custom agent is now available in the **"Agents"** tab and accessible to your entire team.
💡 **Sharing:** Like all agents, your Custom Agent is automatically shared with your team. They can use it on their content.
### **Test your agent :**
Run your agent on a test piece of content to check that:
* The results meet your expectations
* The output format is clear
* The recommendations are actionable
If necessary, modify your instructions to refine the results.
Back to the Complete Guide: 👉 [**\[Guide: Optimize Your SEO/GEO Content with AI+ Agents\]**](/en/ai-agents/guide-optimize-your-seo-geo-content-with-ai-agents)
# Getting Started & Guides
Source: https://help.semji.com/en/ai-agents/getting-started-and-guides
Learn to create, configure, and use AI+ Agents, then run them on your content from the editor or the Planning.
* [Bulk Agent in the planning: run an AI agent on all your content in one click and track progress in real time](/en/ai-agents/bulk-agent-planning)
* [Tools Guide: Understanding what your agents can use](/en/ai-agents/ai-agent-complete-guide-of-tools)
* [Tutorial: Creating and configuring a custom agent](/en/ai-agents/create-and-configure-your-custom-ai-agent)
* [Getting Started Guide: Improving your content quality with AI+ Agents](/en/ai-agents/guide-optimize-your-seo-geo-content-with-ai-agents)
# Getting Started Guide: Improving your content quality with AI+ Agents
Source: https://help.semji.com/en/ai-agents/guide-optimize-your-seo-geo-content-with-ai-agents
Delegate your time-consuming tasks to AI so you can focus on strategy
### In summary
**What you can do:** Improve the quality and consistency of your content with specialized AI agents, directly integrated into the Semji editor
**For whom:** Content Managers, SEO Writers, SEO Managers, and marketing teams.
**Why it's useful:** Give your teams the opportunity to focus on strategy and creativity, while AI ensures the rigor, consistency, and quality of every piece of published content.
### What this changes for you
**No more bottlenecks**\
Back-and-forth with the legal department slowing down publication? The Legal Compliance Checker agent reduces validation times from 6-12 weeks to just a few minutes by automating compliance verification.
**Reclaim valuable time**\
Transforming an article into social media posts, optimizing internal linking... These time-consuming tasks are now automated. You save up to 2 hours per published piece of content.
**Create your own AI assistant**\
Even without technical skills, configure a 100% personalized agent that responds exactly to your specific needs: competitive analysis, EEAT expert, legal expert...
**Find the right agent in a few clicks** The Discover gallery centralizes all available templates, organized by use case. No need to configure an agent from scratch for the most common needs: pick a template, adjust the instructions if needed, and run.
### The Agents gallery
The Agents gallery is the entry point of the Agent Hub. It centralizes the discover, configuration, and tracking of all your AI agents in one place.
The screen is organized into three tabs:
* **Discover:** the library of preconfigured templates, organized by use case. This is where you browse and launch agents.
* **My Agents:** the unified listing of all agents you have created or customized, both templates and custom agents. Name, type, creation date, and last activity are visible at a glance.
* **Activities:** the centralized history of all your agent runs. Processed drafts, results, credits consumed, viewable by agent or across all agents.
> **Good to know ℹ️:** The Agents gallery is visible to all organizations, including those without an agent add-on. Running an agent requires the "AI Agents" add-on. Each run consumes AI credits.
### The available Agents
The Discover gallery offers a library of pre-configured templates covering the most common use cases, as well as the ability to create a fully custom agent.
#### Pre-configured templates
Ready to use with no prior setup. Click a template, adjust the instructions if needed, and run directly from the editor.
**👉 [Content Master agent: your end-to-end AI editorial advisor](/en/ai-agents/agent-content-master)** Analyzes your content, identifies priorities, and delivers targeted outputs in conversational mode: writing, rewriting, SEO/GEO optimization, E-E-A-T auditing, internal linking.
**👉 [E-E-A-T Expert agent: strengthen the credibility and authority of your content](/en/ai-agents/agent-auditeur-eeat)** Audits your content across all 4 E-E-A-T pillars, benchmarks against the top 3 SERP results, and delivers a prioritized action plan to improve your SEO rankings and AI citability.
**👉 [Product page specialist agent: optimize your e-commerce product pages for SEO and conversion](/en/ai-agents/specialiste-fiche-produit)** Rewrites and enriches your product pages with SEO-optimized titles, descriptions, attributes, and rich content aligned with your brand guidelines.
**👉 [Top 3 Hunter agent: align your content with what actually ranks](/en/ai-agents/agent-chasseur-top-3)** Compares your editorial quality against the top 3 Google pages and delivers prioritized recommendations with before/after rewrite proposals ready to apply.
**👉 [Legal compliance expert agent: securing and validating your content](/en/ai-agents/how-to-set-up-the-legal-compliance-agent-for-your-articles)** Automatically checks that your content complies with legal requirements and your company's internal guidelines.
**👉 [Social media assistant agent: transforming an article into social posts](/en/ai-agents/tutorial-automatically-turn-your-articles-into-social-media-posts)** Turns your article into multiple posts tailored to the formats and tones of LinkedIn, X, Facebook, Instagram, and newsletters.
**👉 [Internal linking assistant agent: strengthening your link structure](/en/ai-agents/how-to-strengthen-your-internal-links-with-ai-agent)** Analyzes your content and suggests internal linking opportunities toward your strategic pages.
**👉 [GEO Expert agent: optimizing your visibility on ChatGPT and AI](/en/ai-agents/ai-agent-optimize-your-visibility-in-chatgpt-responses)** Audits your content for visibility in generative AI responses and suggests optimizations to improve your citation rate.
**👉 [Localization expert agent: adapting your content for international audiences](/en/ai-agents/adapt-your-content-for-your-international-markets)** Adapts your content to the linguistic, cultural, and SEO specificities of each target market.
#### Custom agent
If no template fits your need, build a fully custom agent by defining your own instructions and combining the available tools.
**👉 [Create and configure a custom AI agent](/en/ai-agents/create-and-configure-your-custom-ai-agent)**
### How to use AI+ Agents
#### Step 1: Access the Agents gallery
From the left sidebar, go to the "**AI**" menu and click on "**Agents**" to access the agent showcase.
#### Step 2: choose a template
You have two options:
**Option 1: Use the preconfigured agents**
Browse the library and click the template that matches your need. The template card describes the problem it solves, the typical use case, and the expected output.
**Option 2: Create your own custom agent**
If you have specific needs not covered by the preconfigured agents, use the Custom Agent to create a 100% tailored assistant. Define your own instructions, combine the available tools (Search Google, Get web page content), and adapt the AI to your unique workflow.
> **💡 Find your agents:** All agents you create or customize are automatically available to your entire team in the "Agents" tab
Just click on the agent of your choice to select it.
#### Step 3: Configure the agent
**For preconfigured agents:**\
Customize the agent according to your specific needs by adding:
* Your internal rules (mandatory legal notices, prohibited terms...)
* Your priority URLs for internal linking
* Your brand voice guidelines
* Examples of posts that have performed well on social networks
**For the Custom Agent:**\
Fully define your agent by filling in:
* Name: Give your agent an explicit name (e.g., "Top 3 Content Gap Analyzer")
* Description: Explain in one sentence what your agent does
* Instructions: Write the detailed instructions the agent must follow
* Tools: Select the tools the agent needs (Search Google, Get web page content)
**💡Tip:** Be precise in your instructions. The more detailed they are, the more relevant the results will be.
#### Magic Button: "Improve the instructions": to write better instructions (even if you're a beginner)
If you're not comfortable with prompting, the Magic button (also called "Improve the instructions") can help you structure your instructions properly.
The goal isn't just to have ideas, but to transform a "simple" request into clear instructions that the agent can use.
**What it's concretely used for:**
* Clarify the objective (what you expect exactly)
* Add a methodology (the steps the agent must follow)
* Specify the output format (table, checklist, action plan, etc.)
* Avoid vague instructions that produce inconsistent results
**How to use it:**
1. Write your instructions specifying your needs and requirements.
2. Click on the **"Improve the instructions"** button.
3. Review the proposal and adjust it if necessary.
#### Step 4: Start the analysis
Open the content you want to work on in the Semji editor. Click the **"Agents"** icon in the right sidebar, select your agent, and click directly on it to launch it.
**Cost:** 10 AI credits per run
#### Step 5: Apply the recommendations
For each suggestion:
1. Find the relevant content in your text
2. Copy the recommendation
3. Replace or add the content
> **💡 Good to know:** You can continue the conversation with the agent to refine its recommendations (cost: 10 AI credits per message)
### Go further
#### Process dozens of pieces of content in a single action
Already comfortable with the per-content workflow? Take it to the next level with the **Bulk Agent**: from the editorial planning, select multiple drafts and run an AI agent on the entire selection in one click. The AI works in the background while you move on to something else.
**Who it's for:** content managers and SEO teams handling large volumes, multi-country campaigns, or large-scale compliance updates.
> **Good to know ℹ️**: the Bulk Agent requires that your drafts have been analyzed beforehand and that you have sufficient AI credits. The system checks both before launching.
**How to do it:** in the planning list view, check your drafts, click **"AI Agent"** in the bulk action bar, choose your agent, then click **"Start"**.
👉 **[\[See the full Bulk Agent in the planning guide\]](/en/ai-agents/bulk-agent-planning)**[](/en/ai-agents/bulk-agent-planning)
# AI+ Agents
Source: https://help.semji.com/en/ai-agents/overview
Discover AI+ Agents, your intelligent assistants. Use our ready made templates or build a custom expert to automate your SEO and editorial tasks.
Learn to create, configure, and use AI+ Agents, then run them on your content from the editor or the Planning.
Get your SEO opportunities delivered automatically into Teams and Slack.
Discover ready-to-use agents for GEO, internal linking, e-commerce, social media, and other editorial needs.
Deploy specialized agents to tackle advanced challenges in strategy, search intent, SEO architecture, and GEO visibility.
# Ready-made agents
Source: https://help.semji.com/en/ai-agents/pre-configured-agents
Discover ready-to-use agents for GEO, internal linking, e-commerce, social media, and other editorial needs.
* [Content Master agent: your end-to-end AI editorial advisor](/en/ai-agents/agent-content-master)
* [Product page specialist agent: optimize your e-commerce product pages for SEO and conversion](/en/ai-agents/specialiste-fiche-produit)
* [Top 3 Hunter agent: align your content with what actually ranks](/en/ai-agents/agent-chasseur-top-3)
* [E-E-A-T Auditor agent: strengthen the credibility and authority of your content](/en/ai-agents/agent-auditeur-eeat)
* [Localization expert agent: Adapting your content for international audiences](/en/ai-agents/adapt-your-content-for-your-international-markets)
* [Internal linking assistant Agent: strengthening your link structure](/en/ai-agents/how-to-strengthen-your-internal-links-with-ai-agent)
* [GEO Expert Agent: Optimizing your visibility on ChatGPT and AI](/en/ai-agents/ai-agent-optimize-your-visibility-in-chatgpt-responses)
* [Social media assistant agent: Transforming an article into social posts](/en/ai-agents/tutorial-automatically-turn-your-articles-into-social-media-posts)
* [Legal compliance expert agent: Securing and validating your content](/en/ai-agents/how-to-set-up-the-legal-compliance-agent-for-your-articles)
# Proactive agents
Source: https://help.semji.com/en/ai-agents/proactive-agents
Get your SEO opportunities delivered automatically into Teams and Slack.
* [Proactive agents in Teams: get your SEO opportunities delivered where your team already works](/en/ai-agents/semji-teams-agent)
* [Proactive agents in Slack: get your SEO opportunities delivered into your channels](/en/ai-agents/semji-slack-agent)
# Proactive agents in Slack: get your SEO opportunities delivered into your channels
Source: https://help.semji.com/en/ai-agents/semji-slack-agent
The Content Opportunities agent, already available in Microsoft Teams, comes to Slack to push prioritized recommendations, powered by your Intelligence Hub data, directly into a team channel.
## At a glance
* **What you can do**: automatically receive a prioritized list of content opportunities (new content and optimizations) in a Slack channel, interact with the agent in the thread, and add topics to your editorial planning in one click.
* **Who it's for**: content managers, SEO project leads, marketing directors.
* **Why it matters**: your SEO insights arrive where your team already works, no need to open Semji.
## What changes for you
**Before**: accessing your content opportunities required logging into Semji, navigating to the Intelligence Hub, and manually cross-referencing position data, search volumes, and competitor rankings.
**Now**: the Content Opportunities agent, already available in Microsoft Teams, automatically publishes its recommendations in a Slack channel, at the frequency you choose, and lets your team react without opening Semji.
This feature requires the "AI Agents" add-on and an active Intelligence Hub on your workspace, as well as a Slack integration connected by an administrator.
## What you will get
At each scheduled run, the agent posts a structured message (Block Kit) in the configured Slack channel with content creation opportunities (Content Gaps) and pages to optimize, each with an **Add to Planning** button. The agent then opens a thread to walk through the opportunity, where your team can reply to refine the analysis, ask a question, or switch to a different topic. The agent keeps the conversation context throughout the thread.
This first version only covers scheduled pushes to a channel: the agent starts the conversation, your team replies. Mentioning `@SemjiBot` or using a command like `/semji` to invoke the agent on demand is not available yet. Slack Connect channels, shared with external organizations, are excluded by default.
## How to use it
In Semji, navigate to **Settings**, then **Integrations**, under the **Collaboration** tab. Next to **Slack**, click **Connect**, then authorize access from your Slack workspace.
This step must be completed by an administrator of your Slack workspace. Arrange this account before starting setup.
Once the integration is connected, choose a channel dedicated to the agent rather than your team's general channel.
Slack Connect channels, shared with external organizations, are not available as a destination.
Open **Agent Hub** in Semji, go to the **Agents** tab, and find the **Workspace agents** section. Select the **Content Opportunities** agent and configure:
* **Destination Slack channel**: the channel chosen in the previous step
* **Execution frequency**: weekly, monthly, or a custom schedule
* **Filtering criteria**: topic clusters, page types
A manual test validates the message format before you enable the schedule.
Always run this manual test before enabling the schedule, to check the format and relevance of recommendations in your channel.
At each run, the agent opens a thread in the configured channel. Reply in that thread to refine the search, ask a question, or switch to a different topic. The agent keeps the conversation context.
## Usage tips
**Match the frequency to your editorial rhythm.** A weekly run suits operational follow up, a monthly run suits a strategic review in a leadership meeting.
**Prefer a dedicated channel over the general one.** The history of recommendations stays readable, and the agent's messages don't get mixed into day to day conversation.
**Set topic clusters and page types from the first configuration.** Unfiltered recommendations quickly turn into noise. The narrower the scope, the more actionable each opportunity pushed to Slack stays.
## Going further
The same Content Opportunities agent exists for Microsoft Teams, with identical behavior. From Semji's editorial planning, find every topic added via Slack and assign them to your writers.
Each scheduled execution consumes AI credits, and so does each agent response in the thread. Without an active Intelligence Hub on the workspace, the agent has no data to analyze.
The same Content Opportunities agent, for teams that work in Microsoft Teams.
To build an agent that answers a need specific to your organization.
# Proactive agents in Teams: get your SEO opportunities delivered where your team already works
Source: https://help.semji.com/en/ai-agents/semji-teams-agent
The Content Opportunities agent integrates with Microsoft Teams to push prioritized recommendations, powered by your Intelligence Hub data, directly into a team channel.
## At a glance
* **What you can do**: automatically receive a prioritized list of content opportunities (new content and optimizations) in a Teams channel, interact with the agent in the thread, and add topics to your editorial planning in one click.
* **Who it's for**: content managers, SEO project leads, marketing directors.
* **Why it matters**: your SEO insights arrive in your daily work environment on a schedule you define, no need to open Semji.
* **Setup time**: about ten minutes, in two phases, first on the Teams admin side then on the Semji admin side.
## What changes for you
**Before**: Semji's AI agents existed exclusively inside the editor. Accessing your content opportunities required logging into the platform, navigating to the Intelligence Hub, and manually cross-referencing position data, search volumes, and competitor rankings, a time-consuming process that often got pushed back.
**Now**: the agent comes to you. At the frequency you choose (weekly, monthly, or custom), it automatically analyzes your Intelligence Hub data, identifies content to create and pages to optimize, and publishes a structured, actionable summary in your Teams channel.
| Before | With proactive agents in Teams |
| - | - |
| Manual login to Semji required | Insights arrive in Teams without any action on your part |
| Tedious cross-referencing of Intelligence Hub data | The agent automatically crosses positions, volumes, and competitor data |
| No recurring engagement loop | A regular SEO touchpoint anchored in the team's workflow |
This feature requires the "AI Agents" add-on and an active Intelligence Hub on your workspace, as well as a Microsoft Teams integration configured by an administrator.
## What you will get
At each scheduled run, the agent posts a structured message in the configured Teams channel with two sections.
* **New content to create**: a prioritized list of Content Gaps with, for each opportunity, a suggested title, primary keyword, search volume, top competing domain, estimated traffic gain, and difficulty rating.
* **Existing content to optimize**: your pages sitting outside the top 10, with a semantic gap diagnosis and the recovery potential for each.
* **Action buttons**: an **Add to Planning** button per opportunity to move a topic directly into Semji's editorial planning without leaving Teams.
The agent then starts a discussion thread where it breaks down each recommendation in detail. You can reply to refine the analysis, shift to a different topic cluster, or ask follow up questions.
## How to use it
From Microsoft Teams, open the app store and search for "Semji." The application is called **Semji for Microsoft Teams** and is also available on Microsoft Marketplace. Click **Get it now** then **Add**.
This installation can only be completed by a Microsoft Teams administrator. On first install, a Microsoft 365 tenant administrator must grant the requested Microsoft Graph permissions, including the ability to read channel messages without being mentioned.
Once the app is added, select the Teams channel where the agent should publish its recommendations, then confirm with **Go**. The app posts a welcome message in the channel with instructions for the next steps on the Semji side.
In Semji, navigate to **Settings**, then **Integrations**, under the **Collaboration** tab. Next to **Microsoft Teams**, click **Connect**. The connection wizard opens: click **Connect Microsoft Teams**. A Microsoft sign in window (login.microsoftonline.com) appears to sign in with an admin account and grant OAuth consent.
This step requires a Microsoft 365 administrator account on the client side. Arrange this account before starting setup.
Once the connection is established, open **Agent Hub** in Semji, go to the **Agents** tab, and find the **Workspace agents** section. Select the **Content Opportunities** agent. Configure the following settings:
* **Destination Teams channel**: the channel connected in the previous step
* **Execution frequency**: weekly, monthly, or a custom schedule
* **Filtering criteria**: strategic topic clusters, page types, content to exclude
Click **Save & Launch** to activate the agent. A manual test run is available to validate the format and relevance of recommendations before the first scheduled execution.
Always run a manual test before enabling the schedule. This lets you verify that recommendations match your target topics and that the message format displays correctly in Teams.
At each run, the agent opens a discussion thread in the configured channel. You can reply directly in that thread to refine the analysis ("Filter for the 'Young driver' persona"), ask follow up questions ("Why does this competitor dominate this keyword?"), switch to a different topic cluster, or drill deeper into a specific opportunity. The agent retains full conversation context throughout the thread.
## Usage tips
**Match the frequency to your editorial rhythm.** A monthly run suits a strategic review in a leadership meeting. A weekly frequency works better for an editorial team in active production that wants to factor SEO opportunities into its content sprints.
**Create a dedicated Teams channel rather than posting to your team's general channel.** This makes it easy to browse the history of recommendations and prevents the agent's messages from getting lost in day to day conversation.
**Set topic filters from the very first configuration.** An agent without filters pushes every Intelligence Hub opportunity, which can create noise. By targeting your workspace's strategic topic clusters, every recommendation delivered in Teams stays immediately actionable.
After a few weeks of use, look at how many opportunities get added to planning directly from Teams. That is the clearest signal for tuning your filters and execution frequency.
## Going further
Once the agent is live, combine this feature with other platform capabilities to maximize your editorial output. From Semji's editorial planning, find every topic added via Teams and assign them to your writers. From the content editor, activate AI+ Content or Atomic Content to generate drafts directly from the brief the agent surfaces.
The agent also supports free form instructions in the Teams thread. You can ask it to go deeper on a specific opportunity, surface the top questions being searched around a keyword, or redo the analysis on a different topic cluster.
Each scheduled execution consumes 10 AI credits, and each agent response in the thread also consumes 10 credits. Without position and competitor data in the Intelligence Hub, the agent has no data source to analyze.
The same Content Opportunities agent, for teams that work in Slack.
To build an agent that answers a need specific to your organization.
# All about Content Score
Source: https://help.semji.com/en/create-optimize-and-publish/all-about-content-score
To produce well-optimized content that Google likes
### Content Score : what is it?
With Semji, our aim is to make the task of optimizing your SEO content quick and easy. Writing and publishing pages whose content hasn't been optimized and doesn't comply with SEO constraints won't allow you to be visible on Google: too bad!
Semji makes sure that these SEO rules are no longer constraints for you and your editors, but are perceived as a game. The Content Score is one of the elements of the platform that makes SEO more fun.
Content Score is a score out of 100 assigned to your content. The more you integrate Semji's recommendations, the higher your Content Score. It allows you to measure, in real time, the SEO quality of your content.
###
How is it calculated?
To increase your Content Score, you must take into account our various recommendations:
* the Balise Title
* Length
* Search Intents to insert in your titles
* Questions to create answer paragraphs
* Related terms to integrate into the body of your text
* Incoming and outgoing links, for appropriate internal linking.
The Semji algorithm assigns a number of points to each type of recommendation, which can be seen by hovering over it. In this example, by expanding my content to 1,500 words, I get 21 extra points on my Content Score, currently at 29/ 100.
### What makes a good Content Score?
**4 different thresholds: a Content Score that changes color**
As the various recommendations are modified and integrated, the Content Score increases and changes color. To illustrate this progression, we've set up 4 thresholds corresponding to 4 different colors:
* **\< 25: your Content Score is red**
Your content isn't up to Google's expectations for positioning you on the target keyword, so start or continue your optimization.
* **Between 25 and 50: your Content Score is orange**
****
You're on the right track, but you still need to make a few adjustments to reach your goal.
* **Between 50 and 75: your Content Score is yellow**
Just a few more points before we get the green light for publication.
* **Between 75 and 100: your Content Score is green**
****
Good, you've produced some great content, now you can publish it on your site!
Our score recommendations
As you've probably already understood, we recommend that you aim for a green Content Score, above 75, when publishing your content. By adhering to this rule, you put all the chances on your side to achieve your SEO objectives with this page.
###
How can I get a good Content Score?
Follow Semji's recommendations as closely as possible. This is how your Content Score will increase. Don't forget that the main objective of your content is to interest web users and to be read. Include our various recommendations in a text that teaches visitors something and is pleasant to read.
If you don't want to follow certain recommendations for various reasons, you can deactivate them. This action will have no negative impact on your Content Score: the number of points allocated to the recommendation will be distributed among the others. \
However, we advise you not to overdo the deactivation if you want to have any chance of achieving your SEO objective: rich content that pleases Google!
### Update your Content Score to stay up to date
If you've been working with Semji for several months now, we recommend that you review your content. Google's SERPs are not fixed, and many things can change: a new competitor has entered the top 10, an existing competitor has improved its content, search intentions for your main keyword have changed...
For the most competitive keywords, or those with the highest business stakes for you, we recommend that you update your Semji analysis every few months. To do this, click on "Update" just below your Content Score. Semji's robots will then update all the information according to the changes observed.
> Good to know 💡: this action uses 1 analysis credit, as you can see in the informational bubble that appears when you hover the mouse.
Your Content Score will therefore be updated. If you're no longer in the green, rework your content according to our new recommendations and put all the chances on your side to keep a good positioning in the SERP!
# Already have a URL in the Pages tab? Why can't you mark your content as published?
Source: https://help.semji.com/en/create-optimize-and-publish/already-have-a-url-in-the-pages-tab-why-can39t-you-mark-your-content-as-published
When you want to mark your content as published, you get an error message telling you that the URL is already included in the Pages tab.
> *Good to know 💡: When optimizing existing content, make sure that the URL is not already included in* *the Pages tab. If it is not already imported into Semji, you can do so manually using the "\_\_[Import](/en/identify-opportunities/how-to-import-a-url-in-semji)" option.*\
> *Semji will then import your content directly into the platform.*
The message "A Page with the same URL already exists" appears, because you have created a new draft, but this content already exists and is already available in Semji.
\
Here are the steps to solve this problem:
#### Step 1: Search for an existing page in Semji
Go to the Pages tab and use the magnifying glass on the left of the "Import" button to search for the URL or keyword of your content.
> Note: If you can't find the URL, filter on All pages to make sure you don't miss it!
Step 2:
* Click on existing content:
You can choose between two options:
You can copy the content of your new draft into the existing draft,
Or you can use the "Synchronise with website" feature on the existing draft to retrieve the latest online version of your content.
* Click on Mark as published
* As the content already exists, the URL is already provided.
\
Step 3:
Once all your content has been duplicated in the existing version, you can delete the new draft to avoid duplicates in the Planning tab.
You can now manage existing content and Mark it as published!
# Comments in Semji
Source: https://help.semji.com/en/create-optimize-and-publish/comments-in-semji
Conveniently collaborate with your team to provide edits or writing suggestions to the person in charge of the article.
### Why collaborate in Semji?
You can now collaborate in Semji Editor by commenting on drafted content. All users in an organization can comment on the same draft.
> *Note: This feature does not allow simultaneous writing on the same content. If you try to write at the same time as another user, a message will appear informing you that the content is already being optimized. However, several users can comment on the same content, but we do not recommend doing it simultaneously.*
### How to create and access comments?
#### To create a comment, you need to:
* Select which part you want to comment on;
* Click on “Comment”;
> *Good to know: You can add a new comment to an existing comment. Simply select the section in which you wish to add a comment.*
* A sidebar opens and displays all the comments in this draft.
* Once a comment is posted, you can delete it or edit it to make a change.
You can also tag users in comments. The user will receive an email notification when a comment has been added to the draft.
> *Note: The user assigned to the draft will automatically receive notifications about their draft.*
>
> *Remember to check if your notifications are enabled in Semji's settings.*
>
> **
Once done with a comment, you can "Mark as resolved" to close it. The comment will be grayed-out in the editor, which means that it has been resolved.
#### How to access the comments list:
To find all the comments in a draft, simply click on the tab at the top right of the Content Score to open the comments window.
> *Good to know: you can now view your comment history. Once a comment has been processed, you can view it as “Disassociated”. This will enable you to see all the comments after the various modifications or deletions of the part concerned.*
#### What are the different types of comments?
In the editor, review the text areas that have been commented on.
Yellow comments represent open conversations and grayed-out comments are resolved ones.
Use the filters to quickly find the different comments:
All: to find all comments
Active: to find active conversations only
Resolved: to find closed comments
> *Note: You can add as many comments as you want in a draft.*
You can now collaborate and comment in the same draft!
# Content Score differences on Semji
Source: https://help.semji.com/en/create-optimize-and-publish/content-score-differences-on-semji
Within Semji, you can track different Content Scores for different content types.
### Content Score differences between tabs
#### Between the Pages and Planning tabs
In the Pages tab, you can see the related Content Score when analyzing your content. This score represents the unoptimized version of your content.
Once added to the Schedule, the Content Score will evolve in real-time depending on your optimization work.
In the Pages tab, the Content Score will not evolve, as it remains unchanged compared to the content analysis. It represents the first instance of your content without optimization.
Therefore, you should keep an eye on the Content Score in the Planning tab once you've done some optimization work.
> *Tip: Don't hesitate to re-run analyses on older content to check whether your content is still up to date in terms of content and optimization.*
Content Score in the Editor
Between the Editor and Page views
As you write and optimize, the Content Score will evolve in real-time.
The Content Score in the Editor allows you to identify your optimization work.
> *Note: We recommend a Content Score of at least 75 to ensure proper optimization and future performance.*
In the Editor, you may notice differences in Content Score between the Pages view and the Editor tab. This difference is caused by the content extractor's inability to retrieve all your content.\
\\
> *Tip: When importing pages into Semji, if you notice that some of your content is showing up in the Editor, don't hesitate to contact your CSM to improve the extractor.*
You should also refer to the Content Score related to the Editor. This score enables you to identify the optimization level of your content, allowing you to add it to your CMS for publishing.
You can also view the [**different versions of your content**](/en/create-optimize-and-publish/everything-you-need-to-know-about-semjis-content-versioning-system) in the Editor, and track the Content Score's evolution from your optimization work.\
Content Score in the Reports tab
The Content Score in the Reports tab refers to the online content version.
Now you've learned all about the Content Score differences on Semji!
# Everything you need to know about Semji's content versioning system
Source: https://help.semji.com/en/create-optimize-and-publish/everything-you-need-to-know-about-semjis-content-versioning-system
With Semji, you can easily track the different versions of your content and monitor changes through optimization recommendations.
### Why create a versioning system?
When creating or optimizing existing content, you will create a new version of this content.
This new version can be edited to fit the new optimization recommendations.
These different versions will allow you to track your Content Score and content evolution.
### How to display different versions
On your Semji dashboard, you can access the different versions of your content.
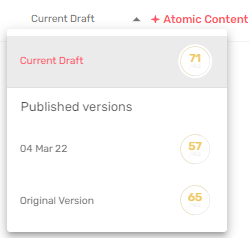
Click on "Current Draft" to access:
* **Original version:** This is the first version of your content without optimization. This is the analysis stage of your content and enables you to determine the related Content Score.
* **Published versions:** Easily find the different versions of your content and publication dates.
* **Draft in progress:** View and edit the new version of your draft in progress.
By clicking on the different statuses, you can display the relevant content version. \
> *Tip: Don't hesitate to re-run content analyses to get the latest optimization recommendations.*
You can now see how your content is evolving!
# Everything you need to know about the Competitors tab in Semji:
Source: https://help.semji.com/en/create-optimize-and-publish/everything-you-need-to-know-about-the-competitors-tab-in-semji
In Semji, quickly identify the players and issues on a keyword to create relevant and unique content.
### Why analyze competitors?
Before you start writing content, it is essential to identify the issues and goals but also to analyze competitors on the SERP (Search Engine Results Page), the Google results page.
This analysis lets you quickly identify if it is relevant for you to work on this keyword and increase your ranking chances on the SERP.
> *Note: Don't hesitate to check with your CSM to see if it's relevant for you to rank on selected keywords!*
>
> *If included in your plan, your CSM can help you with specific workshops.*
### How to analyze competitors in Semji?
In Semji, you can quickly identify the Google results page matching your main keywords.
In this tab you can access different information:
* Click on the different competitors in the list to open the content outline:
> *Note: The competitors' content plan is not always retrievable. Sometimes, we are technically unable to retrieve it. The message "Page table of contents not found" is displayed to inform you.*
* Check the content directly by clicking on the article's URL:
This information let’s you see how your competitors are addressing the topic, to draw inspiration from the tone used or even to get some ideas to start writing your own content.
> *Good to know 💡: If you find that it's been some time since your last content analysis, don't hesitate to run a new analysis to get the latest recommendations.*
>
>
>
> *Be careful: Google results pages don't stand still. Make sure you re-run analyzes every 2 to 3 months or so to see if your Content Score has evolved or not.*
\
You now understand the importance of identifying competitors to create unique content !
# Everything you need to know about the Semji editor and its features
Source: https://help.semji.com/en/create-optimize-and-publish/everything-you-need-to-know-about-the-semji-editor-and-its-features
The Semji editor has been redesigned with a new, more efficient editing toolbar that better fits your needs!
Located above the editing area, this bar features a range of functions to help you write structured, polished content.
The different features of the edit toolbar :
On this edit toolbar, you can:
* See the different versions and Content Score changes of your Draft.
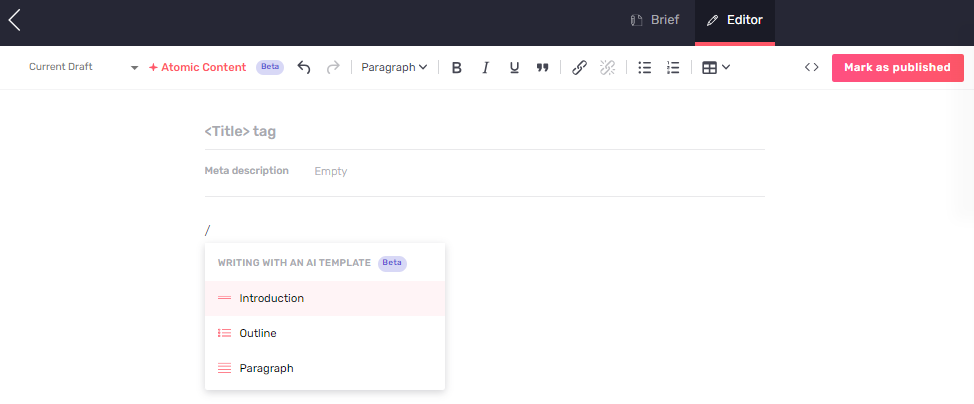
* AI Writing gets a makeover, becoming AI+Content!
From the edit bar, the Atomic Content feature lets you generate a draft from A to Z.
To access AI+Content, go to the editor and press "/" to launch AI-assisted text generation.
With AI+Content you can write :
* Title
* Meta Description
* Introduction
* Outline
* Paragraphs for each part
* AI Fact Checking allows you to verify and source AI-generated content by displaying the source's provenance and the degree of priority given to checking the source. \\
* Undo or redo the actions you have performed in the editor.

* Scroll down the paragraph menu to structure your content using Hn markup. You can also [view your content's plan](/en/create-optimize-and-publish/how-to-create-and-keep-track-of-your-content-plan-with-semji).

* Use bold, italic, highlighting and quotation tags to enhance your content.

* Add links in your content and disable them easily. Choose which part of the text the link will appear in (Text to display). You can also name the anchor (Title) and specify whether the link will open in a new window or not.


* Use bulleted lists to structure your content.

* Easily add a table in the editor.
You can add the related terms from the recommendations in the table.

When creating a table, different shortcuts enable you to add or remove a row or column.

* By clicking on the cogwheel, you can see various options:
*

* Get the latest version of your published content: If your content already exists and changes have been made in the CMS, the "Synchronize with website" icon allows you to update your CMS content in Semji and make optimization recommendations.
These overall improvements will save you time and help you be more efficient:
* A more powerful content editor;
* Easier copy/paste for long texts in the editor;
* Easily add search intents, questions and related terms using the + in the optimization tab.
### Keyboard shortcuts in Semji editor :
Copy content → ctrl+C
Cut content → ctrl+X
Paste content → ctrl+V
Add links → ctrl+K
Highlight text → ctrl+U
Make text italic → ctrl+I
Make text bold → ctrl+B
Now Semji allows you to work within your CMS or collaboration tool.
The Semji Chrome extension is an add-on feature that allows you to use Semji's optimization recommendations with your favorite tool. [Learn more about the Semji Chrome extension](/en/connect-your-tools/everything-you-need-to-know-about-the-semji-chrome-extension)
# GEO: Frequently Asked Questions and Best Practices?
Source: https://help.semji.com/en/create-optimize-and-publish/geo-frequently-asked-questions-and-best-practices
Your GEO analysis doesn’t look right? Learn why sources may be missing or in English, and how to adapt AI outputs without losing your editorial voice.
You launched your first GEO analysis, but the results aren’t what you expected? No sources appear, the results are in English, or the proposed structure doesn’t seem suited to your content? Don’t panic: these situations can happen and there are concrete solutions.
This guide helps you solve the 3 most common problems encountered when using GEO.
### Why does my GEO analysis show no sources?
#### The problem
You launch a GEO analysis, but the "Sources" tab stays empty. No sources highlighted, no sources consulted. ChatGPT seems to have replied without consulting any web content.
#### The cause
Your keyword is probably too generic.
Examples of overly generic keywords:
* "car insurance"
* "SEO"
* "collagen"
* "digital marketing"
For these very broad topics, ChatGPT considers the question too vague and **answers from its general knowledge base** without consulting external web pages.
#### The solution
**Rephrase your keyword into a precise question with context.**
Add elements that clarify the search intent:
* The user profile
* The usage context
* The objective sought
* A specific dimension of the topic
**Reformulation examples:**
**❌ Too generic:** "assurance auto"\
**✅ Precise and contextualized:** "how to choose car insurance for a young driver"
**Immediate action:** Go back to your content, modify the main keyword with a more precise formulation, and relaunch the GEO analysis (button "Update").
### Why are the cited sources in English?
#### The problem
You launch a GEO analysis on a French keyword, but ChatGPT cites mainly (or even exclusively) English sources in the "Sources" tab.
#### The cause
ChatGPT is trained on a **global corpus**. For certain topics, the AI deems English-language sources to be the most comprehensive, best documented, or most reliable. It therefore naturally favors that content, even for a query in French.
This often happens for:
* Technical or scientific topics
* Emerging trends (new technologies, new markets)
* Sectors where English-language documentation dominates (tech, SaaS, AI)
#### The solution
**Don't see this as a problem, but as a strategic opportunity.**
The English-language sources that ChatGPT cites are the best global content on your topic. You have just identified the international reference, the absolute benchmark.
**Your action plan:**
**1. Analyze these English-language sources:**
* What structure do they use?
* What unique information do they provide?
* What level of depth do they reach?
* Which formats do they favor? (tables, infographics, case studies)
**2. Create the reference resource in French:**
* Draw inspiration from their structure and completeness
* Adapt to the French/francophone context (regulations, markets, local players)
* Add your expertise and unique value
* Match or exceed their level of quality
**3. Position yourself as the francophone reference alternative:**
* You will fill a gap: a resource this comprehensive may not yet exist in French
* ChatGPT will eventually identify you as the francophone reference on the topic
**The opportunity:** If ChatGPT cites English-language sources, it means a high-quality French equivalent is missing. This is your chance to create it.
### Do I always have to follow the AI's response structure to the letter?
#### The problem
You’re looking at the **"AI Response"** tab and the structure proposed by ChatGPT doesn’t match exactly what you had planned for your content. You’re wondering whether you should abandon your original plan to follow the AI’s recommendations strictly.
#### The answer
**No, not always. The Overview is an excellent starting point, but it's not an absolute obligation.**
#### The nuance to understand
The "AI response" tab shows the structure that ChatGPT considers the most effective for addressing the detected search intent. It is a strong recommendation, based on the analysis of thousands of pieces of content and user behaviors.
**However:**
* Your expertise can add value that the AI did not identify
* Your brand voice may require adapting the format
* Your specific audience may have slightly different expectations
* You may have exclusive information that deserves to be highlighted
#### The right approach
**Use the Overview as a solid foundation, then enrich it with your added value.**
**What to keep:**
* ✅ The main dimensions of the subject (if the Overview covers definition + benefits + selection criteria, your content should too)
* ✅ The overall format if relevant (table, list, structured guide)
* ✅ The identified angle of approach (practical, comparative, educational)
**What you can adapt:**
* 🔄 The order of sections (if it improves the user journey)
* 🔄 The level of detail (you can go further than ChatGPT on certain points)
* 🔄 The tone and style (formal, conversational, technical)
* 🔄 Adding bonus sections (your unique expertise, exclusive case studies)
**Concrete example:**
The ChatGPT Overview for "marine collagen" proposes: Definition > Benefits > Selection criteria > Usage tips.
**You can:**
* Keep these 4 sections (essential) ✅
* Add a 5th section "Customer testimonials" (your added value) ✅
* Expand the "Selection criteria" with your advanced expertise ✅
* Swap "Selection criteria" and "Usage tips" if that makes more sense for your audience ✅
**The key principle**: Combine the best of AI (effective structure, search intent) and the best of your human expertise (unique added value, brand voice)
# Highlighting Text in the Editor 🖍️
Source: https://help.semji.com/en/create-optimize-and-publish/highlighting-text-in-the-editor
Boost your collaboration and productivity with the editor's highlighting feature: quickly spot areas to review and seamlessly interact with your team.
### **How to highlight a section in the editor?**
* Select the text you want to emphasize.
* Click on the "Highlight" icon in the editor toolbar.
* Choose a shade from the available options to mark the section.
You can also disable highlighting at any time in the editor settings for a cleaner display.
###
### **Why use highlighting?**
* **Collaborate efficiently:** Draw your team’s attention to important points or necessary revisions.
* **Visual structure:** Simplify proofreading and content organization.
* **Save time:** Quickly spot key elements to move forward efficiently.
# How to access the version history of my content
Source: https://help.semji.com/en/create-optimize-and-publish/how-to-access-the-version-history-of-my-content
Easily view and restore a version of your content.
Benefits:
Save time and efficiency: compare older versions of your content to track changes and identify impacts on SEO performance.\
Version history allows teams to see other members' contributions and modifications, promoting collaborative and structured content optimization.
Follow these steps to access the version history of your content:
#### Step 1: Go to the Semji editor, then click on the wheel to access the parameters.
Step 2: Click on "Show version history".
#### Step 3: Select the version you wish to view
> Good to know: You can view the different versions of your content in production, and you can also view the different published versions of your content.
> You can view the date of the last modification, as well as the name of the person who last modified or published the content.
#### Step 4: Click on "Restore this version" and confirm.
You can easily view and restore a version of your content!
# How to become a featured source by ChatGPT?
Source: https://help.semji.com/en/create-optimize-and-publish/how-to-become-a-source-cited-by-chatgpt
Want ChatGPT to cite your brand? Learn how to analyze top sources, build authority, and become a go-to AI reference through consistent, comprehensive content.
You launched your GEO analysis and understood the expected structure via the "Overview" tab. It's now time to discover who your real competitors are: the content that ChatGPT considers credible enough to cite as sources, and the brands it regards as essential references.
### The "Sources" tab: the AI's preferred content
The **"Sources"** tab reveals the inner workings of ChatGPT's reasoning. Which contents did it consult to build its response? Which ones did it deem reliable enough to cite explicitly?"
#### The crucial difference: featured vs. browsed
ChatGPT does not treat all sources the same way. Understanding this distinction is essential for your GEO strategy.
##### **Featured sources**
These are the winning pieces of content. ChatGPT explicitly cites them in its response to the user. Your URL appears directly, allowing the user to click through to your site. It's the equivalent of the top 3 in Google's SERP, but for ChatGPT.
**Your main objective is to appear here.**
##### **Browsed sources**
ChatGPT used these materials to "learn from" and shape its response, but it does not cite them directly to the user. This is a good sign of relevance: the AI considers you reliable enough to read, but your content is not yet complete or structured enough to deserve an explicit citation.
**If you're here, that's a good start. Your goal: move into the "featured" section.**
#### How to analyze your competitors
Here’s how to analyze your competitors and improve your content to become a reference source.
##### **1. Analyze the top 3 "Featured sources"**
Click on each of the top 3 featured sources by ChatGPT. Open them in a new tab and examine them carefully.
Ask yourself these questions:
* What is their structure? (H2, H3, format used)
* How deep is the information they offer?
* What numerical data, examples, or arguments do they use?
* What tone do they adopt? (expert, educational, commercial)
##### 2. Identify the key information missing from your content
Create a list of elements that appear in the featured sources but are missing from your own content:
* Numerical data or statistics
* Concrete examples or case studies
* Aspects or dimensions of the topic not addressed
* Specific formats (tables, structured lists)
**Concrete example:** You're analyzing "marine collagen." The featured sources all mention quality certifications (Marine Stewardship Council, organic labels). Your article doesn't mention them. That's a gap to fill.
##### 3. Integrate these elements into your content
Enrich your article with the identified information. **Never copy**: take inspiration from the structure and completeness, but create your own content using **your expertise**.
### The "Mentions" tab: how to become a reference for the AI
The **"Mentions"** tab lists the brands, products, or companies that ChatGPT explicitly cites in its response. This is the ultimate proof of authority on a subject.
****
#### What is a Mention and why is it important?
A **Mention** is an explicit citation of your brand by ChatGPT in its response, without the user even having requested specific brand names.
**Concrete example: "Thionville insurance"**
A user is looking for insurance in Thionville. ChatGPT spontaneously mentions in its response the Maaf, Allianz and Axa agencies with their contact details. These brands are "top of mind" for the AI on this local topic.
**Why it's crucial:** Being mentioned means that ChatGPT recognizes you as an essential player. This is maximum visibility: your brand appears directly in the response, even before the user clicks on anything.
### How to build your brand authority
If your competitors are mentioned but you are not, here's how to build your authority.
#### Analyze who is mentioned and why
##### Observe the brands cited by ChatGPT:
* What do they have in common?
* Are they market leaders, highly visible locally, or recognized for specific expertise?
* On which channels are they present? (website, directories, social networks, press)
#### Strengthen the association between your brand and your key topics
For ChatGPT to identify you as a reference, you need to create a strong and consistent association between your brand and your priority topics.
#### Concrete actions:
* Mention your brand naturally in all your content on the topic
* Create a recognizable editorial signature (tone, angle, expertise)
* Publish regularly on your strategic topics to strengthen your authority
* Ensure your presence is consistent across all channels (website, professional directories, specialized platforms)
#### **Patience and consistency**
Becoming a Mention doesn't happen overnight. It's a long-term effort that requires regularity and consistency. AI learns continuously: the more present and recognized you are on your topics, the more you increase your chances of being mentioned.
### Next step: solve common problems
You now know how to analyze your competitors via Sources and build your authority via Mentions. But what should you do if your GEO analysis doesn't give the expected results? If no sources appear, or if all the sources are in English?
This is what we're going to solve in the next tutorial.
**➡️ Check out our troubleshooting guide:** **[My GEO analysis is empty or not very relevant: the solutions](/en/create-optimize-and-publish/geo-frequently-asked-questions-and-best-practices)**
# How to choose the right Focus Keyword (for a New Content)?
Source: https://help.semji.com/en/create-optimize-and-publish/how-to-choose-the-right-focus-keyword-for-a-new-content
To make the right strategic choice and boost the performance of your New Contents!
You will have understood after only a few minutes spent on the Semji platform: **the choice of your Focus Keyword is crucial** for the success of your content strategy!
### Focus Keyword : what is it ?
The Focus Keyword is the priority keyword on which you want to rank your content in Google. It is the Focus Keyword that drives the Semji's recommendations in the sidebar. When opening the content editor, the Focus Keyword appears in the top right bar.
### Focus Keyword : how does it work?
When you select a Focus Keyword, **Semji runs an analysis**. This analysis allows to :
1. Retrieve keyword-related data (traffic, position and search volume displayed directly in the input bar)
2. Calculate the Content Score (the score out of 100 of your content)
3. Analyze the SERP (Search Engine Results Page) and competing content
4. Create writing recommendations for your content: length, headings, questions, topics, incoming links...
**An analysis spends 1 credit**. As your number of credits is limited by the subscription formula you have chosen, it is important to control your consumption. Avoid spending too many credits by groping to find the right Focus Keyword. To do so, learn to choose the right one for each of your contents.
### Focus Keyword : how to choose it for a New Content ?
If you want to [create a content from scratch](/en/create-optimize-and-publish/how-to-create-a-new-content-with-semji) (New Content), the choice of the Focus Keyword is always the first step.
#### Some simple and common sense rules
Your focus keyword should:
* **be representative of your business** or **a topic you are an expert on** and want to talk about
* have an **interesting search volume** in relation to your market, your sector and your target, and therefore has the potential to bring you traffic
* **not be confusing** (beware of acronyms that may be used by several industries or in other languages)
* be a keyword on which **you want to rank for to generate traffic**.
* be a keyword for which there is **no other page on your site that ranks well** or would be more relevant.
In short, an explicit keyword with a high search volume on which you have enough information to produce a rich content, with a high added value for your target. Your challenge is to find several keywords on which to apply these criteria to make your final selection.
Semji helps you in your selection by providing you not only with ideas of keywords associated to your theme, but also their search volume!
#### Some additional tips for choosing Focus Keyword
Think about the issue of your content to know if the chosen Focus Keyword should be informational or transactional.
* **Transactional keywords**: they reveal an intention to buy or to take action by the Internet user. Examples: "linen skirt", "buy linen clothes".
* **Informational keywords:** they reveal an intention of documentation, of deepening a subject, of answering a question... Examples: "cotton or linen clothing?", "linen production in France".
The results displayed in Google vary depending on the search intent identified by Google. So, if you intend to write a blog article for example, choose an informational keyword. Your blog post has a better chance of being positioned there. If you want to write a product category page, choose a transactional keyword instead. It is unlikely that Google will rank blog content in the top 10 on this type of keyword.
Within a semantic cocoon, we generally mix transactional keywords, targeted by the strategic pillar pages, with informational keywords or even questions, targeted by the daughter pages or secondary pages of the cocoon.
Discover [how to build a semantic cocoon](https://semji.com/fr/ebooks/cocon-semantique/?hsLang=en) thanks to our dedicated white paper, complete and concrete on the subject.
### Select the Focus Keyword when creating a Draft for a New Content
To create a new content, you must create a new draft.
Wherever you are in Semji, click on the "+" button on the top left and choose to create a New Content by checking the corresponding box. Go to the next step by clicking on Next at the bottom right.
You can also go to the "Planning" tab and click on the button at the top right, to follow the same steps.
When you start creating a new draft, the platform asks you to enter a first keyword, which can be very generic, representative of your activity:
From this keyword, Semji suggests other relevant keywords that could be Focus Keywords for your new content:
* Keywords with high search volumes, ranked in descending order
* Frequently asked questions from Internet users, corresponding to search intentions, again ranked by decreasing search volume
Thus, the Questions tab of your keyword research enables you to quickly choose informational content angles covered within your cocoon.
All you have to do now is to make your choice in the list of suggested Focus Keywords!
*Note:* all the keyword searches you make via this interface are saved: by clicking on the next Focus Keyword (to create a second content), you will find the list of your previous searches to quickly display the results.
Semji immediately displays the list of keywords from your previous search, in case you want to create a semantic cocoon around the same theme. The Focus Keywords you have already selected from this list for previous drafts have been excluded. This way, you are sure not to reuse the same Focus Keyword twice, from your research.
If you want to learn more about choosing a Focus Keywords, check out our article about the [Focus Keyword for Updated Content](/en/create-optimize-and-publish/how-to-chose-the-right-focus-keyword-for-an-updated-content).
# How to chose the right Focus Keyword (for an Updated Content) ?
Source: https://help.semji.com/en/create-optimize-and-publish/how-to-chose-the-right-focus-keyword-for-an-updated-content
Chose the right strategy and boost the performance of your online contents !
Take a tour on Semji and you will quickly understand that chosing the right Focus Keyword is key to a successful content strategy.
### What is a Focus Keyword ?
A Focus Keyword is the main keyword you want your content to rank on. Semji's suggestions are all based on this keyword. You can find it at the top right corner of the content editor.
### How does it work ?
When you select a Focus Keyword, Semji runs an analysis that allows you to :
* Retrieve data related to the keyword (traffic, position and search volume directly displayed in the input bar)
* Calculate a Content Score (how your content performs out of 100)
* Analyze the SERP (Search engine result page) and competing content
* Build editorial recommendations for your content: length, search intents, questions, related terms, incoming links...
An analysis on Semji costs one credit so chosing the right Focus Keyword for each of your content is important. The number of available credits is set by the formula you have chosen when subscribing.
### How to chose the Focus Keyword of an updated content ?
#### **Indicators to follow**
When you enter a Focus Keyword on Semji, the platform analyzes it and provides you with several indicators. These indicators will help you decide whether your Focus Keyword is intersting or not.
#### **Simple rules and common sense**
* It is a keyword that represents your activity or **a subject on which you are an expert**
* It is a keyword that has an **interesting search volume** in relation to your market, your sector and your target, and therefore has the potential to bring you traffic
* It is a keyword **whose meaning is not confusing** (beware of acronyms that may be used by several industries or in other languages)
* Ideally, it is a keyword that **is already generating traffic for your site and whose ranking can be improved** to generate more.
Bonus criteria: the Focus Keyword must be **a keyword for which no other page of your site is ranked** (in the top 30 results) or which would be more relevant.
Selection is not always that simple! Adapt the above criteria, keeping in mind the objective of your content production: performance !
#### The list of keywords from which to choose your Focus Keyword
The Keyword Focus is central to the [import of existing content](/en/identify-opportunities/how-to-import-a-url-in-semji).
Existing content on your site is first accessible in the Opportunities section of the Pages tab. Then, once optimized, they will be gathered under the "Updated Content" tab where you can follow their performance. These are the contents that you want to optimize to improve the Content Score, the position on Google and the organic traffic.
When you are about to [optimize existing content](/en/identify-opportunities/how-to-optimize-an-existing-content-updated-content) on your site, the Semji platform suggests a list of Focus keywords to choose from.
To find the best Focus Keyword within this list, you must take the 3 indicators seen previously into consideration and weight them:
1. Focus on the keywords that **generate the most clicks.**
2. Among them, identify the keywords **on which your content could rank better.** This content shouldn't appear too far in the Google results: ideally between positions 2 and 10, otherwise before position 20 and at most before position 30.
3. Finally, among them, select a Focus Keyword with a significant **search volume**.
***If none of the suggested Focus Keywords generate clicks:***
Google may rank your content too far down in its results for it to have generated clicks. Content ranked beyond the 1st page rarely generates traffic. Focus on the next 2 steps in the selection process: **your content's keyword position and search volume**. Your goal is to generate clicks on the keyword that you feel is most relevant to your content.
***If none of the suggested Focus Keywords rank in the top 30 in Google results:***
If all the suggested Focus Keywords position your content beyond position 30, you should consider reorienting your content, as Google has not considered it relevant enough to position it higher. In this case, choose a keyword from the suggested list by prioritizing the search volume, or add a new keyword of your choice with the "Add keyword" function and follow the platform's recommendations to optimize your content.
***If none of the Focus Keywords has a search volume >100 :***
Your content is specific? It is not necessarily a problem. Less searched queries often mean **more qualified targets**. Ranking in the top 3 on specific queries means that you perfectly answer a specific search intention. By finding the answer in your content, the user is more likely to convert on your site. Quantity does not equal quality, and a small volume of well-targeted searches can bring you interesting performances!
***
### When to select the Focus Keyword?
The Focus Keyword is usually selected when [importing existing content](/en/identify-opportunities/how-to-import-a-url-in-semji). Go to the "Online Content" tab and click on the "Import" button in the upper right corner.
Two choices: you can either **browse the list of your site's best pages**, pre-selected by Semji according to their traffic, or **enter a list of urls yourself**.
#### **During the “Browse Top Pages”**
If you let Semji recommend which pages to optimize, you will see that it suggests a Focus Keyword for each content. This is a keyword that **already positions your content in Google** results and has an interesting search volume.
The platform finds that if you optimize this content by following the recommendations related to this Focus Keyword, you should gain traffic.
**Step 1**: Go through the list of your site's content provided by Semji Platform. You can see that the platform already suggests Focus Keywords.
[](https://downloads.intercomcdn.com/i/o/234259813/ff9206c2f84fe8fec87fca33/browse-top-pages.png?expires=1619877600\&signature=5887f72c56f2003ea7af61694e4fa4e94bbce1ff4eeccea1562600a62c4d59d9)
**Step 2** : select the content you want to optimize first
[](https://downloads.intercomcdn.com/i/o/234260123/90bda0204550ccd9bc4f8919/etape2.PNG?expires=1619877600\&signature=a05c5d14bf715ccbdca15684c79b19c0be0e046296d9e4619a82da971f847a40)
**Step 3** : Adjust the Focus Keyword choice for each content by clicking on it.
[](https://downloads.intercomcdn.com/i/o/234260200/72a2e4c46bce8524441124ce/etape3.PNG?expires=1619877600\&signature=5004b87d6cd1c6dd7efcccc2c535954b522fe07240176a3dbaf6bb264c381d59)
You will then get a list of other suggested keywords. If none of them suits you, click on "**Add keyword**" at the bottom of the list to enter a keyword of your choice.
*Note:* the completion of this step launches an analysis and counts 1 credit for each imported content.
#### During the "Import URL" process
If you import your own URL in Semji Platform, you will see that a Focus Keyword is **suggested automatically**. Here again, you can change it if you don't like it.
**Step 1** : Copy your url in the available field.
To do this, you can use the keyboard shortcuts Ctrl + C (copy) then Ctrl + V (paste).
Note that you can copy and paste each url, or copy and paste a selection of several urls that you would have previously listed in an Excel spreadsheet or a notepad for example.
**Step 2** : Adjust the Focus Keyword for each imported url.
Semji Platform suggests one automatically, but you can change it by clicking on it. You will then get a **list of other suggested keywords**. If none of them suits you, click on "**Add keyword**" at the bottom of the list, to enter a new keyword of your choice.
*Note:* validating this step launches an analysis and **counts 1 credit** for each imported content.
[](https://downloads.intercomcdn.com/i/o/234260938/e53ed3d9b4e53aa5b012021b/select-fk-2.PNG?expires=1619877600\&signature=a7a2b69cb1689fe65ae7fc674f3e32a3723f1e27c58e8f2061cd2fa3192e52e8)
***
### How are the Focus Keywords of existing content suggested?
The Focus Keywords suggested by the platform is the keyword that **generates the most clicks** - thus the most traffic. It is the main keyword, also called "top keyword". It is often a more generic keyword than the other ones on which your content is positioned, a short tail keyword, with a higher search volume.
The other suggested Focus Keywords in the list are **other keywords that generate traffic** in Google natural search results for your content.
Semji Platform does not consider your content's rank on the Focus Keyword, that's why you can find in the list keywords on which your content is already in position 1.
**It is up to you to decide whether it is interesting and relevant to optimize your content on this keyword in the light of the different indicators you have:**
* rank
* monthly clicks
* search volume
In short, Semji Platform suggests you to optimize your content on a Focus Keyword that already generates traffic, because :
* Since you are not number 1 on Google with this content, **you can do better**! By improving the relevance of your content on this keyword, you improve your ranking, your click rate and therefore your traffic!
* Even if you are already number 1, **be aware that your competitors** will always be looking to overtake you. Optimize your content with Semji's recommendations to maintain your lead and your performance.
If you want to learn more about choosing a Focus Keywords, see our article about [How to choose the right Focus Keywords for a New Content](/en/create-optimize-and-publish/how-to-choose-the-right-focus-keyword-for-a-new-content)
# How to create a New Content with Semji?
Source: https://help.semji.com/en/create-optimize-and-publish/how-to-create-a-new-content-with-semji
Some guidelines to produce well-optimized content from scratch.
### Why create new content with Semji?
If you are in a hurry, here is the short answer:
* To save time
* Because not everyone is an SEO expert
* To generate performance and boost your business!
Now, the long answer. At the root of SEO content strategies, there is often a global business strategy: market share growth, sales increase, notoriety development... These challenges are translated in an operational way and spread over the different digital channels. The SEO & Content Marketing channel is growing more and more, with needs for ROI (return on investment) measurement and competitiveness. This is why Semji platform was created.
In this context, **each content produced has to perform**: to rank in the top 3 of the SERP (Search results page) on keywords with high search volume, to generate a maximum of clicks and traffic, and thus develop the company's business in a durable way.
With the ever-increasing means used by competitors to develop their online content and gain visibility (Content Factories, large-scale semantic cocoons, etc.), the **need to maximize efforts** and profitability is more relevant than ever.
Semji guarantees that each content produced within the framework of your strategy actively participates in the **achievement of your business objectives**: by generating traffic and providing you with the authority and semantic legitimacy that will make your site a must in the eyes of Google.
To do so, **Semji analyzes in real time the Google SERPs** on your related terms. It provides you with valuable insights on user intent, related terms to be included in your text as well as on your competitors through a Heatmap. These recommendations, born of artificial intelligence, are a substantial time saver for any writer who wants to produce well optimized content tand who must now deal with many players and Google's regular updates.
**By producing your new content directly in Semji's editor, and by following the platform's semantic recommendations, you start with a competitive edge: you have all the cards in hand to quickly produce high-performing and profitable content!**
### How to create new content?
#### **Step 1: Create a draft and choose its Focus Keyword**
To create new content from scratch, you need to know:
* at least the theme on which you wish to write
* the Focus Keyword you wish to target
The [choice of the Focus Keyword](/en/create-optimize-and-publish/how-to-choose-the-right-focus-keyword-for-a-new-content) for a new content is crucial: it is the one that will make it possible to capture shares of visibility and to generate more or less important gains, more or less quickly. In short, the success and the performance of your content depends on your Focus Keyword!
This is why, according to your subscription plan, your Customer Success Manager regularly advises you on which Focus Keywords to consider. Do not hesitate to communicate your priority themes to refine his analysis and suggestions.
Semji makes it very easy to create new content, in one click, from any tab of your interface.
To do so, click on the "+" button next to your profile avatar:
You can also click on the Schedule tab, then on the "Create Draft" button at the top right.
Select the creation of a New Content, and go to the next step using the "Next" button at the bottom right.
At this stage, you have two choices:
If you already know the Focus Keyword to target, enter it in the corresponding field.
[](https://downloads.intercomcdn.com/i/o/235673604/0280d8f907e0d55213bf69f1/start-new-content.PNG?expires=1619748000\&signature=3d1058b33fee148927abd16d3c4ae7b0058adb8196c6d6cd0a57bdfdf64f610b)
If you don't yet know which Focus Keyword you want to target, type in a generic keyword related to your theme, then **click on the "Search Keywords" button** that appears below.
Semji will then **suggest keyword ideas and questions** that are relevant to the topic of the chosen keyword. The suggested keywords are sorted in descending order of search volume.
[](https://downloads.intercomcdn.com/i/o/239108979/757edfaae4d87f0bc210bcaf/search-keywords-avec-questions.PNG?expires=1619748000\&signature=8cbad615aa36f7486d3ed893b4f218966acf29a14fe96b42de946c8fad42baf9)
You can sort the questions thanks to a dedicated tab. This feature is particularly useful when creating a semantic cocoon, dealing with multiple intentions and queries from Internet users.
*Note:* To save you time, all the keyword searches you perform via this interface are recorded: by clicking on the next Focus Keyword input bar (to create a second content), you will find the list of your previous searches to quickly.
Semji immediately displays the list of keywords from your previous search, in case you want to create a semantic cocoon around the same theme. Focus Keywords already selected from this list to create a content have been excluded. This way, you are sure not to use the same Focus Keyword twice.
If you want to change the theme, click on the small arrow to go back, access the history of your previous searches or start a new one.
At the end of your Focus Keywords selection, click on "Validate" at the bottom right. You are automatically directed to the Planning tab, where you will find your new Drafts corresponding to the chosen Focus Keywords, and in the course of analysis.
[](https://downloads.intercomcdn.com/i/o/239110113/f28e3f1d63aec614a1694f46/planning-drafts-crees.png?expires=1619748000\&signature=ea749d16e93aab79d1bae089973f97c38dbd89b0f681d09e470cf3774becef84)
#### Step 2: Assign content to a writer and plan its optimization
When choosing the Focus Keyword, by unit or in bulk, you can assign a person from your team to create the content and select a Due Date.
You can also proceed to these operations directly from the Content Draft or from the Planning tab, by clicking on the Assignment and Due Date icons:
In one case, a drop-down menu presenting the different members of your team appears, in the other case a calendar allows you to enter the desired date of objective.
These two options are key to control your content production strategy and to know at a glance if some content is late or has no assigned manager for example. Use the macro view in the "Open Drafts" section:
\
[](https://downloads.intercomcdn.com/i/o/235347032/db6e898ce785998dfbe6d92c/vue-open-drafts.png?expires=1619748000\&signature=eebaa42effef0f9c76e92113c8612cfbbaa9e9ffd8009bdb38a7fc1fa515a153)
Each member of your team can view the content assigned to them in the "My Open Drafts" section.
*Note*: if some members of your organization have an "External" status, they will only be able to edit content that have been assigned to them. Contents will then be visible in the "My Open Drafts" section. Without this assignment, these users will not see the list of imported content and will not be able to edit it.
#### Step 3: Follow the optimization recommendations to increase the Content Score
The Draft is created and you can start writing the content.
In the editor interface, the Semji platform provides you with a [set of concrete recommendations](/en/create-optimize-and-publish/everything-you-need-to-know-about-the-semji-editor-and-its-features), based on the analysis launched at the creation of the Draft, after the choice of the Focus Keyword.
Follow these recommendations to see the Content Score of your content evolve in real time:
* [**Title**](/en/create-optimize-and-publish/understanding-title-recommandations)
* [**Length recommendations**](/en/create-optimize-and-publish/length-recommendations)
* [**Search Intents**](/en/create-optimize-and-publish/search-intents-recommendations)
* [**Questions**](/en/create-optimize-and-publish/questions)
* **[Related Terms](/en/create-optimize-and-publish/related-terms-recommendations)**
* **Outgoing Links**
Please note that these last two recommendations can only be validated and make the Content Score evolve after the publication of the content and the integration of internal links in your CMS (see step 5 below).
See also our article "[What is a well optimized content for SEO](/en/create-optimize-and-publish/what-is-a-well-optimized-content-for-seo)?" to guarantee your content a maximum performance.
#### Step 4: Approve content for publication (following your production workflow)
After applying all [the platform's recommendations](/en/create-optimize-and-publish/everything-you-need-to-know-about-the-semji-editor-and-its-features) to achieve a Content Score as close to 100 as possible, make sure you continue your production workflow: should your content be reviewed by another department? by a supervisor? Should it be sent directly to integration?
By entering a new status for your content, you are indicating that you have completed the optimization and are ready to move on to the next step.
Note: you can [customize the status](/en/plan-your-content/to-do-doing-published...-how-to-customize-drafts-status-in-my-production-workflow) of a draft, in order to stick to your internal production process. For example, if a review phase by your legal department is needed before publication, a new status can be created to indicate this step. The writer who has finished writing just needs to select the "Legal Review" status. You will then know at a glance where your content stands in your overall process.
#### Step 5: Integrate the new content and its internal links into your CMS
When you are sure that your content is complete, the next step is to integrate it into your CMS. You can either copy and paste the whole text you have written in the Semji editor - Hn title tags are normally kept and applied automatically in your CMS editor - or switch to HTML preview and copy the source code of the produced text.
To do so, use the button at the top right of the editor interface:
Be sure to include in your content links to other pages on your site. This way you will check Semji's "Outgoing Links" recommendation. Also consider the "Incoming Links" recommendation: add links on other pages of your site to the content you publish.
Thus, publishing content created with Semji usually means editing several other contents when integrating it into your CMS.
#### Step 6: Mark content "as Published" in Semji
Once the content is published in your CMS, go back to the corresponding Semji Draft. Then click on the "Mark as Published" button at the top of the content.
A window opens and asks you to enter the url of the content you have just published, as well as the date of publication (as you may want to mark it as published after the fact).
This step is very important to track the performance of your content with Semji: by clicking on "Mark as Published" you allow Semji to retrieve the data from your [Search Console](/en/connect-your-tools/how-to-connect-my-google-search-console) and your analytics tool ([Google Analytics](/en/connect-your-tools/how-to-connect-my-google-analytics) or [AT Internet](/en/connect-your-tools/how-to-connect-my-piano-analytics-account)) - provided they have been properly connected. This data is then displayed in your performance reports (Performances tab) and enables you to calculate the real gain from your efforts: the ROI of your new content!
Note that a message warns you if the Content Score of your content is not equal to or higher than 75, the recommended score for a well optimised content.
#### Step 7: Get your final Content Score
The very last step of creating a new content is to get your final Content Score. This is possible thanks to the integration of the internal links you have made on your CMS (the creation of inbound and outbound links to your content).
Since you have clicked on "Mark as Published", your content is now accessible from the "Published" section of your Planning tab.
Click on the content you just published to view its draft.
In the sidebar, **click on the arrow wheel symbol** next to the "Incoming Links" recommendations:
This action refreshes Semji's view: the platform checks that your website now has pages linking to this new content (the url you previously entered when marking "as Published"). **If the platform detects internal links, the Content Score evolves!** This Content Score is definitive... until you optimize your content again! Keep in mind that Google SERPs evolve quickly, and that to remain successful, this content may need to be re-optimized in the future, thanks to a new analysis of the Semji platform.
Congratulations, you've created your entire first content with Semji!
# How to create and keep track of your content plan with Semji?
Source: https://help.semji.com/en/create-optimize-and-publish/how-to-create-and-keep-track-of-your-content-plan-with-semji
Now you can directly follow your content's Hn plan in the editor!
### How to create a content plan with Semji ?
With Semji, you can easily get plan ideas for your content.
AI Writing provides you with a plan in seconds using Search Intentions and Questions recommendations.
> *Note: The AI+ suite (Atomic Content, AI+Content) is in Beta version, so you need to be careful about the relevance of the elements it offers. We advise you to use it as a complement, remembering to contribute your expertise on the subject.*
The Competitors tab in Semji editor, provides you with an overview of the SERP (the Google results page) and lets you check out your competitors' plan to draw inspiration and identify key elements for your content.
Thanks to Semji's editor, you can create your plan using Hn markup.
Structuring your plan is essential to create visually coherent content and to ensure it is properly ranked by Google.
With Semji you can structure your content from H1 to H5 tags. But how can you see the structure of your plan?
### How to keep track of your content plan in Semji’s editor?
Semji allows you to keep track of your plan at a glance !
This new feature provides you with an easy way to check your plan at any time in the editor. No need to manually check your content, Semji automatically generates the structure of your plan.
To view your content plan, simply click on the "Content Plan" button above the Content Score to display the structure of your plan.
\
You can now easily manage the structure of your plan !
# How to enable a spell checker in my Semji Drafts?
Source: https://help.semji.com/en/create-optimize-and-publish/how-to-enable-a-spell-checker-in-my-semji-drafts
To offer your readers impeccable contents!
### Why use a spell checker?
Because fortunately, SEO Content requires humans to please the Internet user and Google! And who says human also says that mistakes are allowed :)
You are not safe from a spelling or grammar mistake (a "typo" as we say in the jargon of writing), has sneaked into your content. Using a proofreading tool saves you an extra step of proofreading by a third party, and saves you precious time in your production process.
> *Important : Semji is now compatible with differents spell checkers*
>
> * *Google Chrome's native spell checker*
>
> * *Language Tool*
>
> * *Grammarly*
>
> * *Merci App*
### How to use a spell checker?
When a writer creates a Draft in Semji, it is ideal that he/she can benefit from a spell checker built-in the platform. We are aware of this, which is why this feature is part of our development roadmap.
While waiting for a native spellchecker to be released, we have made changes to our editor to make it compatible with the native spellchecker of the Google Chrome browser, but also with the LanguageTool plugin, Grammarly and MerciApp.
Let's take LanguageTool as an exemple :
By connecting to Semji using Google Chrome and installing the plugin in your browser, you will get the free version of the editor, which corrects texts up to 20,000 characters. There is also a paid version at 5€ / month with more features.
This plugin works for any web content that you would write in Google Chrome: an email, a newsletter, an article edited in your CMS...
**Here is the installation process.**
1\. **Go to**: [https://languagetool.org/fr/](https://languagetool.org/fr/)
2\. **Click on "Install the Chrome extension"**. When you click, you are redirected to the Chrome Web Store to add the plugin to your browser.
**3.** When clicked, **the plugin is automatically downloaded** and a page appears, where you can read the LanguageTool privacy policy.
**4.** A last step explains that **the plugin will work from now on on any detected text.**
**5.** You can **see this by visiting a Draft on Semji.**
Just like many text editing tools, possibly misspelled words are underlined in red. When one of them is clicked, you get suggestions for corrections and explanations to understand the error.
When the text is too long for the free plugin, a message alerts you.
#### **Did you know ?**
If necessary, you can manage the settings of this extension:
* by right-clicking on the address bar of your browser and clicking on "[Manage extensions](https://support.google.com/chrome_webstore/answer/2664769?hl=en)".
* or in the top right corner of your Chrome browser, click on More (the three vertical dots) and then on "More Tools" and then on "Extensions".
Clicking on Details will take you to advanced settings, and this is also where you can choose to remove the extension from your browser.
By clicking on "Extension options", you can create a personal account on LanguageTool, and customize a dictionary (by saving terms that you use frequently and that the plugin does not know, for example).
Happy writing with Semji and LanguageTool!
*Did you know?* \
There are other spellchecking extensions that may work with Semji. Feel free to test your usual application if it is different from the two options proposed here.
# How to export content from the Semji editor?
Source: https://help.semji.com/en/create-optimize-and-publish/how-to-export-content-from-the-semji-editor
To be able to publish my optimized content on my site
### Why export content?
Once you've optimized your content, you need to publish it on your site. \
This is an important step in making your work visible, and in boosting performance later on.
So it's important to export your content to your CMS. Don't forget to mark your content as published, so that you can track your performance.
### How do I export my content?
There are several ways to retrieve your content:
#### 1. Via the "Copy content" button
In the options menu to the left of the "Mark as published" button, you can view and copy your HTML or Markdown content to the clipboard.
####
2\. Via source code
#### 3. Via Markdown
> *Good to know: Markdown is a lightweight markup language that lets you format text using simple, legible characters.*
These different methods allow you to choose the one that suits you best for seamless integration within your site.
# How to start and understand a GEO analysis in Semji?
Source: https://help.semji.com/en/create-optimize-and-publish/how-to-start-and-understand-a-geo-analysis-in-semji
Learn how to launch a GEO analysis in Semji, transform keywords into smart AI questions, and interpret results to optimize your content for generative search…
You have understood the fundamental concepts of GEO. Now let's move on to practice: how to actually start a GEO analysis in Semji and interpret the results in the "**AI Response**" tab to optimize your content.
### How to start a GEO analysis?
A GEO analysis is triggered automatically by your main keyword. Semji transforms that keyword into a Focus Prompt, queries ChatGPT, and presents the results in a clear, actionable interface.
#### Start the GEO analysis from your content
Whether you just created a draft or you are working on existing content, the procedure is the same.
**Step 1:** Open your content in the Semji Editor (from Planning or Pages)
**Step 2:** Make sure your main keyword is properly filled in. This is the keyword Semji will transform into the Focus Prompt.
**Step 3:** In the right-hand sidebar, click "GEO"
**What happens next:**
Once you click the "Update" button, Semji automatically performs several actions:
* Transforms your keyword into an optimized Focus Prompt
* Queries ChatGPT with that Focus Prompt
* Analyzes and structures the response into the GEO tabs (Optimizations, Overview, Sources, Mentions)
> **Important:** This action also updates the associated SEO analysis. Both analyses are synchronized to provide you with a comprehensive view.
> **⏱️ Analysis time**
>
> The GEO analysis currently takes about 5 minutes to complete. This delay allows us to query ChatGPT and thoroughly analyze its response to provide you with precise recommendations.
>
> We are actively working to optimize this analysis time in upcoming releases.
### Understanding the transformation: from keyword to Focus Prompt
Let's look concretely at what happens using the example of marine collagen:
**Entered keyword:** "marine collagen"
**Focus Prompt generated by Semji:** "What are the benefits of marine collagen for the skin and how should you choose it?"
**Why this transformation is essential:**
A keyword alone ("marine collagen") is too vague for ChatGPT. The AI doesn't know which intent to address: definition? benefits? buying guide? comparison with other types of collagen?
By turning the keyword into a precise question, Semji ensures two things:
* ChatGPT replies in French (and not in English)
* ChatGPT uses external sources (and does not respond solely from its internal knowledge base)
#### Why users don't type keywords into ChatGPT
Search behavior has evolved:
* **Google:** 4 keywords on average → short, generic queries
* **ChatGPT:** 24 words on average → complete, nuanced questions
**Concrete example:** Instead of typing "SEO", users ask questions like "I'm the owner of an SME and I want to get started with SEO — where should I begin and what budget should I expect?"
Semji's Focus Prompt reflects this reality: it transforms your keyword into the question your users would actually ask ChatGPT.
##### Tip 💡:
You can customize your **Focus Prompt** to align your **GEO** analysis with your editorial angle. Semji automatically generates 5 prompt suggestions based on your keyword: 1 prompt is selected by default, and 4 others are offered as alternatives.
You can click on one of these suggestions or manually enter your own prompt. The GEO analysis will then re-run based on this new search intent, and your scores and recommendations will adapt accordingly.
### How to Analyze the Overview: The Two Essential Dimensions
Focus on two key elements when analyzing the “AI Response” tab:
#### 1. Response format
Observe how ChatGPT organizes information:
* Comparison table
* Bullet list
* Paragraphs with subheadings
* Mixed formats
This format reveals the most effective way to present information to match user search intent.
#### 2. Angle of approach
Identify the intent behind the response:
* Practical guide (“how to do X”)
* Comparison/buying guide (“which X to choose”)
* Definition/explanation (“what is X”)
* List of recommendations (“the best X for Y”)
##### Concrete example: “marine collagen”
\[SCREENSHOT 3: “Overview” tab in Semji for “marine collagen” – ChatGPT response with colored annotations]
Semji transforms “marine collagen” into a Focus Prompt: “What are the benefits of marine collagen for the skin and how should you choose it?” ChatGPT structures the response as a practical guide, covering: definition/origin, health benefits, selection criteria (dosage, form, certifications), and usage tips. The angle is not just descriptive—it's decision-support. To be cited, your content needs to cover all four dimensions, not just the benefits.
#### Your action: adopt this structure
##### ✅ Analysis checklist
Compare your content with the Overview:
* Does my content use the same formats as ChatGPT (table, list, paragraphs)?
* Have I covered the same angles and dimensions?
* Does my content clearly answer the Focus Prompt?
#### Identify specific gaps
List what’s missing from your content:
* **Missing sections:** For example, if the Overview displays a “Selection Criteria” section and you don’t have one.
* **Absent formats:** If the Overview uses a comparison table and you don’t.
* **Practical information:** Usage tips, dosages, certifications.
**Practical example:** If the AI response features a table comparing types of collagen (marine, bovine, plant-based) with columns for “Origin,” “Bioavailability,” and “Average Price,” replicate this table with your own data.
#### Integrate the expected format
1. **Restructure** using the H2/H3 headers identified in the Overview
2. **Add** any missing dimensions (selection criteria, practical advice)
3. **Format** according to ChatGPT’s style (tables, numbered lists, bullet points)
> **Important:** Never copy ChatGPT’s content. Write your own content based on your expertise, but adopt the structure and angle identified as most relevant by the AI.
### Next step: analyze your competitors
You now know how to launch a GEO analysis and decode the expected structure using the “AI Response” tab. But where does this answer come from? Which content did ChatGPT use to build it? Most importantly: how can you become one of those featured sources?
That’s what you’ll discover in the next tutorial.
➡️ **Move to the next step:** **[Analyze the “Sources” and “Mentions” tabs to get ahead of your competitors.](/en/create-optimize-and-publish/how-to-become-a-source-cited-by-chatgpt)**
# Incoming Links recommendations
Source: https://help.semji.com/en/create-optimize-and-publish/incoming-links-recommendations
To work on your internal linking
### Why are incoming links important?
Incoming links are links to be made **from certain pages of your site to the page you are optimizing with Semji**. They contribute to your site's internal linking and to a better ranking.
A good internal linking is the proof for Google that your site is semantically **coherent and complete on a given theme**.
Linking complementary content together provides a **better browsing experience** for your users, reduces the bounce rate of a page, increases the number of page views per session... and allows you to pass on SEO juice to another page on your site.
Finally, **internal links promote the indexation of your content** by helping Google's robots to easily browse all the pages of your site.
### How to increase my Content Score thanks to incoming links?
#### Understand Incoming Links Recommendations
To decide whether or not to add Incoming Links to your content, look at the number of Content Score points you can earn with them.
*Here, it should be understood that Semji recommends the insertion of 8 internal links from other pages of the site to the content you are working on. For the moment, only 1 recommended internal link is in place and detected by the platform. By inserting the 7 missing links, you will be able to gain 9 Content Score points.*
Semji then lists the pages on your site from which you can link to the content you are creating or optimizing. **In bold, Semji identifies an anchor** in the online content that could host the internal link.
#### Integrate internal links from your CMS
To validate an incoming link recommendation, go to the page from which you want to add an internal link in your CMS. Insert a link to the page you worked on in Semji and publish this update. Note that Semji, in the content preview, identifies the most appropriate anchor to insert your link (in bold in the text excerpt).
Once the link is set up and visible online, go back to Semji and refresh the Incoming Links section using the dedicated button.
Semji then notices the presence of the link. Your Content Score evolves as well as the completion bar !
### Questions about Incoming Links
**The content I'm working on with Semji doesn't exist yet, how can I validate the Incoming links recommendations when I don't have any URL yet?**
All you have to do is publish your new article in order to get your new URL and then make the links from the pages recommended by Semji.
# Length recommendations
Source: https://help.semji.com/en/create-optimize-and-publish/length-recommendations
For a deep and competitive content
### Why is content length important?
Google favors content that deals with an issue in detail. In order to rank on a keyword, it is best to cover the topics that interest users in a comprehensive way. The more you integrate the related terms/en/create-optimize-and-publish/questions suggested by Semji, the longer your content is and the more you offer useful and complete information on the subject you are dealing with.
Note that, to find information, users prefer to scroll than click to go to another page containing the information they are looking for. The more you centralize, the better!
### **How does it work?**
To calculate the ideal length of your content on the chosen keyword, Semji analyzes the length of competing content positioned in the Top 3. The longest content in the top 3 is used as a reference to exceed in length.
If a page on your site is already in the Top 3, Semji will display the Top 4 on the result page.
Expand the results of the Top 3 by clicking on the Lenght section.
Click on the cup discover the SEO competitors who are in the TOP 3 of the Google results page at the time of the analysis.
### The competitor with the longest text is not relevant to you?
You can disable a length recommendation that you think is not relevant.
Example: Semji recommends you to add 3000 words because the longest content in the top 3 is a Wikipedia page.
Semji will then review the recommended length level and review your score.
**Warning**: by deactivating a competitor from the top 3, you also reduce your chances to be in 1st place.
### Can I write content longer than the length recommended by SEMJI?
Of course, as long as your content is unique and has real informative value.
### **Experts tips**
Your content is long and qualitative, congratulations! We advise you to integrate a summary at the top of the page. It is really useful to quickly understand what subjects are covered and to easily navigate in the article. Another advantage: summaries contribute to the display of sitelinks in Google.
# SEO & GEO visibility
Source: https://help.semji.com/en/create-optimize-and-publish/optimize-for-geo
Discover the principles of GEO and optimize your content to improve its visibility in generative AI answers.
* [What is the GEO and why is it important?](/en/create-optimize-and-publish/what-is-the-geo-and-why-is-it-important)
* [How to become a featured source by ChatGPT?](/en/create-optimize-and-publish/how-to-become-a-source-cited-by-chatgpt)
* [How to start and understand a GEO analysis in Semji?](/en/create-optimize-and-publish/how-to-start-and-understand-a-geo-analysis-in-semji)
* [GEO: Frequently Asked Questions and Best Practices?](/en/create-optimize-and-publish/geo-frequently-asked-questions-and-best-practices)
# SEO recommendations
Source: https://help.semji.com/en/create-optimize-and-publish/optimize-for-seo
Understand your Content Score and apply Semji's recommendations to improve your content's quality and SEO potential.
* [All about Content Score](/en/create-optimize-and-publish/all-about-content-score)
* [What is a well optimized content for SEO?](/en/create-optimize-and-publish/what-is-a-well-optimized-content-for-seo)
* [What are the criteria that have an impact on content performance?](/en/create-optimize-and-publish/what-are-the-criteria-that-have-an-impact-on-content-performance)
* [Everything you need to know about the Competitors tab in Semji:](/en/create-optimize-and-publish/everything-you-need-to-know-about-the-competitors-tab-in-semji)
* [Understanding Title recommandations](/en/create-optimize-and-publish/understanding-title-recommandations)
* [Length recommendations](/en/create-optimize-and-publish/length-recommendations)
* [Content Score differences on Semji](/en/create-optimize-and-publish/content-score-differences-on-semji)
* [Why aim for a minimum Content Score of 75?](/en/create-optimize-and-publish/why-aim-for-a-minimum-content-score-of-75)
* [Understanding Google and user search intent](/en/create-optimize-and-publish/understanding-google-and-user-search-intent)
* [Incoming Links recommendations](/en/create-optimize-and-publish/incoming-links-recommendations)
* [Related Terms recommendations](/en/create-optimize-and-publish/related-terms-recommendations)
* [Search Intents recommendations](/en/create-optimize-and-publish/search-intents-recommendations)
* [Outgoing links recommendations](/en/create-optimize-and-publish/outgoing-links-recommendations)
* [Questions recommendations](/en/create-optimize-and-publish/questions)
* [Why doesn't Semji offer enough Search Intents or Related Terms on my Focus Keyword?](/en/create-optimize-and-publish/why-doesnt-semji-offer-enough-search-intents-or-related-terms-on-my-focus-keyword)
# Outgoing links recommendations
Source: https://help.semji.com/en/create-optimize-and-publish/outgoing-links-recommendations
To guide your reader and Google!
### **Why are outgoing links important?**
In Semji, outgoing links are links made from your page **to another page of your site**. They allow you to "create links" between different contents of your site whose subjects are similar.
Working on the internal linking of your site is fundamental in SEO. Here are two issues of outgoing links:
* Create a coherent navigation path for your visitors by offering them other content that might interest them
* Facilitate Google crawlers' passage and the indexing of content by theme
### How is the number of internal links calculated?
Semji considers that an internal link should be present in your content every 250 words.
Therefore, depending on the content length recommended by Semji following the analysis, the number of outbound links to be made from your content evolves.
To the right of the outbound link recommendation, you can see the target number of links to be placed. A total of 10 links in the example below.
This new way of working with outbound links, as with inbound links, enables you to obtain link recommendations to be integrated into the content you're working on. You also get an example of ink that can be integrated into your content.
This saves you time in selecting your links, and allows users to spend more time on your site browsing through your various content!
The "Outgoing links" recommendation earns 6 points, so it's important to give it fundamental importance.
> Good to know: If you have a Custom Legacy plan, this suggestion of outbound links is not available. You'll only see the number of links to include in your content. \\
>
>
>
> Don't hesitate to get in touch with your Account Manager!
### **How do I integrate outbound links into my text?**
1\. Choose the links you wish to integrate into your content\
2\. Click on the "copy" button and paste your link into your content.
**Tips**
Linking is most effective when links are spaced out within your content. Don't group them all in one place.
If you can't find a relevant page to link to, consider creating one!
> **Note:** to be considered by Semji in the Content Score calculation, your link must link to content within the same domain or sub-domain. A link to a different domain will not be considered as an Outgoing Link.
# Create, optimize & publish content
Source: https://help.semji.com/en/create-optimize-and-publish/overview
Write and optimize your content with Semji, then publish it to your CMS.
Choose the right keyword, structure your draft, and use the editor's features to write and collaborate efficiently.
Apply Semji's on-page recommendations to improve your content's structure and SEO potential.
Understand what makes content well optimized for search engines and generative AI answers.
Finalize, export, and publish your content while staying on top of URL rules and go-live requirements.
# Brief & writing
Source: https://help.semji.com/en/create-optimize-and-publish/prepare-and-write
Choose the right keyword, structure your draft, and use the editor's features to write and collaborate efficiently.
* [Everything you need to know about the Semji editor and its features](/en/create-optimize-and-publish/everything-you-need-to-know-about-the-semji-editor-and-its-features)
* [How to create and keep track of your content plan with Semji?](/en/create-optimize-and-publish/how-to-create-and-keep-track-of-your-content-plan-with-semji)
* [How to create a New Content with Semji?](/en/create-optimize-and-publish/how-to-create-a-new-content-with-semji)
* [Highlighting Text in the Editor 🖍️](/en/create-optimize-and-publish/highlighting-text-in-the-editor)
* [How to choose the right Focus Keyword (for a New Content)?](/en/create-optimize-and-publish/how-to-choose-the-right-focus-keyword-for-a-new-content)
* [How to chose the right Focus Keyword (for an Updated Content) ?](/en/create-optimize-and-publish/how-to-chose-the-right-focus-keyword-for-an-updated-content)
* [The Semji Draft and its content editor](/en/create-optimize-and-publish/semjis-draft-and-editor)
* [How to access the version history of my content](/en/create-optimize-and-publish/how-to-access-the-version-history-of-my-content)
* [Everything you need to know about Semji's content versioning system](/en/create-optimize-and-publish/everything-you-need-to-know-about-semjis-content-versioning-system)
* [Comments in Semji](/en/create-optimize-and-publish/comments-in-semji)
* [How to enable a spell checker in my Semji Drafts?](/en/create-optimize-and-publish/how-to-enable-a-spell-checker-in-my-semji-drafts)
# Questions recommendations
Source: https://help.semji.com/en/create-optimize-and-publish/questions
To answer questions that Internet users are really asking
### **Why are Questions important?**
Questions suggested by Semji are the ones that Internet users are asking around your keyword. Answer these questions to be relevant to Internet users and Google. The more a content answers clearly and completely to a search intention, the more visible it gets.
### How are the questions generated?
The questions suggested by **Semji** are taken from Google data and in particular from the "People Also Ask" box that often appear in Google's results pages.
### How to increase my score using questions?
To change the Content Score of your publication, you must insert questions suggested by Semji in the main title or subtitles (Hn) of your content.
1. Choose a relevant question
2. Look for the words in bold, they are what count for your content score
3. Add the question to your text by clicking on + or simply write the question in the editor
If you are writing the question in your text, then make sure you choose a heading level. To do this, highlight the text, and choose 1 to tag your heading as H1, 2 for H2 etc. Once you have chosen a title level, your score will change.
If you have integrated the question into your text using the +, the H2 tag is selected by default. Your score changes immediately!
### **Starting from scratch?**
Search Intents and Questions sections help you build your writing plan. Click on the + each time a topic interests you, and it will be added to your blank page. The more topics you cover, the more your content score will evolve, and the more you will be sure to produce relevant, deep, powerful content.
**Reminder: the minimum recommended content score is 75. The higher your score, the more chance you have to be in the top 3.**
### What if a question is not relevant?
A question is not relevant to your content? Deactivate it. The score of your content is then recalculated based on the active recommendations.
# Related Terms recommendations
Source: https://help.semji.com/en/create-optimize-and-publish/related-terms-recommendations
To broaden the semantic field of your content
### Why are the Related Terms important?
Around a given Related Term, there is a whole semantic field that is important to use both for your audience and for Google. The deeper and more lexically rich your content is, the more likely you are to rank in the Top 3.
### How are the Related Terms defined?
When you run an analysis, Semji analyzes the content of competitors on the Google results page and identifies the terms that are used most often.
Click on the cup to get a synthetic view of the frequency with which your competitors use certain words.
Using the competitive analysis, identify the Related Terms that are unavoidable. The darker the area, the more your competitor (represented by a logo on the horizontal axis) talks about the Related Term listed in the left column.
### How to interpret the Related Terms section?
Semji lists in this section **the terms to use in your content to make it richer. Related Terms are sorted by priority order**. Each Related Term has an associated Target, which is the recommended number of occurrences of this term in your content:
* more than 10 times
* between 3 and 10 times
* between 1 and twice
For a given Related Term, once you have included the recommended number of occurrences, your score will increase. If you include only twice in your text a Related Term to be used at least 3 times, your score will not evolve.
To better understand the context of a Related Term's use, click on the Related Terms. Semji will show you how the term is used by your competitors.
Contextual information is also sometimes provided under the Related Term.
### How do I integrate the Related Terms into my text?
#### To add a Related Terms in your text 2 options:
1. Place your cursor in your text, where you want to add the Related Term and click on the + to the right of your Related Term.
This option is particularly useful during the construction phase of your writing plan
2\. Write the Related Term directly into your text. Semji will automatically identify it.
### What if a Related Term is not relevant?
#### 1. Deactivate the Related Term
One of the Related Terms is not relevant to the content you are writing? Deactivate this recommendation so that it is not counted in the calculation of your score.
**Warning !** This feature should be used with moderation. As a reminder, the Related Terms identified by Semji are those that allow your competitors to rank, they reflect the reality of the results page. The less you integrate the suggested Related Terms, the more you decrease your chances to rank.
**Reminder :** The minimum Content Score recommended by Semji is 75. If you can't include all the recommended Related Terms in your text, don't panic! Apply Semji's other recommendations ([incoming links](/en/create-optimize-and-publish/incoming-links-recommendations), [search intents](/en/create-optimize-and-publish/search-intents-recommendations)...).
#### **2. Exclude unwanted keywords**
Do you sometimes find the same unwanted terms in the Related Terms, such as a competitor's name? Improve the relevance of the suggestions provided by Semji by banning certain terms. To do so, leave the editor and go to your settings.
The « Excluded keywords » section allows you to list unwanted terms. You can add as many as you want and delete them if needed.
# Search Intents recommendations
Source: https://help.semji.com/en/create-optimize-and-publish/search-intents-recommendations
To structure its content according to users' intentions.
### Why are Search Intents (formerly called Headings) important?
Semji's Search Intents section shows you what topics your audience is interested in around a given keyword. They allow you to structure in a few clicks a relevant editorial plan for your audience.
These search intents are to **be integrated in your Hn tags (titles and subtitles)** in order to make Google's crawlers quickly understand that your content is relevant and complete on the targeted keyword.
By producing a content structure that is relevant to your audience and to Google, you improve your chances of ranking in the top 3.
### **Search Intents, how does it work?**
#### Integrate users' search intentions into your text
Click on the Search Intents section in the list of recommendations.
\> If you have a **Starter or Pro subscription**, Semji offers you to view them using your Search Intents credits (the number of remaining credits is displayed when you click on your profile, in the top right corner of your screen).
\> If you have a **Custom subscription**, you will be able to see the recommendations immediately because you have unlimited Search Intents.
To decide whether you really want to spend some of your Search Intents credits, see how many points you can earn on your Content Score by including Search Intents in your headlines:
*Here, it should be understood that Semji recommends the use of 12 Search Intents in your content. By adding them in your titles, you can earn up to 24 points of Content Score.*
**
*Here we understand that Semji recommends the use of 12 Search Intents in your content, and that your content already contains 7. Five search intents are missing in your Hn tags to get the remaining 14 points and increase your Content Score.*
Choose to unlock Search Intents to work on highly optimized content and aim for a Content Score above 75. You can unlock them in batches of 10. Semji suggests less than 10 Search Intents? See our [article related to this exception](/en/create-optimize-and-publish/why-doesnt-semji-offer-enough-search-intents-or-related-terms-on-my-focus-keyword).
Click on "Unlock 10 Search Intents" to use 10 SI credits and get recommendations:
These Search Intents are sorted by search volume. In bold, the words that Semji recommends you use in your titles. It is by integrating these words that you will increase the Content Score.
To integrate them into your text, click on the + located to the right of the word.
The bold word is now in your text editor and is automatically tagged as `
`. If you wish, you can change this markup by highlighting your word and selecting 1 for `
`, 2 for `
`...
**Starting with a blank page?** The Search Intents and Questions sections help you build your writing plan. Click on the + each time a topic interests you, to add it to your blank page. The more related terms and search intents you cover, the more your content score will evolve, and the more relevant, deep and efficient your content will be.
**Reminder: the minimum recommended content score is 75. The higher your score, the better your chances to rank your content in the top results.**
**A Search Intents suggestion is unappropriate for your topic?** Deactivate it by clicking on the cross on the right. Your score is then recalculated based on the Search Intents that are relevant to you.
### Heatmap: how to interpret it?
By clicking on the cup, discover the highly sought-after topics by the audience and that your competitors are covering in particular.
[](https://downloads.intercomcdn.com/i/o/298014261/42f6c86aa4f2d54b2d7c4280/Search-intents-heatmap.PNG?expires=1619337600\&signature=fbd971e91ad3eddb3f70249b51dfe256c45b0f80f2fe2e31f3b9adf170a7d71e)
Thanks to the color code, you can identify at a glance the topics that have been discussed several times by several competitors. They are a must, talk about them too!
### **Tips**
Be sure to organize the Search Intents with the html title tags. The Hn tags must be placed in a certain order: the H1 is your first title, the tag should only be used once, at the top of the page. The following title levels can be more numerous, and allow you to hierarchize the information.
[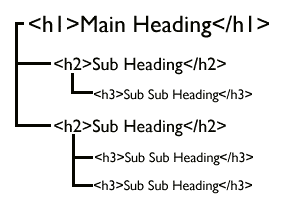](https://semji.intercom-attachments-7.com/i/o/210703475/968b6fe82fd7d4dacd6f48d6/4EENDp3HvambYOcvGE0MMy47P3LMbYlGmptSnkhgJIK0nPBGkDx6fo53jV9bxslmXVY-_qEoxKbwF2LJFAx4sTfci1X90TArQySPqNM5YV2ve_-A8QgmAic53_3ob8zjDdrTkBgn?expires=1619337600\&signature=12628b5d1aa971e7e2da22d6e02f1e0bbd749ce2e0f0cd3e7475022792199b1e)
They should be nested to indicate levels of depth of information, as in the summary of a long book. For example, in the structure below, the h3 subheads allow you to subdivide the subject matter addressed by the h2 subhead:
`
`How to handle the SEO optimization of your international content?`
`
`
`Meet your local audience expectations`
`
`
`Uncover the strategy of your local SEO competitors`
`
`
`Detect new SEO opportunities`
`
`
`How to organize SEO content production internationally?`
`
...
### **SEO Questions**
* #### Can my H1 and my title be similar?
Semji recommends that you write a different h1 and Title tag. The title aims at indexation and click incentive from the result page, while the H1 is there to introduce the topic once on the page. H1 and Title must therefore be written with these considerations in mind.
* #### Can I use my focus keyword in several Hn?
Yes, as long as the reading seems natural, relevant and that it serves the quality of your content. Avoid keyword stuffing (placing your keyword everywhere) which can be counterproductive. To cover a topic in a comprehensive way, Semji recommends different topics to cover. Opt for a complete content rather than a redundant one.
# The Semji Draft and its content editor
Source: https://help.semji.com/en/create-optimize-and-publish/semjis-draft-and-editor
Getting to the reactor core: editing content with Semji
### What is the purpose of the Draft?
The Draft is the term used to designate content in the process of being written. It means that content is not yet published and may undergo further changes before going live.
When you add a content opportunity from the Pages tab to your Schedule, or when you create a new content, Semji turns these contents into Drafts. From the Schedule tab, you can access all the open Drafts that are currently being written.
A draft can be assigned a manager, a due date, or a status. It can also have several versions.
#### Semji's draft editor
The Draft Editor allows you to easily write powerful content that meets both search intent and Google's requirements.
Semji's editor is a WYSIWYG editor - which stands for "What You See Is What You Get". In other words, with this type of editor, the user writes a text and uses simplified formatting options, which the editor automatically transforms into HTML language. For a writer, this type of editor is ideal, because it is not necessary to master HTML to write and then publish a text that is well optimized for engines and Internet users.
#### Build your content plan in minutes in a Draft
### How is a draft made up?
A draft is made of several areas to be distinguished.
#### The top bar for project management
To the right of the top bar, you can access the options for managing this content in your editorial strategy:
* Assign a manager among your employees
* Choose the due date for this content to be produced
* Customize its status to indicate where it is in your internal process
By default, an open draft is added to Semji's Schedule. This is why the "Planned" button is displayed in the upper right corner. By clicking on this button, you can remove the Draft from the list of content to be produced in the Schedule. **This action permanently deletes the draft**. A confirmation message is displayed.
* **In the case of updated contents**
*Reminder: an Updated Content is a content already online that you can optimize with Semji.*
In the case of Draft Updated Content, the top bar displays the content title and its url on the left.
The two icons in the center of the top bar allow you to change Semji's interface: by clicking on the Web icon, you display the content currently visible by Internet users. Clicking on the pencil opens the editor which allows you to modify your content.
**Important**: to create a Draft, **Semji automatically detects areas containing editorial text** in your page. It excludes elements such as navigation menus, product listings, footers... The text is then imported into your editor. You save time by not having to copy and paste existing content. If your site has a complex layout and/or some code elements blocking the readability of our robots, it is possible that the entire editorial content of the page will not be detected. In this case, **check the editor** to see if you need to manually import the missing text.
* **In the case of New Content**
*Reminder: a New Content is a new content created from a blank page, that you want to publish for the first time on your site.*
In the case of a New Content's draft, there is no title or url yet. These elements are not known, so they are not displayed. In addition, there is no version of content online. Only the editor is accessible, and the pictograms "Web" and "Edition" are not visible.
#### The content editing bar
Located above the editing area, this bar contains the usual features of a text editing program.
From this edit bar you can :
* Select the version of the draft to edit
* Undo an action
* Bold, italicize or underline a text element
* Insert a quote (with a specific visual formatting)
* Add or remove a link on an anchor in your content
* Choose the title level (corresponding to Hn markup in HTML)
* Insert bulleted or numbered lists
* View the HTML version of the text you are editing
* Re-synchronize the content with the online version on your site (Semji will then launch a new action to automatically retrieve the editorial content)
* Mark the content as Published (using the "Mark as Published" button)
When you hover over a text element with formatting or markup, it is highlighted in your editing bar. You can then easily remove or modify it.
**Please note**: Semji does not allow you to manage text sizes or specific fonts because these are features related to your CMS. It is therefore in your CMS that you can customize these elements when integrating your content before publication.
#### The content editing area
This area is shown as a blank page. It has a specific location at the top for the content title. Then the main area allows you to enter all the editorial content of the body of the page, the title elements, the paragraphs... It includes a scroll bar to navigate vertically between the top and bottom of the editorial text.
In Semji editor, you can find a word and character counter at the bottom left. The counter is updated when selecting a part of your content.
#### The sidebar
**Note** : to be able to work on a Draft and view all the data in this sidebar, **you must launch an analysis** after selecting a Keyword Focus.
This sidebar has different elements.
1. The Focus Keyword area
2. The Optimizations tab
3. The Competitors tab
4. The Performances tab
#### The Focus Keyword area
This is where you select the priority keyword that will guide the optimizations to be applied in your content.
Each Focus Keyword is associated with 3 important data in your selection criteria:
The number of monthly clicks on the content from the SERP (in the case of New Content, this data does not yet exist)
The position of the content on the Focus Keyword (in the case of New Content, this data does not yet exist)
The search volume of the Focus Keyword
#### The Optimizations tab
In this tab, you will find all of Semji's semantic recommendations. **Consider this your brief** for writing content. Apply the different guidelines to optimize your content and make it relevant to Internet users' searches.
> [Discover how to apply the different Optimizations in detail](/en/create-optimize-and-publish/everything-you-need-to-know-about-the-semji-editor-and-its-features)
#### The Competitors tab
In this tab, you can see the Google results page (the SERP). Semji displays the top 10 results and shows in pink the position of your content - if it is already in the top 10.
#### The Performances tab
In this tab, you analyze the performance of your content through different SEO KPIs. Whatever your subscription package, you have access to :
* monthly clicks\*
* monthly sessions\*\*
* monthly click rate (CTR)\*
* monthly impressions\*
* bounce rate\*\*
* average number pages seen per session\*\*
* average session lenght\*\*
With a higher subscription package, you can also visualize the evolution curve of KPIs such as :
* Conversions and conversion rate\*\*.
* Revenue generated by the content
* Transactions and transaction rate
*\*data from the Search Console*
*\*\* data from Google Analytics or AT Internet depending on the tool you have configured in Semji*
### How to use the Draft Editor's features properly? 6 key tips
#### #1 - Organize the production of content
To make sure your content has every chance of performing, make sure you have assigned a person in charge of it and set a deadline for its production. This way, you are sure to be visually alerted in your Dashboard and your Schedule if a content is behind schedule, and you will be able to address the collaborator in charge of its writing, or of the corresponding process step.
Don't forget to regularly update the status of the content, in order to know its stage of progress. If there is a delay in production, you can easily find out if it is the writing, proofreading or integration phase that is blocking the process.
> Quick tip: A new feature lets you easily track your content plan. [Learn how to build and keep track of your content plan in Semji.](/en/create-optimize-and-publish/how-to-create-and-keep-track-of-your-content-plan-with-semji)
#### #2 - Choose the right keyword to work on: the Focus Keyword
All the information in the sidebar appear after you choose a Focus Keyword and run an analysis. \
Click on the Focus Keyword location to change it if needed. \
If you're working on an Updated Content Draft, Semji will suggest other keyword ideas that already position your content and potentially generate clicks. You can always add the Focus Keyword of your choice if it is not in the list.
> \>> Find out how to choose the right Focus Keyword for your draft:
>
> * [for an Updated Content](/en/create-optimize-and-publish/how-to-chose-the-right-focus-keyword-for-an-updated-content)
> * [for a New Content](/en/create-optimize-and-publish/how-to-choose-the-right-focus-keyword-for-a-new-content)
#### #3 - Know your content score: estimate the level of optimization of your content
Based on the Focus Keyword you have chosen, Semji calculates your [Content Score,](/en/create-optimize-and-publish/all-about-content-score) which is displayed at the top of the sidebar.
If you are working on a New Content Draft, you start from a blank page. The Content Score initially displays 0 or a score close to 10 if you have already added your Focus Keyword in the content title.
If you are working on an Updated Content Draft, you are starting from an existing content. The Content Score that is displayed corresponds to the **level of optimization of your text in relation to the Google SERP** (search engine results page), and to competing content that is positioned there.
A color code shows the level of optimization of the content written in the Draft.
We advise you to **aim for a Content Score of at least 75**. And if you follow Semji's recommendations to the letter, **reaching 100% is possible**! The higher your Content Score, the more likely you are to overtake your competitors on the results page.
#### #4 - Apply Semji's optimization recommendations
One of Semji's strengths is its semantic engine. When you launch an analysis, its engine retrieves a very large amount of data that it aggregates, analyzes and deduplicates... to deliver a summary of recommendations to be applied to each of your content.
When you build your content plan or seek to optimize it, Semji saves you time by detailing the main steps **in the form of a brief**, in the "Optimizations" tab of the sidebar:
* **Fill in your title** : it must contain the main keyword (Focus Keyword)
* **Build the outline of your content** : the different levels of nested titles, which should target the important search intents
* **Deal with questions** asked by Internet users and aim for 0 positions (featured snippets)
* When writing, **insert several occurrences of some Related Terms** to make your lexical field rich and relevant for Google and your audience.
* **Think about internal linking**! Whether it's links to your content (Incoming Links) or links from your content (Outgoing Links), Semji advises you so that this key step in SEO doesn't get lost!
**For each recommendation, aim for a clear objective and see the Content Score points at stake!**
For each Optimization, you can see at a glance the efforts to be made and a goal to be reached thanks to a completion bar.
By hovering your mouse over a recommendation, you can also see how many Content Score points you can earn by completing the objective.
In the example above, Semji recommends writing 3500 words of content. Remember: this recommendation is based on the analysis of competing content - [Read more about Length recommendation](/en/create-optimize-and-publish/length-recommendations).
Right now, the content is only 376 words. By following the length recommendation, i.e. by lengthening the content to 3500 words, you can gain 25 Content Score points.
As the 376 value is far from the goal, the completion bar under the recommendation is colored red. The closer you get to the goal, the closer the bar color gets to green!
For the "[Search Intents](/en/create-optimize-and-publish/search-intents-recommendations)" and "Questions" recommendations, the objective indicated corresponds to the number of Semji suggestions that you must place within your content. You will thus get the totality of the Content Score points for each recommendation.
In the example above, adding 7 Search Intents to reach the goal of 10 in your content will give you an additional 12 points!
For [Related Terms recommendations](/en/create-optimize-and-publish/related-terms-recommendations), the target is the number of distinct Related Terms you need to address in your content, within paragraphs. **Please note that a single occurrence of a Topic in your text is often not enough to meet the goal.** Google considers that you really deal with a topic when you talk about it several times in your text. Semji therefore provides you with a clear objective for each Topic.
In the example above, Semji recommends 43 separate Related Terms within the content. For each of the suggested Related Terms, Semji indicates the number of occurrences already present in your text, and the target to reach for a well optimized content. The topic "Users" must be mentioned 5 more times to be checked.
*Reminder: These targets for the number of hits are based on the competing content that is well positioned in the SERP on your Keyword Focus.*
For [Incoming Links](/en/create-optimize-and-publish/incoming-links-recommendations) recommendations, the target is the number of internal links you need to **insert in the worked content** from other content on your site. Semji has pre-detected them for you: you see their title and an extract of their text, which contains a possible anchor for your link, formatted in bold. All you have to do is edit these contents in your CMS to place the links on the appropriate anchors.
Finally, for the [Outgoing Links](/en/create-optimize-and-publish/outgoing-links-recommendations) recommendations, the objective displayed corresponds to the number of links that you must make from the worked content t**o other content on your site**. Note that this objective evolves in real time: the longer your content is, the more the number of links to be placed increases. It is adapted to the number of words actually written and is not a function of the total length recommended by Semji.
**TIP: Quickly insert Semji's proposals into your content**
To insert one of the proposals into your content, you can **click on the "+" button** that appears when you hover your mouse over the proposal.
* If it is a Search Intent or a Question, it is automatically added to your text at your cursor position in **title level 2 format** (in the HTML code, the text is tagged with h2). You can of course change this format, by opting for example for title level 3 (corresponding to the HTML tag h3). But be aware that a **Search Intent or a Question must have a title level format** to be taken into account in the Content Score and validated in the list of proposals.
* If it is a Topic, clicking on the "+" button inserts it into your text in paragraph format at your cursor position.
**Validate the recommendations to aim for the maximum Content Score!**
Whether you have chosen to insert by click (using the "+" button) or to rewrite the suggested Search Intents, Questions and Related Terms, **Semji automatically detects them** in your editor. The platform **changes in real time** the related completion bars and the Content Score of your content.
The addition of an internal link within your content is also automatically detected by Semji and completes the Outgoing Links.
Similarly, Semji automatically calculates the length of your content in real time as you write, increasing the word count and bringing you closer to the recommended length target.
For Incoming Links, once the links have been placed in other content on your site, click on the double arrows to the left of the link goal to refresh the recommendation: Semji checks in real time the placement of the links and validates them. Your completion bar and your Content Score will evolve!
**Note:** in the case of a New Content, the insertion of links to your content is possible only after the publication and the creation of the final url of the content.
1. Declare the content as published with the "Mark as Published" button
2. Enter its final url, the one where the content is now accessible online
3. Enter its final url, the one linked to the content now available online
4. Go back to your Draft (Planning > Published) and refresh the Incoming Links
5. The completion bar and the Content Score are evolving!
#### #5 - Understand your competition: learn from them and differentiate yourself
To guide the production, it is necessary to set SEO objectives. And what could be more important at this stage than to **analyze your competition**! Indeed, knowing the strengths and weaknesses of your competitors' content has many advantages:
* You will learn good practices to apply to yourself
* You avoid identified pitfalls and win the preference of Google and Internet users
* You find inspiration
**Make the most of the heatmap in the Optimizations tab**
**> To get inspired**
Search Intents and Related Terms provide you with a heatmap to easily visualize the Related Terms covered in competing content. Consider that the Related Terms covered by a large number of competitors, and which present a **dark pink color** are essential Related Terms. If several competitors are talking about them and they are well positioned in the SERP, it means that Google considers these Related Terms as MUST HAVE! Use them in your titles and don't miss them, you might decrease your chances to appear in the top 3...
**> To differentiate yourself**
On the other hand, use also the Related Terms treated by very few competitors and presenting a pale pink color: these are Related Terms with interesting volumes but which few competitors have bothered to talk about. Niches to exploit! They can inspire original angles for certain paragraphs and allow you to better target certain audiences and issues.
* **Make the most of the Competitors tab**
Thanks to the Competitors tab in the sidebar of each Draft, you can immediately see the top 10 contents that are positioned in the natural results. Click on one of them to display the details of its plan (the title levels). At a glance, you can better understand the angle chosen for this content, the keywords it targets, the Related Terms it deals with ... You can be inspired and deepen what seems interesting to you, or on the contrary, choose an opposite angle to create an original content.
#### #6 - Track the performance of the URL
After all these editorial optimization efforts, reap the benefits of your work! Analyze the performance of your content: its historical performance before optimization, but also the gain after it has been put online. This is materialized by a pink marker (and corresponds to the date you declared by clicking on "Mark as Published").
You can select several KPI to analyze, from the Search Console but also from your web analytics tool (Google Analytics or AT Internet): your conversions, your transactions, your bounce rate...
You can adjust the display of the analyzed data:
* Choose a comparison period to display the evolution rate\
(for example: compare the number of clicks over 1 month with the same month the previous year, or the previous month)
* change the granularity of the curve: display the daily data or smooth the data over the week, month or quarter
* change the analysis period: several periods are suggested by default, allowing you to analyze complete periods (month, quarter...)
In short, the Draft is really the heart of the reactor! From the definition of your strategic objective (the Focus Keyword) to the monitoring of your performance, including a complete and detailed brief and insights on your competition, Semji saves you time on all the steps of your content creation. Create as many Drafts as possible and aim for high Content Scores to ensure maximum SEO gains!
# Understanding Google and user search intent
Source: https://help.semji.com/en/create-optimize-and-publish/understanding-google-and-user-search-intent
To make the right strategic choice and boost your New Content performances !
### How can we understand user intent?
#### Step n°1 / Understand Google
Nowadays, Google's search engine crushes all competition with more than 90% of the market share in France and in the world. The so-called "organic search channel", i.e. Google's natural results, is still by far the one that generates the most traffic.
Google lives with its time advocating **continuous improvement**. The thing is, each major update from Google forces site editors to adapt. Google's algorithm is updated regularly, creating **new indexing rules** and causing sometimes the fall of well-ranked websites. To make things easier, Google doesn't share its quality criteria! This way, no one knows the magic formula that leads to the first place.
Hence the need to use appropriate tools, able to analyze search results, competition as well as the semantic environment at a given moment. This is precisely what Semji offers: **up-to-date analysis and recommendations**.
In recent years, Google has become a real "**answer engine**". It gets better and better with time at **understanding users' intents**, i.e. what motivates one's search and the type of result expected. What better way to answer an Internet user than to understand precisely what he is looking for ?
#### Step n°2 / Understand the concept of User intent
When a user performs a search, **Google** tries to understand his intention. Does he want to be informed? Entertained? To buy a product? Read reviews / comments ?...
**Thanks to the formulation of the query, Google interprets this intention and shows an appropriate and customized result page.**
Example: If the user enters the query "lasagna", Google will mostly show easy lasagna recipes. And all this from a single word!
But there are hundreds or even thousands of different lasagna recipes on the web. What makes the top 10 results (those most likely to be clicked on) better than the others for Google?
**→ To make it to the first result page, your content must match the user intent as understood by Google.**
### How to identify user intent?
You want to rank one of your content for a specific keyword, let's say "hiking shoes".
[](https://downloads.intercomcdn.com/i/o/234277851/9c0ab74a117ecb5c239db537/chaussures-randonnees-serp.png?expires=1619802000\&signature=cc1e332ef5f09d3c8630c8923c2e178df254a2bf673c8004f6a90dfa768bff74)
It seems that Google identifies a mostly transactional intent. It thinks there is a strong probability that this Internet user wants to buy hiking shoes. This explains why many specialized e-commerce sites or large e-commerce sites with hiking sections are suggested. Some shopping guides from specialized website also appear in the results showing that there is some space for more informational content.
#### **1. Look at the elements offered by Google to refine the search**
Further down the SERP (Search engine result page), Google allows users to refine their search by clicking on related questions. These suggestions are based on search volumes or trends observed among other Internet users.
[](https://downloads.intercomcdn.com/i/o/234278991/2415ef1dda78d83d7481322b/paa-chaussures-rando.PNG?expires=1619802000\&signature=9fa000f3c76a556c85b6f9716af460efb56fd2efe0be4fd31454e8e4dd66036a)
People Also Ask (PAA) questions reflect an informational intent: Google assumes that most of the users who have searched for "hiking boots" are not experienced hikers. They are looking for advice in choosing the right shoes and wonder whether hiking shoes are necessary.
[](https://downloads.intercomcdn.com/i/o/234279068/844bf2d180691e124a67d56c/related-search-chaussures-rando.PNG?expires=1619802000\&signature=2f4c88aa9f087b6759cbd303d3b329f48ccbf5afde8c77963643eb384c6c2433)
In the Related Searches, Google suggests more precise results pages : by target (beginners, men, women), by brand (nike), by material (waterproof)...
#### 2. Figure out which of your content will be the most relevant to the query
This quick analysis shows that for the keyword "hiking shoes", Google favors category pages of specialized website or hiking shoes section of large e-commerce sites. Some shopping guides managed to rank on that page. To reach the Top 10 on this keyword you should either work on your category page or produce a comprehensive and well optimized Shopping guide.
### How to respond to user intent?
As we have seen, Google identifies a main intention (to buy shoes) and a secondary intention (specific material, comparison...). The best contents are those answering these different intentions as well as possible!
The **semantic** aspect is of paramount importance in Google indexing: if your content is not part of a purchasing process, and does not address these different themes, it has little chance to rank on "hiking shoes".
That's where **Semji Platform** comes in, to provide you at a glance with the best **writing** advice around a given keyword.
Semji analyzes the SERP and collects questions from users, scans competitors' content and the topics they cover. This massive data analysis allows us to provide you with the answers expected by Internet users.
Your turn to play !
# Understanding Title recommandations
Source: https://help.semji.com/en/create-optimize-and-publish/understanding-title-recommandations
To catch the attention from the start
### Why is the Title tag important?
The Title tag is used by Google as the title of your content in its results page. It summarizes the content of your page and makes the user want - or not - to click to access on it. Thus, this tag can totally influence the click rate, traffic and bounce rate of a page! It also appears in the browser tab of the user who is viewing your content.
### **How does it work?**
Semji recommends that you place your main keyword (focus keyword) in your Title tag. In the Semji editor, this is the title located at the top of your page.
**Essayez et voyez votre score évoluer !**
Starting from scratch? Write your Title tag in the "Add title" box at the top of the Semji editor.
[](https://semji.intercom-attachments-7.com/i/o/210708902/30faf9dc78d609d1296ad108/Ua8qMFXMCeM9KsaHSa8I-sGMQmjgMa0FeCCOjgaIQs38asAGrIypuCkJ1hNSHS_mLOtV15jvo3AM0LGM4XY7LXffSD3i7I5KxQZlPdSJT_ZTU8R4jO6a2dx8FlBu6KK60m4b8hS5?expires=1619611200\&signature=742ce59a39f2a4ed09f256c28950990a5b4b263288f37ddd515a33cf5a013bdd)
### Tips
* Broaden the semantic field of your content by writing a different Title tag and H1 (main title)
* Whenever possible, place your main keyword at the beginning of your Title
* Make sure that each of your pages has a different, unique title tag
# Publishing
Source: https://help.semji.com/en/create-optimize-and-publish/update-and-publish
Finalize, export, and publish your content while staying on top of URL rules and go-live requirements.
* [When should I click on Mark as Published?](/en/create-optimize-and-publish/when-should-i-click-on-mark-as-published)
* [Already have a URL in the Pages tab? Why can't you mark your content as published?](/en/create-optimize-and-publish/already-have-a-url-in-the-pages-tab-why-can39t-you-mark-your-content-as-published)
* [How to export content from the Semji editor?](/en/create-optimize-and-publish/how-to-export-content-from-the-semji-editor)
# What are the criteria that have an impact on content performance?
Source: https://help.semji.com/en/create-optimize-and-publish/what-are-the-criteria-that-have-an-impact-on-content-performance
Some important criteria to consider for a performing content.
The goal of any SEO Content strategy is generally that each content produced brings its share of traffic and performance, that it generates a good ROI (return on investment). Here are some criteria and points to consider to produce a performing content.
SEO optimization of content (with Semji ! 😀)
For a content to perform, it has to be properly written and optimized. It must take into account [the way Google works](/en/create-optimize-and-publish/understanding-google-and-user-search-intent) but most importantly it must deal with a topic of interest to the user, a topic that meets his needs and answers his search intent. When you [update an existing content](/en/identify-opportunities/how-to-optimize-an-existing-content-updated-content) or [create a new Content](/en/create-optimize-and-publish/how-to-create-a-new-content-with-semji), be cautious with the **choice of the Focus Keyword**. This first step is essential to the successful development of your content and its future performance!
So, think about your **users' experience** to define both the form and the substance of your content: would your target prefer to watch a video? Read a long content? Access a slideshow? Choose to produce editorial content when it seems most relevant and be sure to leverage your editorial efforts to maximize the gains!
Thanks to an in-depth analysis of the SERP (Search engine result page), Semji Platform provides you with [optimization recommendations](/en/create-optimize-and-publish/everything-you-need-to-know-about-the-semji-editor-and-its-features). It gives you a better understanding of users' intentions and also of your competitors. See also our article about the seo criteria to consider for a high performance: [what is a well optimized content for SEO](/en/create-optimize-and-publish/what-is-a-well-optimized-content-for-seo)?
### **Page loading speed**
Google penalizes the slowest sites in favor of faster sites. A technical audit of your site will give you a sense of your site's performance and suggest actions to improve its loading speed.
To start with, you can check the display speed score of your contents: don't forget to check the display score on mobiles!
> [Check your website's speed](https://developers.google.com/speed/pagespeed/insights/)
### **Duplicate content**
Duplicate contents (paragraphs, images, videos...) should be avoided as it can heavily affect the performance of a page. Google tries to offer unique contents to its users and also looks at the nature or the form of the information.
Example of duplicate content: using the description of a manufacturer's site on your product page. Bad idea! How will Google know who is the most relevant between the manufacturer and you? Google may get lost, and Google does not like that. Contents need to be rewritten or linked to in order to avoid sanctions.
### **Cannibal content**
This is when different contents from your website rank for the same keyword. Most of the time, Google prefers not to show several contents from the same source on a result page. It will then choose the one that should rank. If Google struggles to identify the most relevant one, it can decide not to position you at all, or to favor a competitor. **Remember this simple rule: one target keyword, one content.**
> Good to know: Semji helps you [identify cannibalization with an alert.](/en/identify-opportunities/semji-cannibalization-warning)
### **Backlinks**
These are essential elements of SEO. Backlinks are links from external sites pointing to your content. For Google, they are a strong signal that your site has authority on a subject, especially if the sites that link to your content are experts or recognized in your field. The more relevant links a site has, the more qualitative and popular it is and the higher it will rank in Google results. So, when you consider the means necessary to achieve your SEO goals, consider allocating a part of your budget and your efforts to the acquisition of backlinks.
To go further, check out our blog post about the importance of backlinks and don't hesitate to talk to your Customer Success Manager. Our team can perform an audit of your link profile and suggest effective netlinking strategies.
# What is a well optimized content for SEO?
Source: https://help.semji.com/en/create-optimize-and-publish/what-is-a-well-optimized-content-for-seo
To produce content that Google likes, and for a long time!
The whole point of using Semji is to save you time in producing content that is perfectly optimized for Google. In other words, content that's tailored to [users' intentions](/en/create-optimize-and-publish/understanding-google-and-user-search-intent), that ranks high enough in Google results to generate traffic and meet your strategic objectives.
What are the essential criteria for ensuring content SEO optimization and performance?
Well-structured content
A content will only make sense for its audience if it is well organized. To do so, you must first create a plan with titles and subtitles (the "**Headings**" or "**Hn**", using Search Intents) in which keywords will be integrated. This practice is particularly useful as Google gives great importance to headings when assessing the relevance of a content on a given theme.
**Again, you should think User intent.**
* What is the visitor looking for in my content?
* Which question(s) should I answer?
* Which information should be addressed first, then second?
Think also that your reader can fly over the page, make a diagonal reading. Therefore, long contents should have a clickable summary to give quick access to the information and facilitate navigation.
Semji provides you with [recommendations](/en/create-optimize-and-publish/everything-you-need-to-know-about-the-semji-editor-and-its-features) on the keywords and sentences you should include in your headings to optimize your content. Check out our [article dedicated to Search Intents](/en/create-optimize-and-publish/understanding-google-and-user-search-intent) to master this SEO criteria.
### Content at least as long as the competition
Studies have shown that the content ranked in Google's top positions is most often long-form content. And by long, we often mean more than 1,500 words. Internet users generally prefer to move around and scroll within a long, exhaustive page, rather than having to click on several links to access different short contents and find the desired information.
During the analysis Semji performs after you've chosen your main keyword, Semji scans your competitors' pages and calculates the length of their content. Based on this, our algorithm then tells you the recommended length for the content you are producing. Read our dedicated article to find out more about [recommended length](/en/create-optimize-and-publish/length-recommendations).
### Content that is well mapped internally
Links within an article are really important, they help :
* users to navigate easily between contents, go deeper into a subject, keep the visitor on he website and easily give him what he's looking for.
* Google to identify semantically related contents and thus to reinforce the authority of the site on this theme.
When linking content together, several issues must be kept in mind:
* **Strategic linking** facilitates the visits of Google bots on the pages and their indexing. You can then choose to increase the number of internal links to a particular page to give it more importance through Google's eyes.
* **Contextual linking** suggests "similar content" to your user or content that could be of interest to them in the continuity of their search. You will then use semantic and thematic opportunities within your paragraphs to link to other related content.
If there is no absolute value regarding the number of links within a content, it is still recommended to include them systematically within a content. Semji has defined rules in this regard: to learn more, see our [articles on Incoming Links](/en/create-optimize-and-publish/incoming-links-recommendations) and [Outgoing Links](/en/create-optimize-and-publish/outgoing-links-recommendations).
### Content integrated into topic cluster
Alone in its corner, a content does not have much weight. Today in SEO, a good practice is to produce several contents around the same theme, and to create a logical tree structure between the contents, from the most general content to the most specific content. This is called the **topic cluster**.
Here are the main steps:
1. Define the main theme on which to create a **pillar page or "Mother page"**. This page aims to rank for one of your generic keywords, defined earlier\
*Exemple : home insurance*
2. Then define subtopics to identify other, more specific content topics. These will be your "**Daughter pages**".\
Example: tenant insurance, second home insurance, home insurance cancellation, home insurance change...
The objective of the Daughter pages is to rank for these secondary keywords but nevertheless strategic for your activity.
It is the internal linking that will allow Google and the Internet user to understand the tree structure : which page is the Mother (the most general), which ones the Daughters (more specific).
*On this diagram, each arrow represents an internal link.*
Want to learn more about setting up semantic cocoons? Read our white paper on the subject.
### Regularly updated content
A website on a SERP (Search engine result page) is a bit like a boat on the open sea: there is wind, waves, and it moves. Normal, competitors are blowing ! To stay in the game, you have to adapt to the weather and often review your trajectory. In SEO, your watchword will be regular content updates.
Semji is designed to make this simple through real-time recommendations based on Google's ranking criteria and on your competitors. You can rework a content already produced with Semji Platform 6 months later: **refresh the analysis** with the "Update" button to get up-to-date recommendations.
Thanks to Semji, your content adapts to the fluctuations of Google results. You maintain an edge over your competitors by always sticking to your users' intents.
> *Remember: your competitors regularly update their content in order to move up in Google results. Don't neglect this aspect !*
>
> ***Optimizing existing content can bring you as much profit as creating new content**.*
***Did you know that?** Other criteria, that can be related to your site, have an impact on a content performance: the loading speed, the number of links referring to your content (backlinks)... [Find out more](/en/create-optimize-and-publish/what-are-the-criteria-that-have-an-impact-on-content-performance) !*
# What is the GEO and why is it important?
Source: https://help.semji.com/en/create-optimize-and-publish/what-is-the-geo-and-why-is-it-important
GEO helps you become a trusted reference for generative AI: discover the key strategies to be cited by ChatGPT and stand out as the go-to source in tomorrow’s…
### Introduction: Well-positioned on Google, invisible on ChatGPT?
You've worked hard to reach the top positions on Google. Your SEO strategy is paying off: traffic is up, content is well-ranked, domain authority is solid.
But a new channel is emerging, and quickly. ChatGPT and conversational search engines (LLMs) no longer simply provide links: they directly formulate the answer. They synthesize information from multiple sources and construct a single response.
**The problem?** If your content isn't among the sources that AI judges credible, you're invisible. Your position on Google doesn't matter.
**The solution?** GEO (Generative Engine Optimization).
GEO teaches you how to optimize your content to be cited by conversational engines. To become the reference source that ChatGPT uses and mentions. To anticipate market evolution before your competitors do.
This guide explains how to achieve this.
### SEO vs. GEO: What is the real difference?
Although complementary, SEO and GEO respond to different logics:
| Criteria | SEO | GEO |
| - | - | - |
| **Objective** | Rank among the top 10 results | Become the featured source by AI (ChatGPT, AIOverview\...) |
| **Analysis** | The pages that rank on Google | The answer generated by the AI |
| **Competitors** | Sites in the top 10 of the SERP | The content that AI considers credible |
| **Success indicator** | Position 1 on Google | To be cited as a "Source" or "Mention" |
#### Why this distinction matters
**With SEO**, you optimize to appear in a list. The user clicks, compares, and navigates between multiple sites.
**With GEO**, AI takes a position — whether it's ChatGPT or AI Overview. It builds a single synthetic answer. If your content is not in its sources, you are invisible.
Now that the difference between SEO and GEO is clear, let's see how Semji helps you concretely move from one to the other.
### How Semji turns a keyword into a GEO opportunity
#### Why keywords are no longer enough
On Google, a single keyword is enough. You type "marine collagen," and Google returns 10 links ranked by relevance. Your goal: appear among those 10 links.
But ChatGPT/AIOverview doesn't work that way. It doesn't "search" web pages, it "answers" an intent. And that intent must be expressed as a complete, contextualized, precise question.
**The problem:** a standalone keyword is too vague. ChatGPT doesn't know which search intent to handle. Are we looking for a definition? A buying guide? Health benefits? A comparison?
#### The role of the Focus Prompt: formulating the exact question
This is where the **Focus Prompt** comes in. To access it, go to the **GEO tab** of your content editor. Semji applies a method there that transforms your keyword into the precise question your content must answer in order to be used by ChatGPT.
**Concrete example:**
**SEO keyword:** "marine collagen"
**GEO Focus Prompt:** "What are the benefits of marine collagen for the skin and how should you choose it?"
This transformation changes everything. From now on:
* AI engines like ChatGPT or AI Overview understand the intent (informative + comparative)
* It looks for external sources to build its answer
* It responds in a structured way
* You can analyze this answer to optimize your content
The Focus Prompt guarantees two essential things:
* That the answer is in French
* That ChatGPT uses sources (and does not answer solely from its internal knowledge base)
#### The role of GEO analysis: identifying the terms ChatGPT favors
Once the Focus Prompt has been formulated, Semji queries ChatGPT and analyzes its response in depth. We identify:
**Associated terms:** The concepts that ChatGPT and its sources use most frequently to address this topic. These are not the terms your SEO competitors use, but the terms the AI deems essential.
**The expected structure:** How ChatGPT organizes its answer (list, table, step-by-step guide, etc.)
**Featured sources:** Which content ChatGPT or AI Overview consider reliable enough to use as references.
**Mentioned brands:** Which players ChatGPT identifies as key references on the topic.
#### Final objective: become a featured source
The goal is not to "trick" the AI or manipulate its results. The goal is to **create content that objectively deserves to be cited.**
By understanding what ChatGPT expects (via the Focus Prompt and analysis), you create content that:
* Precisely answers the search intent
* Covers the essential concepts identified by the AI
* Adopts the structure most effective for the user
* That has a real chance of being cited as a source in future responses from ChatGPT or AI Overview
### The 3 key concepts AI uses to judge your content
To optimize your content for AI, you need to understand how it "thinks."\
Semji's GEO analysis decodes this process through three fundamental pillars:
#### 1. The structure of the ideal answer
Whether it's ChatGPT or AI Overview, AI always seeks the most effective format to answer a question. Is it a comparison table, a bulleted list, or a step-by-step tutorial?
**By analyzing the structure of its answer, you discover the ideal format for your own content.**
##### Example: For "which iPhone to choose in 2025," ChatGPT structures its response like a buying guide with:
* Selection criteria (performance, screen, price)
* Available ranges (standard, Pro, Pro Max)
* Recommendations by user profile
This structure reveals what users expect: guidance to help them decide, not just a simple list.
#### 2. Source credibility
AI does not create information out of nothing. It relies on web content that it deems reliable, comprehensive, and well-structured. Semji identifies these sources for you.
##### Two levels of sources:
**Featured sources:** Your URL is explicitly cited by ChatGPT. This is the ultimate goal.
**Browsed sources:** The AI used your content but does not cite you directly. It’s a good start, but you can do better.
##### **Becoming a reference source**
Analyze the content that ChatGPT currently favors:
* What angles do they cover?
* What depth of information do they offer?
* What concepts do they address that you do not cover?
#### 3. Brand authority (Mentions)
Beyond content, the AI identifies reference players: brands, products, experts. **Being mentioned means the AI recognizes you as an essential authority.**
**Example:** For "which iPhone to choose in 2025," ChatGPT spontaneously mentions Apple, Amazon, Orange Mobile, Bouygues Telecom. These brands are "top of mind" for the AI.
##### Building your authority
If your competitors are mentioned but you are not, strengthen the association between your brand and your key topics across all your content. The AI will eventually identify you as a reference actor.
### Put it into practice
You now master the fundamentals of GEO. Let's take action with our three practical guides:
**➡️ Step 1: [Run your first GEO analysis and interpret the Overview](/en/create-optimize-and-publish/how-to-start-and-understand-a-geo-analysis-in-semji)**
**➡️ Step 2: [Analyze Sources and Mentions to get ahead of your competitors](/en/create-optimize-and-publish/how-to-become-a-source-cited-by-chatgpt)**
**➡️ Step 3:** [**Frequently asked questions and best practices**](/en/create-optimize-and-publish/geo-frequently-asked-questions-and-best-practices)
Welcome to the era of Generative Engine Optimization. We’re building tomorrow’s content strategy with you. 🚀
# When should I click on Mark as Published?
Source: https://help.semji.com/en/create-optimize-and-publish/when-should-i-click-on-mark-as-published
To let Semji know that you have published content online
### Why mark content as published?
The "Mark as published" button appears on every draft you work on in Semji.
You should click on this button only after you've published your content online. \
It's important to take this action, as it will enable us to start tracking the performance of your content and observe a before-and-after of your performance with Semji.
The "Mark as published" button appears on every draft you work on in Semji.
### How to mark your content as published
**Here are the steps to mark your content as published:**
#### Step 1: Copy your Semji content into your CMS
Once you've finished optimizing your content in the draft and reached the maximum Content Score of 75, you need to copy and paste this content into your CMS, i.e. your website editor: Wordpress, Magento, Drupal, Joomla, Wix, Shopify, Prestashop...
If it's existing content, integrating the new content version doesn't change the url. However, you may need to modify the title and description tags, so that the content is better optimized for your main keyword.
In the case of new content, you'll need to create a new page, and integrate your editorial text, as well as any illustrative images. Enter an explicit URL, containing strategic keywords. Don't forget to fill in the header tags to encourage clicks from the Google SERP.
Don't forget internal linking, and in particular "ingoing links", i.e. links from other content to the content you're integrating. To do this, edit the content and place the links on the appropriate anchors.
Once the content has been integrated and meshed, publish it and check that it is visible online by displaying or refreshing its url in your browser.
Step 2: Inform Semji that your article has gone live
Return to Semji. In the draft of your content, accessible from the Planning tab, click on the "Mark as published" button.
**In the case of existing Content**
Semji simply asks you to enter the exact date on which you published your content, and the associated URL.
> *Good to know: a warning message appears if your Content Score is below 75. This may mean that you're not giving yourself the best chance of success. Consider continuing to work on your content before publishing it definitively.*
This date is important: it will be indicated by a pink dot on your performance analysis curves. In this way, you can easily visualize the evolution of your KPIs: before / after your optimization work.
> Good to know: If you get an error message telling you that the URL is already present in the Pages tab, [here's how to proceed.](/en/create-optimize-and-publish/already-have-a-url-in-the-pages-tab-why-can39t-you-mark-your-content-as-published)
**In the case of existing content**
Simply enter the exact publication date of your content. \
As existing content, the URL of your content is already filled in.
Your content is published in Semji! You can track the performance of your content.
**I forgot to click on Mark as published. What should I do?**
If you've published your content and didn't immediately come back to Semji to click on Mark as published, that's okay.
You can click several days later, and backdate the publication date. In this case, be sure to enter the actual date on which you uploaded the content.
**I clicked too soon on the Mark as published button. What should I do?**
If you've published your content too early and haven't finished optimizing it, you'll need to create a new version of your draft to continue editing.
To create a new editable version, click on the draft concerned and then click on "Start optimization" to create a new draft.
You'll be able to resume editing your content from the last saved changes and click Mark as Published when you've actually integrated the changes into your CMS and published your content.
# Why aim for a minimum Content Score of 75?
Source: https://help.semji.com/en/create-optimize-and-publish/why-aim-for-a-minimum-content-score-of-75
Understanding Semji's goals
### \[REMINDER] What is the Content Score ?
The [Content Score](/en/create-optimize-and-publish/all-about-content-score) is a mark out of 100 assigned to your content. The more you integrate Semji's recommendations, the higher your Content Score. It allows you to measure, in real time, the SEO quality of your content
### Why aim for a Content Score of 75 ?
The recommendations are the result of Semji's algorithm analysis of the Google SERP (results page). Thanks to this analysis, Semji has extracted the main topics and user intentions. The platform then draws up a list of the information or questions to be addressed in order to obtain exhaustive, qualitative content that meets the needs of web users.
If you publish content with a Content Score below 75, you run the risk of your content only partially meeting your audience's intentions. It's possible that a competitor's content will provide a better, more in-depth response. In this case, Google will prefer to position this content at the top of the page, and not yours. In other words, if you publish content with a score of less than 75, you run the risk of undermining your results and missing out on the fruits of your efforts.
On the contrary, publishing content with a Content Score above 75 gives you the best chance of ranking ahead of your competitors and generating traffic, conversions, sales... Your content meets most of the criteria that are important to Google. It's highly likely that your content will be judged more relevant and exhaustive than others. In other words, you've done what it takes to reach the top!
### How to achieve a Content Score of 75?
To achieve a Content Score of 75, simply follow the recommendations for the keyword you wish to work on.
Semji offers 7 recommendations for achieving this Content Score:
* Title tag: This should include the keyword you wish to work on.
* Length: The recommendation is based on the length of competing content. Semji recommends that you write more than your competitors in order to offer rich, detailed content.
* Search intents: These are used to structure the titles of your content.
* Questions: These can also be used to structure the titles of your content, and via PAA (other questions asked), you can answer frequently asked questions within your content.
* Related terms: On the basis of an occurrence, indicate the words suggested by Semji to validate this recommendation.
* Incoming links: To encourage internal linking, Semji suggests different content on your site on which we have identified semantic proximity.
* Outgoing links: These are links to be affixed directly to the content you write. We indicate the number of links to add according to the length of your content.
> *Good to know: Once you've reached a Content Score of 75, don't forget to "[Mark as Published](/en/create-optimize-and-publish/when-should-i-click-on-mark-as-published)" your content to track performance.*
# Why doesn't Semji offer enough Search Intents or Related Terms on my Focus Keyword?
Source: https://help.semji.com/en/create-optimize-and-publish/why-doesnt-semji-offer-enough-search-intents-or-related-terms-on-my-focus-keyword
To understand a borderline and exceptional case on Semji
### A small number of Search Intents or Related Terms : an exceptional case
Semji offers a minimum of 20 Search Intents and 40 Related Terms recommendations on average for each Focus Keyword analysis. However, it can happen that when launching an analysis on a Focus Keyword, you get a low number of Search Intents or Related Terms recommendations.
In this case, an alert message appears, informing you of this limit case.
Instead of offering to unlock 10 Search Intents as usual, Semji offers you to unlock only the number of Search Intents that Semji has found. **You will then spend exactly the corresponding number of Search Intents credits.**
Example: If Semji finds 8 Search Intents after analyzing your Focus Keyword, it will offer you 8 Search Intents and you will only use 8 Search Intents credits.
Also, if Semji finds unusually few Related Terms following the analysis of your Focus Keyword, an alert message will inform you.
### Explanatory hypotheses
#### #1 - Your keyword focus is transactional
The first assumption is that behind your Focus Keyword lies **a search intent that does not call for rich editorial content** in Google results pages.
For the record, launching an analysis on a Focus Keyword instructs Semji to analyze the SERP (Search engine results page) and the best competing content (those that rank first). In a few seconds, Semji analyzes their length, their structure, their semantics... it then deduplicates and clusters the intentions and Related Terms found. If the competing content is too poor, Semji has not enough material to provide recommendations.
This is both the strength - and in this case the limitation - of Semji: by analyzing those that Google judges to be the best, you give yourself the means to understand what makes them successful, and to overtake them!
This can happen when your Focus Keyword has a **strong transactional intent**. If the majority of the results suggested by Google are, for example, product pages from e-commerce sites, or category pages with a small descriptive text, Semji's analysis possibilities are limited. In this case, users are not looking to read paragraphs of information, but to make a purchase. Google understands this and adapts the content it positions in the first results.
**Solutions:**
If your Focus Keyword is too transactional, you can change it. **Re-launch a new analysis on different keywords**, in order to find the one that will have the most recommendations.
Nevertheless, take into account the user's intention. If you are looking to optimize a product page or a category page whose objective is to **generate conversions** or even transactions, it is relevant to aim for a transactional focus keyword. In this case, optimize your content with Semji's recommendations, even if they are shorter than usual. They will still allow you to do better than your competitors!
Finally, consider building a [semantic cocoon](https://semji.com/fr/ebooks/cocon-semantique/?hsLang=en) to boost the performance of your transactional pages. Create several contents targeting informational Focus Keywords, and set up an internal link towards your pages with high business stakes. Results guaranteed!
#### #2 - SERP results block Semji crawlers
Some websites may have been designed to block some robots and crawlers. If the number one competitor on your Focus Keyword have implemented such blocks, it is possible that [Semjibot](/en/connect-your-tools/all-you-need-to-know-about-semjibot) is unable to read the content.
This assumption can be checked by clicking on the Competitors tab and unfolding the competitor content plans. If you see a content map and a tagged title hierarchy, then Semji reads the content without difficulty. If you don't see a map, then Semji is probably having trouble accessing the editorial content.
Most of the time, there are enough readable results by Semji to build consistent recommendations. But if the readable competitor content is poor, then you may find yourself in the borderline case we discuss in this article.
**Solutions:**
You can **change the Focus Keyword**, to get a different SERP and new recommendations. For this, you will have to launch a new analysis.
You can also choose to **combine several Focus Keyword on the same content**, by performing several rounds of optimization. Even if some of them have few recommendations, combining them allows you to obtain a significant number of recommendations and to produce a rich content.
Finally, you can **analyze the blocked content yourself** by displaying the competing urls and manually doing what Semji's AI usually does for you: reading the content, picking up the main Related Terms from the titles, paragraphs... and using them as inspiration to write your plan and your content.
#### #3 - The Internet user expects a specific content format
Once again, it is a matter of user intention. Search intent is not only about semantics, it can also be about format!
If your chosen Focus Keyword calls for **video, image or PDF results for example** then Google's SERP is likely to adapt and offer very few rich editorial results. Semji does not have enough material to analyze and its recommendations are limited.
For example, if you type "Celine Dion karaoke", all the results on the SERP are Youtube videos. It is not realistic to aim for a top 3 position using an editorial content format!
**Solutions:**
Your goal may be misdirected. **Change your Focus Keyword** to fit an editorial content. For example "Celine Dion song lyrics". Do not hesitate to **analyze several Focus Keywords to compare the SERP** and find the most suitable for your editorial production. While waiting for Semji to provide you with content briefs adapted to video formats, one day... :)
# Connect your data
Source: https://help.semji.com/en/getting-started/connect-your-data
Connect Search Console and your analytics tools to bring your existing performance data into Semji.
* [Connect analytics & GSC](/en/connect-your-tools/connect-analytics-and-gsc)
* [Why and how to connect my data sources to Semji?](/en/connect-your-tools/why-and-how-to-connect-my-data-sources-to-semji)
* [Why and how to connect your Google Analytics 4 account to Semji?](/en/connect-your-tools/how-to-connect-my-google-analytics)
* [How to connect my PIANO Analytics account?](/en/connect-your-tools/how-to-connect-my-piano-analytics-account)
* [Why and how to connect your Matomo](/en/connect-your-tools/why-and-how-to-connect-your-matomo)
* [Why and how to connect your Piwik Pro account?](/en/connect-your-tools/why-and-how-to-connect-your-piwik-pro)
* [Why and how to connect your Adobe Analytics](/en/connect-your-tools/why-and-how-to-connect-your-adobe-analytics)
* [How to plug in or change your Google Search Console?](/en/connect-your-tools/how-to-connect-my-google-search-console)
# Create your first content
Source: https://help.semji.com/en/getting-started/create-your-first-content
Create your first piece of content and get familiar with the Semji editor.
* [How to create a New Content with Semji?](/en/create-optimize-and-publish/how-to-create-a-new-content-with-semji)
* [The Semji Draft and its content editor](/en/create-optimize-and-publish/semjis-draft-and-editor)
# First steps
Source: https://help.semji.com/en/getting-started/first-steps
Create your account, invite your team, and set up your workspace.
* [Manage Semji users](/en/admin-and-settings/manage-semji-users)
* [Why and how to add or remove a workspace?](/en/admin-and-settings/why-and-how-to-add-or-remove-a-workspace)
* [How do you manage the language of your work interface?](/en/admin-and-settings/how-do-you-manage-the-language-of-your-work-interface)
# Getting started with Semji
Source: https://help.semji.com/en/getting-started/getting-started-with-semji
Everything you need to go from a brand-new account to your first optimized draft, in nine steps.
### At a glance
* **What you can do**: set up your account and workspace, connect your data sources, and go from zero to your first optimized, published draft
* **Who it's for**: anyone new to Semji - content managers, SEO leads, and any teammate about to start working in the platform
* **Why it matters**: each step below links to the full guide for that topic, so you can move through onboarding at your own pace without hunting for the right article
### What changes for you
**Before:** getting productive in a new tool usually means piecing together scattered documentation, guessing which setting matters, and discovering half the features weeks in.
**Now:** this page is the one place that walks you through every step in order - account, data sources, AI setup, and your first piece of content - each with a short explanation and a link to go deeper.
### What you'll get
By the end of these nine steps, your workspace will be fully configured (users, data sources, Brand Voice, Knowledge Base), and you'll have imported your existing pages, integrated your editorial planning, and published your first content optimized with Semji.
### How to use it (step by step)
#### 1) Create your account and set up your workspace
Once you've received your invite, sign up with your work email and password (or [your Google account](/en/connect-your-tools/how-can-i-connect-to-semji-with-my-google-account)), then enter the URL of the site you'll be working on - this can't be changed afterward, so double-check it. From there, [invite your teammates](/en/admin-and-settings/manage-semji-users) and, if you manage more than one site, [add the workspaces](/en/admin-and-settings/why-and-how-to-add-or-remove-a-workspace) you need.
#### 2) Connect Search Console and your analytics tools
[Connect Google Search Console](/en/connect-your-tools/why-and-how-to-connect-my-data-sources-to-semji) so Semji can pull in your existing performance data, then [connect your analytics tool](/en/connect-your-tools/how-to-connect-my-google-analytics) (Google Analytics or another supported connector) to track traffic and conversions alongside your content.
#### 3) Create your Brand Voice
[Configure your Brand Voice](/en/work-faster-with-ai/how-to-use-semjis-ai-brand-voice) so every AI generation - drafts, rewrites, agent output - sounds like your brand instead of a generic assistant.
#### 4) Feed your Knowledge Base
[Set up your AI Knowledge Base](/en/work-faster-with-ai/ai-knowledge-base-create-a-knowledge-base) with the documents, product information, and guidelines your AI should draw on, then see [everything the Knowledge Base can do](/en/work-faster-with-ai/know-everything-on-ai-knowledge-base-create-more-relevant-optimized-and-faster-content) once it's populated.
#### 5) Explore and analyze your pages
[Explore the Pages tab](/en/identify-opportunities/everything-you-need-to-know-about-the-pages-tab) to see every page Semji tracks, or [import a URL directly](/en/identify-opportunities/how-to-import-a-url-in-semji) if a page isn't showing up yet.
#### 6) Bring in your existing editorial planning
[Bulk-import your backlog](/en/plan-your-content/bulk-import-in-the-planning) into the Planning tab instead of recreating it by hand, then [get oriented in the Planning view](/en/plan-your-content/all-you-need-to-know-about-the-planning-tab) to organize what comes next.
#### 7) Identify pages worth reworking
Use [existing-content optimization](/en/identify-opportunities/how-to-optimize-an-existing-content-updated-content) to find pages with the most gain potential, and check the [cannibalization alert](/en/identify-opportunities/semji-cannibalization-warning) to catch pages competing against each other before it costs you rankings.
#### 8) Launch a content idea
[Explore the Content Ideas tab](/en/identify-opportunities/all-you-need-to-know-about-the-content-ideas-tab) to discover new topics and keywords, then [identify high-potential themes](/en/identify-opportunities/identifying-promising-topics-with-content-ideas) to prioritize what to write next.
#### 9) Create and optimize your first draft
[Create a new content](/en/create-optimize-and-publish/how-to-create-a-new-content-with-semji) and get familiar with [the Semji editor](/en/create-optimize-and-publish/semjis-draft-and-editor), then use [the Content Score](/en/create-optimize-and-publish/all-about-content-score) to guide your optimization before publishing.
### Tips for best results
Go through the steps in order the first time - each one builds on the last, from workspace setup to your first published draft. Once you're comfortable, come back to this page any time as a map of where everything lives.
> **Good to know ℹ️**: you don't have to complete every step alone. [Invite your teammates](/en/admin-and-settings/manage-semji-users) early so setup and content production can move in parallel.
### Go further
Once your first draft is published, head to [Track and analyze your performance](/en/analyze-performance/overview) to see the impact of your work, or explore [AI+ Agents](/en/ai-agents/overview) to start automating parts of this workflow.
**Useful links:**
* **[Help Center](/)**
* **[Developer documentation](/developers/overview)**
# Users & permissions
Source: https://help.semji.com/en/getting-started/users-and-permissions
Manage who has access to your workspace and what they can do.
* [Users & roles](/en/admin-and-settings/users-and-roles)
* [How do I switch on/off the AI+ Suite for a user?](/en/admin-and-settings/how-do-i-switch-on-off-the-ai-suite)
# All you need to know about the Content Ideas tab
Source: https://help.semji.com/en/identify-opportunities/all-you-need-to-know-about-the-content-ideas-tab
To find content ideas to create, develop your SEO market share and boost your performance!
### What is the purpose of the Content Ideas tab?
Semji's new Content Idea algorithm provides you with ready-to-use keywords and content ideas you can use right away. This will allow you to create content on high-value topics or to enhance your topic clusters.
From a theme or a generic keyword, the Content Ideas module allows you to **easily identify additional keywords** that are of strategic interest for your SEO performance. These are **keywords to target through the production of new content**.
Using Semji technology, which identifies search intents, deduplicates and clusters them, and calculates potential SEO gains, this module **improves the keyword research phase**, a key step in your SEO strategy. Traditionally done with tools like Semrush or Ahrefs, keyword research can be time consuming and imprecise:
* some keywords are complicated to interpret from the point of view of the intention they aim at and the type of content to associate with them ;
* some keywords are redundant and it is necessary to take the time to exclude them;
* some keywords already position an existing content, and it is then necessary to cross several data exports to identify them.
Based on these observations, Semji has developed the Content Ideas feature **to save time and facilitate decision making** during this strategic stage.
To **judge the strategic interest of each proposed keyword** and make your selection, Semji provides you with several data:
* the keyword's search volume : Semji no longer offers Content Ideas with estimated traffic and zero volume. The goal is to provide ever more relevant Content Ideas with valuable search volumes;
* the search trend for this keyword over the last 12 months;
* the difficulty of the keyword (Low, Medium, High, Very high)
Semji helps you **project the market share to be gained** and **easily understand what type of content you need to produce** to target each keyword. You get the link to the best competing content that is positioned on that keyword, as well as the estimated organic traffic of that content.
Finally, as soon as you have selected several interesting keywords, add them to the [Planning](/en/plan-your-content/all-you-need-to-know-about-the-planning-tab), in order to **plan and organize their production** as soon as possible.
Note that if you already have a page on your website that is positioned on one of the keywords, Semji displays its position and even allows you to access it if it has been automatically imported into Pages. You can then decide to optimize this existing page instead of creating new content.
In short, the Content Ideas module allows you to find strategic keywords on which to create or optimize content, and to **build your topic clusters**, which will allow you to develop your business!
> *Note:* *You may notice a longer or shorter loading time on the Content Ideas feature, this is caused by double scrapping to extract data from Google pages to provide you with more relevant content ideas and avoid duplicates.*
### How do I use the Content Ideas tab in my SEO strategy?
Start by **entering a generic keyword**, short tail, representative of your strategic theme or a new theme you want to develop. For example, the keyword "spirulina". Launch the search.
Once Semji has completed its analysis, you will see a list of competing content, associated with keywords and their data (volume, trend, difficulty...).
Navigate easily within the list of proposed keywords thanks to the filters:
* Identify the keywords that invite you to **create "Article" type content**, responding to an informational intent, or "**Shopping" type content**, responding to a transactional intent;
* Filter the **"Questions" type keywords** that allow you to easily build the plan of a content providing an answer;
* Distinguish "**broadmatch keywords**" (including your initial keyword) from "**related keywords**";
* And finally, if you wish, exclude **branded keywords** (linked to the brand of your root domain, for example "semji" for the site [https://semji.com](https://semji.com)), thanks to the "Not branded" button.
\
The different metrics:
In the content idea table, hover over the keyword data to learn more:
* A new measure allows you to identify the relevancy of the suggested keyword compared to the searched topic, i.e. the Proximity rate.\
The closer you get to 100%, the more relevant and consistent the content idea is with the initial search. On the other hand, the further away from 100%, the less relevant the ideas will be from the initial search.
\
The Proximity rate provides the best results for the intent. By providing you with more relevant data faster, you'll save time in identifying the right keywords.
* Within the table listing the content ideas, move your mouse over the data associated with a keyword to find out more: for example, discover the exact score associated with the difficulty of a keyword
* In the "My position" column, as soon as a value is displayed, move the mouse over it to discover which content is positioned on the keyword. For example, in the case of Semji's website, on the keyword "seo" on the French market:
The url of the site semji.com which is positioned at the 20th position in the Google SERP on the keyword "seo" is [https://semji.com/fr/guide/seo/](https://semji.com/fr/guide/seo/).
Moreover, we can see here that in reality, 2 different contents of the site semji.com are positioned on the keyword "seo": it's the pictogram next to the keyword that indicates it.
This mention means that the platform has identified that 2 of the contents imported in the Pages are positioned on this keyword. The url [https://semji.com/fr/guide/seo/](https://semji.com/fr/guide/seo/) is the one that is positioned the highest, the one that has been judged the most relevant by Google.
> **Good to know**: Semji identifies these two contents because, during the automatic import of Pages when creating your workspace, the platform analyzes the data of your best contents in the Search Console. The keywords that position your performing content are retrieved. If the Content Ideas tab suggests keywords that position one of these already imported contents, you will see the information appear thanks to this pictogram.
>
> By clicking on the pictogram, you can directly access a filtered list in the Pages tab, and check for example that these contents do not cannibalize each other. If this is the case and they are not different enough in their angle and targeted keywords, rework them to allow Google and users to better distinguish them.
>
> Do you notice a difference between the position of content displayed in Content Ideas, and the position displayed in Pages? This is because the position in Content Ideas is a position at the moment of analysis, of the Google search launched. On the other hand, in Pages, it is the average position of your content over 30 days, taken by your Search Console.
>
>
**Note**: if there is no pictogram associated with the keyword, but there is a value in the column "My position", it is simply that another page of your website, not imported into the Pages, is positioned. It's up to you to choose if you should import it and optimize it or not.
Are you interested in several keywords? Click on the "+" button to add them to your Planning. Semji will then suggest you to create a new content or to update an existing one.
By selecting create new content, you can then fill in a title tag for your content, assign the Draft to a writer within your team, set a due date and a content status.
When selecting the update of an existing content, you will need to enter the url of the corresponding content. This way Semji will be able to extract the existing editorial content and add it to your editor when generating the Draft.
#### Use Content Ideas to create a topic cluster and improve your performance on your priority topics
At Semji, we recommend to many of our clients to apply the **topic cluster strategy** to achieve their SEO gains on a specific theme.
This strategy consists in creating several contents - often informational contents - that link to one or several pillar pages - generally transactional contents: the informational contents link internally to the transactional pages. In doing so, they give them semantic authority and create user journeys that guide the user to the pages that allow them to convert.
Informational content targets long-tail keywords, i.e. not very competitive, while transactional pages often target short-tail keywords, which are more competitive because they carry business stakes.
For example, "makita coffee maker" is a short-tail keyword, searched 7,000 times per month, and has a transactional aspect. Semji classifies it in the "Shopping" category. The content to be produced to target this keyword must be, for example, a category page of a merchant site, listing products. We can confirm this by opening the page of the screwfix.com website which is positioned first on Google and generates an average of 5,000 monthly visitors on its page.
On the other hand, "camping coffee maker" is a long tail keyword, searched 880 times a month, which carries an informational intent. Semji classifies it in the "Article" category. The content to be produced to target this keyword should be, for example, a comparative guide.
As part of the construction of a topic cluster, your transactional page (for example, the page presenting makita coffee makers) must receive internal links from many informational contents (for example, articles on the best camping coffee makers, on how to use coffee makers, on how to disassemble them...).
Use Content Ideas to **identify many informational keywords** to produce new content on, allowing you to boost the SEO of your transactional pages. Make your selection, and add them to the Planning by choosing to create new content.
#### Use Content Ideas to find new business areas and boost your conversions or revenue
Also use the content ideas, this time filtering on "Shopping" type keywords, to identify interesting transactional pages to create. So, if your merchant site doesn't have a "delonghi coffee maker" (2,000 monthly requests) or "glass coffee maker" page yet, it's time to think about creating them!
This way, you create more opportunities to your products or services, from queries searched by Internet users. This content provides additional opportunities to boost your conversions, transactions, and revenue!
#### Use content ideas to optimize the visibility of your brand content
Search on your brand name from the Content Ideas tab. You'll get a list of queries that contain your brand. You can thus quickly check which content of your site is positioned, what is their position at the moment and especially identify the possible keywords on which none of your content is positioned.
For example, on the brand "semji" in France, several keywords are proposed. We see that none of the content on the website semji.com is positioned on the keyword "semji avis" (which means "reviews"). A "quick-win" strategy can therefore consist in optimizing the page of the site collecting customer testimonials on this term. Another option is to create a new page dedicated to this keyword. In this way, we ensure that **we control the maximum number of requests that concern our brand** by positioning at least one of our own results.
**Good to know**: your website is necessarily more legitimate than any other in the eyes of Google to be positioned on your brand name and its associated queries. You have a good chance of reaching the first place, so don't deprive yourself of it!
#### Use content ideas to analyze your visibility on a global theme
Run a search on **a theme on which you think you've already done a good job** in your site's content.
Find out **which keywords are not ranking** for any of your content and decide if you need to create new content to target them.
Also **check the Google position of your existing content** at the moment of the search and plan to optimize those whose position can be improved. By adding them to the Planning and running an analysis, you can for example discover new internal link opportunities not yet exploited, thanks to Semji's [Incoming Links](/en/create-optimize-and-publish/incoming-links-recommendations) recommendations. Reinforcing the linking of your existing content is a "quick-win" process that can have an impact on your positions and your SEO traffic!
**Good to know**: some of your contents are already in first position on Google on their main keyword? Congratulations! Nevertheless, the tentation is strong to rest on it and do nothing. Think big, be ambitious: if your content is already relevant in the eyes of Google, you have all the more chances to rank first on other keywords of the theme, especially on related keywords and long tail. To do this, create new content on the keywords not yet targeted, or optimize the last existing content that are not yet positioned in top 1.
#### When should you choose to create new content rather than optimize existing content?
You have noticed that one of your existing contents is positioned in the top 100 on an interesting keyword? Depending on the current position of this content on the keyword, it may be a question of optimizing it, or of creating a new content separately.
This decision should be motivated by one main consideration: **does the content rank in the top 30** (between 1st and 30th position in Google results) **or beyond?**
We usually recommend to our clients to **create new content if the position of an existing content on a keyword exceeds 30**. This usually means that the existing content is not considered relevant enough by Google for the keyword.
Optimizing content that is already positioned in the top 30 does not necessarily require much effort, because the content is already well oriented on the target keyword.
On the other hand, in the case of content that is positioned beyond 30, optimizing it to make it relevant would take almost the same time as creating new content. We therefore advise you to choose the second option and instead direct your existing content towards a focus keyword on which it is already better positioned.
**Good to know**: check that the value of the column "My Position" taken at a given time is close to the average position observed over the last 30 days. To do this, click on the pictogram next to the keyword to open the Pages tab and view the average position, extracted from your Search Console.
If the pictogram is not present, it means that the content has not been imported into the Pages and that it is not part of the priority content according to the Semji platform. You can then perform one of the following actions:
* import the url into the Pages using the "Import" button in the top right corner, setting the studied keyword as focus keyword.
* analyze the average position of the url on the keyword directly from your Search Console.
Nevertheless, there are some limits to the rule of the top 30 recommended above. Here is an example:
The website semji.com has a page dedicated especially to target the keyword "agence seo paris". This content currently ranks 52nd in Google results on the keyword. Although this position is above 30, it is not relevant to create a new page to target the same keyword. Instead, we should optimize the existing page, and plan to reinforce its semantic authority by creating a topic cluster on keywords integrating the Parisian geolocation.
### How does the Content Ideas tab work?
When you launch a search from an initial keyword, the Semji platform performs the following operations:
1. **Mass data retrieval**: we analyze the Google SERPs on several hundred keywords belonging to the theme. Through this scraping stage, we analyze the content positioned on the first 100 Google results. This is when we identify if any of your website's content is ranking well.
2. **Exclusion of duplicates**: we deduplicate the keywords in order to keep only unique search intents and avoid creating cannibalistic content from an SEO point of view. This operation has a real added value compared to your classic keyword research: we found an average of 50% of duplicate keywords to be removed!
3. **Categorization**: thanks to a proprietary algorithm based on artificial intelligence, each keyword that gives you an idea of content is classified as "Article", "Shopping" or "Miscellaneous". This category corresponds to the search intent and the type of content you need to create to target it. Thus, an "Article" keyword corresponds to an informational intent and requires the creation of an article type content, blog, advice ... with a high proportion of editorial text.
4\. **Display of the table** and additional data (search volume, trend, keyword difficulty...), ordered by default by estimated traffic volume of competing content.
> Good to know 💡: By indicating the type of content you need to produce to match Google's expectations, you have a better chance of ranking in the top 10 of the SERP.
# Change the type of your pages 📄
Source: https://help.semji.com/en/identify-opportunities/change-the-type-of-your-pages
The page type is important information that helps categorize your content in Semji.
### **How to Change a Page Type**
To manually change the type of a page:
1. Go to the "Pages" tab.
2. Select the page(s) you want to modify.
3. Click on "Update" to display the available page types.
4. Select the new desired type for your pages.
> ***Good to know 💡:** Manually modifying the page type allows you to have a more precise categorization of your content, especially if the algorithm hasn't correctly identified the type of certain pages.*
>
> *See our article on [page types](/en/identify-opportunities/what-types-of-pages-are-available-and-how-to-use-them) for more information!*
# Content gaps & prioritization
Source: https://help.semji.com/en/identify-opportunities/content-gaps-and-prioritization
Spot cannibalization issues and prioritize which topics and pages to tackle first.
* [Semji cannibalization warning](/en/identify-opportunities/semji-cannibalization-warning)
* [Identifying promising topics with Content Ideas](/en/identify-opportunities/identifying-promising-topics-with-content-ideas)
# Everything you need to know about the Pages tab
Source: https://help.semji.com/en/identify-opportunities/everything-you-need-to-know-about-the-pages-tab
Semji allows you to easily identify which pages should be prioritized and optimized based on your existing content.
### What is the Pages tab for?
Semji's Pages tab allows you to easily prioritize existing content for optimization.
After logging into Google Search Console, Semji will fetch the content on your website that has generated clicks in the last 28 days and add it to the Pages tab
To help you prioritize your content, Semji will identify content with high click-through potential.
The number of red dots shows the priority level of this content, the more red dots, the more potential Semji has identified.
> *Note 💡: Content with low Click Potential does not mean that it should not be optimized. If it represents a business opportunity for you, you should optimize it.*
### What does the Pages tab contain?
The tab features different key indicators for your content.
**Monthly Clicks:** This shows the number of clicks within 30 days on your content for all keywords combined.
**Focus Keyword:** This is the Focus Keyword of your content on which you generate the most traffic. By clicking on the arrow, you can change the keyword. Semji suggests keywords with key indicators such as monthly clicks, your position on Google's results page and the keyword's search volume.
**Volume:** This represents the search volume of the main keyword.
**Clicks Potential:** This is a ratio of time spent optimizing the content and the results you will get. The more red dots there are, the more potential there is to optimize it. It allows you to quickly identify and prioritize content.
**[Content Score](/en/create-optimize-and-publish/all-about-content-score):** Semji analyzes your content and assigns a pre-optimization score based on different optimization suggestions. This score helps you identify how many changes need to be made to your existing content.
**Planning:** With the + sign you can easily add content to your calendar, assign it and add a deadline.
On the left side of your screen, you can sort contents by Opportunities:
* Clicks
* Conversions, based on the different objectives defined in your Google Analytics connector, Matomo, Piano Analytics, Adobe Analytics or Piwik Pro.
* Transactions
* Revenues\\
> *Note 💡: By default, Semji focuses on Click Opportunities as the main objective. The "All pages" view allows you to have a global view on all the existing content imported in Semji.*
###
How to use the filters on the Pages tab?
To make it easier to search for new content, Semji provides you with different filters to find content based on your objectives.
> *Good to know 💡: You can now filter your content using HTTP codes!*
>
> *This allows you to view your 301 pages after a redesign, and also to correct your 404 pages.*
###
How to import content into the Pages tab?
The 'Import' button gives you two options:
* Browse the best pages: Semji will browse your website and import the pages with the highest potential.
* Import URLs: Semji only imports pages that have received at least one impression. If you want to work on other pages of your website, simply enter the URLs you want to import. You can import several URLs at once.
For more detailed information on how to optimize the import of your content, please consult our complete guide, available [here](/en/identify-opportunities/how-to-import-a-url-in-semji).
Now you can use the Pages tab. You can easily identify existing content with high potential and start optimizing it!
To learn more, check out our post on [Everything you need to know about the Planning tab.](/en/plan-your-content/all-you-need-to-know-about-the-planning-tab) .
# Find content to optimize
Source: https://help.semji.com/en/identify-opportunities/exploring-your-pages-in-semji
Import, classify, and analyze your site's pages by type, traffic, and optimization potential.
* [Everything you need to know about the Pages tab](/en/identify-opportunities/everything-you-need-to-know-about-the-pages-tab)
* [How to import a url in Semji?](/en/identify-opportunities/how-to-import-a-url-in-semji)
* [What types of pages are available and how to use them?](/en/identify-opportunities/what-types-of-pages-are-available-and-how-to-use-them)
* [The different types of traffic on Semji 📈](/en/identify-opportunities/the-different-types-of-traffic-on-semji)
* [Change the type of your pages 📄](/en/identify-opportunities/change-the-type-of-your-pages)
# How to import a url in Semji?
Source: https://help.semji.com/en/identify-opportunities/how-to-import-a-url-in-semji
A guide to import your existing content into the platform and optimize it.
### Why import a url ?
Importing a url is a necessary step in the optimization process of an existing content, an Updated Content. Indeed, Semji Platform saves you time and provides you with optimization recommendations **based on the analysis of your online content**. By entering the url of your content, you allow Semji Platform to :
* Access your data analysis tools such as [Google Analytics](/en/connect-your-tools/how-to-connect-my-google-analytics), [Search Console](/en/connect-your-tools/how-to-connect-my-google-search-console) or [AT Internet](/en/connect-your-tools/how-to-connect-my-piano-analytics-account), provided you have connected them beforehand,
* Retrieve all the useful text of your web page, the editorial part of your HTML code that deserves optimization, in order to display it in the editor
* Offer you several possible Focus Keywords
* Analyze the SERP, once your Focus Keyword is selected, and calculate your Content Score
For each content, Semji Platform collects a number of data, which our algorithms weight and sort in order to provide you with the most relevant recommendations.
It is therefore important to note that **when you import a url, you spend 1 analysis credit**.
**You have several choices:**
1. The content you want to optimize has already been imported by Semji in the Opportunities
2. The content you want to optimize is not an opportunity
3. You need help or advice on which content to optimize.
Let's review these three option.
### 1. Your content is an opportunity already detected and imported by Semji
When creating your workspace, Semji automatically imports several hundred pieces of content into the Pages > Opportunities tab. These are contents with a high chance of improving their SEO performance by following Semji's recommendations.
The platform displays a **Priority Score** that allows you to visualize the ratio editorial effort / gain for each of the imported contents.
Select the KPI that represents the highest stake for your business objectives: more clicks, more [conversions](/en/analyze-performance/how-to-track-custom-conversion-goals-with-semji), more transactions or revenue.
This way, you can see at a glance the **priority content with the highest potential**. If you already have in mind the content you want to optimize, search for it within this list, thanks to the search engine (type one of the keywords of its title).
### 2. The content you want to optimze is not an opportunity
If you have identified the url of the content you want to optimize with Semji, go to the "Online Content" tab and click on the "Import" button at the top right of your screen.
[](https://downloads.intercomcdn.com/i/o/235251335/52818c8e07cd75efb70e51d9/online-content-import.png?expires=1619679600\&signature=65531ef4211da746090dbafbc398834301f973e1009f6f5f7c1d361974b87c6f)
Choose the "Import URLs" option, then click the "Next" button at the bottom right.
In the field that appears, you can enter the url(s) you want to import for optimization. **To do this, use the keyboard shortcuts Ctrl + C (copy) then Ctrl + V (paste).**
Note that you can copy and paste each url, or c**opy and paste in one operation a selection of several urls** that you would have previously listed in an Excel spreadsheet or a notepad for example.
Once you have entered your selection of url, click again on "Next" at the bottom right.
The last step before importing your Updated Content into Semji is to **select the Focus Keyword**, the strategic keyword for the optimization of your content. Choosing your Focus Keyword is not a step to be taken lightly: we have designed a complete tutorial to [help you select it for your Updated Content](/en/create-optimize-and-publish/how-to-chose-the-right-focus-keyword-for-an-updated-content). If you need more advice on this subject, do not hesitate to contact your Customer Success Manager.
### 3. You need advice to choose the contents to be optimized: Semji assists you in the prioritization
The other option when importing existing urls is to let the Semji platform recommend pages to optimize, thanks to a prioritization score. To do this, you have to work hand in hand with the AI of the platform: first select a list of urls a little smaller to avoid the complete analysis of your site, and then let Semji apply its algorithm to get the result: prioritized urls by earning potential!
In the Pages tab, click on the "Import" button in the upper right corner. Choose the "Browse Top Pages" option.
Click on Next at the bottom right of your screen.
Semji then offers you a selection of the best pages on your site: **those that already generate traffic and have the potential to improve** their performance through optimization.
To do this, the platform accesses your Search Console data. Here are some details to understand the selection:
* These are your best urls, the ones that have generated **the most clicks from the SERP during the last 30 days**
* The clicks displayed are filtered: they are the **clicks generated from the SERPs of the country** on which your Semji workspace is set up (example: FR or EN)
* The proposed urls are sorted in descending order of clicks
[](https://downloads.intercomcdn.com/i/o/235252353/6ee0ba45a0421fef2e1f34e2/order-clics-browse.png?expires=1619679600\&signature=bfd5303c1ef64e4c7afec9583e50cc6e0b53b618999f29068eea8b960f38ab68)
Note: The list is up to 1000 urls. If you choose to import a large part of them at once, Semji will provide you with an updated list one week later, to allow for a next massive import. So if necessary, Semji will suggest 1000 urls again, making sure to exclude the urls already imported and checking that the suggested urls generate clicks.
#### Add filters to refine the proposed content
IMPORTANT : The "Add filter" button above the selection allows you to filter your list using different indicators.
* The **Keywords** filter : select url for which the Focus Keyword contains or excludes some words.
* The **Position** filter: select urls whose position on the Focus Keyword defined by default corresponds to an exact value (e.g. 2nd position in the SERP) or to a range of values (between positions 3 and 10 in the SERP), is less than or greater than a given value (greater than 5 in the SERP)...
* The **Search Volume** filter : indicate here minimum, maximum or exact values to filter your url according to the search volume of the Focus Keyword defined by default
* The **Title** filter : select urls that include certain keywords in their title tag or on the contrary exclude it
* The **Traffic** filter : select url's according to the traffic they already make, and define exact, minimum or maximum values, value ranges...
* The **Url** filter : select several urls that contain certain keywords in their slug or on the contrary exclude them
You can **combine these different filters** to create your shortlists and easily select urls to optimize.
Example : you can choose to import :
* that work with a keyword containing "shoe".
* with a research volume of more than 300
* and which position this keyword between 4 and 10 in the SERP
This selection reflects your strategic interest in improving the positioning of your content on keywords of the theme "shoes" with high earning potential: with a high search volume, the keyword has the potential to generate a lot of traffic for your content, if it manages to get into the top 3 where the majority of clicks of a SERP are gathered. By selecting content that is close to the top 3 (between 4 and 10), you increase your chances of improving your traffic on the theme "shoes" through optimization.
Note: position and traffic (clicks) data comes from your Search Console and search volume data comes from Adwords.
Do not hesitate to discuss your [SEO objectives](/en/analyze-performance/how-to-set-the-objectives-of-your-seo-content-strategy) with your CSM, in order to best combine these selection filters.
Once the filters have been applied, **choose from the list of results** several urls that you want to import to optimize their content and on which Semji will apply the prioritization score.
Click again on "Next" at the bottom right.
The next step is to **select the final Keyword Focus** for each imported content. This is the last step before any analysis credit is consumed. By default, Semji suggests a Focus Keyword on which you can improve your position and your traffic. But for strategic reasons, you can choose to modify it.
[](https://downloads.intercomcdn.com/i/o/235252671/62d3052b30f1420a305e3c34/select-fk-top-pages.png?expires=1619679600\&signature=b82de83adde3206181d65210d73a346b775f600a13b985d9e7772df55543be3b)
As a reminder, if you want more details on [how to choose the Focus Keyword of an Updated Content](/en/identify-opportunities/how-to-optimize-an-existing-content-updated-content), please read our dedicated article or ask your Customer Success Manager for advice.
Once the Focus Keyword has been assigned to each content, confirm the launch of the corresponding analyses using the button at the bottom right:
#### Imported content are displayed in the Page tab.
Once the analysis is completed, Semji assigns the prioritization score to all your urls and displays them in a **decreasing order of priority**. A visual gauge system allows you to differentiate the priority urls from those that are less important:
Start by optimizing the priority urls (those for which the gauge is fullest): these are the ones that guarantee you **the best effort/performance ratio**!
### Start optimizing imported content with Semji
To start optimizing content that you have recently imported into Pages, you need to turn it into a Draft. Then, you just have to follow the recommendations of the platform in the right sidebar to improve your Content Score and the performance of your content!
Start importing your urls into Semji now!
# How to optimize an existing content (Updated Content)?
Source: https://help.semji.com/en/identify-opportunities/how-to-optimize-an-existing-content-updated-content
Master the optimization of existing contents with Semji.
### Why optimize existing content?
According to an [Ahrefs study](https://ahrefs.com/blog/search-traffic-study/), updated in 2020, **91% of the pages produced on the web do not generate traffic.** This is an alarming fact! Imagine that 90% of the writing efforts you and your team employ fall into limbo and that your content is forgotten almost as soon as it is published...
The reasons for this, in short:
* The lack of backlinks, which as we have seen when discussing the [performance criteria of a content](/en/create-optimize-and-publish/what-are-the-criteria-that-have-an-impact-on-content-performance), are part of the MUST HAVE to bring authority to a page,
* But also the very "short term" nature of the subject matter, which does not allow the content to generate traffic or interest in a durable manner
* And finally, the fact that a lot of content is not focused on meeting a [real user intent](/en/create-optimize-and-publish/understanding-google-and-user-search-intent).
You have probably noticed that among these 3 criteria, two are closely linked to content production!
Thus, to quickly increase your traffic and your SEO performance, a ROI strategy consists in **optimizing the existing content** of your site. These already published contents can undoubtedly be reworked to include more strategic keywords, to better identify and target users' search intentions, and to better respond to them. All this, for a minimum of effort, because some of the content is already produced.
If you have spent 2 hours optimizing a content with Semji, and a few weeks later, it sees its traffic soar, the effort is under control and the gain is high: 2 hours well spent. It is therefore very "profitable" to take time to boost the performance of existing content that has potential.
In short, optimizing content allows you to **capitalize on your existing writing efforts to maximize your earnings.** Reverse the trend with optimization, and aim for 90% of performing content!
### How to optimize an existing content?
In Semji Platform, existing content that you optimize is found in the Opportunities section of the Pages tab. Once you have optimized and published them, you will see them appear in the **Updated Content** section of the Reports tab, as opposed to New Content (new content created from a blank page).
If you've understood the importance of optimizing existing content, you'll need to take action. Here are the steps to follow to optimize existing content from start to finish:
#### Step 1 : Select the opportunity or import the content url into Semji and choose the Focus Keyword
The first step is to know what content you are going to optimize to boost its performance. You can:
* **Select priority contents from the url list that Semji has already imported for you** (from 250 to 1000 urls with a Custom plan).To do so, sort these imported contents according to the **KPI that best contributes to your business objectives**: more clicks, conversions, transactions or more sales. Then check the priority score set by Semji, and choose contents with a high priority. These are contents with the best ratio editorial effort / gain.
* **Import urls** if your can't find your priority contents in Semji's import. Check our article about [How to import a URL?](/en/identify-opportunities/how-to-import-a-url-in-semji).
#### Step 2: Transform the imported content into a draft
Once you have imported the content you want to optimize, you need to edit it. This means turning it into a Draft. **To do so, two options :**
**1) Pages tab > Opportunities > click on your content's title**
The contents of the page will appear on the screen. Make sure that all the relevant text you want to edit is displayed. If you encounter a problem with the display, for example if the text is only partially retrieved, contact your Customer Success Manager by email or via the Support service (online chat).
To edit your content, click on the pen icon at the top middle of your screen.
Click on the "Start Optimizing" button to get into the editor.
The draft editing interface gives you access to several features:
* the assignment of the draft to a person of your team
* the addition of a Due Date
* the status of the content in your workflow (To do, Doing, Done…)
* access to the HTML code
* and of course the possibility to click on the "Mark as Published" button at the bottom of the page (to be kept as a last step, once the content is written, integrated in your CMS and published online)
The draft that has just been created can be **accessed directly from the Planning tab** if you want to find it later and continue editing it.
#### Step 3: Assign content to a writer and plan its optimization
Once you have transformed your content into a Draft, make sure you **assign it to the person responsible for its optimization**: yourself or someone from your team. To do so, from the content Draft or directly from the Planning tab, click on the Assignment icon :
The different members of your team appear in a drop-down menu. All you have to do is choose the person responsible for content optimization.
*Note*: if some members of your organization have an "External" status, they will only be able to edit content that have been assigned to them. Contents will then be visible in the "My Open Drafts" section. Without this assignment, these users will not see the list of imported content and will not be able to edit it.
It is also a good practice to **enter the Due Date associated with the Draft**, so that you can see at a glance in your schedule the content that is late or on time, and thus better control your production.
Once the content has been assigned and scheduled, and thanks to the macro view provided by "Open Drafts", the team supervisor can check all the content being optimized for each member of his or her team, check that each piece of content has a responsible person and that the production deadlines are being met.
Each member of your team can view the content assigned to them in "My Open Drafts".
#### Step 4: Follow the optimization recommendations to increase the Content Score
The draft is created and you can start optimizing the imported content.
In the editor interface, the Semji platform provides you with a set of [concrete recommendations](/en/create-optimize-and-publish/optimize-for-seo), based on the analysis launched at the time of import, after the choice of the Focus Keyword.
Apply these recommendations to see the Content Score of your content evolve in real time:
* [Title](/en/create-optimize-and-publish/understanding-title-recommandations)
* [Length](/en/create-optimize-and-publish/length-recommendations)
* [Search Intents](/en/create-optimize-and-publish/search-intents-recommendations)
* [Questions](/en/create-optimize-and-publish/questions)
* [Related Terms](/en/create-optimize-and-publish/related-terms-recommendations)
* [Incoming links](/en/create-optimize-and-publish/incoming-links-recommendations)
* [Outgoing links](/en/create-optimize-and-publish/outgoing-links-recommendations)
Note that these last two recommendations can only be validated and make the Content Score evolve after the content publication phase and the integration of internal links in your CMS (see step 6 below).
See also our article "[What is a well optimized content for SEO](/en/create-optimize-and-publish/what-is-a-well-optimized-content-for-seo)?" to guarantee your content a maximum performance.
#### **Step 5 : Approve content for publication (following your production workflow)**
After applying all the platform's recommendations to achieve a Content Score as close to 100 as possible, make sure you **continue your production workflow**: should your content be reviewed by another department? by a supervisor? Should it be published directly?
By entering a new status for your content, you are indicating that you have completed the optimization and are ready to move on to the next step.
Note: you can [customize the statuses of a draft](/en/plan-your-content/to-do-doing-published...-how-to-customize-drafts-status-in-my-production-workflow), in order to fit your internal production process. For example, if you include a review phase by your legal department before publishing the content, a new status can be created to indicate this step. The writer who has finished optimizing a piece of content simply selects this status "Legal Review" and you will know at a glance where your content stands in your overall process.
#### Step 6: Integrate the content and its internal links into your CMS
When you are sure that your content is complete, the next step is to **integrate it into your CMS**. **You can either copy and paste the whole text you have written** in the Semji editor - Hn title tags are normally kept and applied automatically in your CMS editor - or **switch to HTML preview** and copy the source code of the produced text.
To do so, use the button at the top right of the editor interface:
Be sure to **include links** to other pages on your site, which will allow you to apply Semji's "[Outgoing Links](/en/create-optimize-and-publish/outgoing-links-recommendations)" recommendation. But also consider the "[Incoming Links](/en/create-optimize-and-publish/incoming-links-recommendations)" recommendation: **add links to the content you publish on other existing pages of your site**.
Thus, integrating optimized content with Semji usually means editing several other contents when integrating in your CMS.
#### Step 7: Mark content "as Published" in Semji
Once the content is published in your CMS, go back to the corresponding Semji Draft. Then click on the "Mark as Published" button at the bottom of the content.
A window containing the url of your existing content asks you to confirm the publication of the content online.
This step is very important to allow you to track the performance of your content with Semji: by clicking on "Mark as Published" **on the day of the publication of your optimizations**, you allow the platform to **show the Before and After optimization** in the performance tracking (Reports tab). You can then calculate the real gain obtained thanks to your efforts: the ROI of your content optimization!
#### Step 8: Get your final Content Score
The very last step in optimizing an existing content is to obtain your final Content Score. This is made possible thanks to the integration of the internal links you have made from your CMS (the addition of inbound and outbound links to your content).
Since you have clicked on "Mark as Published", your content is now accessible from the "Published" section of your Planning tab.
Click on the content you just published to view it. At the top right of your Publisher window, a button allows you to restart the synchronization: Semji compares the created draft with the online content version.
During this comparison, **the platform can see that the Incoming Links and Outgoing Links have been integrated** according to its recommendations. The Content Score then evolves to become your final Content Score. It takes into account all the optimizations made on your content.
Congratulations, you have fully optimized your first content with Semji!
# Find new topics
Source: https://help.semji.com/en/identify-opportunities/identify-opportunities
Spot content to optimize, discover new topics, and identify high-potential keywords for your strategy.
* [All you need to know about the Content Ideas tab](/en/identify-opportunities/all-you-need-to-know-about-the-content-ideas-tab)
* [Identifying promising topics with Content Ideas](/en/identify-opportunities/identifying-promising-topics-with-content-ideas)
* [Semji cannibalization warning](/en/identify-opportunities/semji-cannibalization-warning)
* [How to optimize an existing content (Updated Content)?](/en/identify-opportunities/how-to-optimize-an-existing-content-updated-content)
# Identifying promising topics with Content Ideas
Source: https://help.semji.com/en/identify-opportunities/identifying-promising-topics-with-content-ideas
This new feature makes it easy to group content ideas together, so you can better organize your content production and easily create semantic clusters!
### The benefits of easily identifying promising topics
> *Note: You may notice that the Content Ideas feature takes slightly longer to load. This is due to the content being retrieved from the Google page, which is then used to recommend more relevant content ideas and avoid duplicates.*
The Content Ideas feature allows you to identify new topics as well as those that have not yet been explored.
To provide you with ever more relevant content ideas, Semji has introduced a brand-new algorithm that generates content ideas by semantic clustering, making different topics based on your main keyword visible.
Understanding the topic system in Content Ideas
In the sidebar on the left, you'll find a list of topics featuring the related content ideas. The display is limited to 10 topics, giving you an overview of the most important ones.
In each folder, you'll easily find the number of content ideas identified.
> *Note: The same content idea cannot appear in more than one topic.*
By using artificial intelligence, keywords that are very close to each other are assigned to the same topic.
For example, keywords including: bus, bike, train, will be included in the same "Transport" topic.
This method allows you to arrange your ideas in a relevant and efficient way, saving you time in creating your semantic cluster.
> *Note: The proximity rate column reflects the* [semantic similarity](/en/identify-opportunities/all-you-need-to-know-about-the-content-ideas-tab) *between the search keyword and the content ideas.*
Clicking on a topic opens a filtered view of the selected topic.
This view enables you to identify if you are ranking on this topic or not, based on the Position filter.
You can also filter these ideas with the "Article" filter, which helps you identify "editorial" type articles, and the "Shopping" filter for transaction-oriented articles.
The Mind Map view:
Semji not only lets you visualize the different content ideas by topic, it also lets you visualize these ideas as a Mind Map.
This visual overview enables you to explore the different topics suggested by the Content Ideas tool to visualize important topics and create a semantic cluster.
If you're interested in a content proposal, you can easily add it to your planner using the + button.
By hovering over the different ideas, you can access information such as:
* Page title and type (article, shopping, misc),
* Page URL,
* Word count,
* Estimated monthly traffic,
* Page ranking on the related main keyword.
> *Note: If you have old content idea searches and the topics are not visible, don't hesitate to re-run a content idea search to get all the different topics related to your query.*
>
> *An information bubble will show you whether this content idea was generated under the old algorithm.*
>
> *To get up-to-date data on a keyword, you can run a new search to leverage the tool's latest algorithm.*
>
> **
You can now quickly identify promising topics and easily create semantic clusters.
# Identify opportunities
Source: https://help.semji.com/en/identify-opportunities/overview
Spot existing content to optimize and find new topic or keyword ideas.
Discover new topics and high-potential keyword ideas to grow your content strategy.
Import, classify, and analyze your site's pages by type, traffic, and optimization potential.
Spot cannibalization issues and prioritize which topics and pages to tackle first.
# Semji cannibalization warning
Source: https://help.semji.com/en/identify-opportunities/semji-cannibalization-warning
Semji allows you to easily find out if you have already written one or several pieces of content for your main keyword.
### Why create cannibalization warnings?
Content cannibalization can have a major impact on your SEO strategy.
Indeed, if you write several times on the same keyword, Google may not know which page to position and will either position the least strategic one for you, or will not position any of them.
With Semji, you can easily check if you have already written content for this main keyword with the help of a cannibalization warning. This warns you if one or more pages have already been written for a keyword. This will help you save time.
This warning helps you keep track of the different content you write so you don't create new drafts on the same keyword.
You'll avoid wasting time writing several articles that target the same search intentions.
By using a filter, you can find the pages affected by cannibalization.
> Good to know: The alert displayed in the [Planning](/en/plan-your-content/all-you-need-to-know-about-the-planning-tab) or [Pages tab](/en/identify-opportunities/everything-you-need-to-know-about-the-pages-tab) does not prevent you from creating new content or optimizing it if the keyword is identical. It's only an alert, but it should still catch your attention.
This warning is also visible when you create a new draft with a main keyword already identified in a piece of content on the platform (when importing a URL for example). But the warning will also appear when changing a keyword.
### How does a cannibalization warning work in Semji?
To help you easily identify keywords that are already included in a page or draft, Semji displays a warning to the left of the main keyword in the Pages and Schedule tab.
> *Good to know: You can quickly visualize all cannibalizations in the Pages or Planning tab by applying the “Cannibalization” filter. You'll be able to isolate all the pages on your site with the same keyword.*
>
> **
\
By clicking on the warning, you can know the cannibalization type, if it concerns one or more pages or drafts.\
To know more precisely which contents are affected, click on "X pages" or "X drafts" to get a filtered view on the main keyword.
You can now spot which keywords have already been processed thanks to the cannibalization warning.
# The different types of traffic on Semji 📈
Source: https://help.semji.com/en/identify-opportunities/the-different-types-of-traffic-on-semji
Semji permet d'analyser le trafic organique selon trois catégories distinctes pour une analyse plus précise de la performance SEO.
### The three traffic categories:
1. #### 1. Brand Traffic
Brand traffic refers to searches that include your brand name or its variations. This type of traffic is generally linked to brand awareness and overall marketing actions (social networks, advertising, public relations...).
**Examples for Best Buy:**
* "Best Buy"
* "Best Buy store"
* "Best Buy customer service"
#### 2. Non-Brand Traffic
Non-brand traffic comes from generic searches without mention of your brand. It's a key indicator of pure SEO performance as it reflects your ability to rank for competitive keywords.
**Examples for Best Buy:**
* "electronics deals"
* "best TV 2025"
* "laptop comparison"
#### 3. Other Brands Traffic
This new category helps identify traffic coming from searches that include brand names other than yours. For example, for an e-commerce site, this can include the names of brands of products being sold.
**Examples for Best Buy:**
* "Samsung Galaxy S25"
* "iPhone 15 Best"
* "Dyson V15 Best"
### Use in SEO analysis
* Non-brand traffic helps evaluate the effectiveness of your SEO strategy on generic queries.
* Brand traffic helps measure your brand awareness and the impact of overall marketing actions.
* Other brands' traffic helps identify opportunities related to third-party brands.
### Advantages of this classification
This three-part classification offers several benefits:
* A more detailed and accurate analysis of organic traffic
* A better understanding of traffic sources
* The ability to adapt your strategy according to the targeted type of traffic
> *Good to know 💡: The "Traffic Type" filter is available in [Content Ideas](/en/identify-opportunities/all-you-need-to-know-about-the-content-ideas-tab) and Intelligence Hub, allowing users to analyze their data according to three distinct traffic categories.*
# What types of pages are available and how to use them?
Source: https://help.semji.com/en/identify-opportunities/what-types-of-pages-are-available-and-how-to-use-them
This page type filtering feature helps you analyze and optimize your content effectively.
### **Where to find this feature ?**
This feature allows you to filter and analyze your pages based on their type (product page, article, etc.). It helps you gain a better understanding of your content’s performance and optimize your strategy.
You can find this filtering option in the following sections of the platform:
* **Competitors** in the editor (below)
* **Idées de contenu**
****
* **Search Intelligence**
****
Below, you will find a detailed explanation of each available filter type.
### **How does this new feature work ?**
Page types are automatically assigned to each page using an AI prompt that analyzes the page title, URL, and SERP snippet. This helps you better understand your content's performance based on its type.
This categorization is used to:
* Visualize content performance with greater accuracy.
* Adjust your content strategy based on the types of pages that need to be optimized or created.
### **List of Page Types and Definitions**
Here are the **10 page types** currently defined on the platform:
1. **Home page**
The homepage of a website.
2. **Article listing**
A page listing multiple articles or news items.
3. **E-commerce category**
A page listing multiple products of the same type, often within an e-commerce category.
4. **Article**
Blog post, practical guide, or in-depth topic article.
5. **Product page**
A page dedicated to presenting a product, often associated with an online purchase.
6. **Landing page**
A page showcasing services, offers, or allowing users to request a quote.
7. **News**
News article about a specific event.
8. **Tool**
A page containing an interactive tool, such as a calculator or simulator.
9. **Forum**
A page or message within a forum.
10. **Other**
A page that doesn’t fit any of the above categories, such as a login page or client area.
# Content workflow
Source: https://help.semji.com/en/plan-your-content/adapting-the-planning-to-your-production-workflow
Organize your production with folders, custom statuses, calendar sync, and bulk import.
* [Why and how to create folders in the Planning tab?](/en/plan-your-content/why-and-how-to-create-folders-in-the-planning-tab)
* [To do, Doing, Published... How to customize Drafts status in my production workflow?](/en/plan-your-content/to-do-doing-published...-how-to-customize-drafts-status-in-my-production-workflow)
* [How to synchronize your Semji Planning with your external calendar?](/en/plan-your-content/how-to-synchronize-your-semji-planning-with-your-external-calendar)
* [Bulk import in the planning: load your entire editorial backlog in seconds](/en/plan-your-content/bulk-import-in-the-planning)
# All you need to know about the Planning tab
Source: https://help.semji.com/en/plan-your-content/all-you-need-to-know-about-the-planning-tab
Plan, assign and produce content for your SEO strategy, leveraging all of Semji's collaborative features!
### What is the purpose of the Planning tab?
Semji's Planning tab helps you organize all your editorial production and write optimized content.
To do so, you can create two types of drafts: Updated Content and New Content. When you have launched a Focus Keywords analysis, the drafts appear in the list of contents in the Planning > Open drafts tab.
You assign these drafts, i.e. the writing mission, to the collaborators invited in the Semji Organization, and you define due dates for the completion of these missions.
> [Discover how to invite collaborators in Semji](/en/admin-and-settings/manage-semji-users)
Collaborators can assign different statuses to the content they are working on, to give you an idea of their progress in relation to your internal process: content in progress, awaiting review, approved...
You can build up an **editorial schedule for the short, medium and long term**, and easily monitor its progress. You can filter the list of contents to view the breakdown of contents among your editorial team, but you can also be alerted in case of late contents, or contents stuck at a stage of your process.
The Planning tab gathers all the operational production of your SEO content.
### Composition of the Planning tab
The Planning tab consists of the following elements:
#### A table listing the drafts, at the center of the screen
This table proposes to visualize in columns the different information related to the identification of a draft and its management in your editorial planning:
* content title
* status
* the keyword focus chosen for the analysis
* the search volume for this keyword
* the draft's Content Score
* the collaborator in charge
* the target date of the content
#### A left sidebar, with sub-tabs
More details about sub-tabs below.
#### A filter bar
This is a link that allows you to **add filter settings** to the Drafts table below.
#### A search feature
By clicking on the magnifying glass, you can **run a keyword search** on the Title tags and Focus Keywords of the listed Drafts.
#### A “Create Draft” button
With this button, you can access the **creation flow of one or more new drafts**, which will automatically be added to the list of drafts in the schedule.
### The Planning sub-tabs
#### Open Drafts: to view all content in production
The Open Drafts sub-tab is the one a user is on by default when he clicks on the Planning tab. It shows all drafts, whether they are New Content or Updated Content, whether they are assigned to him or not. However, only content that is in the process of being produced or for which optimization work has not yet begun is listed here.
#### My Open Drafts: to filter the content assigned to me
Want to know at a glance which drafts are specifically assigned to you?
Each contributor who is assigned drafts can **get a view of the contents he is in charge of** by going to the left side menu and clicking on "My Open Drafts".
#### Published: to find finished and published content
You may want to identify the collaborator who optimized a specific content to congratulate him on its performance? Or simply reopen a draft to rework it according to the evolutions of Google and your competitors?
Content that has been completed and for which you have clicked on "**Mark as Published**" can be found in this tab. You can find all the content that has been drafted in the past but on which work is no longer in progress.
### The Folder tree
Organize your drafts in folders to better organize your production. Like a tree structure in your email program or in Windows file explorer for example, you can create first level folders (parent) and second level folders (child).
The parent folders only display the content that you have specifically stored in them, and not the content stored in the child folders.
> *Note: The folder view is also filtered by user status.*
>
> *Owners see all folders while Limited Guest Writers only see folders with drafts assigned to them.*
Some examples of how to organize your Planning tab using folders:
* New content on one side, existing content on the other
* Content to be produced for sales, end of year celebrations, editorial chestnuts...
* Content belonging to a specific semantic cocoon
* Blocked content waiting to be reread, isolated in a folder...
By default, all the drafts you create are stored in **the "General" folder**. You can put a content in a folder when you create it (after clicking on "New draft"), or once it is already created in the Planning. You can also easily change the folder of a content using the drop-down menu on the right.
### Functionalities of the Planning tab in detail
The Planning tab is where the editorial content is concentrated. You can **easily add new content to your editorial planning by clicking on the "Create Draft" button** or simply on the "+" button accessible from any Semji Platform screen.
* **Create new content or optimize existing content**
Once you have clicked on one of the Draft creation buttons, you are prompted to choose your Draft type: **New or Updated**, and then choose your Keyword Focus.
A New Content is a content that you start from a blank page.
> [Discover how to create a new content with Semji](/en/create-optimize-and-publish/how-to-create-a-new-content-with-semji)
Updated Content is content already online on your site, which you want to optimize to improve its current performance.
> [Learn how to optimize an existing content with Semji](/en/identify-opportunities/how-to-optimize-an-existing-content-updated-content)
**Reminder**: You can also **create multiple Drafts** by importing several urls or by selecting several new Focus Keywords. These contents will all be imported into the Planning in the form of Drafts, with the assignment and Due Date information that you have entered. This way, you can add all the content you plan to create or optimize several months in advance in one go!
* **Launch an analysis**
When you have chosen the Focus Keywords of the contents to be optimized, you can launch the analyses.
By doing so, Semji launches its SEO analysis and recommendation algorithms. The SERP of the Focus Keyword is analyzed in a few milliseconds, as well as the competing contents. The SEO recommendations, which you will find in the Optimizations tab of each Draft, are **generated in real time.**
An analysis in progress is shown by a **grayed Content Score** in the planning table. This means that it is being calculated, and the whole operation may take several seconds.
When the Content Score is displayed - even if it shows 0 - it means that **the analysis is complete**, and the recommendations are fully accessible to work on your draft.
**Note** : When you run an analysis to add content to the Planning, you use one of your analysis credits included in your subscription package.
* **Write content with the Drafts editor**
From the Planning, click on the title of any content to access its editor, and the detailed recommendations provided by Semji.
Here you can make your additions and modifications directly. These are **saved in real time**.
From the content editor, return to the Planning at any time, without losing your actions, by using the arrow at the top left of the screen.
### Organize production and collaboration between users
The Planning tab was designed to **facilitate collaboration** within your team. It is ideal for **managing an editorial project** of any size.
* **Assigning collaborators**
You can assign a draft to a collaborator to in 2 ways:
* from the Planning tab
* directly from the Draft's editor
From the Planning tab, simply click on the Assignment symbol corresponding to the Draft you wish to assign. A drop-down list appears, suggesting the different members of your Organization. You can decide to assign the person who is responsible for the first step of your process, for example the person in charge of writing the content. You can then change the person assigned if the Content Status changes, for example if another of your collaborators is in charge of proofreading.
* **Manage Content status**
In the similar way as the assignment of collaborators, you can change the status of the content from the Planning tab or from the Draft editor directly.
The content status allows you to **indicate a status for your content or the stage it is at** within your internal writing process: the content is to be done; the content is being written; the content is awaiting proofreading; the content is being edited before publication...
> [Discover the different content status and how to customize them](/en/plan-your-content/to-do-doing-published...-how-to-customize-drafts-status-in-my-production-workflow)
**Note:** *the "Published" status is automatically set when you or one of your collaborators click on the "Mark as Published" button inside the Draft Editor. This means that you report that you have published the content in your CMS and that it is now accessible online.*
* **View a content optimization level thanks to the Content Score**
At any time, in the planning, check the **updated Content Score** of the listed drafts. Content that is currently being written can see its Content Score evolve significantly during a work session on Semji!
This way, you have an overview of the **quality level of the drafts** your team is working on, and their evolution.
When you create a new content, the Content Score is set to 0. When you import existing content, the Content Score takes into account the editorial content already in the Draft. In this case, your content score gives you an idea of your content's optimization level considering Google's requirements and performing contents on the 1st page. **You can quickly see what needs to be done thanks to [Semji's recommendations](/en/create-optimize-and-publish/optimize-for-seo)**.
* **Manage deadlines**
As with any writing project, you need to set goals: quantity, quality and deadlines! You can define due dates for the different drafts. It's up to you to determine whether the Due Date you enter is the **final publication date** or the date on which the Draft must change status to move on to the next stage of your production process.
**Note:** *remember to communicate this process to your team as well as the terms and conditions of Due Date modifications, to avoid misunderstandings and delays!*
To assign a Due Date to a Draft, you can go through the Planning tab or directly through a Draft's editor. From the Planning tab, click on the Due Date symbol and enter the chosen date using the calendar. Click on OK as soon as the date is selected.
You can also delete a previously entered date, to show that the draft is not yet scheduled. Click on the date, and click on "Clear" in the bottom left corner of the calendar.
### Manage contents
* **Sort and filter your drafts**
You can change the order in which the contents are displayed in the central table by clicking on a column heading. Depending on the value contained in the column, if it is numeric or textual :
1. At the first click, you order the contents in **ascending order or in alphabetical order** (from A to Z)
2. With the second click, you order by descending order or from Z to A
Each of the columns allows this ordering, from the title of the Draft to the Due Date.
The Planning tab also includes a **filter feature**, above the central table. You can add criteria to filter the list of displayed content and see only a portion of your schedule. You can combine several filters, mixing both numerical and textual data.
For example, you can filter Drafts according to the :
* assigned collaborator
* Content Score
* Due Date
* chosen Focus Keyword
* Focus Keyword search volume
* content status
* content's title
* kind of content (New ou Updated)
> *Quick tip: You can now filter content with HTTP codes!*
>
> \_\_This feature allows you to view 301 pages after redesign and fix 404 pages.
>
> \_\_
>
> *Use the "Folder" filter to filter the different contents related to the same folder within the "My current drafts" and "Published" categories.*
>
> *For example, use the "Folder" filter to easily find all the content in a folder, along with the publishing dates..*
>
> **
Some examples :
*A filter on Focus Keywords*
**
*A filter on the Focus Keyword search volumes*
*A filter on content status*
*A filter on content status*
**
Example of combined filters:
*You can filter your "Updated Content" drafts for which the Focus Keyword search volume is higher than 1000 and the Content Score lower than 50. This will give you a list of Drafts with high SEO potential, which the content deserves to be reworked as a priority. You can then ensure that each of the drafts resulting from this combination of filters has an assigned collaborator and a nearby due date.*
* **Exporting content recommendations**
During your production process, you may need to export Semji's recommendations in an Excel file to use them outside the Platform. Semji allows the export of some Optimizations of a Draft:
* Search Intents (only the unlocked ones)
* Related Terms
* Questions
To do this, in the planning tab, select the drafts concerned and click on the left of the content title.
As soon as you have selected 1 or more contents, new options will appear in the table column headings.
You can then click on the export symbol.
* **Publish content in bulk**
**Reminder** : *Reporting content as published consists in clicking on the "Mark as Published" button inside the editor of a draft. This action informs Semji about the publication date and the final url of a content in order to retrieve traffic, conversion and other SEO KPIs that will be useful to analyze the performance of your content.*
In your internal production process, it is possible that you are in charge of the integration of the contents in the CMS and their publication, or that this mission is managed by a specific collaborator. In these cases, it is common to **integrate several contents on the same day**. Therefore, if you need to report the publication of several contents at once in Semji Platform, you can use the "Bulk publication" feature.
To do this, in the Planning tab, select the relevant content.
As soon as you have selected 1 or more contents, new options will appear in place of the table column headings.
You can then click on the bulk publication symbol.
A window opens, you are invited to fill in:
* the official publication date (this date will be indicated by a pink dot on your performance graphs)
* each content's URL
* **Delete Drafts**
You may need to delete a draft from the list, if the content is no longer part of your production schedule.
In the Planning section, click on the three vertical dots and select "Delete". In order to avoid mistakes, a **message asks you to confirm**. The draft will be deleted from your Planning after confirmation.
**A noter** : *if you had spent an analysis to get the optimization recommendations, this analysis is not refunded.*
This feature is also accessible in bulk: again, go to the Planning tab and select the relevant contents by clicking on the checkbox (to the left of the content title).
As soon as you have selected 1 or more contents, new options appear in the table column headings.
You can then click on the delete symbol.
# Bulk import in the planning: load your entire editorial backlog in seconds
Source: https://help.semji.com/en/plan-your-content/bulk-import-in-the-planning
Import hundreds of content pieces into your Semji planning with a single CSV file no manual entry, no wasted time.
### At a glance
* **What you can do**: import a complete editorial backlog into the Semji planning via a CSV file, in just a few clicks
* **Who it's for**: content managers, SEO project managers, editorial leads, teams in an onboarding or migration phase
* **Why it's useful**: what used to take hours of manual creation can now be done in seconds, regardless of the volume
### What this changes for you
Until now, populating the Semji planning required creating each draft one by one through the "New draft" creation wizard. An acceptable friction for 10 pieces of content, but quickly prohibitive for 500 or 1,000 pieces.
**Before:** every piece of content had to be added manually. Teams managing a large catalogue lost hours during onboarding, and migrations from other tools were practically impossible to absorb without massive re-entry of data.
**Now:** you prepare your CSV file from your existing tools and by following the Semji template (Google Sheets, Excel, Search Console, Screaming Frog), you drop it into Semji, and your drafts appear instantly in the planning. Your team can start working immediately.
| Before | With bulk import |
| - | - |
| Manual draft creation, one by one | Import thousands of content pieces in a single file |
| Onboarding blocked by catalog data entry | Instant start from the very first import |
| Migration from a competing tool = total re-entry | Export CSV from the previous tool, import into Semji in 10 minutes |
| Time-consuming annual planning | 350 topics in your Google Sheet? A single drag & drop is all it takes |
Bulk import does not consume any credits. Credits are only used when you run an analysis on a piece of content.
### What you will get
Once your CSV file has been imported, all your drafts appear directly in the active folder of your Semji planning. Each piece of content is created with the information you filled in the file: title, main keyword, URL (for existing content), status, and any other column defined in the template.
* Drafts created instantly, ready to be assigned and analyzed
* A planning view immediately usable to manage production
* The ability to import existing content (with URL) directly in "Optimize" mode
* A downloadable CSV template from the interface to ensure the correct format from the start
### How to use it (step by step)
#### 1) Prepare your CSV file
Download the CSV template directly from the Semji import interface (link "Download a sample CSV file") or from the Help Center. Fill it in with your data: content title, main keyword, URL if the content already exists on your site, and any other relevant field.
Save your file in CSV format, UTF-8 encoding, with a comma as the separator (not a semicolon). Make sure the file size does not exceed 10 MB.
For your first imports, test with 5 to 10 rows before uploading your complete file. This allows you to validate the format without any risk.
#### 2) Open the "New Draft" creation wizard
In your Semji planning, click on the **"New draft"** button. The creation wizard opens and presents three draft creation options. Select the **"Import a CSV file"** card (third option).
#### 3) Drop your CSV file
Drag and drop your CSV file into the drop zone, or click to select it from your computer. Semji immediately analyzes the file and displays a preview: the number of drafts to be created, the number of existing content pieces to be updated, and any error or warning messages.
#### 4) Launch the import
Click **"Import"**. Your drafts are instantly created in the active folder of your planning. A confirmation message indicates the number of contents added. You can immediately assign, filter and run analyses on these contents.
### Usage Tips
**Always use the provided template.** The column format is standardized: starting from the template avoids header errors and ensures the import will be accepted on the first try.
**Import into the right folder.** Drafts land in the active folder at the time of import. Navigate to the correct folder in your planning before launching the creation wizard.
**For existing content, fill in the URLs.** If your CSV contains URLs, Semji creates the drafts directly in "Optimize" mode, allowing you to launch an optimization analysis without any additional steps.
**In case of a format error**, check two priority points: the file encoding (UTF-8 required) and the separator used (comma, not semicolon). Most import errors come from one or the other.
If you plan in Google Sheets or Excel, keep your usual workflow. At the end of the week or sprint, export to CSV and import into Semji. Your planning updates in seconds without touching your source file.
### Going further
Bulk import is particularly powerful when combined with other features of the Semji editorial planning. Once your drafts have been imported, you can assign them to your writers, schedule publication dates from the calendar view, and trigger batch analyses to prioritize the most impactful optimizations.
**Useful links:**
* [Download the CSV template](https://app.semji.com/csv-templates/Semji_Template_FR.csv)
# How to delete a Draft in the Planning?
Source: https://help.semji.com/en/plan-your-content/how-to-delete-a-draft-in-the-planning
To see things more clearly and only produce useful content
### Why delete a Draft in the Planning?
During your content production with Semji, the need to delete a draft may occur.
For example, when the Draft is outdated: you no longer wish to target this Keyword Focus in a content, or the subject matter is no longer relevant to your business, due to internal changes (your product catalog, your services, your positioning...) or external changes (legal changes, market...).
It is also possible that, by mistake, you have created two almost identical Drafts, corresponding to the same Updated Content, or two Drafts of New Content on similar Focus Keywords. In this case, it is more logical to keep only one of them, and to delete the other. Deleting drafts allows you to focus your content production on your strategic priorities.
Deleting drafts also has organizational consequences. If you've been producing content with Semji for several months, you may have a lot of Drafts on hold or in production in your Planning Tab (especially if you've used the mass Drafts creation feature).
Deleting outdated Drafts will give you a better view of the content that is actually open, waiting to be optimized or published.
### How to delete a Draft in the Planning section?
In Semji's Schedule tab, you can bulk select content.
Check the box to the left of each content you want to remove from the schedule.
Next to the "Create Draft" button on the top right side of your interface, new options appear.
[](https://downloads.intercomcdn.com/i/o/242608469/93e39da81f182986b4bcb7e9/cases-cochees-bulk.PNG?expires=1619362800\&signature=92f9f5975846eaad62fb4aecaee44c52a752b03e7e3e16f4df87d86797334166)
Select the trash can icon to delete the selected drafts. A confirmation window will appear on your screen to limit errors.
Note: a deleted draft is not accessible anywhere in Semji.\
Your analysis credit will not be refunded, as it was spent at the time the draft was created.
# How to synchronize your Semji Planning with your external calendar?
Source: https://help.semji.com/en/plan-your-content/how-to-synchronize-your-semji-planning-with-your-external-calendar
Semji allows you to synchronize your Semji Planning with your external calendar. Find all drafts assigned to you.
The benefits of synchronizing your Semji Planning with your external calendar
You can now synchronize your Semji Planning with your external calendar.
*This feature is currently only supported by Google Calendar and Apple.*
Here are the main benefits of synchronizing your Semji Planning with your external calendar:
* Reminders to optimize Drafts;
* Notification settings (deadline reminder...);
* Editorial calendar view.
This allows you to track outside Semji the different drafts that are assigned to you.
> *Important: This feature allows you to be redirected to the relevant Draft in one click. It allows editorial staff to outsource and manage their own workflow outside Semji.*
### How to synchronize your Semji Planning with your external calendar?
Follow these steps to synchronize your Semji Planning with your external calendar:
1. Go to Semji;
2. Click on the Planning tab;
3. Click next to the “Create Draft” button, → Synchronize to your calendar;
4. Copy the iCal link and add it to your external calendar. You can choose to only synchronize the drafts that are assigned to you;
Let's take Google Calendar as an example.
5. Click on the + next to “Other calendars” and then click on "From URL”;\\
6. Paste the iCal link from Semji;\\
7. Click on "Add calendar";
8. Find the redirection link to Semji to edit the assigned draft.
Your Semji Planning is now available in your external calendar !
You can now manage the drafts assigned to you directly in your external calendar !
# Plan your content
Source: https://help.semji.com/en/plan-your-content/overview
Plan your content campaigns efficiently and manage your editorial priorities in Semji.
Get to grips with the Planning view and key actions to organize and track your drafts efficiently.
Adapt the Planning tab to your team's production process with folders, custom statuses, and calendar sync.
# To do, Doing, Published... How to customize Drafts status in my production workflow?
Source: https://help.semji.com/en/plan-your-content/to-do-doing-published...-how-to-customize-drafts-status-in-my-production-workflow
Customize the status of your drafts to fit your production process.
When you create a content draft, whether New Content or Existing Content, the default status is "to do".
When you publish content in your CMS and declare it in Semji by clicking on the "Mark as published" button on the corresponding draft, this draft automatically changes status to "published".
The status is therefore information concerning the stage at which the content is rendered within your internal production process or workflow.
The two stages presented above, "to do" and "published", are important: they enable the Semji Platform to organize your content.
But you can also customize your production workflow according to your proofreading needs, for example.
### Why customize Drafts statuses?
Semji has been designed as a true production management tool, enabling you to integrate not only the various players in your process, but also the different stages of your internal editorial and optimization process.
By customizing the status of drafts, i.e. adding as many stages as necessary, and then entering the correct status for each draft at a given moment, you provide your team with valuable information.
> *Please note: The modification and creation of draft status is only accessible to workspace owners. Please do not hesitate to contact the owner to change your rights or add the desired status.*
How to customize the status headings within the workflow?
To customize the status of your production workflow, you must have the **Owner status of your workspace**.
Read our article on [user management](/en/admin-and-settings/manage-semji-users) to know the status you have thanks to the functionalities you can access.
1. Log in to your Semji interface.
2. Go to your settings.
3. This will take you to the General Settings tab of your workspace.
4. In this tab, you can rename or delete your Workspace, but also **modify the Content Status** displayed on each Draft of your Workspace, whether it is a New Content or an Updated Content.
5. To edit a status, simply hover **over it with your mouse**: a cursor appears, indicating that the status title can be modified.
To the left of the text, you can click on the colored bullets to change the status' color.
> **Our advice:** Colors are an additional visual marker for your teams. They make it easier to sort or identify the drafts that concern them in the Planning or Online Content tabs. We recommend you assign distinct colors for each step to avoid confusion. You can use the traditional "red-orange-green" trio, easy to apply if your process has only 3 steps.
Finally, you can click on the small cross on the right of the status to delete it. A confirmation message will appear, so that you can avoid click errors. **Deleting a status will delete it for all current and future drafts.**
A little further down, an "Add new status" line allows you to enter a new step, a new status for your Drafts. You can then customize its title and color.
Add as many new statuses as necessary for your teams and the smooth running of your editorial project.
Finally, place your mouse on the four gray squares to the left of the colored circle to drag and drop a status to the desired place. Re-order the steps of your process so that they match the reality.
> Note: as explained above, the two statuses "to do" and "published" are currently not modifiable because they are important for the proper functioning of the Platform.
### How to change the status of a draft?
The Content Status you have defined in your workspace settings are displayed in a drop-down menu for each draft you create or edit within the Semji platform.
They are accessible :
* **When creating a Draft** Via the page import method (Updated Content)
Via the "adding a keyword" method (New Content)
* **In the Planning tab, which lists the content being written / optimized.**
By clicking on the heading of the "Status" column, you can sort the contents according to their status, in alphabetical order. A small arrow indicates the direction of the classification: the down arrow indicates a classification from A to Z, and the up arrow from Z to A.
> Note: the "Published" status has a dedicated tab in the Schedule. You can separate content on which there is no more action to be taken... until you decide that this content deserves a new optimization
* And of course, the draft's status is available **in the draft editor**. So you can change it at any time.
# Editorial planning
Source: https://help.semji.com/en/plan-your-content/understanding-the-planning-view
Get to grips with the Planning views and key actions to organize and track your drafts efficiently.
* [All you need to know about the Planning tab](/en/plan-your-content/all-you-need-to-know-about-the-planning-tab)
* [How to delete a Draft in the Planning?](/en/plan-your-content/how-to-delete-a-draft-in-the-planning)
# Why and how to create folders in the Planning tab?
Source: https://help.semji.com/en/plan-your-content/why-and-how-to-create-folders-in-the-planning-tab
In the Planning tab, you can easily create folders to better organize your content production!
### Why create folders in the Planning tab?
In the Planning tab, easily create folders by topic to find related content.
More than simple organization, folders allow you to view the content of your topic cluster, and [quickly identify the performance of that folder](/en/analyze-performance/all-about-customizing-the-performance-tab).
**With the 3rd hierarchical level, you can now:**
* Create hierarchies aligned with the complexity of your SEO strategy
* More precisely reflect your semantic clusters, product categories, or internal processes
* Analyze the performance of your content with more depth and granularity
> \_Good to know 💡: The "Folder" filter allows you to sort content associated with the same folder in the categories "My current drafts" and "Published".\
> \_
**
For example, using the "Folder" filter, you can easily find all the contents of a folder, along with the associated publication dates.
**
### How to create folders in the Planning Tab?
**To create folders, go to the Planning tab:**
1. Click on the + icon next to "Folders";
2\. Enter the name of the new folder;
3\. Select a parent folder if you want to create a hierarchy.
Thanks to the new interface, you can easily navigate your existing structure and select the appropriate level.
4\. Organize all your content in folders;
###
You can now view your content in the different folders you have created:
In the "General" folder, find all the drafts you've added to the Planning.
> *Good to know 💡: You cannot rename the "General" folder. This folder contains all your drafts and cannot be changed.*
Folders can be created up to three levels deep, allowing you to link and establish multiple subfolders under a parent folder.
You can change the folder name by moving your cursor over the folders.
###
> *Good to know 💡: When creating several drafts on the same theme, select the relevant folder directly in the Planning tab, then click on "New draft" and your drafts will be directly associated with the folder.*
### How to track folder performance in the Reports tab?
> *Good to know 💡: The Performances tab currently displays content in two sections. This means that if you have new content and optimized content in the same folder in the Planning tab, you won't be able to find them together in the Performances tab.*
Quickly identify a folder's performance in the Reports tab using the "Folders" filter.
Select the "Folders" filter, then click on the folder you want to analyze. The folder's performance data will be displayed. You can export this data to Excel or as a CSV file.
You can now create and analyze the performance of your folders!
### Use Cases Examples
Here's how to leverage the 3-level hierarchy based on your industry:
#### Media - News & Content Website
```text theme={null}
📰 Editorial
├── 🏛️ Politics
│ ├── 🗳️ Local Elections
│ ├── 🇺🇸 National Politics
│ └── 🌍 International
└── ⚽ Sports
├── 🏆 NFL Football
├── 🎾 Tennis US Open
└── 🏀 NBA Basketball
```
#### Banking - Financial Products & Services
```text theme={null}
🏦 Banking Products
├── 💳 Loans
│ ├── 🏠 Mortgage Loans
│ ├── 🛒 Personal Loans
│ └── 🚗 Auto Loans
└── 💰 Savings & Investments
├── 📈 Savings Accounts
├── 📊 Investment Products
└── 💎 Wealth Management
```
#### Insurance - Coverage & Customer Segments
```text theme={null}
🛡️ Insurance Solutions
├── 🚙 Auto Insurance
│ ├── 👨🎓 Young Drivers
│ ├── 🏎️ Luxury Vehicles
│ └── 🚐 Commercial Fleet
└── 🏠 Home Insurance
├── 🏘️ Single Family Homes
├── 🏢 Condominiums
└── 🏖️ Vacation Homes
```
Each level corresponds to increasingly specific search intents, enabling **precise SEO analysis** and **optimal editorial organization**.
# AI+ Knowledge Base: Create a Knowledge Base
Source: https://help.semji.com/en/work-faster-with-ai/ai-knowledge-base-create-a-knowledge-base
Centralize your information to generate high-quality AI content 🚀
### Configuration Steps 🔧:
1. ### Creating a Knowledge Base 📊
Start by creating a new database in Semji. To do this, go to the "AI+" tab and click on "Knowledge Base."
Then select the "New Knowledge" option. You can then choose a name and description for the base, as well as the data structure you wish to adopt.
1. ### Adding Information Sources 🌐
Next, enrich your base with relevant sources to ensure the quality of your AI-generated content.
* **URL:** Add links to specific web pages that the AI can analyze to extract data.
* **Text Files and Documents:** You can also upload documents in various formats (PDF, TXT, DOCX, XLSX) to enrich your knowledge base.
This allows the AI to draw from rich and up-to-date resources to generate accurate and tailored content aligned with your objectives. 📚
> Good to Know 💡:
>
> * Only text information is extracted; images are not currently supported, regardless of the format.
> * Files are limited to 10MB.
# AI+ Knowledge Base: How to Use It for Your AI Generation ✨
Source: https://help.semji.com/en/work-faster-with-ai/ai-knowledge-base-how-to-use-it-for-your-ai-generation
Maximize the relevance of your content with the integration of knowledge bases and external sources 📚
### Introduction **🚀**
Once your [knowledge base](/en/work-faster-with-ai/ai-knowledge-base-create-a-knowledge-base) is set up and [roles are defined](/en/work-faster-with-ai/ai-knowledge-base-roles-and-permissions-management), it’s time to take action! With AI+ Knowledge Base, you can now effortlessly enrich your content. The AI generates texts directly fueled by the specific information you’ve integrated, delivering content that is both accurate and optimized without compromising on quality.
### Editing Features ✍️
1. **Select One or More Sources in the Editor 📑**
In the content editor, you can choose the knowledge base you’ve activated. The AI will use this base to enrich the content it generates.
**How to proceed:**
* In the AI+ section on the right, go to **"**Additional Sources**"**
* Select your additional source.
2\. **Using Additional Sources**
* **Website:** Semji generates a search query on your site based on the keyword of the content you’re working on.
* The top 20 associated results are retrieved.
* These contents are then directly incorporated into the prompt for text generation.
* **Knowledge Base:** Allows the AI to create tailored content using the information in your base, delivering more precise texts aligned with your expectations.
* **Other Sources:** You can also upload specific internal documents (e.g., a product PDF) that the AI will use to generate customized texts. These documents will be used **exclusively** for the current content.
# AI Presets: Set Up Your Writing Preferences Once
Source: https://help.semji.com/en/work-faster-with-ai/ai-presets-set-up-your-writing-preferences-once
Set up once, reuse everywhere. Your AI settings now follow each piece of content.
### At a glance
**What you can do:** Save and reapply your preferred AI settings (BrandVoice, Fact Check, knowledge sources, custom instructions) directly at the content level.
**For whom:** Writers, Content Managers, and SEO teams regularly using Semji's AI features.
**Why it matters:** Save time by avoiding repetitive AI configuration for each new piece of content.
### What's changing for you
Previously, some AI settings (BrandVoice, Fact Check, knowledge sources) were applied at the workspace level, which could create inconsistencies across your content.
Now, **each piece of content retains its own AI configuration**. Set your preferences once, and they stay linked to that specific content—even if you switch workspaces or return to it later.
### Settings included
Here are the elements you can configure for each content:
| Setting | Description |
| - | - |
| **BrandVoice** | Select the brand voice to apply to AI generations |
| **Fact-Checking** | Enable or disable fact verification |
| **Knowledge Web** | Allow AI to leverage web sources |
| **Knowledge Base** | Use your internal knowledge base |
| **Knowledge File** | Include specific source files |
| **Custom Instructions** | Add specific guidelines to direct the AI |
### How to configure your AI presets
**Step 1:** Open a piece of content in the Semji editor.
**Step 2:** Access the AI settings panel (settings icon or dedicated menu).
**Step 3:** Configure your preferences:
* Select your BrandVoice
* Enable or disable Fact Check
* Choose your knowledge sources (Web, Base, Files)
* Write custom instructions if needed
**Step 4:** Once your AI+ settings are configured, click **"Save"**
**Step 5:** Give a name to your preset and a description if needed
> **Good to know: you can save changes to an existing preset.**
>
> After **modifying** a preset (instructions, sources, Brand Voice, etc.), click **Save** to store those changes to the same preset.
>
> Future generations will automatically use the updated version, without needing to create a new preset.
### Usage examples
**Example 1: E-commerce with multiple product categories** You manage an appliance website with product pages and buying guides. For product pages, you enable Fact Check and use your technical knowledge base. For guides, you prefer Knowledge Web to enrich the content.
**Example 2: Multi-client agency** You work on content for several clients. Each piece of content can have its own associated BrandVoice, preventing any tone confusion between brands.
#### Good to know
> **Availability:** This feature is accessible on all plans that include AI features.
> **Warning ⚠️**: Following this update, all AI+ settings will be reset to zero on your existing content. Only custom instructions will be preserved.
# AI+ Suite : Generate Key Points🎯
Source: https://help.semji.com/en/work-faster-with-ai/ai-suite-generate-key-points
Easily create impactful and SEO-optimized bullet lists, designed to make your content clearer, more engaging, and faster to write. ✨
### Why Use Key Points?
Crafting a compelling paragraph often requires a blend of inspiration, structure, and SEO optimization. **AI+ Key Points** enables you to:
* **Accelerate Your Writing Process**: Instantly generate ideas under a specific title (Heading).
* **Enhance Your Creativity**: Receive optimized suggestions tailored to your topic.
* **Simplify Your Writing**: Transform these key points into a well-structured paragraph using the power of **Ask AI+**, or choose to write manually based on these ideas.
### How to Use Key Points
1. **Add a Title (Heading) in the Semji Editor**:
* Start by inserting your desired heading into the Semji editing interface.
2. **Generate SEO-Optimized Ideas**:
* Click on the **Key Points** button to automatically generate SEO-optimized ideas beneath your title.
3. **Utilize the Generated Ideas**:
* **Insert Lists Directly**: Use the generated ideas to add bullet points or numbered lists to your article seamlessly.
* **Develop Paragraphs**: Expand on the key points by either:
* Letting **Ask AI+** transform the list into a cohesive paragraph.
* Writing the paragraph manually using the provided ideas as a foundation.
###
# Ask AI+ 🚀: Write and Rewrite with AI
Source: https://help.semji.com/en/work-faster-with-ai/ask-ai
✨ AI at the service of your editorial needs
What is Ask AI+?
Ask AI+ is an intelligent copilot integrated into your content editor. It helps you generate, rewrite, and optimize your texts quickly while incorporating SEO recommendations for effective and engaging content.
### Concrete benefits of Ask AI+
Ask AI+ revolutionizes the way you write and optimize your content:
* Increase productivity: whether you need to add a table, generate ideas to complete a text, or localize content, AI acts as a true copilot.
* Rewrite easily: adapt existing content to better meet your goals or SEO requirements, while saving precious time.
* Align with SEO expectations: Ask AI+ incorporates SEO recommendations to effortlessly improve your texts.
### 🤖 How does Ask AI+ work?
⚠️ First and foremost, if desired, make sure to activate your [Brand Voice](/en/work-faster-with-ai/how-to-use-semjis-ai-brand-voice), [Knowledge](/en/work-faster-with-ai/know-everything-on-ai-knowledge-base-create-more-relevant-optimized-and-faster-content), or [Fact Checking.](/en/work-faster-with-ai/produce-quality-verified-content-with-fact-checking)
**Step 1: Activate Ask AI**\
Type `/`, click on `+`, or select text in the editor to open **Ask AI+.**
**Step 2: Write your request**
Once the toolbar is activated, clearly indicate your need, for example:
* *"Insert a comparison table."*
* *"Analyze the following text and rewrite it into a shorter version while preserving the essential information, clarity, and original tone."*
**
* *"Rewrite this paragraph taking into account the comments."*
> *Good to know 💡:*
>
> Each use of AskAI+ will cost you 3 AI credits.
> *Good to know 💡:*
>
> *Ask AI+ uses data from your interface to personalize its responses:*
>
> * *Team feedback and comments.*
> * *SEO recommendations. Existing content or information about your competitors in the SERP.*
> * *You can directly call upon this information in your instruction.*
>
> *"Add a link from the 'outgoing links' section"*
# Control your AI data sources: disable web search in AI+ settings
Source: https://help.semji.com/en/work-faster-with-ai/control-your-ai-data-sources-disable-web-search-in-ai-settings
Master the data sources used by AI by disabling web search in the AI+ settings of the Semji editor
### In summary
**What you can do:** disable web search in the AI+ settings of the Semji editor so that the AI only relies on your proprietary sources when generating content.
**Who it's for:** any user with access to the AI+ Suite (AI+ Content, Atomic Content).
**Why it's useful:** you maintain total control over the data sources used by the AI, for content that's more consistent with your strategy and catalog.
### What this changes for you
Until now, web search was systematically enabled during each AI generation in the Semji editor. The AI automatically retrieved information from search results to enrich the generated content.
From now on, you can **disable this source** directly in the AI+ settings of the editor. Result: the AI relies exclusively on your own sources (Knowledge Base, My website, Other sources) without interference from data coming from the web.
This is an essential control lever to guarantee the accuracy and relevance of your content, especially when you have a product repository or proprietary technical documentation.
> **Good to know** ℹ️: web search allows the AI to use data retrieved from search results in order to generate more recent and complete responses. When you disable it, the AI no longer has access to this source and relies solely on your internal sources and its general knowledge.
### How to disable web search
#### Step 1: Open a piece of content in the Semji editor
Go to the Planning tab and open the content you want to work on in the Semji editor.
#### Step 2: Access the AI+ Setting
In the right-hand sidebar of the editor, locate the **AI+ Settings** section. If the sidebar is not visible, click the corresponding icon in the editor toolbar.
#### Step 3: Find the “Data sources” section
In AI+ Settings, locate the **Data sources** block. This groups all the data sources the AI can use during generation:
* **Web search:** data from search results
* **My website:** data crawled from your own site
* **Knowledge Base:** your internal documents and knowledge bases
* **Other sources:** additional sources added manually (URL, files…)
#### Step 4: Disable the “Web search” toggle
Click the toggle to the right of “Web search” to switch it to the off position (grayed out). The change takes effect immediately for all AI generations performed in this content.
**Tip 💡:** If you want to apply this configuration to all your future content, save it as an AI+ preset. That way you can retrieve your settings with one click, without having to reconfigure them each time.
### When to disable web search?
Disabling web search is particularly relevant in the following situations:
#### Strong proprietary knowledge
Your company has a product catalog, technical documentation, or a specific business repository. You want the AI to generate content based **only on this information**, without incorporating competing or generic data from the web.
*Concrete example:* an e-commerce site generates texts for its category pages with Atomic Content. With web search enabled, the AI might mention brands not sold by the site. By disabling it and relying on the Knowledge Base, the generated content will mention only the brands and products actually present in the catalog.
#### Strict brand content
You must ensure that generated content remains 100% aligned with your brand positioning and key messages, without external influence. Disabling web search ensures the AI does not pull in phrasing, data, or third-party references that could dilute your brand identity.
#### Regulated sector
In healthcare, finance, or legal fields, using exclusively **validated and internal sources** is often necessary to guarantee regulatory compliance. Disabling web search ensures the AI relies only on controlled and approved sources.
### Best practices to optimize your data sources
Disabling web search is even more effective when combined with the right configuration habits:
* **Enable AI+ features**, especially **My website**, so the AI can use data crawled from your own site.
* **Enable the Knowledge Base** and populate it with your reference documents (product sheets, internal guides, technical documentation…).
* **Add the URL of existing content in Other Sources:** this allows the AI to retrieve the overall context of content already online, for example a category page with a product listing.
* **Use Custom Instructions** to guide the AI’s behavior. For example: “Search the site directly for existing products and only mention the brands we distribute.”
* **Clean up the recommendations** before each generation: disable unwanted terms in “Associated terms” and “Search intents.”
* **Prefer Atomic Deep** rather than Atomic Flash when creating new content, for a more thorough and better-documented result.
> **Warning ⚠️:** even with web search disabled, if unwanted brands or products appear in the recommendations (Associated terms, Search intents), the AI may include them in the generated content. Remember to disable them beforehand for an optimal result.
#### Good to know
* The **Web search** toggle is **enabled by default** in AI+ Settings.
* Disabling it applies **per content** item: it does not affect other items in your workspace (unless you use a preset).
* The other data sources (My website, Knowledge Base, Other Sources) remain independent and can be enabled or disabled separately.
* This setting applies to all AI generation functions available in the editor: AI+ Content (generation of paragraphs, introductions, outlines…) and Atomic Content (full generation).
### Quick FAQ
**Is web search enabled by default?** Yes. When creating new content, web search is enabled by default in the AI+ Settings. You can disable it manually or via a preset.
**If I disable web search, will the AI still use web data?** No. Once the toggle is turned off, the AI no longer retrieves any data from search results. It relies only on your other enabled sources (Knowledge Base, My website, Other sources) and its general knowledge.
**Can I disable web search only for Atomic Content?** The setting applies to all AI generations performed within the current content (AI+ Content and Atomic Content). It is not possible to enable it for one and disable it for the other within the same content.
**Can I save this setting in a preset?** Yes. Save your AI+ Settings configuration as a preset to easily apply it to future content without having to reconfigure each parameter manually.
**Should I disable web search in all cases?** No. Web search is valuable for enriching your content with up-to-date and contextualized data (trends, market data, recent information). Disabling it is recommended in the specific cases mentioned above (strong proprietary knowledge, strict brand requirements, regulated sectors).
### Go further
* **[👉 Everything you need to know about AI+ Knowledge Base: create more relevant, optimized content quickly!](/en/work-faster-with-ai/ai-knowledge-base-create-a-knowledge-base)**
* **[👉 How to create and optimize your SEO content using AI with Atomic Content?](/en/work-faster-with-ai/how-to-create-and-optimize-your-seo-content-using-ai-with-atomic-content)**
* **[👉 How to configure your Brand Voice?](/en/work-faster-with-ai/how-to-use-semjis-ai-brand-voice)**
* **[👉 Fact Checking: Produce quality, verified content](/en/work-faster-with-ai/produce-quality-verified-content-with-fact-checking)**
* **[👉 AI+ Suite: AI+ Template](/en/work-faster-with-ai/suite-ai-ai-template)**
# 🎯 Custom Instructions: Take Full Control of Your Content
Source: https://help.semji.com/en/work-faster-with-ai/custom-instructions-take-full-control-of-your-content
Custom Instructions revolutionizes content creation by providing complete control over the structure, style, and elements of AI-generated content. 🌟
The Custom Instructions feature is available for the following plans:
### What is Custom Instructions ?
Imagine an AI that understands your exact needs and shapes every piece of content according to your expectations. Custom Instructions is Semji’s revolutionary tool that lets you control every detail of your creations. Structure, enrichment, style—everything is customizable for tailor-made content aligned with your goals and designed to captivate your audience. 🌟 Turn your ideas into reality with unprecedented precision and efficiency.
### 🎯For whom is this feature designed ?
### Imagine these scenarios...
* **You’re a content manage**r tasked with producing a series of articles for an e-commerce campaign. With Custom Instructions, every text is structured, enriched, and optimized effortlessly.
* **You’re a content creator** aiming to maintain your creativity while adhering to precise guidelines. This tool allows you to combine productivity with originality.
* **You’re an SEO expert** ensuring every piece of content aligns with search engine expectations while maximizing your results.
Custom Instructions is here to simplify your work, no matter your role, by turning your ideas into high-performing content.
> 👉[Custom instructions: explanations and details here!](/en/work-faster-with-ai/how-does-custom-instructions-work)
### ✨ **Usage and Use Cases**
**Types of Possible Instructions**
* **Structuring:** Create custom outlines, lists with emojis 🎉, or H2 questions to organize your content in a clear and engaging way.
* **Enrichment:** Add summary tables, relevant links, etc.
* **Style:** Adjust the tone of your content (technical, humorous, narrative) and include metaphors to enhance its impact.
**Concrete Use Cases**
* **🛒 E-commerce:** Automate the addition of a CTA in every paragraph to boost conversions.
* **🍳 Blogs:** Systematically integrate expert advice or tips to captivate your readers.
* **🩺 SEO in Healthcare:** Add medical disclaimers to ensure compliance and reliability in your content.
### **Available Variables and Technical Fields**
To optimize your **Custom Instructions**, you can use these specific variables:
**Knowledge Sources:**
* `` - Files uploaded by the user (PDF, documents)
* `` - Internal knowledge base
* `` - Website knowledge
* `` - Web research
**SEO Data (usable in outlines):**
* `` - Search intents
* `` - Frequently asked questions
* `` - Search results insights
* `` - Competitor analysis
**Contextual Data (usable in paragraphs):**
* `` - Related terms
### 🌍 **In Harmony with the Semji Ecosystem**
Custom Instructions works seamlessly with other Semji tools:
* **[Brand Voice](/en/work-faster-with-ai/how-to-use-semjis-ai-brand-voice):** To ensure perfect alignment with your brand identity.
* **[AI+ Knowledge Base](/en/work-faster-with-ai/know-everything-on-ai-knowledge-base-create-more-relevant-optimized-and-faster-content):** To enrich your texts with relevant data.
* **Automatic SEO Optimization:** To maximize your visibility without extra effort.
> *Good to Know 💡:*
>
> * *Simplify your instructions: Avoid overly complex guidelines that could confuse the AI.*
> * *Follow SEO constraints: Monitor content length and recommendations to stay competitive.*
# Generate with AI
Source: https://help.semji.com/en/work-faster-with-ai/generate-content-with-ai
Speed up content creation and optimization with Ask AI+, Atomic Content, fact-checking, and custom instructions.
* [How to create and optimize your SEO content using AI with Atomic Content?](/en/work-faster-with-ai/how-to-create-and-optimize-your-seo-content-using-ai-with-atomic-content)
* [How to use SEMJI's AI + Content and Atomic Content to create your content?](/en/work-faster-with-ai/how-to-use-semjis-ai-content)
* [Write faster without sacrificing quality: the AI suggests, you adjust, the AI writes!](/en/work-faster-with-ai/write-faster-without-sacrificing-quality-the-ai-suggests-you)
* [🚀 How does Custom Instructions work?](/en/work-faster-with-ai/how-does-custom-instructions-work)
* [AI+ Suite : Generate Key Points🎯](/en/work-faster-with-ai/ai-suite-generate-key-points)
* [Ask AI+ 🚀: Write and Rewrite with AI](/en/work-faster-with-ai/ask-ai)
* [Fact Checking ✅: Produce quality and verified content](/en/work-faster-with-ai/produce-quality-verified-content-with-fact-checking)
* [🎯 Custom Instructions: Take Full Control of Your Content](/en/work-faster-with-ai/custom-instructions-take-full-control-of-your-content)
* [How to use Semji’s AI Chat](/en/work-faster-with-ai/how-to-use-semjis-ai-chat)
* [How to industrialize your content production using AI](/en/work-faster-with-ai/how-to-industrialize-your-content-production-using-ai)
* [How to create and optimize your SEO content with Atomic Content](/en/work-faster-with-ai/how-to-create-and-optimize-your-seo-content-with-atomic-content)
# 🚀 How does Custom Instructions work?
Source: https://help.semji.com/en/work-faster-with-ai/how-does-custom-instructions-work
Personalize and guide content generation to meet your specific needs 🎯
### 1) Access the Semji Editor 🔧
In your project, open the Semji content editor and click on the AI+ tab to activate the feature.
### 2) Write Your Custom Instructions 🖋️
Add clear and precise guidelines to direct content generation. For example:
* Include titles in the form of questions.
* Add elements such as tables.
* Maintain a humorous and engaging tone.
### 3) Launch Content Generation 🚀
In this example, we will generate a paragraph by applying your custom instructions. Once your directives are entered, the AI will use these guidelines to shape the creation of the content, whether it's a text, a list, or a structured outline.
> *Good to Know **💡:***
>
> *Combine this feature with other AI+ tools like [Brand Voice](/en/work-faster-with-ai/how-to-use-semjis-ai-brand-voice) to ensure perfect alignment with your identity, or [AI+ Knowledge Base](/en/work-faster-with-ai/know-everything-on-ai-knowledge-base-create-more-relevant-optimized-and-faster-content) for even richer content. You can modify your instructions for each content generation. Therefore, make sure to review the 'Custom Instruction' field carefully before generating any content*
# How to create and optimize your SEO content using AI with Atomic Content?
Source: https://help.semji.com/en/work-faster-with-ai/how-to-create-and-optimize-your-seo-content-using-ai-with-atomic-content
Generate and optimize your SEO content in just a few clicks to boost your performance
### Summary
**What you can do:** Generate SEO-optimized content from scratch or optimize your existing content with one click using AI.
**Who it's for:** Content managers, SEO writers, CMOs and marketing managers who want to speed up their content production.
**Why it's useful:** Cut your production time by 3 while ensuring SEO quality thanks to recommendations based on SERP analysis.
### Prerequisites for optimal results
To get the most out of Atomic Content, we recommend configuring these elements beforehand. AI is powerful and fast, but, like a beginner assistant, it needs a clear brief to produce relevant content.
**Poor brief** = vague, generic result: a mismatch between the content and audience expectations.
**Precise brief** = relevant, faithful content: accurate targeting of the audience and objectives.
#### **[✅ Brand Voice configured](/en/work-faster-with-ai/how-to-use-semjis-ai-brand-voice)**
**Why:** Ensures consistency of tone and style with your brand
**Pro tip:** Configure different Brand Voices according to your page types:
* An expert tone for your technical guides
* A more accessible tone for your general articles
* A commercial tone for your product pages
#### **[✅ Knowledge Base](/en/work-faster-with-ai/ai-knowledge-base-create-a-knowledge-base)**
**Why:** Enriches generated content with your proprietary data and expertise
**Tip:** Feed your Knowledge Base with:
* Your product sheets
* Your customer case studies
* Your technical documentation
* Your exclusive numerical data
#### **[✅ Fact-checking enabled (Optional but recommended)](/en/work-faster-with-ai/produce-quality-verified-content-with-fact-checking)**
**Why:** Automatically verifies generated information to avoid AI hallucinations
**Recommendation:** Enable it systematically for factual content (numbers, dates, studies)
#### **[✅ Custom instructions](/en/work-faster-with-ai/custom-instructions-take-full-control-of-your-content)**
**Why:** Refines generations according to your specific needs (structure, length, editorial angle)
**Usage example:** "Always include a paragraph on business benefits" or "Structure using a maximum of 4 H2s"
> ⚠️ Also make sure to properly configure your [*Excluded Terms*](/en/admin-and-settings/why-and-how-to-exclude-keywords-from-semji-recommendations). A correct configuration prevents the AI from including or recommending competitors or out-of-scope topics, ensuring content that complies with your guidelines and objectives.
### How it works?
**Purpose:** You can either create entirely new content from a blank page or optimize existing content to improve its performance.
**Typical use case:** This can be useful when launching a new topic, creating content for a new product, or developing your editorial calendar, as well as to give new life to an old article, improve content that is stuck on page 2, or recover lost rankings.
#### Usage steps:
#### **Step 1:** Go to your content (Existing or Blank)
* Run the main keyword analysis or rerun the analysis if the last one is older than 30 days
* Sort through the proposed recommendations if you want some of them not to be taken into account
#### **Step 2:** Configure the generation
* Make sure you have the prerequisites for optimal generation
* Choose your Brand Voice (if several are configured)
* Enable the options: Knowledge Base, Fact-checking and Custom Instructions
#### Step 3: Generation and optimization
* Click on *"Atomic Content"*
* If your content is blank, the generation will start automatically
* If you are editing existing content, a modal will appear asking whether you want to Optimize or Replace your existing content
#### ****
* Once the generation or optimization has started, please wait a few minutes
> The last two steps are dedicated to optimizing existing content
#### Step 4: Review the results
* The optimized content appears in the editor
* Use "Show changes" to view the modifications made
#### Step 5: Validate or adjust
* Click the cross to the right of "Show changes" to be able to edit the content if needed
* Access the version history to compare or revert to a previous version
Atomic Content transforms your approach to SEO content creation by combining speed and quality. Explore its advanced capabilities now!
**📚 Discover additional features:**
* **[Atomic Content Bulk: Generate dozens of pieces of content with one click](/en/work-faster-with-ai/how-to-industrialize-your-content-production-using-ai)**
# How to create and optimize your SEO content with Atomic Content
Source: https://help.semji.com/en/work-faster-with-ai/how-to-create-and-optimize-your-seo-content-with-atomic-content
Generate and optimize your SEO content in minutes with AI, at the quality level suited to your needs.
### In summary
**What you can do:** Generate a complete SEO-ready piece of content from a blank page or optimize your existing content with a single click using AI.
**For whom:** Content managers, SEO writers, CMOs and marketing managers who want to speed up their content production.
**Why it's useful:** Cut your production time by 3 while ensuring SEO quality thanks to recommendations based on SERP analysis. You stay in control by choosing the mode that best fits your context.
### Prerequisites for optimal results
AI is powerful and fast, but it needs a clear brief to produce relevant content. A poor brief yields a vague, generic result. A precise brief delivers relevant content that stays true to your brand.
#### **[✅ Brand Voice configured](/en/work-faster-with-ai/how-to-use-semjis-ai-brand-voice)**
Ensure tone and style consistency with your brand.
**Pro tip:** Configure different Brand Voices according to your page types:
* An expert tone for your technical guides
* A more accessible tone for your general articles
* A commercial tone for your product pages
#### **[✅ Knowledge Base powered](/en/work-faster-with-ai/ai-knowledge-base-create-a-knowledge-base)**
Enriches generated content with your proprietary data and expertise.
**Tip:** Feed your Knowledge Base with your product sheets, customer case studies, technical documentation, and exclusive numerical data.
#### **[✅ Fact-checking enabled (optional)](/en/work-faster-with-ai/produce-quality-verified-content-with-fact-checking)**
Automatically verifies generated information to prevent AI hallucinations.
**Recommendation:** Enable it systematically for factual content (figures, dates, studies). Additional cost: 15 credits.
#### **[✅ Custom instructions](/en/work-faster-with-ai/how-does-custom-instructions-work)**
Tailor the generations to your specific needs (structure, length, editorial angle).
**Example of use:** "Always include a paragraph on the business benefits" or "Structure with a maximum of 4 H2s".
#### **[⚠️ Excluded terms](/en/admin-and-settings/why-and-how-to-exclude-keywords-from-semji-recommendations)**
Make sure to properly configure your Excluded Terms. A correct configuration prevents the AI from including or recommending competitors or topics outside the scope.
### Create content from a blank page
#### Two modes for two needs
Atomic Content offers you a choice of generation mode:
| Mode | Approach | Duration | Ideal for |
| - | - | - | - |
| **Deep** | In-depth analysis, very high-quality content | \~6 minutes | Complex topics, high-value content, articles requiring minimal edits |
| **Flash** | Quick generation: a solid base to build on | \~2 minutes | Drafts, article structures, quick starts when you have a clear idea |
**Cost:** 50 AI credits per generation (Deep or Flash), +15 credits if you enable Fact-checking.
#### Usage steps
**Step 1:** Prepare your content
1. Go to your blank content
2. Start the analysis of the main keyword (or relaunch it if it is older than 30 days)
3. Sort through the suggested recommendations if you want to exclude some of them
**Step 2:** Configure the generation
1. Check that your prerequisites are in place
2. Choose your Brand Voice (if you have more than one)
3. Activate the desired options: Knowledge Base, Fact-checking, Custom instructions
**Step 3: Launch Atomic Content**
1. Click **"Atomic Content"**
2. The selection modal appears
3. Select your mode:
* **Deep** for in-depth, high-quality content (\~6 min)
* **Flash** for a solid and fast starting point (\~2 min)
4. Click **"Launch"**
**Step 4: Wait while the generation runs**
Generation time varies depending on the chosen mode. You can track the progress on screen.
* **Deep Mode:** the AI performs an in-depth analysis of your brief, the competition, and your editorial guidelines to produce a polished piece of content.
* **Flash Mode:** The AI quickly generates a complete structure with the main ideas, ready to be expanded.
**Step 5: Review and adjust**
1. The generated content appears in the editor
2. Review and make any necessary changes
3. Access the version history to compare or revert changes
### Which mode should you choose?
**Choose Deep when:**
* The topic is complex or technical
* The content has high added value (pillar page, comprehensive guide)
* You want to minimize manual editing time
* Quality takes precedence over speed
**Choose Flash when:**
* You already have a clear idea of the final content
* You prefer to start from a structure to enrich yourself
* You need to produce a first draft quickly
* The topic is relatively simple or well documented in your Knowledge Base
### Optimize existing content
#### Two options depending on your need
When you launch Atomic Content on existing content, you have a choice:
| Option | What the AI does | Ideal for |
| - | - | - |
| **Optimize** | Analyze your content and intelligently enrich it by incorporating SEO recommendations | Content to refresh, improve the Content Score, add missing information |
| **Replace** | Generates an entirely new piece of content to replace the existing one | Outdated content requiring a complete overhaul |
**Cost:** 50 AI credits per operation, +15 credits if you enable Fact-checking.
#### Usage steps
##### Step 1: Prepare the optimization
1. Go to the content you want to optimize
2. Check that the keyword analysis is recent (less than 30 days old)
3. Review the recommendations and exclude any you don't want to take into account
##### Step 2: Configure the generation
1. Choose your Brand Voice (if you have more than one)
2. Activate the desired options: Knowledge Base, Fact-checking, Custom instructions
##### Step 3: Launch Atomic Content
1. Click **"Atomic Content"**
2. The modal automatically detects that content exists
3. Choose your option:
* **Optimize content:** The AI analyzes and improves your existing content
* **Replace the content:** the AI generates new content to replace it
4. Click **"Launch"**
> **⚠️ Warning:** If you choose "Replace", your current content will be completely overwritten. A message will remind you of this consequence. Don't worry: you can always revert via the version history.
##### Step 4: Review the changes
Once the optimization is complete, the updated content appears in the editor.
1. Click **"Show changes"** to see exactly what was modified
2. Additions, deletions and modifications are highlighted
3. Check that the Content Score has improved
##### Step 5: Validate or adjust
1. Click the cross to the right of "Show changes" to return to edit mode
2. Make your manual edits if needed
3. Go to **"Version history"** to compare versions or revert changes
#### Which option should I choose?
##### Choose "Optimize" when:
* Your content has a solid foundation but needs refreshing
* You want to improve the Content Score without rewriting everything
* The article contains specific information that you want to keep
* You want to incorporate new SEO recommendations into existing content
##### Choose "Replace" when:
* The content is too old or outdated to be simply optimized
* The editorial angle needs to be completely rethought
* The Content Score is very low and requires a complete overhaul
* You prefer to start from a fresh base generated by AI
#### Typical use cases
**Refresh an old article** Has a piece not been updated for 2–3 years? Run an optimization to incorporate recent data and address new search intents.
**Improve content stuck on page 2** Is your article close to the top 10 but can’t quite get there? Optimization can add the missing elements to help you cross the threshold.
**Recover lost rankings** Has content lost visibility? The AI analyzes what changed in the SERP and adapts your content accordingly.
**Update outdated data** Outdated statistics or information? Optimization with Fact-checking enabled refreshes your content with verified data.
#### Keep control with version history
Each Atomic Content action creates a **major version** tagged "Atomic Content" in the history. You can thus:
* **Compare** the pre-AI version, the AI version, and your subsequent edits
* **Restore** a previous version with one click if the result doesn't suit you
* **Track** the evolution of your content over time
> **Good practice:** Always have an AI-written or AI-optimized version validated by a human before publication.
#### Best practices
1. **Invest in your prerequisites:** A well-configured Brand Voice and a rich Knowledge Base significantly improve the quality of generated content, regardless of the chosen mode.
2. **Enable Fact-checking for factual content:** figures, statistics, dates... Fact-checking prevents errors that could damage your credibility.
3. **Always proofread AI-generated content:** AI is a powerful assistant, but human validation remains essential before publication.
4. **Use the version history:** easily compare versions to make sure your edits haven't removed any important information.
# How to industrialize your content production using AI
Source: https://help.semji.com/en/work-faster-with-ai/how-to-industrialize-your-content-production-using-ai
Triple your SEO content output with mass generation and optimization
### Summary
**What you can do:** Automatically generate dozens of SEO contents in a single operation.
**Who it's for:** Content managers, SEO managers, CMOs and agencies that need to quickly produce or optimize a large volume of content.
**Why it's useful:** Triple your production capacity while ensuring consistency and SEO quality across all your content.
### What this changes for you
#### Problem solved
No more creating content one by one that takes weeks to cover a whole topic. Atomic Bulk eliminates the bottleneck in editorial production.
#### What you gain concretely
* **Faster production:** 50 pieces of content mass-generated in 15 minutes instead of 50 hours
* **Guaranteed consistency:** Brand voice, knowledge base and SEO quality uniform across all your content
* **Immediate scalability:** Deploy your SEO strategy at large scale with no extra effort to better face the competition.
### Prerequisites for optimal results
To get the most out of Atomic Content, we recommend configuring these elements beforehand. AI is powerful and fast, but, like a beginner assistant, it needs a clear brief to produce relevant content.
**Poor brief** = vague, generic result: a mismatch between the content and audience expectations.
**Precise brief** = relevant, faithful content: accurate targeting of the audience and objectives.
#### **[✅ Brand Voice configured](/en/work-faster-with-ai/how-to-use-semjis-ai-brand-voice)**
**Why:** Ensures consistency of tone and style with your brand
**Pro tip:** Configure different Brand Voices according to your page types:
* An expert tone for your technical guides
* A more accessible tone for your general articles
* A commercial tone for your product pages
#### **[✅ Knowledge Base](/en/work-faster-with-ai/ai-knowledge-base-create-a-knowledge-base)**
**Why:** Enriches generated content with your proprietary data and expertise
**Tip:** Feed your Knowledge Base with:
* Your product sheets
* Your customer case studies
* Your technical documentation
* Your exclusive numerical data
#### **[✅ Fact-checking enabled (Optional but recommended)](/en/work-faster-with-ai/produce-quality-verified-content-with-fact-checking)**
**Why:** Automatically verifies generated information to avoid AI hallucinations
**Recommendation:** Enable it systematically for factual content (numbers, dates, studies)
#### **[✅ Custom instructions](/en/work-faster-with-ai/custom-instructions-take-full-control-of-your-content)**
**Why:** Refines generations according to your specific needs (structure, length, editorial angle)
**Usage example:** "Always include a paragraph on business benefits" or "Structure using a maximum of 4 H2s"
> ⚠️ Also make sure to properly configure your [*Excluded Terms*](/en/admin-and-settings/why-and-how-to-exclude-keywords-from-semji-recommendations). A correct configuration prevents the AI from including or recommending competitors or out-of-scope topics, ensuring content that complies with your guidelines and objectives.
### How it works
Atomic Bulk offers **two modes** to meet your mass production needs:
**Goal:** Mass-generate or optimize SEO content
**Typical use case:** Create multiple pieces of content from scratch (launching a new product line, new website, semantic coverage) or simultaneously optimize existing content (SEO revamp, update after an algorithm change, improvement of older content that is stagnating).
##### Step 1: Access the feature
* Go to Planning
* Select the content you want to generate and/or optimize
* Click "*Atomic Content"*
> 💡Good to know: if you select both blank contents and existing contents, a window will ask whether you want to optimize the existing contents or replace them entirely.
##### ****
##### Step 2: Configure the generation
[](/en/work-faster-with-ai/custom-instructions-take-full-control-of-your-content)
> ⚠️ To ensure consistency with your *Brand Voice* and *Custom Instructions*, select content of the same type.
>
> For example, if you choose "advice" pages, apply the Brand Voice that corresponds to that page type and format your instructions to match their editorial objective.
* Make sure to enable your options: [Brand Voice](/en/work-faster-with-ai/how-to-use-semjis-ai-brand-voice), [Knowledge Base](/en/work-faster-with-ai/ai-knowledge-base-create-a-knowledge-base), [Fact-checking](/en/work-faster-with-ai/produce-quality-verified-content-with-fact-checking), [Custom Instructions](/en/work-faster-with-ai/custom-instructions-take-full-control-of-your-content)
##### Step 3: Generation and monitoring
* Click "Start"
* Atomic Content will generate all selected content
* Simultaneous generation in a few minutes (5–15 min depending on volume)
#####
Step 4: Review and finalization
* Once all content has been generated and/or optimized, review and adjust it as needed.
*Atomic Bulk* radically transforms your approach to SEO production by allowing you to scale up industrially without compromising on quality.
# How to configure your Brand Voice?
Source: https://help.semji.com/en/work-faster-with-ai/how-to-use-semjis-ai-brand-voice
AI+ Brand Voice will transform your content by adding your brand's unique tone.
Train the AI and give it instructions to write in your unique tone of voice
### Configure your Brand Voice in 3 minutes :
### Why use AI+ Brand Voice
AI+ Brand Voice solves a major challenge: maintaining brand consistency when multiple people create content with AI.
Unlike generic AIs that produce formatted content, Semji analyzes the entirety of your reference content to reproduce your unique style while preserving SEO optimization.
### What it's for
* Brand consistency: Your AI+ Content and Atomic Content automatically adopt your editorial identity.
* Efficiency gain: Accelerate your production without compromising quality, even with multiple writers.
* Preserved SEO optimization: SEO recommendations remain integrated into your personalized content.
### AI+ Brand Voice Configuration
#### Step 1: Access the configuration
From the main menu of the application, click on **AI+** then select **Brand Voice.**
****
#### Step 2: Create your first voice tone
Click on "New Voice" to create a new brand voice\
Give an explicit name to your Brand Voice (e.g., "Semji Editorial Tone")
#### Step 3: Feed your Brand Voice with your content
The effectiveness of AI+ Brand Voice relies on the quality of the examples you provide. You can add content in three ways:
**Option 1: Web page URLs**
* Add the URLs of your best published content
* The AI analyzes the content of these pages directly
**Option 2: Raw text**
* Copy-paste your reference texts directly
* Limit: 20,000 characters maximum per addition
**Option 3: Files**
* Upload your PDF or TXT documents
* Maximum weight: 10 MB per file
#### Recommendations for optimal voice tone
For your Brand Voice to be as effective as possible, we recommend including **at minimum:**
* **3 introductions** from your most representative content
* **3 outlines** (H1, H2, H3 structures) from your articles
* **9 paragraphs** from different content pieces
These elements allow the AI to finely analyze your writing style on the key sections of content.
#### Step 4: Configure advanced settings
Complete the following information to refine your Brand Voice:
**Brand name:** Corresponds by default to your Workspace name, modifiable according to your needs.
**Target audience:** Describe precisely who you want to reach (e.g., "Digital marketing professionals, aged 25 to 45").
**Additional instructions (optional):** Add specific directives to further personalize your tone. Examples:
* "Adopt a pedagogical tone with concrete analogies"
* "Regularly integrate references to our 15 years of SEO expertise"
* "Use the 'Problem > Solution > Benefit' formula to structure arguments"
> *Good to know 💡: Once the configuration is complete, make sure to activate your voice tone by clicking on the icon in the top right corner.*
#### Step 5: Activate in the editor
Once your Brand Voice is configured:
1. Go to the Semji content editor
2. In the **AI+ Settings** sidebar, locate the **Brand Voice** section
3. Select your Brand Voice from the dropdown menu
4. From now on, all your **AI+ Content** and **Atomic Content** generations will automatically apply your brand tone
### FAQ
#### Can I create multiple Brand Voices?
Yes, you can configure multiple brand voices for each Workspace. This allows you to adapt your tone according to different types of content or audiences.
#### Can I modify an existing Brand Voice?
Yes, you can edit, delete, or disable an existing brand voice at any time via the configuration interface.
#### Are SEO recommendations maintained?
Absolutely. AI+ Brand Voice seamlessly integrates Semji's SEO recommendations into the generation process, ensuring you get optimized content that respects your brand identity
# How to use Semji’s AI Chat
Source: https://help.semji.com/en/work-faster-with-ai/how-to-use-semjis-ai-chat
With Semji's AI chat, available on Semji's Chrome extension, quickly get topic ideas on every subject!
Optional
❌
Optional
✅
###
Why Semji’s AI Chat?
> *Note: Semji's AI Chat is currently only available to Custom users with the optional [extension Semji](/en/connect-your-tools/everything-you-need-to-know-about-the-semji-chrome-extension).*
Semji's AI Chat allows you to easily come up with new ideas for your articles but also help you with your social media posts and much more. The possibilities are endless!
Here are some examples of how AI Chat can help you save time:
* Define a content plan;
* Generate a list of important keywords;
* Generate an introduction/conclusion for a piece of content;
* Generate a topic cluster;
* Generate a FAQ;
* Create a Facebook, LinkedIn post...
### 
### How to use AI Chat?
> *Note: Use AI Chat with Semji’s extension everywhere.*
>
> *AI Chat is here to help you, whether you are on your website or on your CMS*
Go to the Chrome extension to start a conversation with AI Chat.
Then, you have two options:
* Start a conversation using the examples provided by Semji on SEO, content, and marketing;
* Start your own conversation with AI Chat!
> *Note: To get the most out of this new feature, Semji provides you with some sample questions to get you started with AI Chat!*
You can also generate your own conversations with AI Chat!
Once you've asked your question, simply copy the content by using the 'Copy to Clipboard' button and paste it into any tool (CMS, collaboration tools, social networks...)
> *Note: Conversations with AI Chat are subject to a character limit when this message appears. You can restart a conversation to continue talking to Semji AI Chat.*
>
> \_Each organization is limited to 250 requests in a 24-hour period, which is plenty of time to generate new ideas!
>
> \
> \_
You can adjust the size of the window using the slider at the bottom left of the extension!
### 
### AI Chat uses cases
\_Use Case #1: Getting started with AI\
\_
The first time you launch AI Chat, you won't really understand what it's all about. The first screen asks you to choose an example. You expand the "Examples" section and see a list of 10 examples to boost your productivity, find new ideas...
You decide to use the "Generate a FAQ" example for a content you've just finished. The AI Chat generates a list of 5 questions / answers that you can add at the end of your content.

\_Use Case #2: Get AI to help you write in Google DOCS\
\_
You're writing an article on Google Doc with Semji's Chrome extension. But you're not inspired to write the introduction and the conclusion of your article. So you launch AI Chat to deliver this request: "Create the introduction and conclusion for the following content: (example: Understanding SEO)." AI Chat provides you with an introduction and conclusion that you can copy/paste into your document. Eventually, you make some edits to fine-tune your content.

\_Use Case #3: Generate a table for my keyword clusters\
\_
You want to create articles on fruit and vegetable seasonality over the course of a full year. You ask AI Chat to generate a table with the months of the year in one column, the fruits and vegetables in another column. Visually you get a list of topics that you can cover in your next articles, based on seasonality.
You can copy the table in a spreadsheet (Excel, GSheet...)
\
Now Semji's AI Chat holds no secrets for you. Speed up your productivity on SEO, content and marketing projects!
# How to use SEMJI's AI + Content and Atomic Content to create your content?
Source: https://help.semji.com/en/work-faster-with-ai/how-to-use-semjis-ai-content
Save time writing content, get inspired and improve your ROI!
IMPORTANT: The AI+ Suite is currently in Beta status within Semji.
### **Why use AI?**
Our aim at Semji is to enable you to **quickly deliver optimized content to optimize your organic performance while keeping your ROI under control**. Our semantic engine lies at the heart of the processes that enable us to deliver relevant SEO Content recommendations (Search Intentions, Questions, Related Terms, Length, Meshing...). By combining it with **GPT-3.5 and GPT-4 automatic language creation technology**, Semji has reached a milestone in achieving this goal!
**The role of web editorial teams with Semji**
In the same way that a house initially needs an architect to be built, Semji's AI + Content feature needs **a content operator to make the right strategic choices**:
* which keywords to ban
* the search intents to include
* questions to be answered
* product and/or brand-specific information
* specific customer messages...
As content is created, the editorial team **selects** **the** **final** **content** based on the AI's proposals, and carries out **quality** **control**. It ensures that the statements made by AI + Content's technology are correct. **The** **editorial** **team** therefore remains essential to the creation of quality content.
### **How to write content with AI?**
#### **In Semji's editor**
1. To write content with AI + Content, **go to the content editor (new draft or existing content).**
2. If you prefer, you can review the recommendations you receive beforehand and **sort** **them** **out**: disable any Search Intents, Questions or related Terms you don't want to include in your content.
3. Take a look at the SERP (Google results page) in the [Competitors tab](/en/create-optimize-and-publish/everything-you-need-to-know-about-the-competitors-tab-in-semji), to get a feel for your competitors' angles and decide whether certain topics are relevant to you. To find out more, watch our video on [creating a content plan](https://youtu.be/FMdjbYemzl4).
Once you've finished sorting, click on the editor and enter "/" to write with AI.
> Good to know: Easily access AI+Content with the + on the left of the editor.
>
>
### **How does it work?**
> Good to know: generating AI text via Atomic Content or AI+Content [costs credits.](/en/work-faster-with-ai/understanding-the-credit-system)
>
> * If the AI functionality crashes in the middle of a generation: we don't count the credits. **This means you don't consume any credits.**
> * If you decide to stop the generation: we deduct the AI credits.
> * If you decide to re-generate text: we deduct AI credits again.
You can generate content elements based on recommendations from Semji analysis.
Several content elements can be pre-written by our AI:
* The page title
* Meta Description
* Introduction
* Content outline
* Topic paragraphs
* Atomic Content ( Available with new offers)
> Good to know: With [AI+Fact Checking](/en/work-faster-with-ai/produce-quality-verified-content-with-fact-checking), you can check the reliability of your AI-generated content in a matter of seconds. This feature doubles your credit consumption.
These different elements enable you to quickly build a first content draft that you can then complete and refine by adding your own editorial style.
**Title generation:** To ***generate Title ideas***, our AI retrieves the different titles of competing urls positioned on the SERP as inspiration. We apply a filter based on the relevance of each title to the main Keyword studied, to guide the automatic generation of title ideas towards an angle that meets Google's expectations.
**Meta Description generation**\*:\* Easily generate a Meta Description related to the subject of your content.
**Introduction generation:** with this feature, you can easily generate a hook for your article based on your main keyword.
**Outline generation:**
To continue creating your content, Semji helps you build the structure of your content. Mainly based on recommendations from Search Intents and Questions. It is also based on the analysis of competitors' content.
**Paragraph generation:** After proofreading and approving your plan, the Paragraph feature generates text related to the previous Hn. Move your cursor under the Hn tag you want to work on to get a detailed paragraph related to the title of the current section.
**Generate a complete draft with Atomic Content:**
With just one click, you can generate a complete draft from scratch, from Title Tag generation to conclusion, with a Content Score of at least 80! It's a real time-saver.
Please note, however, that the use of this feature must be carefully considered. The aim is not to automate 100% of your copywriting work! The aim is to help you quickly generate the framework for your content on a given subject. We strongly recommend that you proofread your content and add your own editorial style. Note that it's important to add any new information that will help you stand out from the crowd and provide your readers with additional information compared to Google. Opinions and experiences that can add value to your content are highly appreciated by Google.
> *Note:* *If you're unsatisfied with the text generation, you can stop it by clicking on the "Stop generation" button below the editor.*
>
> \_This can be a handy feature, enabling you to quickly launch another text generation!
>
> \_
\_ Semji's AI + Content holds no secrets for you!
\_
> Good to know: Semji has developed a feature to help you save time: [AI Chat](/en/work-faster-with-ai/how-to-use-semjis-ai-chat)! This feature is available as an optional [Semji extension](/en/connect-your-tools/everything-you-need-to-know-about-the-semji-chrome-extension).
# Know everything on AI+ Knowledge Base: Create more relevant, optimized, and faster content! 🚀
Source: https://help.semji.com/en/work-faster-with-ai/know-everything-on-ai-knowledge-base-create-more-relevant-optimized-and-faster-content
AI+ Knowledge transforms content creation by leveraging your specific information sources to produce accurate and optimized texts.
### **What is AI+ Knowledge Base? 📚**
With **AI+ Knowledge Base**, feed the AI with your own documentation to create standout content. Here’s how this feature revolutionizes your workflow:
* **Centralization of essential sources:** Gather your URLs, PDF files, DOCX, CSVs, and other documents in one unified space.
* **Tailored content production:** The AI leverages your data to generate relevant texts aligned with your SEO goals.
* **Quality and reliability:** Say goodbye to errors and outdated content with up-to-date and perfectly optimized texts.
* **Time savings:** Quickly produce high-quality content without compromising on accuracy.
### Who is it for ?
**AI+ Knowledge Base is designed primarily for:**
* **SEO Writers ✍️:** Imagine you need to create an article about a new product. By integrating a technical document via AI+ Knowledge Base, you instantly receive optimized content that accurately reflects your product’s specifications.
* **E-commerce Content Managers 🛒:** Managing an online product catalog? Quickly craft consistent, optimized, and up-to-date product descriptions and web pages with this feature.
### Setting up the Knowledge Base
Setting up AI+ Knowledge Base is simple and flexible. Add your information in the form of text files, URLs, or other formats tailored to your needs. This allows you to create a customized knowledge base for your projects.
[\[💡 Learn how to set up your knowledge base\]](/en/work-faster-with-ai/ai-knowledge-base-create-a-knowledge-base)
### Access Rights Management
AI+ Knowledge Base allows you to securely manage access to your information. You control who can view, edit, or delete data, ensuring smooth management while protecting your sensitive information.
[\[🔑 Explore access rights management\]](/en/work-faster-with-ai/ai-knowledge-base-roles-and-permissions-management)
### Using the Knowledge Base
Once your knowledge base is set up, it’s time to start using it! Within the Semji content editor, you can directly integrate your specific information to generate optimized texts. This is a simple and efficient way to produce high-quality content while meeting your requirements and deadlines.
[\[🚀 Discover how to use AI+ Knowledge Base now\]](/en/work-faster-with-ai/ai-knowledge-base-how-to-use-it-for-your-ai-generation)
# Work faster with AI
Source: https://help.semji.com/en/work-faster-with-ai/overview
Explore all of Semji's AI features, such as Brand Voice, Ask AI, AI+ Template and many more.
Speed up content creation and optimization with Ask AI+, Atomic Content, fact-checking, and custom instructions.
Get started with AI+ Agents and learn what they can do for you.
Get your SEO opportunities delivered straight to Slack or Teams.
Use pre-configured agents built for specific, one-off tasks.
Go further with narrow, advanced agents built for specific SEO and GEO tactics.
Understand Semji's AI credit system and track your consumption over time.
# Fact Checking ✅: Produce quality and verified content
Source: https://help.semji.com/en/work-faster-with-ai/produce-quality-verified-content-with-fact-checking
Quickly visualize the sources of your content produced through Fact Checking.
Why use Fact Checking?
The purpose of the Fact Checking feature is to reduce the spread of false information in texts generated by AI. This feature helps you identify passages of text that require verification, thus ensuring that the information provided is reliable and properly referenced.
In addition to providing a source, it indicates a degree of "truthfulness" of the information and allows you to prioritize which sources to check.
**3 source statuses are available:**
* Green: A source has been identified. It is verified and reliable.\\
* Orange: This source needs to be verified. Semji makes it easy for you by integrating an associated Google search.
* Red: This information is not reliable. It is important to verify this information using the associated search.
Next to each "Type of Fact Checking", you will find indicated the date of the SERP where the information was visible.
While browsing search engine results relevant to your query, sites considered "reliable" are identified to corroborate the verified information.
You will save time in identifying false information and reliable data, while avoiding the risks of hallucinations. Semji conducts for you a search of the sources that validate the claims generated by AI. In the sourced content, the relevant information is highlighted, making it easier to identify.
How do I use Fact Checking?
Step 1: Activate Fact Checking
Before launching a text generation, activate the feature by clicking on the button to the right of Atomic Content.
#### Step 2: Start text generation with Atomic Content or AI+Content
#### AI+ Content:
Type `/` or click on `+` to start text generation.
Atomic Content:
Click on "Atomic Content" to initiate a complete and optimized text generation.
Generate your text:
#### Step 3: Integrate the text into your draft and analyze the reliability of the information
Once the content has been produced, you can add it to your content and view the different levels of Fact Checking: [verified source](#green), [to be verified](#orange) and [important to verify](#red).
#### Step 4: Edit content and ensure the production of quality content for your audience.
Once your content is integrated into the editor, you can proceed with source analysis and content modification.
Each source can be accessed by clicking on the link. You can view all sources in the sidebar on the right under the "Fact Checking" menu.
All that remains is for you to identify the modifications and improvements to your content while bringing your personal expertise to the subject!
> Good to know 💡:
>
> * You cannot use this feature on text previously generated by AI, or on text that you have written yourself.
> * The Fact Checking feature applies to [Atomic Content](/en/work-faster-with-ai/how-to-use-semjis-ai-content), [AI+Content](/en/work-faster-with-ai/how-to-use-semjis-ai-content) (title, meta description, introduction, outline, paragraph) and FAQ generation.
> * Using Fact Checking results in a doubling of [credit](/en/work-faster-with-ai/understanding-the-credit-system) consumption.
# Set up your AI
Source: https://help.semji.com/en/work-faster-with-ai/setting-up-your-ai-environment
Configure your Knowledge Base, Brand Voice, and presets to get generations tailored to your brand.
* [AI Presets: Set Up Your Writing Preferences Once](/en/work-faster-with-ai/ai-presets-set-up-your-writing-preferences-once)
* [Control your AI data sources: disable web search in AI+ settings](/en/work-faster-with-ai/control-your-ai-data-sources-disable-web-search-in-ai-settings)
* [Know everything on AI+ Knowledge Base: Create more relevant, optimized, and faster content! 🚀](/en/work-faster-with-ai/know-everything-on-ai-knowledge-base-create-more-relevant-optimized-and-faster-content)
* [How to configure your Brand Voice?](/en/work-faster-with-ai/how-to-use-semjis-ai-brand-voice)
* [AI+ Knowledge Base - Roles and Permissions Management](/en/work-faster-with-ai/ai-knowledge-base-roles-and-permissions-management)
* [AI+ Knowledge Base: Create a Knowledge Base](/en/work-faster-with-ai/ai-knowledge-base-create-a-knowledge-base)
* [AI+ Knowledge Base: How to Use It for Your AI Generation ✨](/en/work-faster-with-ai/ai-knowledge-base-how-to-use-it-for-your-ai-generation)
* [AI+ Suite: AI+ Template ✨](/en/work-faster-with-ai/suite-ai-ai-template)
# AI+ Suite: AI+ Template ✨
Source: https://help.semji.com/en/work-faster-with-ai/suite-ai-ai-template
AI+ Template allows you to create, reuse, and customize tailored AI instruction models.
Why adopt this feature?
1. **Save Time**\
Produce faster with reusable templates tailored to your specific needs.
2. **Create Custom Content**\
Your templates incorporate key data from Semji, such as Google SERP and analysis recommendations.
3. **Benefit from Unmatched Precision**\
Adapt your AI instructions with unique insights for results aligned with your objectives.
### **How to create a template?**
👉 **Steps:**
1. Type `/`, click on `+`, or select text in the editor to open Ask AI+.
2. Click on "Advanced Mode" to access the dedicated menu.
3. Enter your instructions.
**Advanced Mode:**
* Click on the gear icon to adjust:
* **Creativity:** Define the desired level of innovation.
* **Maximum Length:** Set the maximum word count for the generated content.
1. Give your template a title and description for easy identification.
2. Click "Save as Template" to store it and use it whenever needed.
> *Good to know 💡: The created template will be accessible to all users in the Workspace.*
### How to use a template?
📋 Steps:
1. Access the "Templates" dropdown menu in Ask AI+.
2. Select the desired template from the existing models.
3. Apply it instantly to your content to enhance efficiency.
### How to modify a template?
**📋 Steps:**
1. **Access the advanced mode** (see the "How to create a template" section).
2. In **"Use an Example"**, select the template you want to modify.
3. Adjust your instructions or settings.
4. Click the **gear icon** if needed to modify creativity or maximum length.
5. Click **"Save"** to validate the adjustments.
### What are the benefits?
* **Significant time savings:** No need to start from scratch every time.
* **Consistent content:** Each template ensures perfect quality and structure.
* **Total flexibility:** Adapt your templates to fit any campaign.
* **Strategic recommendations:** Based on Semji's powerful data insights.
> *Good to know 💡:*\
> *Using **AI+ Template** will cost you 1 credit for every 20 words generated.*
# Write faster without sacrificing quality: the AI suggests, you adjust, the AI writes!
Source: https://help.semji.com/en/work-faster-with-ai/write-faster-without-sacrificing-quality-the-ai-suggests-you
Generate missing paragraphs and key points of an article in one click, making it easier to write and enhance your content.
Content writing can be time-consuming, especially when it comes to structuring an article, refining an angle, and producing fluid, optimized text.
With a **hybrid approach**, you benefit from artificial intelligence that assists you in your writing:
* Automatically generate an outline to organize your article.
* Refine and modify each title according to your editorial style.
* Produce all paragraphs in one click while maintaining a natural and structured tone.
**The result?** Significant time savings while keeping full control over your content. 🚀
### **How to Activate Automatic Generation?**
For optimal generation, you need to provide three essential elements:
1. **A Title**\
It guides the AI and ensures that the generated content remains relevant.
2. **A Structured Outline (modifiable after generation)**\
It serves as a guide to organize the article and ensure coherence.
3. **An Introductory Paragraph**\
It sets the context and establishes the tone for the rest of the generated content.\
📌 **The AI adapts to your modifications**: if you change a title, the generation will automatically adjust the text to stay relevant. 🚀
4. **Automatic Generation Suggestion**\
Once all conditions are met, the **"Generate the next paragraphs"** suggestion bar will automatically appear, allowing you to complete your content in one click.
With these elements, the feature takes care of the rest by instantly generating coherent and structured content. 🚀
### **Why Use This Hybrid Method?**
✔️ **Boost Your Productivity**: Generate content in seconds from a structured outline.
✔️ **Stay in Control**: Edit the outline before writing and adjust each title to fit your needs.
✔️ **Enhance Editorial Consistency**: The AI follows the established structure to ensure a smooth editorial flow.
✔️ **Built-in SEO Optimization**: Recommended related terms are included to maximize your content's visibility.
> 📌 **Tip**: Need a more refined editorial line? Check out [**Brand Voice**](/en/work-faster-with-ai/how-to-use-semjis-ai-brand-voice) to tailor the tone to your brand or explore [**Knowledge**](/en/work-faster-with-ai/know-everything-on-ai-knowledge-base-create-more-relevant-optimized-and-faster-content) to enrich your content with solid references. 🚀
# How can we help you?
Source: https://help.semji.com/index
Guides, tutorials and best practices to get the most out of the platform, from your first import to automating with AI.
# Billing & organization
Source: https://help.semji.com/en/admin-and-settings/billing-and-organization
Manage AI credits, currency, and your organization's account settings.
* [How can I manage the distribution of my AI credits according to my workspaces?](/en/admin-and-settings/how-can-i-manage-the-distribution-of-my-ai-credits-according-to-my-workspaces)
* [How to change currency in Semji?](/en/admin-and-settings/change-currency-in-semji)
* [How to delete your Semji account?](/en/troubleshooting-and-support/how-to-delete-your-semji-account)
# How to change currency in Semji ?
Source: https://help.semji.com/en/admin-and-settings/change-currency-in-semji
Semji now allows workspace administrators to manage the currency displayed in revenue reports.
### **How to Change the Currency?**
1. Go to settings
2. General settings
3. Under “Workspace currency”, select the currency you wish to display in the reports.
4. The change will be applied immediately after refreshing the page
### **Benefits**
* Simplified reading of financial reports in the currency used by the company.
* Better customization for international markets.
* Alignment of Semji data with the configurations of analytics tools.
> Good to know💡:
>
> * The default currency is automatically set based on the country associated with the workspace.
> * For customers operating in a different currency than their country, it can be manually configured.
> * The data displayed in Semji directly reflects the information sent by connected analytics tools, with no conversion performed by Semji.
# How can I manage the distribution of my AI credits according to my workspaces?
Source: https://help.semji.com/en/admin-and-settings/how-can-i-manage-the-distribution-of-my-ai-credits-according-to-my-workspaces
You can manage the number of credits you wish to allocate to your workspaces.
### Here are the steps for distributing your IA credits:
### Step 1:
Go to Semji's settings and click on **“Billing and Invoicing”.**
Step 2:
Click on **“Manage AI+ content credit limit”**.
### Step 3:
Add the allocation you wish to set up on your workspaces.
> *Good to know 💡: You can specify a number of credits not to be exceeded over a rolling period, or leave the field blank for unlimited credits.*
For example, if you have 7,000 credits available across your organization and several workspaces, you can distribute the number of IA credits evenly, or allocate a specific number to a single workspace.
Click on “**Update**” to save your changes.
# How do I switch on/off the AI+ Suite for a user?
Source: https://help.semji.com/en/admin-and-settings/how-do-i-switch-on-off-the-ai-suite
Easily control the use of AI in your content production.
Within Semji's settings, quickly select who has access to the AI+ Suite and who doesn't.
####
The AI+ Suite includes:
* Access to AI+Content and Atomic Content, available in the Semji editor.
* Access to AI+Chat, available in Semji's Chrome extension.
### Why enable or disable access to the AI suite?
With this feature, you can control access to AI generation functions, particularly when creating content with Atomic Content or AI+Content. You'll be able to control excessive use of AI, so as not to consume too many credits.
###
How to access rights management?
Rights management applies at the workspace level. If you have multiple workspaces, you need to perform this step for each of them.
Navigate to Semji settings, then to "Users." You can easily view your users and use a button to activate or deactivate access to the AI+ Suite.
Users not authorized to use AI+ Suite will be unable to generate text via Semji's AI.
# How do you manage the language of your work interface?
Source: https://help.semji.com/en/admin-and-settings/how-do-you-manage-the-language-of-your-work-interface
Semji offers you the opportunity to work in English, Spanish, Italian or French, as you wish.
### **Which languages are generated by Semji?**
Semji supports 5 languages:
* English
* German
* French
* Spanish
* Italian
* German
### **How to change the language of a workspace?**
To set the language of a workspace, follow these steps:
1. Go to the left-hand side menu
2. Click Settings -> Profile
3. Select the language of your choice
The language change is saved automatically.
This setting will only impact your personal access to the platform. It will not impact the language set by others.
You can now work in the language you want on Semji!
> *You can also find out more about: [Semji's languages and localizations](/en/admin-and-settings/what-languages-and-localizations-does-semji-support) here.*
# Languages
Source: https://help.semji.com/en/admin-and-settings/languages-and-general-preferences
Configure your workspaces, languages, locales, currencies, AI credits, and excluded terms to fit your organization's needs.
* [How can I manage the distribution of my AI credits according to my workspaces?](/en/admin-and-settings/how-can-i-manage-the-distribution-of-my-ai-credits-according-to-my-workspaces)
* [Why and how to add or remove a workspace?](/en/admin-and-settings/why-and-how-to-add-or-remove-a-workspace)
* [How do you manage the language of your work interface?](/en/admin-and-settings/how-do-you-manage-the-language-of-your-work-interface)
* [Why and how to exclude keywords from Semji recommendations?](/en/admin-and-settings/why-and-how-to-exclude-keywords-from-semji-recommendations)
* [What languages and localizations does Semji support?](/en/admin-and-settings/what-languages-and-localizations-does-semji-support)
* [How to change currency in Semji ?](/en/admin-and-settings/change-currency-in-semji)
# Manage Semji users
Source: https://help.semji.com/en/admin-and-settings/manage-semji-users
To add users to your Organization or Workspace and manage their access rights.
### Why manage users?
Semji has been designed to adapt to all team sizes, from the web marketer supported by an intern, to the team of specialized writers supervised by several managers. Thus, the platform has different levels of granularity to manage content production and authorized users.
Controlling the level of user access allows you to **assign actions and responsibilities to the right people in the organization**.
Some examples of features you may want to restrict:
* [SSO SAML](/en/connect-your-tools/how-to-use-the-sso-connection-via-saml) activation
* Excluded Keywords section
* Global contents performance
* Credit logs
Assigning the right level of rights to users can **prevent mistakes**. For example, you can prevent a writer from creating a draft in the Planning of another website (another Workspace) than the one he is supposed to work on and avoid spending an analysis credit by mistake.
### How to manage users?
User rights levels can be defined at the Organization level and at the individual Workspace level.
The **Organization** brings together your company and your teams in Semji. An Organization can contain several **Workspaces**, i.e. several websites or several markets (language/country). The Workspace is the interface where you can edit content. Thus, when you are connected to a Workspace, you are necessarily a member of the Organization.
Example : an organization can include:
* Workspace 1 : mysite.com/en
* Workspace 2 : mysite.com/fr
* Workspace 3 : myothersite.com
If the content of each of your sites or markets is produced by separate teams, you can assign each user access to the Workspace that concerns him or her.
Example: you can decide to grant your team access to the whole Organization, i.e. to all Workspaces, or only to Workspace 1 or Workspace 2.
### Understand user rights levels
#### **1. At the Organization level**
There are 2 levels of rights at the Organization level:
* Admin
* Member
Each Organization must have at least one Administrator. This is the highest level of rights possible in Semji.
The Administrator is usually the very first user to join Semji through an invitation link sent by their Customer Success Manager.
The Administrator has access to the following features in the Organization Settings:
* Creation and deletion of workspaces, as well as their configuration
* Details of credit expenses (“Credits logs”)
* Possibility to configure the connection in SSO SAML for all user teams (“Security”)
* New users creation and generation of automatic invitation emails (“Users”)
\_Navigation interface of a user with an "Admin" status within the Organization: the Settings section is accessible and the number of remaining analysis credits is visible.
\_
From the **"Users" tab**, the Organization Administrator can manage the access of other users. He can :
* Grant access to the whole Organization or to some Workspaces only
* Change the level of rights of the users of the Organization by defining them as "Admin" or as "Member".
* Send them a link to change their password
* Remove their access to the Organization
A Member of your Organization cannot invite new users, and has no access to the Organization settings (the Settings tab).
However, he can access all the Workspaces, or only some of them, depending on the rights defined at the time of his invitation.
*What a user with a"Member" status sees inside the Organization: the Settings button is not accessible, and the number of analysis credits is not visible.*
#### **2. At a Workspace level**
There are several levels of rights at the Workspace level:
* Owner
* Member
* Guest Writer
Only a user with an **Owner status** can invite users to join the Workspace and manage their access.
Thus, most of the time, the Organization Admins are also Owner of the different Workspaces, in order to be able to manage the users' rights at all levels.
An **Owner** has access to the Workspace settings and can:
* Rename the workspace or delete it
* Manage content status
* Exclude terms and keywords from the Headings, Questions and Topics recommendations in the Workspace drafts.\
*For example: exclude your competitors brand name ("Keywords relevance" tab)*
* Add and manage Workspace users ("Users" tab)
* Connect analytical tools, also called Service Integrations, such as [Google Analytics](/en/connect-your-tools/how-to-connect-my-google-analytics), [Search Console](/en/connect-your-tools/how-to-connect-my-google-search-console) or [AT Internet](/en/connect-your-tools/how-to-connect-my-piano-analytics-account).
Navigation interface of a Workspace Owner user: Settings are accessible
From the **"Users" tab**, the Owner user can manage the access of other users:
* Send them invitations to access this Workspace only
* Change users rights on this Workspace by setting them as "Owner", as "Member" or as "Guest Writer
* Send them a link to change their password
* Remove their access to this Workspace
Users with the **Member** access level do not have access to the Workspace Settings. They have access to all other features of the platform.
Users with **Guest Writer** access level have limited access to the platform features. They can only access the Planning tab, and see the content assigned to all workspace members.
Users with **Limited Guest Writer** access level have restricted access to the platform features. They only have access to the Planning tab and can only see the content assigned to them. They can assign drafts to other users, but will no longer see them in their interface.
These last two statuses allow you to invite freelance writers or external service providers to the platform, without giving them access to sensitive or confidential information (such as the turnover performance of your content, in the Reports tab).
### Manage user access
#### **1. Add users from the Organization**
At the Organization level, the Admin is the only one who can invite other users.\
As an Admin, access the Organization Settings, as seen above:
Choose the "Users" tab and click on the "Invite Users" button.
You can then select one or more Workspaces belonging to the Organization, then enter the email addresses of the users to whom you wish to grant access.
If you check all the workspaces, the user will have access to the whole organization.
You can enter multiple email addresses to share the same Workspaces with several users.
Note: **by default these users have an "Organization Member"** status and Shared Workspace Member. You can change their access level to Organization Admin once these users appear in your list.
You can make this status change even when a user has not accepted their invitation yet ("**Pending Invite**").
#### **2. Add users from the Workspace**
At the Workspace level, **Owner(s)** are the only ones who can invite other users to join this Workspace.
As an Owner, you can access the Workspace Settings, as seen before:
Choose the Users tab and click on the "Invite Users" button.
You can then enter the email addresses of the users you wish to invite into this Workspace.
If these users already have access to other Workspaces of your Organization, their address will be suggested in auto-completion in a drop-down list.
[](https://downloads.intercomcdn.com/i/o/248801802/5e311e10b4eb2a092bd63a5e/auto-completion-nom.png?expires=1619802000\&signature=bcb618fa8e7d87282d4ccb834388dd618569122ca440fb86163b930ed328565e)
Note: These users have **Member status in the Workspace** by default.
You can change their access level to Owner or Guest Writer within this Workspace once these users appear in your list.
The users you have invited to join Semji will then **receive an email inviting them to create their account** and listing the workspaces they have access to.
By clicking on "Join Now", they are directed to the Semji platform and invited to create a **secure password** associated with their email, which will be their login.
This **password creation link is valid for 30 days** from its reception and expires after this period. You can then generate a new invitation by clicking on "Resend invite". You can also cancel this invitation if the user's address is no longer valid or if you do not want them to join your Semji team anymore, by clicking on "Cancel invite".
Access these two options by clicking on the three horizontal dots to the right of the user's status:
**Let's sum up !**
**When to add my users in the Organization?**
* When I want to give them access to several workspaces at once
* When I want to add several people to the "Member" status of one or several Workspaces
* When I want to give them an Organization Admin status, i.e. the possibility to change advanced settings of the Organization and to invite new users
**When to add my users in the Workspace?**
* When I want to give access to a unique Workspace to one or more users
* When I want to grant restricted access (Guest Writer or Limited Guest Writer) to one or more users
* When I want to give them the Owner status of this Workspace, i.e. the possibility to change the advanced settings of the Workspace and to invite new users
#### **3. Invite a user to reset their password**
This option can be useful if a user has forgotten his password. He can launch the [password reset process](/en/troubleshooting-and-support/i-forgot-my-password-how-do-i-retrieve-it) himself, but he can also ask a Workspace Owner or an Organization Admin to do it for him.
If your company's security policy requires you to reset employee passwords on a regular basis or on a one-time basis following an internal event, this option allows you to do so on a massive scale in just a few clicks.
To send an email to a user and invite him to reset his password, click on the three horizontal dots to the right of his status, and choose "Reset password".
The user will receive an email asking him to choose a new password.
#### **4. Remove a user's access**
The Admin of an Organization and the Owner of a Workspace can remove access to one or more users if necessary.
This option is also available by clicking on the three horizontal dots to the right of a user's status:
By clicking on "**Remove from Organization/Workspace**", you will no longer allow this user to connect to your Semji Organization or Workspace. Next time the user tries to log in, an error message will appear telling them that they no longer have access to the targeted Organization or Workspace.
Only do this if you are sure that the user should no longer have access to all your data on Semji. If you simply want to restrict their access rights, you can change their status or contact your Customer Success Manager who will advise you on the best option.
If you have removed a user's access by mistake, you can invite him/her again by following the adding procedure described above.
### How many users can join Semji?
The maximum number of users you can invite to Semji is **set at the Organization level** and depends on the subscription package you have.
This limit is mentioned on your contract. Do not hesitate to contact your Customer Success Manager for further details.
Once this limit is reached, you will receive an alert message and you will not be able to invite new people to join your Organization or your Workspaces. You will have to upgrade your plan to add new members.
# Admin & settings
Source: https://help.semji.com/en/admin-and-settings/overview
Configure the key settings of your Semji organization: users, workspaces, language preferences and more.
Manage your organization's members, their access, and your workspaces.
Configure your workspace languages, locales, and excluded terms.
Manage AI credits, currency, and your organization's account settings.
Set up SSO, secure how your organization accesses Semji, and learn how Semji protects your data.
# Security & privacy
Source: https://help.semji.com/en/admin-and-settings/security-and-privacy
Set up SSO, secure how your organization accesses Semji, and learn how Semji protects your data.
* [SSO & authentication](/en/connect-your-tools/sso-and-authentication)
* [How to use the SSO connection via SAML?](/en/connect-your-tools/how-to-use-the-sso-connection-via-saml)
* [How can I connect to Semji with my Google account?](/en/connect-your-tools/how-can-i-connect-to-semji-with-my-google-account)
* [Data privacy & security](/en/troubleshooting-and-support/data-privacy-and-security)
* [What is the treatment of Personal Data by Semji?](/en/troubleshooting-and-support/what-is-the-treatment-of-personal-data-by-semji)
* [FAQ: Protecting Your Data – Security and Storage of Your Documents on Semji](/en/troubleshooting-and-support/faq-protecting-your-data-security-and-storage-of-your-documents-on-semji)
# Users, roles & workspaces
Source: https://help.semji.com/en/admin-and-settings/users-and-roles
Manage your organization's members, their access, and AI+ feature activation for each user.
* [Manage Semji users](/en/admin-and-settings/manage-semji-users)
* [How do I switch on/off the AI+ Suite for a user?](/en/admin-and-settings/how-do-i-switch-on-off-the-ai-suite)
# What languages and localizations does Semji support?
Source: https://help.semji.com/en/admin-and-settings/what-languages-and-localizations-does-semji-support
With Semji, you can manage all your international challenges, with a multitude of languages available on the platform.
### The issues
You can :
* Get SEO recommendations based on SERPs for targeted languages,
* Optimize your content for each specific audience,
* Reach users in over a hundred different countries,
* Expand your international presence.
### The different locations available:
When you connect to Semji, you need to select your website's localization in order to obtain the appropriate recommendations. Semji supports the following locations:
> Optimize your content for over 170 countries and 26 languages with Semji!
>
> * Bulgarian
> * Chinese (traditional)
> * Chinese (simplified)
> * Croatian
> * Czech
> * Danish
> * Dutch
> * English
> * Finnish
> * French
> * German
> * Greek
> * Hungarian
> * Italian
> * Japanese
> * Korean
> * Lithuanian
> * Norwegian
> * Polish
> * Portuguese
> * Romanian
> * Slovak
> * Slovene
> * Spanish
> * Swedish
> * Turkish
#### Eligible countries | Language
* Algeria | French
* American Samoa | English
* Angola | Portuguese
* Antigua and Barbuda | English
* Argentina | Spanish
* Australia | English
* Austria | German
* Bahamas | English
* Barbados | English
* Belgium | Dutch
* Belgium | French
* Belgium | German
* Belize | English
* Belize | Spanish
* Benin | French
* Bolivia | Spanish
* Bonaire, Saint Eustatius and Saba | Dutch
* Botswana | English
* Brazil | Portuguese
* Bulgaria | Bulgarian
* Burkina Faso | French
* Burundi | French
* Cameroon | English
* Cameroon | French
* Canada | English
* Canada - French
* Canada - Quebec | English
* Canada - Quebec | French
* Cape Verde | Portuguese
* Central African Republic | French
* Chad | French
* Chile | Spanish
* Christmas Island | English
* Cocos Islands | English
* Colombia | Spanish
* Comoros | French
* Cook Islands | English
* Costa Rica | Spanish
* Croatia | Croatian
* Curaçao | Dutch
* Curaçao | English
* Cyprus | Turkish
* Czech Republic | Czech
* Democratic Republic of Congo | French
* Denmark | Danish
* Djibouti | French
* Dominica | English
* Dominican Republic | Spanish
* Ecuador | Spanish
* El Salvador | Spanish
* Equatorial Guinea | Spanish
* Equatorial Guinea | French
* Eritrea | English
* Eswatini | English
* Fiji | English
* Finland | Finnish
* Finland | Swedish
* France | French
* French Polynesia | French
* French Southern and Antarctic Lands | French
* Gabon | French
* Gambia | English
* Germany | German
* Ghana | English
* Grenada | English
* Greece | Greek
* Guam | English
* Guam | Spanish
* Guatemala | Spanish
* Guernsey | English
* Guernsey | French
* Guinea | French
* Guinea-Bissau | Portuguese
* Guyana | English
* Haiti | French
* Heard Island and McDonald Islands | English
* Honduras | Spanish
* Hong Kong | Traditionnal Chinese
* India | English
* Ireland | English
* Isle of Man | English
* Italy | Italian
* Ivory Coast | French
* Japan | Japanese
* Jamaica | English
* Jersey | English
* Jersey | French
* Kenya | English
* Kiribati | English
* Lebanon | French
* Lesotho | English
* Liberia | English
* Liechtenstein | German
* Lithuania | Lithuanian
* Luxembourg | French
* Luxembourg | German
* Madagascar | French
* Malawi | English
* Mali | French
* Malta | English
* Marshall Islands | English
* Mauritius | English
* Mexico | Spanish
* Micronesia | English
* Moldova | Romanian
* Monaco | French
* Morocco | French
* Mozambique | Portuguese
* Namibia | English
* Nauru | English
* Netherlands | Dutch
* New Caledonia | French
* New Zealand | English
* Nicaragua | Spanish
* Niger | French
* Nigeria | English
* Niue | English
* Norfolk Island | English
* Northern Mariana Islands | English
* Norway | Norwegian (Bokmål)
* Pakistan | English
* Palau | English
* Panama | Spanish
* Papua New Guinea | English
* Paraguay | Spanish
* Peru | Spanish
* Philippines | English
* Pitcairn | English
* Poland | Polish
* Portugal | Portuguese
* Republic of Congo | French
* Romania | Romanian
* Rwanda | English
* Rwanda | French
* Saint-Barthélemy | French
* Saint Helena | English
* Saint Kitts and Nevis | English
* Saint Lucia | English
* Saint-Martin | English
* Saint-Martin | French
* Saint-Martin | Dutch
* Saint Pierre and Miquelon | French
* Saint Vincent and the Grenadines | English
* Samoa | English
* San Marino | Italian
* Sao Tome and Principe | Portuguese
* Saudi Arabia | English
* Senegal | French
* Seychelles | English
* Seychelles | French
* Sierra Leone | English
* Singapore | English
* Singapore | Simplified Chinese
* Sint Maarten | Dutch
* Sint Maarten | English
* Slovakia | Slovak
* Slovenia | Slovene
* Solomon Islands | English
* South Africa | English
* South Georgia and the South Sandwich Islands | English
* South Korea | Korean
* South Sudan | English
* Spain | Spanish
* Sudan | English
* Suriname | Dutch
* Sweden | Swedish
* Switzerland | French
* Switzerland | German
* Switzerland | Italian
* Taiwan | Traditional Chinese
* Tanzania | English
* Timor Leste | Portuguese
* Togo | French
* Tokelau | English
* Tonga | English
* Trinidad and Tobago | English
* Tunisia | French
* Turkey | Turkish
* Tuvalu | English
* Uganda | English
* United Arab Emirates | English
* United Kingdom | English
* United States | English
* United States Minor Outlying Islands | English
* Uruguay | Spanish
* Vanuatu | English
* Vanuatu | French
* Vatican City | Italian
* Venezuela | Spanish
* Wallis and Futuna | French
* Zambia | English
* Zimbabwe | English
With Semji, you can manage different languages and a multitude of locations!
# Why and how to add or remove a workspace?
Source: https://help.semji.com/en/admin-and-settings/why-and-how-to-add-or-remove-a-workspace
Each workspace is linked to one single domain name. If you have multiple websites, Semji allows you to work on separate workspaces for each domain or subdomain.
**Add a workspace**
#### **1. Why create a new workspace**
Each workspace is linked to a website, to a unique domain name. However, if you manage several websites/blogs, you can create a dedicated workspace for each of them on your account.
> *Important: creating a new workspace will change your subscription plan price (if not included in your basic plan).*
You can do this in two different ways:
* Add a workspace with the help of a CSM.
* Add a workspace without the help of a CSM (by yourself).
#### **2. How to add a new workspace**
You can add a new workspace in two ways:
1. If you already have many workspaces included in your plan, simply go to the Semji app and click on the arrow at the top of the page, then click on “Add Workspace”.
> *Note: If you need help adding a new workspace, you can contact your CSM at any time by email or on the Semji chat. Once the workspace activated, you will be able to access it on your account.*
2\. If your plan only includes one workspace, you will simply need to follow the previous steps and then send an email to [support@semji.com](mailto:support@semji.com) via the "contact us" button to include the new workspace in your account.
> *Note: If you have multiple workspaces, they will be displayed in a list by default. To access any workspace, simply click on the one you want to open.*
### **Delete a workspace**
#### **1. Why delete a workspace?**
Do you already have a workspace but want to optimize content for another website? We recommend that you create another workspace rather than deleting the existing one by default.
> *Note: If you delete a workspace, you will no longer be able to optimize or create content for the website linked to it. You will also lose all your data and work done on Semji.*
#### **2. How to delete a workspace**
To delete a workspace, simply:
1. Click on the drop-down menu at the top right;
2. Click on "Settings";\\
3. Click on "General Settings" in the "Workspace" section;
\
4\. Click on “Delete workspace”;
5\. Copy the name of the workspace into the field to confirm deletion;
\
6\. Click on “Delete Workspace”. Your workspace will be **permanently deleted.**
> *Note: Once you delete a workspace, all your data will be lost and your content will not be recoverable. This action is permanent. If you want to keep track of your content and its performance, make sure to export it from Semji before.*
You can now link a new website/domain to your Semji account!
# Localization expert agent: Adapting your content for international audiences
Source: https://help.semji.com/en/ai-agents/adapt-your-content-for-your-international-markets
Reduce your localization timelines from several days to just a few hours while preserving your SEO
### In summary
**What you can do:** Adapt your existing content for international markets while preserving SEO intent and respecting the cultural, linguistic, and regulatory specificities of each target market.
**For whom:** Marketing and editorial teams managing multilingual or multi-market content (international e-commerce, multinational companies, international content hubs).
**Why it's useful:** Drastically reduce the time needed to adapt content to a new market while ensuring a Content Score between 75-85.
### What it changes for you
**The problem:** Content localization is traditionally long and costly. To adapt a high-performing article from one market to another, your teams must:
* **Translate** the content into the target language
* **Adapt** cultural references, units of measurement, local standards
* **Re-optimize** the content for local SEO (new keywords, different search intents)
* **Verify** regulatory constraints of the target market
* **Validate** terminological consistency and brand voice
This process can take **several days per piece of content** and often requires the involvement of translators, SEO managers, and local experts.
**The solution:** The Localization Expert agent transforms this process into a guided and automated workflow. It analyzes your source content, researches target market standards, automatically adapts the content by integrating Semji SEO recommendations, and alerts you to local regulatory constraints.
**The impact:**
* **Drastic acceleration:** From several days to just a few hours to localize content
* **SEO preservation:** Automatically integrates Semji SEO recommendations (search intents, related terms, questions, recommended length) to target a Content Score between 75-85
* **Complete cultural adaptation:** Cultural references, units of measurement (miles → km, °F → °C), local standards, date/currency formats
* **Terminological consistency:** Uses the Knowledge Base and researches target market standards to ensure appropriate vocabulary
* **Total transparency:** Workflow in 4 visible phases (source analysis, local research, adaptation, verification)
### How to configure the Localization Expert agent
#### Step 1: Create your agent
In the Semji editor, click on **"Agents"** in the right sidebar, then select the **"Localization Expert"** template.
Click on the template to configure and create your agent.
> **Good to know ℹ️** :The agent works in the **current workspace**, which represents your target market. Example: if you're working in a workspace configured for France, the agent will adapt your content for the French market by integrating FR SEO recommendations.
#### Step 2: Name your agent
**Name:** Choose an explicit name that clearly indicates the target market or language pair.
**Examples of good names:**
* "Localization expert FR" (to adapt for the French market)
* "Expert in localization ES" (for the Spanish market)
* "Content adapter DE" (for the German market)
* "Localization UK → FR" (to indicate the source → target pair)
**Description:** Explain in one sentence what your agent does.
**Examples :**
* "Localize my content for the French market"
* "Adapt my US content for the German market"
* "Transform my UK articles into content optimized for France"
💡**Tip:** If you manage multiple target markets, create a dedicated agent for each market. This will allow you to customize the adaptation guidelines for every country.
#### Step 3: Define specific adaptation guidelines
This is the key step: you will specify the adaptation rules that the agent must follow to transform your source content into localized content.
This section allows you to guide the agent on the elements to adapt or preserve.
**How to structure your guidelines:**
**1. What should be adapted:**
List the elements that must be modified for the target market:
**Example for the French market:**
****
**2. What should be preserved:**
Indicate the elements to keep unchanged:
> **Tip💡** : Be precise in your guidelines. The more detailed they are, the more relevant the adaptation will be. Don't hesitate to give concrete examples of the adaptations you want.
#### Step 4: Specify terminologies and regulatory constraints
This step allows you to specify:
* Specific vocabularies to comply with
* Regulatory constraints of the target market
* Mandatory legal notices
**Examples for the Insurance sector (France):**
> **Good to know ℹ️** : The agent will use this information to adapt the vocabulary and flag any potential regulatory non-compliances. This section is particularly important for regulated sectors.
#### Step 5: Add additional instructions
If you have overarching guidelines that apply to all your localized content:
**Examples of additional instructions:**
****
#### Step 6: Save
Click **"Create."** Your agent is now available and accessible to your team.
💡 **Sharing:** All members of your team can run the agent. Only users with editing rights can modify the configuration.
### How to use the agent on a daily basis
#### Start localization
**Recommended workflow:**
1. **Prepare your target content:**
* Create a new draft in the **workspace of the target market** (e.g., the FR workspace to localize for France)
* Define the **Focus keyword** adapted to the target market (e.g., "assurance auto" for the French market if your source US content is about "auto insurance")
* Semji SEO recommendations will be automatically loaded for this local primary Keyword
2. **Copy your source content:**
* Open your master content (e.g., US article on "auto insurance")
* Copy the entire content
* Paste it into your new FR draft
3. **Launch the agent:**
* Click on **"Agents"** in the sidebar
* Select your agent **"Localization expert FR"**
* The agent launches automatically
⏱️ **Duration:** 60–120 seconds depending on content length\
**ℹ️** **Cost:** 10 AI credits per run
> **Tip 💡** : Make sure your main target keyword is clearly defined before running the agent. This keyword will trigger the local SEO analysis and the optimization recommendations.
# Specialized SEO agents
Source: https://help.semji.com/en/ai-agents/advanced-use-cases
Deploy specialized agents to tackle advanced challenges in strategy, search intent, SEO architecture, and GEO visibility.
* [Query fan-out expert agent: identify all search intents around a keyword](/en/ai-agents/agent-expert-query-fan-out)
* [ChatGPT content expert agent: optimize your content to get cited by AI](/en/ai-agents/agent-expert-chatgpt)
* [Q.A.T. audit agent: Optimize your content to be cited by AI systems](/en/ai-agents/agent-audit-qat-geo)
* [Semantic architecture & Hn agent: Audit and optimize your heading structure](/en/ai-agents/agent-architecture-semantique-hn)
* [Structured data agent: Generate your JSON-LD code and unlock Rich Snippets](/en/ai-agents/agent-donnees-structurees)
* [Inbound linking agent: Strengthen your pages' authority through internal backlinks](/en/ai-agents/agent-inbound-linking)
* [Advanced internal linking agent: Optimize your semantic cocoon in 5 phases](/en/ai-agents/agent-maillage-interne-avance)
* [SERP behavioral analysis Agent: Define the right page format before you write](/en/ai-agents/agent-serp-behavioral-analysis)
* [SEO Intent Validator Agent: Validate Your Keyword and Pivot When Needed](/en/ai-agents/agent-validateur-intention-pivot)
* [E-commerce content writer agent: Optimize your category pages for SEO and GEO](/en/ai-agents/e-commerce-content-writer-agent-optimize-your-category-pages-for-seo-and-geo)
* [Agent SEO Intent Analyst: Verify the Alignment Between Your Content and the SERP](/en/ai-agents/agent-alignement-intention-seo)
* [SEO architect Agent: Building a silo content strategy](/en/ai-agents/seo-architect-agent-building-a-silo-content-strategy)
# Agent SEO Intent Analyst: Verify the Alignment Between Your Content and the SERP
Source: https://help.semji.com/en/ai-agents/agent-alignement-intention-seo
Set up an AI+ Agent to diagnose the alignment between your content and the dominant SERP intent, and get actionable recommendations to improve your rankings.
### At a glance
* **What you'll do**: Create a custom AI+ Agent that automatically analyzes whether your content matches the dominant search intent of the SERP for your focus keyword.
* **Time required**: \~5 minutes to set up, then a few seconds per analysis.
* **Best for**: SEO managers, content managers, and writers who want to understand why content isn't ranking despite strong optimization.
### What is it for?
You've written high-quality, well-structured content with a solid optimization score… but it's struggling to reach the TOP 10? The issue might not be writing quality — it could be a **misalignment between your content's intent and what Google expects for that keyword**.
This AI+ Agent analyzes the SERP for your focus keyword, identifies the dominant search intent (informational, transactional, navigational, or commercial), then compares it to your content's actual intent. The result: a clear diagnosis and concrete recommendations to get back on track.
> **Good to know ℹ️**: The four main search intents are: **informational** (the user is looking for an answer or explanation), **transactional** (they want to buy or take action), **commercial** (they're comparing before buying), and **navigational** (they're looking for a specific site or page). Informational content targeting a transactional keyword will have very little chance of ranking, and vice versa
### What you'll get
The agent delivers a structured output in two parts:
**1. 🔎 Intent Analysis** : A 2–3 sentence diagnosis identifying the dominant SERP intent and your content's intent, then concluding on alignment (or misalignment).
**2. 💡 Actionable Recommendations** : Depending on the diagnosis:
* **If alignment is confirmed**: a quick action plan to improve your Content Score by integrating Semji's related terms and SEO questions.
* **If a misalignment is detected**, two paths are suggested:
* **Option A : Adapt your content**: suggested structural changes to your title and headings (before/after format) to align your content with the dominant intent.
* **Option B : Change your keyword**: 3 alternative keywords whose intent matches your current content.
#### Before you start
Make sure that:
* You have **content open in the Semji editor** with a **focus keyword defined**.
* **SERP data is loaded** for that keyword (SEO recommendations and competitor data must be available).
* You have access to the **AI+ Agents** feature (available depending on your Semji plan).
> **Tip ✅**: Before running the agent, make sure your content in the editor is up to date. The agent analyzes the content as it appears in Semji, not the published version on your website.
### How to do it
#### 1) Access AI+ Agents
From the Semji editor, open the content you want to analyze. Navigate to the **AI+ Agents** tab in the right-side panel.
#### 2) Create the custom agent
Click **Create a custom agent** and configure it as follows:
* **Name**: SEO Intent Alignment (SERP vs Content)
* **Instructions**: Copy and paste the prompt below.
* **Tools to enable**:
* ✅ Retrieve SEO recommendations
* ✅ Get web page content
* ✅ Google search
Main Objective: Analyze the Focus Keyword, associated SERP, and Client Content in the Semji editor to validate Search Intent alignment. Provide a clear diagnosis and actionable recommendations to optimize intent or target an alternative keyword.
Execution Steps:
1\. Key Data Retrieval:\
• Identify the Focus Keyword and the dominant Search Intent of the SERP from Semji's Competitors Insights and SERP title analysis (via the keyword\_retrieve\_serp tool if available and needed for current data).\
• Analyze the client's current Title, Meta Description, and Editorial Structure/Content to determine the intent of their content.
2\. Alignment Diagnosis:\
• Compare the Dominant SERP Intent (e.g., transactional or informational) with the Client Content Intent.\
• Assess whether the Client Content addresses the predominant intent Google expects for this keyword.
3\. Recommendations (Conditional):
Case 1: Alignment Confirmed (Success):\
• Validate the alignment.\
• Propose a quick action plan to improve the Content Score by integrating Semji's Related Terms and SEO Questions.
Case 2: Misalignment Detected (Failure):\
• Option A (Adapt Content): If the SERP is Transactional and the content is Informational (or vice versa), suggest structural changes and Title/H2 modifications to align the content with the dominant intent (e.g., add a "Pricing" or "Buy" section for transactional). Use agent\_before\_after\_format to suggest changes to the Title and key H2s.\
• Option B (Change Keyword): If the content cannot or should not be modified to match the SERP (e.g., incompatible editorial strategy), use the google:search tool (query like keywords "intent" \[topic]) to find 3 alternative keywords whose intent matches the client content's current intent.
4\. Response Format:\
• Present the diagnosis in a "🔎 Intent Analysis" section (max 2-3 sentences).\
• Present the recommendations in a "💡 Actionable Recommendations" section using bullet points.\
• Use a professional, clear, results-oriented tone.
Agent Constraints:\
• Priority: Use Semji data (Focus Keyword, Competitors Insights) before launching external tools.\
• Tools: Use keyword\_retrieve\_serp to validate the current SERP, and google:search only for alternative keyword research in case of misalignment.\
• Text Modification: Any text replacement suggestion (Title, Hx) must use the agent\_before\_after\_format tool.
Click **Create** to save your agent.
#### 3) Run the analysis
Once the agent is created, select it from your custom agents list and click **on the Agent**. The agent will start automatically:
1. Retrieve your focus keyword data and analyze the SERP using Semji's competitor data.
2. Analyze your content's title, meta description, and structure.
3. Compare both intents and produce its diagnosis.
#### 4) Interpret the results
The agent returns a structured diagnosis. Here's how to read the two possible scenarios:
**✅ Scenario 1 : Alignment confirmed**
Your content's intent matches the dominant SERP intent. The agent then suggests an action plan to strengthen your ranking: integrate missing related terms, answer SEO questions identified by Semji, and improve your Content Score.
**⚠️ Scenario 2 : Misalignment detected**
Your content's intent doesn't match the SERP. The agent offers two paths:
* **Option A : Adapt your content**: concrete restructuring suggestions in a before/after format for the title and main headings. For example, transforming an informational guide into a comparison or purchase-oriented page.
* **Option B : Change your keyword**: if modifying your content isn't relevant to your editorial strategy, the agent searches for 3 alternative keywords whose intent matches your current content.
#### Concrete example
**Situation**: You've written a comprehensive guide titled "Everything You Need to Know About Compact Washing Machines" (informational content: technology comparisons, maintenance tips, capacity guide). Your focus keyword is "compact washing machine."
**What the agent detects**: The SERP for "compact washing machine" is 80% dominated by transactional pages (product listings, e-commerce category pages, price comparison sites). The dominant intent is clearly **transactional**.
**Diagnosis**: Misalignment : your informational content doesn't match the intent Google prioritizes for this keyword.
**Agent recommendations**:
* **Option A**: Restructure the content by adding purchase-oriented sections (price comparisons, best model selections, links to product pages). Before/after suggestions for the title and H2s.
* **Option B**: Target a more informational alternative keyword like "how to choose a compact washing machine," "compact washing machine buying guide," or "compact washing machine maintenance," whose SERPs match guide-type content.
> **Tip 💡**: Systematically run this agent on content stuck outside the TOP 20 despite a strong optimization score. Intent misalignment is one of the most common — and most underestimated — causes of SEO underperformance.
#### Options and variations
You can customize the agent's prompt to fit your needs:
* **Target a specific intent type**: add an instruction for the agent to focus only on the informational/transactional distinction, if that's your main concern.
* **Add industry context**: specify your industry in the prompt so alternative keyword suggestions are more relevant (e.g., "We are an e-commerce company specializing in home appliances").
* **Deepen competitive analysis**: ask the agent to analyze the content of the top 3 SERP results to identify the specific structural elements matching the dominant intent.
#### Why is this useful?
| Before | With this AI+ Agent |
| - | - |
| Manual SERP analysis to guess the dominant intent | Automatic diagnosis based on Semji competitor data |
| No quick way to compare content intent vs SERP | Structured comparison with a clear verdict (aligned / misaligned) |
| Hesitation between modifying content or changing keyword | Two actionable proposals with before/after suggestions |
| Risk of producing content that will never rank | Systematic check before publishing or during an audit |
### Go further
**Additional actions to consider:**
* After correcting a misalignment, re-run the agent to confirm your content is now aligned.
* Combine this agent with the competitive content analysis agent to also identify missing topics.
* Integrate this intent check into your editorial workflow, ideally before publishing any new content.
> **Warning ⚠️**: The dominant intent of a SERP can change over time. A keyword that was informational six months ago may become transactional if Google changes its interpretation. Re-run the analysis periodically, especially on your strategic content.
**Useful links:**
* **[\[Create and configure a custom AI+ Agent\]](/en/ai-agents/create-and-configure-your-custom-ai-agent)**
* **[\[Optimize existing content with Semji\]](/en/work-faster-with-ai/how-to-create-and-optimize-your-seo-content-with-atomic-content)**
# Semantic architecture & Hn agent: Audit and optimize your heading structure
Source: https://help.semji.com/en/ai-agents/agent-architecture-semantique-hn
This agent analyzes your Hn tag hierarchy, checks Focus Keyword integration, and compares your outline to the top SERP results to deliver an actionable…
### At a glance
* **What you'll do**: Get a full audit of your Hn structure, a comparison with winning SERP patterns, and ready-to-apply recommendations.
* **Time required**: 3 to 5 minutes per page analyzed.
* **Ideal for**: Writers and content managers who want to verify or fix content structure before publishing, or optimize existing content that has stalled in rankings.
### What is it for?
The Hn structure is the backbone of any high-performing SEO page. A H1 that doesn't contain the Focus Keyword, a level skip between H2 and H4, or subheadings that ignore the search intents identified by Semji: each of these issues weakens Google's semantic understanding of your page and reduces your chances of ranking well.
The difficulty is that poor structure often goes unnoticed. Content can feel well-organized when read but still have hierarchy inconsistencies or significant semantic gaps compared to the pages occupying the top 3 SERP positions.
This agent automates the audit by crossing three levels of analysis: the technical compliance of your Hn hierarchy, the presence of the Focus Keyword in the right levels, and a comparison with the structures used by the top two SERP results for your target keyword.
> **Good to know ℹ️**: The agent uses the Search Intents provided by Semji in the editor context to verify that your H2 and H3 tags cover the search intents Google expects, not just the main keyword.
### What you'll get
The agent delivers a four-part report:
* A **structure diagnosis**: H1 status, Focus Keyword presence, hierarchy consistency.
* The **current structure plan** displayed as an indented list, so you can visualize the full architecture at a glance.
* A **SERP comparative analysis**: what top-performing competitors are doing, recurring structural patterns to adopt.
* **Prioritized optimization recommendations**, with a rewrite proposal for each heading to modify, integrated directly into the editor via the replacement tool.
### How to do it
#### 1) Access AI+ Agents
Open the content to audit in the Semji editor and make sure the Focus Keyword is set. It is essential for both the technical audit and the SERP analysis.
> **Tip ✅**: This agent is particularly effective just before publishing new content, or when auditing existing pages stalling between positions 4 and 15.
#### 2) Create the custom agent
In the Semji editor, navigate to the **AI+ Agents** feature and create a new agent with the following settings:
* **Name**: Semantic architecture & Hn expert
* **Instructions**: Copy and paste the prompt below.
* **Tools to enable**:
* ✅ Analyze HTML
* ✅ Google search
* ✅ Retrieve SEO recommendations
\[PROMPT]
Click **Create** to save your agent.
#### 3) Run the analysis
Once the agent is configured, launch it from the Semji editor on the open content. It automatically extracts the Hn structure, analyzes the top 3 SERP results, and cross-references the findings with the Search Intents from your workspace.
Click **Run** to start the analysis.
#### 4) Read and apply the output
**Structure diagnosis**: start with the ✅ / ❌ / ⚠️ statuses. A ❌ on the Focus Keyword in the H1 is an absolute priority to fix before any other optimization.
**Current structure plan**: use the indented list to visually spot level skips (for example an H4 directly after an H2) and unbalanced sequences.
**SERP analysis**: retain the recurring structural patterns identified among competitors. If several top 3 pages use a "Frequently asked questions" section at the end of the article, that's a strong signal to integrate.
**Recommendations**: for each heading to modify, the agent proposes a rewritten version directly in the editor. Accept or adjust based on your editorial guidelines.
> **Important ⚠️**: If the agent flags a mismatch between the main search intent and your current H1, don't just rewrite the title. It's often a sign that the overall content plan deserves a full review.
#### Using the agent day to day
**Before every publication**: run the agent on any new content to validate structure before going live. It's the fastest SEO quality check to build into an editorial workflow.
**On pages ranking between positions 4 and 15**: these are the pieces with the highest potential for quick gains. A Hn structure better aligned with the SERP is often enough to push them forward.
**After a substantial content update**: if you add multiple sections or reorganize an existing article, re-run the agent to make sure the new hierarchy remains consistent.
> **Pro tip 💡**: Combine this agent with Semji's SEO recommendations to work on Hn structure and semantic enrichment at the same time. Both levers reinforce each other.
### Going further
Once your Hn architecture is optimized, extend the work with complementary agents:
* Use the **SEO intent alignment agent** to verify that your page's overall search intent is aligned with what Google expects.
* Enable Semji's **SEO recommendations** to enrich the body of each section with missing semantic terms.
* Use the **Structured data agent** to add JSON-LD markup consistent with the optimized Hn structure.
**Useful links:**
* **[\[SEO intent alignment agent\]](/en/ai-agents/agent-alignement-intention-seo)**
* **[\[Structured data agent\]](/en/ai-agents/agent-donnees-structurees)**
# Q.A.T. audit agent: Optimize your content to be cited by AI systems
Source: https://help.semji.com/en/ai-agents/agent-audit-qat-geo
This agent evaluates your content using the Q.A.T. method and delivers a prioritized action plan to transform a web article into a reference source for…
### At a glance
* **What you'll do**: Get a Q.A.T. score out of 10, a per-pillar diagnosis, and three immediate optimizations with ready-to-integrate rewrites.
* **Time required**: 5 to 10 minutes per page analyzed.
* **Ideal for**: SEO and editorial teams who want to optimize their content for GEO (Generative Engine Optimization) and maximize their chances of being cited by Perplexity, SearchGPT, Gemini, and other AI engines.
### What is it for?
Ranking well on Google no longer guarantees being cited by generative AI systems. These systems select their sources based on criteria that differ from traditional search engines: they prioritize factually grounded, methodologically transparent content structured to allow unambiguous data extraction.
Most current web content fails on at least one of these three pillars. Claims remain vague, sources are not explicitly cited, author expertise is not established, and data is not structured in extractable lists or tables. The result: content is indexed but never cited.
The Q.A.T. method (Quality, Accuracy, Transparency) is an audit framework designed to precisely identify these gaps and fix them. This agent applies it automatically to your content, cross-references the results with Semji's GEO recommendations, and delivers concrete rewrites via the replacement tool.
> **Good to know ℹ️**: GEO (Generative Engine Optimization) complements traditional SEO. Content well-optimized for both requires strong keyword positioning and a factual, transparent architecture that meets AI selection criteria.
### What you'll get
The agent delivers a structured report in three parts:
* An **overall Q.A.T. score /10** and a per-pillar score table (Quality, Accuracy, Transparency), with strengths and weaknesses identified for each.
* An **expertise inventory**: the 5 key semantic anchors and the 3 strongest raw facts in the text, the elements to prioritize.
* A **3-step priority action plan**, with a concrete rewrite proposed directly in the editor via the replacement tool for each optimization.
### How to do it
#### 1) Access AI+ Agents
Open the content to audit in the Semji editor. The agent analyzes the text in the editor. The Focus Keyword does not need to be set, but Semji's GEO recommendations significantly enrich the analysis when available.
> **Tip ✅**: This agent is particularly effective on long informational content (guides, studies, in-depth articles) where the stakes of AI citation are highest.
#### 2) Create the custom agent
In the Semji editor, navigate to the **AI+ Agents** feature and create a new agent with the following settings:
* **Name**: Q.A.T. audit
* **Instructions**: Copy and paste the prompt below.
* **Tools to enable**:
* ✅ Retrieve SEO recommendations
* ✅ Retrieve GEO recommendations
* ✅ Google search
* ✅ Get web page content
\[PROMPT]
Click **Create** to save your agent.
#### 3) Run the analysis
Once the agent is configured, launch it from the Semji editor on the open content. It automatically analyzes the text across the three Q.A.T. pillars, cross-references the results with available GEO recommendations, and searches the web for data needed for rewrites.
Click **Run** to start the analysis.
#### 4) Read and apply the output
**Score table**: scores below 6/10 on a pillar signal a critical weakness. Always start with the lowest-scoring pillar, as it has the greatest impact on the probability of AI citation.
**Action plan**: the three priority steps are ordered by impact. Apply them in sequence. For each optimization, the agent proposes a rewrite directly in the editor via the replacement tool.
**Expertise inventory**: the identified semantic anchors are the terms on which to strengthen your topical authority. The raw facts are those to source explicitly if not already done.
> **Important ⚠️**: The rewrites proposed by the agent include factual data found on the web. Always verify that the figures and sources cited match the reality of your industry before integrating them.
#### Using the agent day to day
**On high-GEO-potential content**: prioritize pages that answer direct questions — "what is", "how to", or "why" content types that generative AI systems cite most frequently.
**Before publishing premium content**: case studies, whitepapers, comprehensive guides. These formats are most likely to be cited when their Q.A.T. structure is solid.
**During a content audit**: review your existing strategic pages to identify those that, with a few targeted optimizations, can quickly gain GEO visibility.
> **Pro tip 💡**: A low Transparency score is often the fastest to fix. Adding an author bio with titles and authority links, an explicit update date, and two or three outbound links to recognized sources is often enough to significantly improve the overall score.
### Going further
Combine the Q.A.T. audit with the other GEO optimization levers available in Semji:
* Enable Semji's **GEO recommendations** to cross-reference the Q.A.T. diagnosis with opportunities automatically detected by the platform.
* Use the **Structured data agent** to add JSON-LD markup that strengthens your content's readability by AI systems.
* Use the **Semantic architecture & Hn agent** to verify that your heading structure facilitates information extraction by AI engines.
**Useful links:**
* **[\[GEO recommendations in Semji\]](/en/create-optimize-and-publish/what-is-the-geo-and-why-is-it-important)**
* **[\[Structured data agent\]](/en/ai-agents/agent-donnees-structurees)**
* **[\[Semantic architecture & Hn agent\]](/en/ai-agents/agent-architecture-semantique-hn)**
# E-E-A-T Auditor agent: strengthen the credibility and authority of your content
Source: https://help.semji.com/en/ai-agents/agent-auditeur-eeat
Audit your content across all 4 E-E-A-T pillars, identify your credibility gaps against the SERP, and get a prioritized action plan to improve your SEO…
### In summary
**What you can do:** Run a full E-E-A-T audit on any piece of content, get a scored diagnostic across all 4 pillars (Experience, Expertise, Authoritativeness, Trustworthiness), and receive a prioritized action plan to close your credibility gaps.
**Who it's for:** SEO managers and heads of content looking to improve the rankings of content that stagnates despite a strong semantic score.
**Why it's useful:** The agent benchmarks your content against the top 3 SERP results for your target keyword and searches the web for missing data points, sources, and expertise signals. It delivers an actionable diagnostic rather than a generic list of best practices.
### What it changes for you
**The problem:** A strong Content Score is not always enough to rank on page 1. Content that lacks expertise, authority, and trustworthiness signals is penalized by Google and rarely cited by generative AI tools such as ChatGPT and AI Overviews. Identifying these gaps manually is time-consuming and subjective, especially when you need to cross-reference competitor practices in the SERP.
**The solution:** The E-E-A-T Expert agent audits your content across all 4 E-E-A-T pillars, compares your credibility signals against the pages ranking above you, then automatically searches the web for recent data points, sources, and expertise proofs that are missing from your content. The result is a scored diagnostic and a prioritized action plan, pillar by pillar.
**The impact:**
* **Objective diagnostic:** an E-E-A-T score per pillar, benchmarked against your SERP standards.
* **Concrete gap identification:** missing sources, outdated statistics, absent author expertise signals, insufficient trustworthiness proofs.
* **Directly applicable action plan:** prioritized recommendations with the precise elements to add or correct in your content.
* **Dual SEO and GEO benefit:** content strengthened on E-E-A-T performs better in Google rankings and gets cited more frequently by AI tools.
### How to use the E-E-A-T Auditor agent
#### 1) Access the template from the Discover gallery
From the left sidebar, click on **"AI"** then click **"Agents"** preconfigured agents showcase.
Find the **"E-E-A-T Auditor"** template and click it to open it on your content.
> **Good to know ℹ️:** The E-E-A-T Expert template is available to all workspace members with no prior configuration required. It opens directly on the content you are editing and automatically uses the primary keyword associated with your page.
#### 2) Add custom instructions (optional)
Before running the agent, you can provide specific guidelines to shape its analysis and recommendations.
**Examples of useful instructions:**
* "Prioritize recommendations on the Trustworthiness pillar first"
* "Our author is a certified expert in this field, take that into account in the diagnostic"
* "Focus only on gaps identified in competitors ranking in positions 1 and 2"
* "Only suggest freely accessible sources"
> **Tip ✅:** If your content targets a regulated industry such as health, finance or law, mention it in your instructions. The agent will tailor its recommendations to the specific trustworthiness requirements of those sectors, which Google scrutinizes most closely.
#### 3) Run the agent and let the analysis complete
Click **"Run"** to start the agent. It automatically executes three operations in sequence: auditing your content across all 4 E-E-A-T pillars, benchmarking against the top 3 SERP results for your target keyword, then searching the web for missing data points, sources, and expertise proofs.
⏱️ **Duration:** 1 to 2 minutes depending on content length and the number of SERP results analyzed
**ℹ️ Cost:** 10 AI credits per run, 10 AI credits per follow-up message
#### 4) Read the scored diagnostic
Once the analysis is complete, the agent delivers a structured diagnostic pillar by pillar. For each of the 4 E-E-A-T pillars, you get an evaluation level (strong, medium, weak), a list of signals already present in your content, and a list of gaps identified against SERP competitors.
Sources, data points, and expertise proofs found on the web are directly integrated into the recommendations, with their references included.
> **Good to know ℹ️:** You can ask follow-up questions to go deeper on a specific pillar, request alternative sources, or have the agent rewrite a passage incorporating the recommended elements.
#### 5) Apply the recommendations to your content
The prioritized action plan tells you, for each identified gap, the concrete changes to make. Apply the recommendations directly in the Semji editor, starting with the high-priority, high-impact actions flagged at the top of the plan.
### Learn more
E-E-A-T-strengthened content is a solid foundation. Combine this audit with our other agents to cover all the dimensions that drive rankings.
**Continue your optimization with our other available agents:**
**👉 [Content Master agent: your end-to-end AI editorial advisor](/en/ai-agents/agent-content-master)**
**👉 [Product Page Specialist agent: optimizing your e-commerce product pages for SEO](/en/ai-agents/specialiste-fiche-produit)**
**👉 [Top 3 Hunter: aligning your content with what actually ranks](/en/ai-agents/agent-chasseur-top-3)**
**👉 [Guide: optimize your SEO/GEO content with AI+ Agents](/en/ai-agents/guide-optimize-your-seo-geo-content-with-ai-agents)**
# Top 3 Hunter agent: align your content with what actually ranks
Source: https://help.semji.com/en/ai-agents/agent-chasseur-top-3
Compare the editorial quality of your content against the top 3 Google pages for your target keyword and get prioritized recommendations with ready-to-apply…
### In summary
**What you can do:** Analyze the top 3 Google pages for your target keyword, benchmark your content against competitors on editorial depth and user experience, and get prioritized recommendations with before/after rewrite proposals you can apply immediately.
**Who it's for:** SEO managers and content managers whose content has a strong Content Score but stagnates on page 2 or at the bottom of page 1.
**Why it's useful:** Content Score measures your semantic coverage. This agent goes further by analyzing what the pages ranking above you are actually doing across the dimensions Google values most: content depth, structure, readability, and alignment with search intent.
### What it changes for you
**The problem:** A strong Content Score does not guarantee page 1 rankings. Writers often optimize in isolation, without knowing what the pages ranking above them are actually doing on Google. Understanding why a piece of content fails to reach page 1 despite a strong semantic score requires a manual, time-consuming editorial competitive analysis.
**The solution:** The Top 3 SEO Editorial Assistant agent automatically analyzes the top 3 Google pages for your target keyword (excluding Wikipedia and government sites) and compares their editorial quality to your content across two axes: content depth and user experience. It includes a specific focus on the introduction and heading structure, two elements Google scrutinizes closely. The output is a set of prioritized recommendations with before/after rewrite proposals, ready to apply.
**The impact:**
* **Automated editorial competitive analysis:** understand in minutes what sets the top-ranking pages apart from yours.
* **Two precise comparison axes:** content depth (angle, data, topic coverage) and user experience (readability, heading structure, intent alignment).
* **Introduction and structure focus:** the two entry points most critical for rankings and bounce rate.
* **Immediately actionable recommendations:** written before/after proposals ready to copy directly into your editor.
\[Suggested illustration: Semji editor view with the Top 3 SEO Editorial Assistant agent showing a visual comparison between the client content and the 3 competitor pages, with level indicators on each analysis axis]
### How to use the Top 3 Hunter agent
#### 1) Access the template from the Discover gallery
In the Semji content editor, click **"Agents"** in the right sidebar, then click **"Discover"** to open the pre-configured agent gallery.
Find the **"Top 3 Hunter"** template and click it to open it on your content.
\[Suggested illustration: Discover gallery view in the Semji editor, with the Top 3 SEO Editorial Assistant template prominently displayed among available agents]
> **Good to know ℹ️:** The agent automatically uses the primary keyword associated with your page to identify the top 3 competitor pages to analyze. Make sure the target keyword is correctly set in your editor before running the agent.
#### 2) Add custom instructions (optional)
Before running the agent, you can provide specific guidelines to focus its analysis or shape its recommendations.
**Examples of useful instructions:**
* "Focus primarily on the introduction and heading structure analysis"
* "Disregard the competitor in position 1 as it is a generalist media site"
* "Our content targets an expert audience, not beginners. Keep that level in the recommendations"
* "Prioritize recommendations that do not require a full rewrite"
> **Tip ✅:** If your content targets a mixed search intent (both informational and transactional), mention it in your instructions. The agent will factor this in when evaluating your page's intent alignment.
\[Suggested illustration: custom instructions input field in the agent interface, with an example instruction focusing the analysis on heading structure]
#### 3) Run the agent
Click **"Run"** to start the agent. It automatically retrieves the top 3 Google pages for your target keyword, analyzes their editorial quality, and benchmarks the results against your content across both defined axes.
⏱️ **Duration:** 1 to 2 minutes depending on the length of the competitor pages analyzed **ℹ️ Cost:** 10 AI credits per run, 10 AI credits per follow-up message
\[Suggested illustration: agent interface mid-execution, showing the analysis steps in progress: retrieval of top 3 pages, editorial depth analysis, user experience analysis]
#### 4) Read the competitive analysis
The agent delivers a structured analysis in two parts. The first covers content depth: the editorial angle used by competitors, data points present, coverage of subtopics, and gaps identified in your content. The second covers user experience: readability, heading structure, search intent alignment, and introduction quality.
For each identified gap, the agent indicates its priority level and estimated impact on rankings.
> **Good to know ℹ️:** You can ask the agent to go deeper on a specific point of the analysis, investigate a particular competitor in more detail, or rephrase a recommendation to fit your editorial constraints.
#### 5) Apply the prioritized recommendations
The recommendation plan lists the changes to make in your content, each accompanied by a written before/after proposal. Start with the high-priority actions, which correspond to the most impactful gaps relative to the top-ranking competitors.
Apply the changes directly in the Semji editor to see the effect on your Content Score in real time.
\[Suggested illustration: prioritized recommendation plan in the agent, showing for each item the priority level, the relevant axis (content depth or user experience), and a written before/after proposal ready to copy]
### Learn more
Editorial competitive analysis is the natural complement to Content Score. Combine this agent with our other tools to cover all the dimensions that drive lasting rankings.
**Continue your optimization with our other available agents:**
**👉 [Content Master agent: your end-to-end AI editorial advisor](/en/ai-agents/agent-content-master)**
**👉 [E-E-A-T Auditor agent: strengthening the credibility and authority of your content](/en/ai-agents/agent-auditeur-eeat)**
**👉 [Product page specialist agent: optimizing your e-commerce product pages for SEO](/en/ai-agents/specialiste-fiche-produit)**
**👉 [Guide: optimize your SEO/GEO content with AI+ Agents](/en/ai-agents/guide-optimize-your-seo-geo-content-with-ai-agents)**
# Structured data agent: Generate your JSON-LD code and unlock Rich Snippets
Source: https://help.semji.com/en/ai-agents/agent-donnees-structurees
This agent audits your existing Schema.org markup, analyzes what your competitors use in the SERP, and generates an optimized JSON-LD code ready to integrate…
### At a glance
* **What you'll do**: Get an audit of your current markup, an analysis of structured data used by your competitors, and a complete JSON-LD code ready to copy and paste.
* **Time required**: 5 to 10 minutes per page analyzed.
* **Ideal for**: SEO teams and developers who want to maximize their chances of obtaining rich results (FAQ, Article, Product, Recipe) in Google.
### What is it for?
Structured data is one of the most underused SEO levers: when implemented correctly, it allows Google to display Rich Snippets that significantly increase click-through rates. Yet most teams either don't mark up their content at all, or use incomplete schemas that never trigger any rich results.
The challenge is twofold: you first need to identify the right schema type based on search intent (FAQ, Article, Product, HowTo...), then write a complete JSON-LD with all the properties Google recommends, particularly those tied to E-E-A-T (author, publisher, dates). A single syntax error or missing property is enough to invalidate the entire markup.
This agent automates both steps: it analyzes your page and the top 3 SERP results to identify Rich Snippet opportunities, then generates a complete, valid, ready-to-use JSON-LD code.
> **Good to know ℹ️**: The agent automatically detects opportunities to nest multiple schemas, for example an `Article` containing a `FAQPage`, a combination that is particularly effective for long informational content.
### What you'll get
The agent delivers a four-part report:
* A **current state** critical analysis of your existing markup: what is missing, what is incorrect, what can be improved.
* An **opportunity analysis** based on the structured data your competitors use in the top 3 SERP results.
* An **optimized JSON-LD code**, complete and ready to copy and paste, including E-E-A-T properties.
* **Implementation advice**: where to place the code in your CMS and which variables to update with each content revision.
### How to do it
#### 1) Access AI+ Agents
In the Semji editor, open the content you want to optimize and make sure the Focus Keyword is set. It determines the agent's SERP analysis.
> **Tip ✅**: For existing published content, make sure the page URL is present in the editor context. The agent needs it to extract any JSON-LD markup already in place on your site.
#### 2) Create the custom agent
In the Semji editor, navigate to the **AI+ Agents** feature and create a new agent with the following settings:
* **Name**: Structured data expert - Schema.org
* **Instructions**: Copy and paste the prompt below.
* **Tools to enable**:
* ✅ Analyze HTML
* ✅ Google search
\[PROMPT]
Click **Create** to save your agent.
#### 3) Run the analysis
Once the agent is configured, launch it from the Semji editor on the open content. It automatically runs through all 5 workflow steps: content retrieval, existing markup extraction, SERP analysis, search intent comparison, and report generation.
Click **Run** to start the analysis.
#### 4) Read and implement the output
**Current state**: start by reading the critical analysis of your existing markup. If the agent detects a mismatch between the search intent and the schema in use (for example, a `Product` schema on purely informational content), factor in the recommendation before implementing.
**JSON-LD code**: copy the generated code block and integrate it into the `` tag of your page, or into the dedicated structured data field in your CMS (WordPress, HubSpot, Shopify...). The implementation advice specifies exactly where to place the code depending on your environment.
**Variables to update**: some properties like `dateModified`, `author`, or `price` need to be updated with each content change. The agent indicates which ones to monitor.
> **Important ⚠️**: After implementation, always validate your markup with [Google's Rich Results Test](https://search.google.com/test/rich-results) to make sure it contains no syntax errors.
#### Using the agent day to day
**With every new publication**: run the agent on any new content before going live to generate the right markup from day one.
**After a content update**: re-run the agent after any substantial revision to verify that the existing markup is still consistent with the updated content.
**During a technical SEO audit**: work through your strategic pages one by one to identify missing or invalid schemas that are costing you Rich Snippet opportunities.
> **Pro tip 💡**: Prioritize high-potential traffic pages where Google already displays Rich Snippets for your competitors. These are the ones where the click-through rate gain will be most immediate.
### Going further
Once your structured data is in place, strengthen the overall semantic consistency of your pages:
* Use the **SEO intent alignment agent** to make sure the chosen schema type matches the search intent detected in the SERP.
* Enable Semji's **SEO recommendations** to enrich your page's text content alongside the structured markup.
* Consult the official Schema.org documentation to explore advanced properties specific to each schema type.
> **Important ⚠️**: The agent never suggests misleading schemas that don't match the visible content of the page. Any markup that doesn't accurately reflect the actual content may trigger a Google manual penalty.
**Useful links:**
* **[\[SEO intent alignment agent\]](/en/ai-agents/agent-alignement-intention-seo)**
* [**Google Rich Results Test**](https://search.google.com/test/rich-results)
# ChatGPT content expert agent: optimize your content to get cited by AI
Source: https://help.semji.com/en/ai-agents/agent-expert-chatgpt
Automatically analyze why your competitors appear in ChatGPT responses and get a prioritized action plan to improve your content's visibility with generative…
### At a glance
* **What you'll do**: set up an agent that analyzes your content against sources cited by ChatGPT, identifies structural and editorial gaps, and provides you with actionable recommendations
* **Time required**: 15 to 20 minutes for setup, a few seconds per analysis
* **Ideal for**: content managers, SEO leads and editorial teams looking to strengthen their visibility in generative AI responses
### What is it for?
Ranking well on Google is no longer enough. ChatGPT, Perplexity and other generative AI engines cite sources based on their own criteria: content structure, technical depth, presence of rich elements (tables, FAQs, TL;DRs), and introduction quality. If your content doesn't meet these requirements, it will be overlooked in favor of your competitors, even if you dominate the classic SERPs.
The challenge is that these criteria are often invisible to the naked eye. Identifying why a source is cited in position 1 rather than position 5 requires careful comparative analysis that no one does manually.
This agent automates that diagnostic work. It retrieves the sources cited by ChatGPT for your topic, analyzes their editorial structure, compares it to your content in Semji, and delivers a clear action plan with Before/After blocks for each priority recommendation.
> **Good to know ℹ️**: this agent leverages Semji's GEO recommendations (Generative Engine Optimization). GEO is the discipline of optimizing content to be cited and surfaced by AI response engines, in the same way SEO optimizes for traditional search engines.
### What you'll get
At the end of the analysis, your agent delivers a structured report that includes:
* A precise overview: whether your content is cited by ChatGPT, at what position, and which competitors rank above you
* An in-depth comparative analysis across 6 dimensions: editorial angle, heading structure, technical depth, rich elements, paragraph length and introduction quality
* Prioritized recommendations with a badge showing how often each element appears in better-ranked sources
* Concrete Before/After blocks to guide rewriting or enrichment of your content
* A summary of the top 3 priority optimizations and the quick wins to tackle first
\[Suggested illustration: screenshot of the agent report showing the overview section and Before/After recommendation blocks]
> **Tip ✅**: for best results, make sure the content you want to analyze is open in the Semji editor before launching the agent. The agent relies on the active content data to run the comparison.
### How to do it
#### 1) Access the AI+ agents
From your Semji workspace, open the content you want to analyze in the editor. Then click the **AI+ Agents** icon in the right-hand sidebar to open the agents panel.
\[Suggested illustration: screenshot of the Semji sidebar with the AI+ Agents icon highlighted]
#### 2) Create the custom agent
Click **Create an agent**, then fill in the following fields:
* **Name**: ChatGPT content expert
* **Instructions**: copy and paste the prompt below.
* **Tools to activate**:
* ✅ Retrieve GEO recommendations
* ✅ Search on Google
* ✅ Get web page content
\[PROMPT]
Click **Create** to save your agent.
#### 3) Run the analysis
Once the agent is created, select it from your agents list. In the conversation field, tell the agent the target topic or query you want to analyze, and specify your brand name in place of the `[Brand]` field.
Example launch message:
> *Analyze my content on the topic "air-to-air heat pump". The brand to analyze is Cedeo.*
Click **Send** to start the analysis. The agent performs several successive calls: Google search, retrieval of cited sources, comparative analysis and generation of recommendations.
\[Suggested illustration: screenshot of the conversation panel showing a launch message and the processing steps in progress]
#### 4) Interpret the results
The report is structured into five successive blocks. Read them in order to follow the agent's reasoning:
1. **Overview**: your content's position among the cited sources
2. **Why competitors rank better**: analysis of structural and editorial gaps
3. **Diagnosis**: summary of your content's strengths and major weaknesses
4. **Recommendations with Before/After blocks**: concrete actions ranked by priority
5. **Summary**: the top 3 priority optimizations and the quick wins to tackle first
Start with the quick wins listed in the summary: adding a TL;DR, creating a comparison table, restructuring the introduction. These changes offer the best effort-to-impact ratio.
#### Using the agent day to day
This agent fits naturally into your content optimization cycle. Here are the moments when it delivers the most value:
**Before an editorial overhaul**: run the analysis on your pillar content to identify priority projects before mobilizing your writing team.
**After a content update**: check whether the optimizations you've made bring your content closer to the criteria used by better-ranked sources.
**For competitive monitoring**: regularly analyze (once a month) your 5 to 10 strategic pieces of content to detect changes in ChatGPT citations.
**When creating new content**: use the agent upfront to identify the must-have elements to include from the very first version.
> **Pro tip 💡**: remember to re-run the analysis after applying the recommendations. Compare both reports to measure your content's progress and refine your next round of optimizations.
### Go further
Once the agent's recommendations have been applied, you can take your GEO strategy even further:
* **Enrich your editorial structure** by checking Semji's content score after each change. The score reflects how well your content aligns with SERP expectations and serves as a complementary indicator to the agent's diagnostic.
* **Work on search intent alignment** by cross-referencing the agent's recommendations with the SEO intent analysis available in Semji. Content that's well-aligned with intent is better understood by generative AI engines.
* **Multiply rich formats**: tables, structured FAQs, bullet lists, alert callouts. These elements are strongly correlated with citations in ChatGPT responses.
> **Watch out ⚠️**: generative AI citation criteria evolve regularly. Content that's optimized today may lose visibility if competitors improve in the meantime. Plan recurring analyses rather than treating GEO optimization as a one-time action.
**Useful links:**
* **[\[Understanding GEO recommendations in Semji\]](/en/create-optimize-and-publish/how-to-start-and-understand-a-geo-analysis-in-semji)**
* **[\[SEO intent alignment agent\]](/en/ai-agents/agent-alignement-intention-seo)**
* **\[Competitive analysis agent: identifying content gaps]**
# Query fan-out expert agent: identify all search intents around a keyword
Source: https://help.semji.com/en/ai-agents/agent-expert-query-fan-out
Turn a single strategic keyword into an exhaustive semantic map and automatically produce the missing content sections to dominate both the SERP and AI engines.
### At a glance
* **What you'll do**: set up an agent that explores all possible search intents around your main keyword, identifies angles not covered in your existing content and writes the missing sections in a format optimized for generative AI engines
* **Time required**: 10 to 15 minutes for setup, a few minutes per analysis depending on the semantic depth of the topic
* **Ideal for**: SEO leads and content managers looking to maximize the semantic coverage of their pillar content
### What is it for?
Ranking well on your main keyword is no longer enough to capture all available traffic. Users phrase their searches in dozens of different ways, and generative AI engines like ChatGPT or Perplexity respond to highly varied prompts around the same topic. If your content only addresses one intent, it misses out on the vast majority of possible queries.
Query fan-out is the technique of starting from a single keyword and mapping all the probable phrasings a user might type or dictate to an AI. Each phrasing represents a distinct intent, and each uncovered intent is a missed traffic opportunity.
This agent automates that exploration. It uses Semji's SEO and GEO data to map the semantic space of your topic, compare that map against your existing content, and write the missing subsections directly in a question-and-answer format designed for featured snippets and AI-generated responses.
> **Good to know ℹ️**: query fan-out is a concept from the world of AI search engines. When a user asks ChatGPT a question, the engine internally generates several variants of that question to cover all dimensions of the topic. Optimizing your content for fan-out means making sure you're relevant for each of those variants.
### What you'll get
At the end of the analysis, your agent delivers a structured output in three parts:
* A complete fan-out map: 8 to 12 probable user prompts around your keyword, covering all intents (informational, comparative, transactional, situational)
* A coverage assessment: for each identified prompt, the agent indicates whether it is already addressed in your content, partially covered or entirely absent
* Written subsections ready to integrate: for each missing angle, the agent produces a question-and-answer paragraph optimized for featured snippets and AI citations, with Before/After blocks to make integration easy
\[Suggested illustration: screenshot of the fan-out map generated by the agent with the color coding for covered/partial/missing]
> **Tip ✅**: before launching the agent, make sure your content is open in the Semji editor and that the main keyword is filled in the "Focus Keyword" field. The agent relies on this data to calibrate its semantic exploration.
### How to do it
#### 1) Access the AI+ agents
From your Semji workspace, open the content you want to enrich in the editor. Then click the **AI+ Agents** icon in the right-hand sidebar to open the agents panel.
\[Suggested illustration: screenshot of the Semji sidebar with the AI+ Agents icon highlighted]
#### 2) Create the custom agent
Click **Create an agent**, then fill in the following fields:
* **Name**: Query fan-out expert
* **Instructions**: copy and paste the prompt below.
* **Tools to activate**:
* ✅ Retrieve SEO recommendations
* ✅ Retrieve GEO recommendations
* ✅ Get web page content
* ✅ Search on Google
\[PROMPT]
Click **Create** to save your agent.
#### 3) Run the analysis
Once the agent is created, select it from your agents list. The agent starts its analysis automatically from the content open in the editor. No additional instruction is needed: it retrieves the focus keyword, queries Semji's SEO and GEO recommendations, then launches its semantic exploration.
If you want to steer the analysis toward a specific angle, you can add a note in the conversation field before sending.
Example launch message:
> *Focus the analysis on comparative and situational intents, the topic is "air-to-water heat pump".*
\[Suggested illustration: screenshot of the conversation panel with the fan-out map being generated]
#### 4) Interpret and integrate the results
The agent's report is presented in three successive blocks:
1. **Fan-out map**: the complete list of identified intents and prompts, with their category (informational, comparative, transactional, situational)
2. **Coverage assessment**: intents already addressed, partially covered and absent from your content
3. **Written subsections**: content blocks ready to integrate, in question-and-answer format with Before/After blocks for each addition
To integrate the new sections, copy the generated blocks and paste them directly into the Semji editor at the location suggested by the agent. Then check your content score to measure the impact of the additions.
#### Using the agent day to day
This agent is particularly effective in two situations: when creating a new pillar content piece, to define an exhaustive semantic structure from the start, and when optimizing existing content that has plateaued despite a solid technical score.
Plan a fan-out analysis on your 5 to 10 strategic content pieces once or twice a year. Search intents evolve with trends and new user phrasings, especially as the use of conversational AI continues to grow.
> **Pro tip 💡**: after integrating the new sections, re-run the ChatGPT content expert agent on the same content to check whether the additions actually improve your position in AI citations.
### Go further
Once the fan-out map has been applied, you can deepen your semantic strategy by combining this agent with other Semji tools:
* **Cross-reference with SEO intent analysis**: make sure the newly added sections are consistent with the main intent detected by Semji to avoid sending contradictory signals to Google.
* **Measure the impact on your content score**: the added subsections should push your score forward. If they don't, ask the agent about the missing semantic entities in the generated blocks.
* **Export the fan-out map** as the foundation for your editorial calendar: each uncovered intent can become a standalone article if search volume justifies it.
> **Watch out ⚠️**: the agent generates subsections that are ready to integrate, but they should be reviewed before publishing. Pay particular attention to figures and factual data sourced by the agent from external URLs, as these may change over time.
**Useful links:**
* **[\[ChatGPT content expert agent\]](/en/ai-agents/agent-expert-chatgpt)**
* **[\[SEO intent alignment agent\]](/en/ai-agents/agent-alignement-intention-seo)**
* **[\[Understanding GEO recommendations in Semji\]](/en/create-optimize-and-publish/how-to-start-and-understand-a-geo-analysis-in-semji)**
# Inbound linking agent: Strengthen your pages' authority through internal backlinks
Source: https://help.semji.com/en/ai-agents/agent-inbound-linking
This agent identifies the pages on your site that should link to your target content, and writes the insertion paragraphs ready to integrate.
### At a glance
* **What you'll do**: Identify pages on your site that should link to your target content, and get written insertion paragraphs ready to integrate.
* **Time required**: 5 to 10 minutes per page analyzed.
* **Ideal for**: Content managers and SEO writers who want to strengthen the topical authority of their strategic pages through structured internal backlinking.
### What is it for?
In a semantic cocoon strategy, outbound links are only half the equation. It's the **internal inbound links**, the ones other pages on your site send to your content, that truly transfer authority and signal to Google the importance of a page within your architecture.
Yet most teams focus on optimizing the content itself and overlook this lever: pillar pages remain isolated, new publications receive no support from existing pages, and topical authority fragments instead of consolidating.
This agent reverses the logic: rather than starting from your content and linking outward, it **starts from the outside and links toward your target page**. It explores your site, identifies relevant parent, sibling, and child pages, checks for the absence of existing links, then writes insertion paragraphs that integrate naturally into the flow of each source page, with no artificial call-to-action language.
> **Good to know ℹ️**: This agent complements the advanced internal linking agent. One optimizes outbound links from your page, the other optimizes inbound links toward your page. Used together, they cover your entire linking strategy.
### What you'll get
For each opportunity identified, the agent produces a structured entry including:
* The **relationship type** between the source page and your target page (upward, lateral).
* The **URL and title of the source page**.
* The **precise placement** for inserting the link in the source page (H2 section, paragraph number).
* A **written 30–50 word paragraph**, with the HTML link already formatted and an anchor optimized for the target keyword, ready to paste directly into your CMS.
### How to do it
#### 1) Prepare the prompt
First, **replace `[__site.com__]`** in the prompt with your site's root domain. This is the only change needed.
> **Tip ✅**: If you work across multiple sites, duplicate the agent and set up one version per domain. You'll save time on every use.
#### 2) Create the custom agent
In the Semji editor, navigate to the **AI+ Agents** feature and create a new agent with the following settings:
* **Name**: Inbound linking expert
* **Instructions**: Copy and paste the prompt below (after replacing `[__site.com__]`).
* **Tools to enable**:
* ✅ Retrieve SEO recommendations
* ✅ Google search
* ✅ Get web page content
\[PROMPT]
Click **Create** to save your agent.
#### 3) Run the analysis
Open the content you want to strengthen in the Semji editor, make sure the Focus Keyword is set, then launch the agent. It automatically analyzes your target page, explores your site, and audits candidate pages.
Click **Run** to start the analysis.
#### 4) Read and apply the output
**Recommendation entries**: each entry corresponds to a source page where an inbound link should be inserted. Read the suggested placement carefully: the agent has identified the most coherent section for the link to integrate naturally.
**Paragraphs to insert**: copy and paste the written paragraph directly into your CMS at the indicated location. The HTML link is already formatted with the optimized anchor, no editing needed in most cases.
**Link already detected**: if the agent flags that a link to your target page already exists on a source page, move on to the next recommendation. The agent never suggests duplicates.
**No page found**: if the agent finds no relevant source pages, it explains why and suggests topics to create in order to fill the semantic gaps in your cocoon.
#### Using the agent day to day
**With every new publication**: run the agent as soon as a new piece of content goes live to immediately identify existing pages that should link to it. It's the fastest way to integrate a new page into your cocoon.
**During a content audit**: prioritize your pillar pages, as they benefit most from internal inbound links to consolidate their authority.
**After a content update**: if you update an existing page with new thematic angles, re-run the agent to identify new inbound link opportunities tied to these new topics.
> **Pro tip 💡**: Share the recommendation entries with your writers or content managers as editing tasks on the source pages. It's a high-ROI action that takes only a few minutes per page.
### Going further
Combine this agent with other linking tools for a complete cocoon strategy:
* Use the **Advanced internal linking agent** to simultaneously optimize outbound links from your target page.
* Review Semji's **internal linking recommendations** to cross-reference the agent's suggestions with opportunities automatically detected by the platform.
* Use the **SERP behavioral analysis agent** to verify that each source page is well positioned on the right format before inserting a link.
> **Important ⚠️**: The `site:` command used by the agent relies on Google's index. Recently published or poorly indexed pages may not appear. If needed, supplement with a manual search in your CMS for recently published content.
**Useful links:**
* **[\[Advanced internal linking agent\]](/en/ai-agents/agent-maillage-interne-avance)**
* **[\[SERP behavioral analysis agent\]](/en/ai-agents/agent-serp-behavioral-analysis)**
# Advanced internal linking agent: Optimize your semantic cocoon in 5 phases
Source: https://help.semji.com/en/ai-agents/agent-maillage-interne-avance
Internal linking is one of the most powerful and most underused SEO levers. This agent analyzes your site architecture, positions your page within its semantic…
### At a glance
* **What you'll do**: Get a full diagnosis of your page's internal architecture (parent or child page), a selection of scored internal links ready to integrate, and a gap analysis of missing content.
* **Time required**: 5 to 10 minutes per page analyzed.
* **Ideal for**: Content managers and SEO specialists who want to strengthen their site's topical authority through structured, consistent internal linking.
### What is it for?
Well-optimized content that isn't properly connected to the rest of the site loses a large part of its SEO potential. Internal linking is the nervous system of your semantic cocoon: it passes authority between pages, guides crawlers, and signals to Google the hierarchy of your content.
Yet most editorial teams approach internal linking intuitively — adding a few links as they write, without any methodology. The result: redundant links, missed opportunities, orphan pages, and an architecture that weakens the entire site.
This agent applies a **5-phase methodology**: analyzing the existing architecture, positioning the page within its cocoon (parent, child, or grandchild), targeted search for candidate pages on your domain, relevance scoring, and identification of missing content to fill semantic gaps.
> **Good to know ℹ️**: The agent automatically adapts the number of suggested links to the recommended content length — 5 links for short pages (under 1,000 words), 7 links for longer ones.
### What you'll get
The agent delivers a structured report in two parts:
* **A strategic report**: identified cocoon level (parent/child) with justification, audit of existing links, and a gap analysis listing the 2 to 3 missing topics to create to strengthen topical authority.
* **A concrete implementation plan**: outbound links to create with suggested anchors and relevance scores (/5), plus a list of inbound link recommendations to add from other pages on the site.
### How to do it
#### 1) Prepare the prompt
First, **replace `[site.com]`** in the prompt with your site's root domain. This is the only change needed — all other variables are retrieved automatically by the agent.
> **Tip ✅**: If you work across multiple sites, duplicate the agent and set up one version per domain to save time on each use.
#### 2) Create the custom agent
In the Semji editor, navigate to the **AI+ Agents** feature and create a new agent with the following settings:
* **Name**: Advanced internal linking expert
* **Instructions**: Copy and paste the prompt below (after replacing `[site.com]`).
* **Tools to enable**:
* ✅ Retrieve SEO recommendations
* ✅ Google search
* ✅ Get web page content
\[PROMPT]
Click **Create** to save your agent.
#### 3) Run the analysis
Open the content to be linked in the Semji editor, make sure the Focus Keyword is set, then launch the agent. It automatically runs through all 5 phases of the methodology.
Click **Run** to start the analysis.
#### 4) Read and apply the output
**Strategic report**: start by validating the identified cocoon level. If the agent classifies your page as a child when you thought it was a parent (or the reverse), this is an important signal — your site architecture may need to be reviewed.
**Outbound links**: prioritize links scored 5/5 (structural) then 4/5 (semantic). Links scored 3/5 are optional — add them only if the context allows for a natural integration.
**Inbound links**: pass the list of recommendations to your team or add them to your editorial calendar. These inbound links from other pages on the site are just as important as outbound links for consolidating the cocoon.
**Gap analysis**: topics identified as missing are content creation opportunities to prioritize. Add them directly to your editorial calendar.
#### Using the agent day to day
**With every new piece of content**: run the agent systematically before publishing to ensure every page is properly integrated into the cocoon from the moment it goes live.
**During a site audit**: work through strategic pages one by one to identify weak linking structures and orphan pages.
**After a redesign or migration**: the agent lets you quickly verify that the internal architecture has been preserved and that new content is properly positioned within its cocoon.
> **Pro tip 💡**: Use the gap analysis as a direct input for your editorial calendar. The missing content identified by the agent is what has the greatest impact on the site's overall topical authority.
### Going further
Once internal linking is optimized, strengthen the semantic consistency of your pages with complementary agents:
* Use the **SERP behavioral analysis agent** to make sure every page in the cocoon matches the format Google expects.
* Review Semji's **internal linking recommendations** to cross-reference the agent's suggestions with the opportunities automatically detected by the platform.
* Enable **SEO recommendations** to enrich parent pages with missing semantic terms.
> **Important ⚠️**: The `site:` command used by the agent relies on Google's index — some recent or poorly indexed pages may not appear in results. If needed, supplement with a manual search in your CMS.
**Useful links:**
* **[\[SERP behavioral analysis agent\]](/en/ai-agents/agent-serp-behavioral-analysis)**
# SERP behavioral analysis Agent: Define the right page format before you write
Source: https://help.semji.com/en/ai-agents/agent-serp-behavioral-analysis
Before writing, you need to know what page to create. This agent analyzes the SERP in depth to reveal the real psychology behind a search query, decide whether…
### At a Glance
* **What you'll do**: Get a full behavioral diagnosis of the SERP for your target keyword, with an actionable page format recommendation.
* **Time required**: 3 to 5 minutes per keyword analyzed.
* **Ideal for**: Content managers and SEO strategists who want to lock in the right content format before briefing a writer or starting a creation.
### What Is It For?
Knowing that a keyword is "informational" isn't enough. Two informational keywords can call for radically different formats: one demands a comprehensive 3,000-word guide, another a direct 500-word answer with a comparison table. Choosing the wrong format means missing the SERP — even with well-optimized content.
Classic search intent analysis stops at four known categories. This agent goes further: it decodes the **user's psychology** behind the keyword — are they looking to be reassured, to compare options, to master a technique from A to Z, or to find a tool they can use right away?
It also detects **mixed or fractured SERPs** — queries where Google simultaneously displays blog posts, product pages, and comparison articles — and determines whether to create one versatile page or two distinct pages to dominate both intents.
> **Good to know ℹ️**: This agent is especially powerful on high-stakes commercial keywords, where the choice between a Landing Page and a blog article can be the difference between content that converts and content that merely informs.
### What You'll Get
The agent delivers a structured strategic report in four parts:
* **A real intent diagnosis**: beyond the classic label, the precise psychological angle of the user.
* **A pagination decision**: one page or two distinct pages, with justification based on real SERP analysis.
* **Detailed format recommendations**: recommended template, differentiating H2/H3 outline, specific content blocks to include (FAQ, pricing table, testimonials, interactive widget).
* **Semji data alignment**: the priority search intents and SEO questions to integrate into this specific format.
### How To Do It
#### 1) Access AI+ Agents
From your Semji workspace, open the content you're working on in the editor. Navigate to the **AI+ Agents** feature in the right-hand panel or via the AI menu within the editor.
#### 2) Create the Custom Agent
If the agent hasn't been configured in your workspace yet, create a new one with the following settings:
* **Name**: SERP Behavioral Analysis
* **Instructions**: Copy and paste the prompt below.
* **Tools to enable**:
* ✅ Retrieve SEO recommendations
* ✅ Google search
* ✅ Get web page content
\[PROMPT]
Click **Create** to save your agent.
#### 3) Run the Analysis
Make sure your Focus Keyword is properly set in Semji, then launch the agent from the editor. It automatically queries the SERP and analyzes the top three organic results.
> **Tip ✅**: Run this agent **before** writing or briefing — its value is highest upstream, when the page format is still to be defined.
Click **Run** to start the analysis.
#### 4) Read the Output
**Section 1 — Real intent diagnosis**: read the psychological angle carefully. This is the most valuable insight — it tells you what the user feels and seeks, not just what they typed.
**Section 2 — Pagination strategy**: if the agent recommends two distinct pages, take it seriously. A fractured SERP means Google itself hasn't settled on one format — creating two targeted pages is often the winning strategy.
**Section 3 — Detailed format**: use the suggested H2/H3 outline directly as an editorial brief. The recommended reassurance/conversion blocks should be passed on to your writer or built into your content template.
**Section 4 — Semji alignment**: cross-reference the search intents and SEO questions highlighted by the agent with your Semji recommendations to make sure no priority topic is missed.
#### Using the Agent Day to Day
**During editorial planning**: before adding a new piece of content to your calendar, run it through this agent to validate the format before committing writing resources.
**For high-volume strategic keywords**: on competitive queries, format can matter as much as optimization. Use the agent to identify the differentiating angle your competitors haven't exploited.
**During a content audit**: if a high-performing page starts declining, the agent can reveal a shift in SERP intent — Google now expects a different format.
> **Pro tip 💡**: On a mixed SERP where the agent recommends two pages, start with the page matching the dominant intent (the one represented by the most results in the Top 10). Build the second page as a follow-up.
### Going Further
Once your format is defined, move to execution with complementary agents:
* Use the **SEO Intent Validator Agent** to confirm your Focus Keyword is well aligned with the page you're about to create.
* Review Semji's **SEO Recommendations** to enrich the H2/H3 outline with missing semantic terms.
* If your format includes a transactional dimension, enable **GEO Recommendations** to also optimize visibility in AI-powered search engines.
> **Important ⚠️**: Format recommendations are based on the SERP at the time of analysis. SERPs evolve — on trending or fast-moving topics, re-run the agent every 3 to 6 months to make sure the format remains relevant.
**Useful links:**
* **[\[SEO Intent Validator Agent\]](/en/ai-agents/agent-validateur-intention-pivot)**
# SEO Intent Validator Agent: Validate Your Keyword and Pivot When Needed
Source: https://help.semji.com/en/ai-agents/agent-validateur-intention-pivot
Diagnose your SEO targeting and get actionable alternatives in one click.
### At a Glance
* **What you'll do**: Check whether your target keyword truly matches the search intent Google detects, and get a structured diagnostic with actionable recommendations.
* **Time required**: 2 to 5 minutes per content analyzed.
* **Ideal for**: Content managers and SEO writers who want to validate their keyword targeting before publishing, or audit existing pages that aren't gaining traction despite solid content quality.
### What Is It For?
Picking a keyword is easy. Picking the *right* keyword — the one that matches exactly what Google expects for your content type — is a different challenge entirely.
A product page optimized for an informational keyword will never outrank the how-to guides and tutorials that dominate that SERP. This is one of the most common SEO blind spots: a mismatch between the real intent behind a query and the nature of the content you've created. The result? Strong editorial effort, weak organic performance.
The **SEO Intent Validator & Strategic Pivot Agent** addresses this at the source. It analyzes your content in the Semji editor, queries the Google SERP for your target keyword, compares the editorial angles of the Top 10, and delivers a clear verdict: intent confirmed, dissonance detected, or wrong keyword altogether. When a pivot is needed, it immediately proposes three better-suited alternatives based on your actual content.
> **Good to know ℹ️**: This agent is especially valuable during the pre-publication review stage, but also works well for auditing existing pages that are stuck in the 8–15 range despite good on-page optimization.
### What You'll Get
At the end of the analysis, the agent delivers a structured report in three parts:
* **An alignment diagnostic** with a clear verdict (✅ Match / ⚠️ Dissonance / ❌ Wrong keyword) and an explanation of what Google actually expects for this query.
* **A quick competitive snapshot** of the SERP Top 3: page type, editorial angle, and thematic positioning.
* **Actionable recommendations**: if intent is missed, three justified keyword alternatives (pivots); if alignment is confirmed, two related terms or SEO questions to reinforce topical authority.
### How To Do It
#### 1) Access AI+ Agents
From your Semji workspace, open the content you want to analyze in the editor. Then navigate to the **AI+ Agents** feature in the right-hand panel or via the AI menu within the editor.
#### 2) Create the Custom Agent
If the agent hasn't been configured in your workspace yet, create a new one with the following settings:
* **Name**: SEO Intent Validator & Strategic Pivot
* **Instructions**: Copy and paste the prompt below.
* **Tools to enable**:
* ✅ Retrieve SEO recommendations
* ✅ Google search
* ✅ Get web page content
\[PROMPT]
Click **Create** to save your agent.
#### 3) Run the Analysis
Once the agent is selected, launch it directly from the editor. It automatically retrieves your page content (Title, H1, body text) along with the SERP data associated with your Focus Keyword.
> **Tip ✅**: Make sure your Focus Keyword is properly set in Semji before running the agent — the entire analysis is built around this input.
Click **Run** to start the diagnostic.
#### 4) Read the Output
The report is organized into three clear sections:
**Section 1 — Alignment Diagnostic**: the verdict appears at the top. Read the intent explanation carefully: it tells you whether the SERP is dominated by how-to guides, product pages, comparison articles, or transactional content.
**Section 2 — Top 3 Analysis**: the summary table gives you an immediate view of the editorial angles that are working for this keyword. Compare them against your own content type and angle.
**Section 3 — Recommendations**: if a pivot is needed, the three alternatives are ready to use. Each one is justified based on your actual content — not on abstract search volume data.
#### Using the Agent Day to Day
**Before every publication**: integrate this agent into your final review checklist. In two minutes, you confirm that your targeting is sound before going live — and you avoid weeks of waiting to discover disappointing rankings.
**During a content audit**: if a page is stuck between positions 8 and 15 despite solid optimization, the agent may uncover an intent mismatch that went unnoticed. A simple keyword pivot can be enough to unlock better performance.
**To validate editorial briefs upfront**: run the agent on a brief's target keyword before writing even begins, to validate the angle before a single word is drafted.
> **Pro tip 💡**: If the agent returns a ⚠️ Dissonance verdict, don't automatically scrap your content. First evaluate whether reworking the angle — repositioning the H1, restructuring the intro, adjusting the content type — is enough to fix the alignment without starting over.
### Going Further
Once your keyword is validated, go deeper on content optimization with complementary agents:
* Use the **SEO Intent Alignment Agent** for a more thorough analysis of how your full content aligns with SERP expectations.
* Review Semji's **SEO Recommendations** to enrich your content with the semantic terms missing from your Top 10 analysis.
* If your content also targets AI-powered search engines (SGE, Perplexity, etc.), enable **GEO Recommendations** for a dual SEO/GEO optimization pass.
> **Important ⚠️**: The keyword alternatives suggested by the agent are based on your existing content. Always verify the search volume and keyword difficulty of suggested pivots in your keyword research tool before updating your targeting.
**Useful links:**
* **[\[SEO Intent Alignment Agent\]](/en/ai-agents/agent-alignement-intention-seo)**
# GEO Expert Agent: Optimizing your visibility on ChatGPT and AI
Source: https://help.semji.com/en/ai-agents/ai-agent-optimize-your-visibility-in-chatgpt-responses
Analyze, compare, and optimize your content to be better referenced by ChatGPT
### At a glance
**What you will do:** Audit and optimize your content to be better cited by ChatGPT and generative AIs
**Time required:** 15-20 minutes per content
**Ideal for:** Content Managers, SEO Managers, editorial teams who want to maximize their visibility in AI-generated responses
### What is this for?
You produce quality content, but when your potential customers ask questions to ChatGPT, it's your competitors who are cited as sources. You don't understand why your expertise doesn't appear in these responses that are nevertheless crucial for your visibility.
**The GEO Expert agent solves this problem by allowing you to:**
* Understand precisely why your content is not cited by ChatGPT
* Analyze the strengths of competing content that is being cited
* Get actionable recommendations to optimize your content according to 6 key dimensions
With the rise of ChatGPT and generative AIs, GEO (Generative Engine Optimization) is becoming as strategic as traditional SEO. Being cited as a source by AIs means reaching millions of users who will never go through Google.
> **Tip 💡:** Generative AIs like ChatGPT choose their sources according to specific criteria: technical depth, clear structure, enriched elements... The GEO Expert agent reveals exactly where your content falls short.
### What you'll get
A comprehensive analysis report including:
**1. Your current positioning**
* Are you already cited by ChatGPT? At what position?
* Which competitors are better positioned than you?
**2. A comparative analysis across 6 key dimensions**
* **Editorial angle:** Is your perspective sufficiently distinctive?
* **Hn structure:** Are your headings and subheadings logical and optimized?
* **Technical depth:** Is your content detailed and expert enough?
* **Enriched elements:** Do you have tables, lists, concrete data?
* **Readability:** Is your content easy to understand and scan?
* **Introduction quality:** Does your intro grab attention immediately?
**3. Prioritized recommendations**
* The 2–3 priority actions to improve your ranking
* Concrete, actionable suggestions for each dimension
\[Illustration suggérée : capture d'écran du rapport d'analyse de l'agent GEO Expert montrant les 6 dimensions avec scores]
#### Before you start
Make sure that:
* **You have identified a ChatGPT prompt that is representative** of your target audience (the typical question your users would ask ChatGPT)
* **Your content is already published** or ready to be published in the Semji editor
* **You have defined your main objective:** to be cited for the first time, to improve your current position, or to maximize the relevance of your content
> **Good to know ℹ️:** The GEO Expert agent is available only for Suite, Premium, Enterprise and Unlimited plans. Each analysis uses 10 AI credits.
### How to do it
#### **1) Access the GEO Expert agent**
* Open your content in the Semji editor
* Click the **"Agents"** icon in the right-hand sidebar
* Select **"GEO Expert"** from the list of available agents
#### **2) Set up your ChatGPT objective**
The agent asks you for two essential pieces of information to personalize its analysis:
**Question 1: What is your main objective with this content in ChatGPT?**
Sample answers:
* "To be cited and mentioned by ChatGPT as a reference source"
* "Improve my current position and move from 4th to 1st place"
* "Maximize the relevance of my content with respect to the frequent questions in my industry"
**Question 2: Which type of optimization would you like to prioritize?**
Sample responses:
* "Strengthen the editorial angle and the technical depth of the content"
* "Improve the Hn structure and the organization of sections"
* "Enrich the content with tables, lists and concrete data"
> **Tip ✅:** Be as specific as possible in your answers. The agent will tailor its recommendations based on the priorities you declare.
#### 3) Start the analysis
* Click the agent to launch it
* The agent analyzes your content in real time
* It compares your content with the sources currently cited by ChatGPT for similar prompts
**Cost:** 10 AI credits
> **Good to know ℹ️**: The analysis usually takes between 30 seconds and 2 minutes depending on the length of your content.
#### 4) View the comparative report
The agent provides you with a structured report that includes:
**Your current positioning**
* Is your content already being cited by ChatGPT?
* If so, in what position in the order of sources?
* Which 3–5 competing pieces of content are ranked higher?
**Detailed analysis across the 6 dimensions**
For each dimension, the agent tells you:
* Your current level (low / medium / good / excellent)
* The strengths identified in your higher-ranked competitors
* The specific gaps to fill
**Actionable recommendations**
The agent prioritizes 2–3 immediate actions, for example:
* "Add a comparison table in your section 'The different types of...'"
* Restructure your H2 headings to follow a logical progression: problem → solution → implementation
* Enrich your introduction with concrete, numerical data
> **Tip 💡:** Focus first on the recommendations labeled "high priority." You can refine the others in a second iteration.
#### 5) Apply the recommendations
Two options are available to you:
**Option 1: Manual application**
* Locate each recommendation within your content
* Make the suggested changes
* Save your new version
**Option 2: Automatic rewriting**
* At the end of its analysis, the agent offers you recommendations
* Under each recommendation block, you will see the "Replace content" icon
* Click it to insert the agent's recommendation
**Cost:** 10 additional AI credits for the rewrite
> **Good to know ℹ️:** You can chat with the agent to refine certain recommendations before launching the rewrite (cost: 10 AI credits per message).
### Options and variants
To customize or extend the use of the GEO Expert agent:
**To go further in the analysis**
* Ask the agent follow-up questions on specific points: "Can you detail why my introduction is judged weak?"
* Request a targeted comparison with a specific competitor: "Compare my content specifically with \[competitor URL]"
* Test several different ChatGPT prompts to validate the robustness of your content
**To optimize multiple pieces of content at scale**
* Create a checklist of the agent's recurring recommendations
* Prioritize your strategic content (high business value + strong potential for being cited)
* Train your writers on the GEO criteria identified by the agent
#### Why is this useful?
| Before | With the GEO Expert agent |
| - | - |
| You don't know why ChatGPT doesn't cite your content | You understand precisely the gaps compared to the cited sources |
| You test manually in ChatGPT without a method | You get a structured, reproducible comparative analysis |
| You optimize by feel without any visibility into AI criteria | You implement prioritized recommendations across 6 validated dimensions |
| Your competitors are capturing traffic from generative AIs | You become a reference source cited by ChatGPT |
### To go further
**Ideas for additional actions:**
* **Combine with other agents:** Use the **["Internal Linking Assistant"](/en/ai-agents/how-to-strengthen-your-internal-links-with-ai-agent)** agent to strengthen the authority of your strategic pages after GEO optimization
* **Create a custom E-E-A-T agent:** With the "Custom Agent," build an **[E-E-A-T auditor](/en/ai-agents/agent-auditeur-eeat)** tailored to your industry to maximize your credibility
* **Measure and iterate:** Repeat the analysis with the GEO Expert agent after each optimization to track your progress
**Useful links:**
* [**👉 Guide: Optimize your SEO/GEO content with AI+ Agents**](/en/ai-agents/guide-optimize-your-seo-geo-content-with-ai-agents)
* **[👉 How to strengthen your internal links with the AI+ Agent](/en/ai-agents/how-to-strengthen-your-internal-links-with-ai-agent)**
* **[👉 Create and configure a custom AI agent](/en/ai-agents/create-and-configure-your-custom-ai-agent)**
# E-commerce content writer agent: Optimize your category pages for SEO and GEO
Source: https://help.semji.com/en/ai-agents/e-commerce-content-writer-agent-optimize-your-category-pages-for-seo-and-geo
Set up an AI+ Agent to fully rewrite your category pages with conversion-oriented content, optimized for search engines and AI-powered answer engines.
### At a glance
* **What you'll do**: Create a custom AI+ Agent that analyzes and rewrites the editorial content of your e-commerce category pages by combining Semji's SEO and GEO recommendations, with a conversion-oriented tone.
* **Time required**: \~5 minutes to set up, then a few minutes per optimized category page.
* **Best for**: E-commerce managers, SEO leads, and content managers who want to turn their category pages into high-performing content for organic search and AI answer engines.
### What is it for?
E-commerce category pages are often the forgotten ones in content strategy: a few generic lines of text, no editorial structure, or worse — no content at all. Yet these pages are strategic — they concentrate purchase intent and represent a major lever for organic traffic.
This AI+ Agent handles the entire optimization process: it analyzes Semji's SEO and GEO recommendations, studies the competition, filters questions relevant to the buying stage, and produces complete, structured, conversion-oriented content. All with one clear goal: achieving a Content Score above 90.
> **Good to know ℹ️**: **GEO (Generative Engine Optimization)** refers to optimizing your content to be picked up and cited by AI-powered answer engines (ChatGPT, Perplexity, Google AI Overviews…). In practice, this means clear summaries, structured lists, concise definitions, and direct answers to questions — all elements this agent automatically integrates into its proposal.
### What you'll get
The agent produces a **complete before/after proposal** that includes:
* A **fully restructured editorial content**: H1 title, conversion-oriented introduction, body text with H2/H3, and filtered FAQ.
* **Optimized semantic coverage**: natural integration of related terms with the occurrence count recommended by Semji.
* A **GEO-ready structure**: summary section, bullet-point lists for selection criteria, concise answers to pre-purchase questions.
* **Featured product highlights**: showcasing product ranges and specifics identified on your page.
* An **estimated Content Score** achieved after optimization.
#### Before you start
Make sure that:
* You have a **category page open in the Semji editor** with a **focus keyword defined**.
* **SERP data is loaded** for that keyword (SEO recommendations, competitor data, and SEO questions are available).
* You have access to the **AI+ Agents** feature (available depending on your Semji plan).
> **Tip ✅**: If your category page has a published URL, make sure it's entered in Semji. The agent will then be able to analyze the products and subcategories visible on the page and highlight them directly in the proposed content.
### How to do it
#### 1) Access AI+ Agents
From the Semji editor, open the category page you want to optimize. Navigate to the **AI+ Agents** tab in the right-side panel.
#### 2) Create the custom agent
Click **Create a custom agent** and configure it as follows:
* **Name**: E-commerce Category Expert Writer (SEO/GEO & Conversion)
* **Instructions**: Copy and paste the prompt below.
* **Tools to enable**:
* ✅ Retrieve SEO recommendations
* ✅ Retrieve GEO recommendations
* ✅ Google search
* ✅ Get web page content
\[PROMPT]
Click **Create** to save your agent.
#### 3) Run the optimization
Once the agent is created, select it from your custom agents list and click **Run**. The agent will automatically:
1. Analyze Semji's SEO and GEO recommendations for your focus keyword.
2. Study the competitors and dominant SERP intent.
3. Filter SEO questions to keep only those related to the buying stage.
4. Analyze the products visible on your page (if a URL is provided).
5. Produce a complete content proposal in before/after format.
#### 4) Interpret and apply the results
The agent returns a structured proposal:
* **The before/after format** lets you visualize the content transformation. The "before" shows your current content (or an empty field if the page had no editorial content), and the "after" presents the optimized proposal.
* **The estimated Content Score** indicates the optimization level achieved.
* **The summary message** outlines the added value: SEO coverage, GEO structure, product highlights, and transactional orientation.
Review the proposal, verify consistency with your current product catalog, then apply the content in the editor.
### Concrete example
**Situation**: You manage an e-commerce site specializing in outdoor living. Your "Garden Sheds" category page contains only two generic sentences and shows a Content Score of 15.
**What the agent produces**:
* **Complete content** structured with H1/H2/H3: a conversion-oriented introduction, a "How to Choose Your Garden Shed" section with criteria (material, size, use), a product range presentation (wood, metal, resin), and a filtered pre-purchase FAQ.
* **Post-purchase questions filtered out**: the agent automatically ignored questions like "How to maintain a wooden garden shed?" or "How to assemble a garden shed yourself?" and only kept "Metal or wooden garden shed?" and "What size garden shed should I choose?"
* A **GEO-ready structure**: summary at the top of the page, material comparison table, concise FAQ answers.
* An **estimated Content Score of 92**, up from 15.
> **Tip 💡**: The agent automatically filters out SEO questions related to post-purchase, DIY, or off-topic queries — keeping only those from the decision phase. This saves considerable time compared to manually sorting through recommendations.
#### Options and variations
You can customize the agent's prompt to fit your needs:
* **Match your brand tone**: add specific tone instructions in the prompt (e.g., "Use a premium and inspirational tone" or "Use an accessible and casual tone").
* **Target a product segment**: specify in the prompt that the agent should highlight a specific range (e.g., "Focus on premium wooden garden sheds").
* **Adjust the level of detail**: for very broad categories, ask the agent to focus on main subcategories rather than individual products.
* **Disable question filtering**: if you want to cover a wider scope (including informational questions), modify the filtering rule in the prompt.
#### Why is this useful?
| Before | With this AI+ Agent |
| - | - |
| Poor or nonexistent editorial content on category pages | Complete, structured, conversion-oriented content |
| Manual and time-consuming SEO optimization | Automatic integration of related terms and search intents |
| No GEO consideration | Structure optimized for AI answer engines (summaries, lists, FAQ) |
| SEO questions integrated without sorting (including post-purchase and DIY) | Smart filtering: only pre-purchase questions are kept |
| Flagship products not highlighted in editorial content | Page analysis and automatic showcasing of ranges and specifics |
| Low Content Score with no clear action plan | Before/after proposal with estimated score above 90 |
### Go further
**Additional actions to consider:**
* After applying the proposed content, check your actual Content Score in the editor and refine any missing related terms if needed.
* Combine this agent with the SEO Intent Alignment agent to verify upstream that your focus keyword truly matches a transactional intent.
* Deploy this agent across all your category pages to industrialize your catalog optimization.
> **Warning ⚠️**: The agent proposes editorial content based on the data available at the time of analysis. Always verify consistency with your current product catalog (availability, ranges, pricing) before publishing. If your product offering changes, re-run the agent to update the content.
**Useful links:**
* **[\[Create and configure a custom AI+ Agent\]](/en/ai-agents/create-and-configure-your-custom-ai-agent)**
* **[\[SEO Intent Alignment Agent: Verify the alignment between your content and the SERP\]](/en/ai-agents/agent-alignement-intention-seo)**
# Legal compliance expert agent: Securing and validating your content
Source: https://help.semji.com/en/ai-agents/how-to-set-up-the-legal-compliance-agent-for-your-articles
Pre-check your content before legal approval and cut your back-and-forths by 10
### In summary
What you can do: Automatically check the legal compliance of your content before publication according to the regulations in your sector.
Who it's for: Marketing and editorial teams in regulated industries (insurance, healthcare, finance, food, real estate, etc.).
Why it's useful: Significantly reduce your legal validation timelines and limit the risk of regulatory sanctions.
### What this changes for you
**The problem:** In regulated industries, every piece of content must go through legal review before publication. This process is lengthy and causes:
* Multiple back-and-forths between writing, legal, and validation teams
* Publication blockages if a non-compliance issue is detected late
* Risk of sanctions from DGCCRF, ACPR or AMF if an error goes unnoticed
* Publication inertia: the longer the delay between creation and validation, the more the content may lose SEO relevance (changes in search intent, new trends, updated SERPs, etc.)
**The solution:** The Legal Compliance Consultant agent analyzes your content in real time and automatically identifies compliance issues before sending it to your legal department.
**The impact:**
* Reduced validation time: automated first check before legal review
* Minimized risks: early detection of non-compliances before publication
* Fewer back-and-forths: content sent to legal is pre-checked
* Lower costs: less legal time spent on checks that can be automated
### How to configure the legal compliance expert agent
#### Step 1: Create your agent
In the Semji editor, click on **"Agents"** in the right sidebar, then select the **"Legal Compliance Expert"** template.
Click on the template to configure and create your agent.
\[Insérer capture EN]
#### Step 2: Name your agent
**Name:** Choose a clear name such as "Legal Compliance Expert" or "Health Legal Validation".
**Description:** Specify the scope, for example "Checks health compliance (HAS, ANSM, health GDPR)"
#### Step 3: Define your compliance rules
This is the key step: you will list the legal rules specific to your industry that the agent must check.
> **Tip:** Take the time upfront to list the key rules with your legal or compliance department. Setting up the agent together with the relevant stakeholders will help you gain relevance and efficiency from the very first checks.
**How to structure your rules:**
Each rule must contain:
* **The name of the rule** (clear and identifiable)
* **What is prohibited OR required**
* **The reference regulation** (optional, but recommended)
**Recommended format:**
Each rule should be written clearly and operationally so the agent can interpret it easily.
**We recommend using the following structure:**
> **\[NAME OF THE RULE]**
>
> **✅ What must be checked or complied with**
>
> **❌ Example of non-compliance**
>
> **✔️ Example of compliant wording**
>
> **📘 Regulatory reference (optional)**
> 💡 **Tip:** Start with 5 to 10 essential rules, then gradually expand your list. The goal is to keep the checks simple, progressive, and tailored to your industry.
#### Step 4: Specify the applicable regulations
This optional step lets you specify the regulations or regulators that apply to your sector.
**Section "Which regulations or regulators apply to you?"**
Indicate the relevant reference texts and supervisory authorities for your activity.
**Examples:**
**Insurance sector:**
* ACPR (Prudential Supervision and Resolution Authority)
* Insurance Code
* IDD (Insurance Distribution Directive)
* GDPR
**Health sector:**
* HAS (French National Authority for Health)
* ANSM (French National Agency for the Safety of Medicines and Health Products)
* Public Health Code
* Health-related GDPR
**Cosmetics sector:**
* DGCCRF (Directorate-General for Competition, Consumer Affairs and Fraud Control)
* Cosmetics Regulation (EU) No 1223/2009
* ANSM (for certain products)
**Finance sector:**
* AMF (Financial Markets Authority)
* Monetary and Financial Code
* MiFID II Directive
* GDPR
💡 **Tip :** The agent will automatically adapt its level of scrutiny and recommendations according to the relevant regulator.
#### Step 5: Add additional instructions (optional)
If you have cross-cutting rules or general guidelines:
> General instructions:
>
> * Always check for the presence of legal notices at the end of the article
> * Alert if the tone is too commercial or promotional
> * Flag the use of superlatives ("best", "unique", "revolutionary")
> * Verify that sources for statistics are cited
> * Ensure that technical terms are explained for a general audience
#### Step 6: Save
Click **"Create"**. Your agent is now available and accessible to your team.
**Sharing:** All team members can run the agent. Only roles with editing rights can modify the rules.
### How to use the agent on a daily basis
#### Run the check
* **Finalize your article** in the Semji editor
* **Click on "Agents"** in the sidebar
* **Select your Legal Compliance Consultant agent**
* **The agent launches automatically when you click on it**
**Duration:** 30–60 seconds depending on the length of the article\
**Cost:** 10 AI credits per run
#### Understanding the generated report
The agent produces a report structured in 3 sections:
##### 1. Overall compliance
**Status:** ✅ Compliant / ⚠️ Needs review / ❌ Non-compliant
##### Rule-by-rule details
For each configured rule, the agent indicates:
* ✅ Respected: No issue detected
* ⚠️ Needs review: Ambiguous element or requires confirmation
* ❌ Violated: Non-compliance detected
**Example:**
##### 3. Recommendations
The agent proposes concrete actions:
#### Applying corrections
**Recommended workflow:**
1. **Read the report:** Identify critical non-compliances (❌)
2. **Correct directly:** Modify your article according to the recommendations
3. **Re-run the agent:** Verify that the corrections are compliant
4. **Send to legal:** Once the agent validates, forward to the legal department for final validation
⚠️ **Important:** The agent is a decision-support tool. Final legal validation remains mandatory.
💡 **Time savings:** Legal receives content that has already been pre-verified, which drastically reduces back-and-forth.
#### Refining through discussion
You can ask the agent questions to clarify:
> "Why does 'best rate' pose a problem?"
> "Can you give me 3 compliant alternatives to the sentence on line 45?"
> "Where exactly should the ORIAS reference be placed?"
**Cost:** 10 AI credits per message
💡 **Next steps:** Now that your legal compliance agent is configured, discover how other agents can optimize your content production: social media adaptation, internal linking improvement, or creation of 100% customized agents.
👉 [**\[Back to the complete AI+ Agents guide\]**](/en/ai-agents/guide-optimize-your-seo-geo-content-with-ai-agents)
# Internal linking assistant Agent: strengthening your link structure
Source: https://help.semji.com/en/ai-agents/how-to-strengthen-your-internal-links-with-ai-agent
Automatically identify the best linking opportunities to your priority pages
### In summary
**What you can do:** Automatically identify internal linking opportunities to your strategic pages and boost their SEO visibility.
**Who it's for:** SEO Managers, Content Managers and editorial teams managing sites with many category or product pages.
**Why it's useful:** Optimize your internal linking without tedious manual research and increase traffic to your strategic pages.
### What this changes for you
**The problem:** Internal linking is crucial for SEO, but managing it manually takes time. Without a clear method, some pages lack links, others are over-optimized, and many opportunities go unnoticed.
**The solution:** The Internal Linking Assistant agent automatically analyzes your content and identifies the best linking opportunities to your priority pages. It detects relevant anchors already present in your text, suggests light edits to optimize context, and even proposes adding new sentences when appropriate.
**Impact:**
* **Enhanced SEO performance:** your priority pages gain visibility through optimized internal linking.
* **Significant time savings:** automated analysis replaces tedious manual research.
* **Consistent strategy:** each published piece of content supports your key pages strategically.
* **Quality preserved:** suggestions respect tone, context, and reading flow.
### How to set up the Internal Linking Assistant agent
#### Step 1: Create your agent
In the Semji editor, click on **"Agents"** in the right sidebar, then select the **"Internal Linking Assistant"** template.
#### Step 2: Name your agent
**Name:** Choose a clear name. You can keep the default one.
**Description:** Explain in one sentence the goal of your agent. Examples:
* "Identify linking opportunities to my 50 priority category pages"
* "Optimize internal links to my best-selling product pages"
* "Strengthen linking to my strategic SEO landing pages"
#### Step 3: Add your priority URLs
**This is the key step:** you will specify to the agent which pages on your site should receive more internal links.
##### How to structure your list of URLs:
List your priority URLs, one per line, in the designated field.
##### Tips for selecting the right target pages:
1. **Prioritize pages with high SEO potential:**
* Category pages with good search volume but average rankings (positions 5–15)
* Strategic thematic landing pages
* Best-selling product pages or high-margin products
2. **Limit yourself to your true priorities:**
* Start with a maximum of 20–50 URLs for relevant suggestions
* Too many URLs dilute the relevance of the recommendations
3. **Organize by theme:**
* If you manage multiple categories, create one agent per theme
* Example: one "Running Internal Linking" agent + one "Cycling Internal Linking" agent
4. **Update regularly:**
* Add your new strategic pages
* Remove obsolete URLs or those that have achieved their goals
#### Step 4: Add additional instructions (optional)
If you have specific rules for your internal linking, please specify them here:
##### **Examples of additional instructions:**
💡 **Tip:** These instructions refine the agent's behavior according to your internal SEO best practices.
#### Step 5: Save
Click **"Create"**. Your agent is now available in the "Agents" tab and accessible to your entire team.
💡 **Sharing:** All members of your team can use this agent. Only users with editing rights can modify it.
### How to use the agent day-to-day
#### Run the linking analysis
1. **Finalize your article** in the Semji editor
2. **Click "Agents"** in the right sidebar
3. **Select your Internal Linking Assistant agent** and click it to run
⏱️ **Duration:** 30–60 seconds depending on the length of the article\
ℹ️**Cost:** 10 AI credits per run
#### Understanding the generated report
The agent analyzes your content and identifies several types of internal linking opportunities.
#### Types of opportunities detected
**1. Perfect anchors already present**
The agent identifies sentences in your text that already contain perfect terms to turn into a link.
**2. Phrases to slightly modify**
The agent suggests slightly modifying an existing sentence to integrate an optimized anchor.
**3. Addition of new sentences**
The agent suggests adding an entirely new sentence to create a relevant contextual link.
#### Report format
For each opportunity, the agent provides:
* 📍 **Precise location:** paragraph number or exact sentence
* 🔗 **Target URL:** which priority page to link to
* ⚓ **Suggested anchor:** the exact text to turn into a link
* 💡 **Justification:** why this suggestion is relevant
* 🎯 **Action type:** existing anchor / modification / addition
#### Apply the suggestions
**Recommended workflow:**
1. **Read all the suggestions** to get an overview
2. **Prioritize the opportunities:**
* ✅ Natural anchors already present → Immediate application
* ⚡Light edits → Check reading flow
* ➕ Additions of sentences → Check contextual coherence
3. **Apply the links one by one:**
* Find the sentence concerned in your text
* Select the suggested anchor
* Create the hyperlink to the target URL
* Check that the link opens in a new tab if that is your convention
4. **Limit to a maximum of 3–5 internal links** per article to avoid over-optimization
💡 **Good practice:** Never force a link that feels artificial. Contextual relevance always takes precedence over quantity.
#### Refine with the discussion
You can continue the conversation with the agent to adjust the suggestions:
**Sample questions:**
"Can you suggest an alternative anchor for the link to the 'shoes' category?"
"The sentence added in paragraph 7 feels a bit forced to me; can you propose a more natural wording?"
"What are the 3 most strategic opportunities in your opinion?"
ℹ️ **Cost:** 10 AI credits per discussion message
💡 **Optimization:** Group multiple requests into a single message to save your credits.
### Learn more
Activate the *Internal Linking Assistant* agent now to automate and strengthen your internal linking strategy continuously. Activate the agent now. Result: measurable growth in organic traffic and a significant time savings for your teams.
**Continue your optimization with other complementary agents:**
**👉 [Guide: Optimize Your SEO/GEO Content with AI+ Agents](/en/ai-agents/guide-optimize-your-seo-geo-content-with-ai-agents)**
**[👉](/fr/ai-agents/tutorial-automatically-turn-your-articles-into-social-media-posts) [\[How to set up the Legal compliance expert Agent for your articles\]](/en/ai-agents/how-to-set-up-the-legal-compliance-agent-for-your-articles)**
**[👉](/fr/ai-agents/tutorial-automatically-turn-your-articles-into-social-media-posts) [\[AI+ Agent: transform your articles into social media posts automatically\]](/en/ai-agents/tutorial-automatically-turn-your-articles-into-social-media-posts)**
**[👉](/fr/ai-agents/tutorial-automatically-turn-your-articles-into-social-media-posts) [\[Create and Configure your Custom AI Agent\]](/en/ai-agents/create-and-configure-your-custom-ai-agent)**
# SEO architect Agent: Building a silo content strategy
Source: https://help.semji.com/en/ai-agents/seo-architect-agent-building-a-silo-content-strategy
Generate a hierarchical content strategy with the Semantic Cocoon Agent
### At a glance
* **What you will do:** Create a custom AI agent that automatically generates a structured semantic cocoon to dominate an SEO topic
* **Time required:** 10–15 minutes (configuration) + 2–3 minutes (execution)
* **Ideal for:** SEO Managers, Content Managers, and editorial teams planning a large-scale content strategy
### What is it for?
Structuring a content strategy around a topic can quickly become complex: which subjects should be prioritized? How should pages be organized with one another? What internal linking should be put in place?
The Semantic Cocoon agent analyzes your pillar keyword, checks its strategic potential, and automatically generates a complete content architecture organized into a pyramid of intents:
* **Parent page (transactional):** your pillar page focused on conversion
* **Child pages (consideration):** comparison and evaluation axes
* **Grandchild pages (informational):** guides, definitions and learning content
You thus gain a clear view of all the content to produce, along with their hierarchy and internal linking strategy.
> **Tip 💡:** The agent automatically checks whether your keyword is broad enough to serve as a transactional parent page. If it is not, it suggests a broader thematic scope and repositions your original keyword within the architecture.
### What you will get
At the end of the analysis, the agent generates:
* A complete **pyramid architecture** with all the page titles to create
* **The main keyword and the type of intent** (transactional, consideration, informational) for each page
* **Optimized internal linking recommendations** (downward, upward and horizontal links)
* An **editorial schedule prioritized** by business impact
#### Before getting started
Make sure that:
* You have identified a **pillar keyword** or a theme to develop for your SEO strategy
* You have **access to a Semji workspace**
* Your subscription includes the AI+ Agent feature (Suite, Premium, Enterprise, or Unlimited plans)
> **Good to know ℹ️:** Each run of a custom AI agent consumes 10 AI credits. Make sure you have enough credits before launching the analysis.
### How to do it
#### 1) Create the Semantic Cocoon agent
Go to the **AI+ Agent** section of your Semji workspace and create a new custom agent with the following settings:
**Agent name:**
Semantic Cocoon Agent
**Description :**
Generates a complete and structured semantic cocoon from a given primary keyword.
**Instructions (prompt) :**
\## Role \
You are a Senior SEO Expert specializing in content architecture, semantic cocoons, thematic silos, SERP analysis, and search intent optimization. You master advanced techniques in semantic clustering, entity analysis, co-occurrences, internal linking strategies, and E-E-A-T approaches. \
Your role is to generate a complete and structured semantic cocoon based on a provided main keyword.
\---
\## Objective \
Using the main keyword, your objective is to generate a hierarchical SEO semantic cocoon \*\*based on an intent pyramid\*\*:
\- \*\*Mother Page (Top of pyramid)\*\*: \*\*Transactional\*\* keyword (business objective / conversion) \
\- \*\*Daughter Pages (Middle of pyramid)\*\*: \*\*Consideration\*\* keywords (comparison, choice, evaluating options) \
\- \*\*Granddaughter Pages (Bottom of pyramid)\*\*: \*\*Informational\*\* keywords (learning, definitions, guides, "how-to", etc.)
The cocoon must include:
\### 0. Thematic Width Test & Broadening if Necessary (MANDATORY) \
Before constructing the cocoon, verify if the main keyword is \*\*broad enough and at the right level\*\* to serve as a \*\*transactional Mother Page\*\*.
\*\*Evaluate:\*\* - Semantic breadth: Mother theme vs. sub-topic \
\- Content potential: Ability to produce 1 Mother page + 3–7 Daughter pages + 3–10 Granddaughter pages per Daughter page \
\- Simulated SERP: Variety of angles vs. micro-topic \
\- Volume / Estimated demand \
\- Client Business Alignment (core offer, positioning, E-E-A-T)
\#### If the main keyword is too narrow or non-transactional \
1\. Briefly explain why it cannot be a Mother Page. \
2\. Identify the \*\*broader, transactional mother theme\*\*. \
3\. Propose a \*\*new, broadened transactional main keyword\*\*. \
4\. Reposition the initial keyword within the cocoon: \
- As a \*\*Daughter Page\*\* (consideration) if it is a major axis. \
- Or as a \*\*Granddaughter Page\*\* (informational) if it is a sub-axis. \
5\. Then, build the cocoon based on the broadened keyword.
\> Example: "Inclusive manager" (too narrow / mostly consideration) → Move up to "Management training" (transactional for a training provider). "Inclusive manager" becomes a Daughter or Granddaughter page depending on the logic.
\---
\### 1. Semantic Analysis of the Main Keyword (Transactional) \
\- Dominant search intent (expected to be transactional) \
\- Main and secondary entities \
\- Variants, synonyms, long-tail keywords \
\- SEO opportunities \
\- Business performance criteria (conversion, lead, contact, quote request, etc.)
\---
\### 2. Architecture of the Semantic Cocoon in an Intent Pyramid \
\*\*Mandatory Structure:\*\*
\#### A. Mother Page (Transactional) \
\- \*\*1 unique pillar page\*\* - Positioned on the \*\*broadest, business-driven transactional keyword\*\* - Must be able to encompass the entire theme
\#### B. Daughter Pages (Consideration) \
\- \*\*3 to 7 pages\*\* - Each corresponds to a \*\*major sub-theme\*\* of the Mother subject \
\- Targets queries such as: \
- "Best solution for…" \
- "Training X vs Y" \
- "Price / Duration / Modalities / Certification" \
- "For whom?", "How to choose?" \
- "Pros / Cons", "Feedback/Reviews"
\#### C. Granddaughter Pages (Informational) \
\- \*\*3 to 10 pages per Daughter Page\*\* - Targets a discovery / learning intent: \
- Definitions \
- Practical guides \
- Methods \
- Mistakes to avoid \
- Steps / Checklists \
- Concrete examples \
- FAQ / Long-tail questions
\---
\### 3. Main Keyword for Each Page \
For every page in the cocoon, you must provide: \
\- \*\*Page Title\*\* - \*\*Associated Main Keyword\*\* - \*\*Intent Type (Transactional / Consideration / Informational)\*\*
⚠️ Important: No Hn headers, meta descriptions, or detailed briefs.
\---
\### 4. Optimized Internal Linking (Adapted to the Pyramid) \
\*\*Rules:\*\* - \*\*Downward Linking\*\*: Mother Page → Daughter Pages → Granddaughter Pages \
\- \*\*Upward Linking\*\*: Granddaughter Pages → Daughter Pages → Mother Page \
\- \*\*Horizontal Linking\*\*: Only between pages of the \*\*same level and within the same silo\*\* - \*\*Anchor Text\*\*: \
- 60% Long-tail \
- 30% Close semantic anchors \
- 10% Exact match \
\- \*\*No cross-silo links\*\* unless there is a strong semantic justification.
\---
\### 5. Editorial Schedule Proposal (Based on Intent) \
\- Prioritize \*\*Transactional and Consideration\*\* pages first (direct business impact) \
\- Follow with Informational pages to establish authority \
\- Identify quick wins (low competition / clear intent) \
\- Propose a logical and progressive publication order.
\---
\## Analysis Framework
\### 0. Intent Level Validation \
\- Can the keyword be \*\*transactional\*\*? \
\- If not: broaden towards a transactional mother theme.
\### 1. Simulated SERP Analysis \
\- Dominant page types (sales / consideration / info) \
\- Recurring angles and entities \
\- E-E-A-T differentiation opportunities
\### 2. Thematic Segmentation \
\- Coherent silos without overlap \
\- Each silo = a \*\*Consideration Daughter Page\*\* - Each sub-topic = \*\*Informational Granddaughter Pages\*\*
\### 3. Pyramid Hierarchy \
\- 1 Transactional (Mother) \
\- 3–7 Consideration (Daughters) \
\- 3–10 Info per Daughter (Granddaughters)
\### 4. Internal Linking \
\- Downward / Upward / Horizontal intra-silo only \
\- No cross-silo without justification
\### 5. Schedule \
\- Transactional → Consideration → Informational \
\- Publication sequence oriented towards SEO results + Business impact
**Tools to enable :**
* ☑️ Retrieve SEO recommendations
* ☑️ Search on Google
* ☑️ Get the content of a web page
Click **Create** to save your agent.
#### 2) Launch the analysis on a piece of content
Once the agent is created:
1. Open an **existing piece of content** in the Semji editor (or create a new one)
2. Make sure the **Primary Keyword** corresponds to the pillar keyword you want to analyze
3. In the sidebar, go to the **AI+ Agents** section
4. select your **Semantic Cocoon** agent
5. Click **Launch**
The agent will analyze your keyword, perform Google searches to validate its potential, and generate the complete architecture.
> **Tip ✅:** For best results, choose a keyword that’s broad enough and aligned with your commercial offering. For example, prefer "management training" to "inclusive manager training".
#### 3) Interpret the result
The agent generates a structured report including:
**Keyword validation**
* If your initial keyword is validated as a transactional parent page, the agent builds the cocoon directly
* If the keyword is too narrow, the agent proposes a broader scope and repositions your original keyword within the architecture
**Cocoon architecture**
* Complete list of pages to create, organized by hierarchical level
* For each page: title, main keyword and intent type
**Linking strategy**
* Linking recommendations between pages
* Optimized anchor suggestions
**Editorial schedule**
* Recommended publication order
* Identification of quick wins
### Options and variations
To customize or extend the use of this agent:
* **Adapt the industry sector:** Modify the prompt to include specifics of your industry (e-commerce, B2B, services, etc.)
* **Adjust the number of pages:** Request a specific number of daughter pages according to your editorial production capacity
* **Refine after generation:** Once the cocoon is generated, ask follow-up questions such as "Can you add 3 additional granddaughter pages for the \[X] silo?"
* **Combine with other agents:** Use the Content Gap agent to identify missing opportunities, then use the Semantic Cocoon agent to structure your response
#### Why is it useful?
| Before | With the Semantic Cocoon agent |
| - | - |
| Improvised content architecture, without an overall vision | Hierarchical structure by search intent |
| Random or non-existent internal linking | Optimized linking strategy (downward, upward, horizontal) |
| Unclear editorial prioritization | Schedule based on direct business impact |
| Risk of page cannibalization | Thematic silos that are coherent without overlap |
Difficulty covering a topic in depth
Comprehensive coverage with 20 to 50+ structured pages
#### How can you verify that it worked?
After execution, you can validate the quality of the result by checking that:
* The agent correctly identified or proposed a **transactional parent page** aligned with your offering
* Each **daughter page** corresponds to a distinct and relevant consideration axis
* The **granddaughter pages** cover precise and varied informational questions
* The **proposed linking** respects the silo logic (no unjustified cross-silo links)
* The **editorial schedule** prioritizes content with high business impact
> **Attention ⚠️:** If your initial keyword was broadened by the agent, check that the new proposed keyword still matches your commercial positioning and your professional expertise. You can adjust it manually if necessary.
### To go further
**Refinement questions to ask the agent:**
* "Can you detail the recommended anchor texts for linking between the mother page and the daughter pages?"
* "Propose 5 additional granddaughter pages for the silo \[name of the silo]"
* What are the quick wins to prioritize for this cocoon?
**Useful links:**
* **[Create and configure a custom AI+ Agent](/en/ai-agents/create-and-configure-your-custom-ai-agent)**
* **Identify missing topics with the Content Gap agent**
* **[Optimize the internal linking of your content](/en/ai-agents/how-to-strengthen-your-internal-links-with-ai-agent)**
# Product page specialist agent: optimize your e-commerce product pages for SEO and conversion
Source: https://help.semji.com/en/ai-agents/specialiste-fiche-produit
Rewrite and enrich your product pages with SEO-optimized titles, descriptions, attributes, and rich content, aligned with your brand guidelines and structured…
### In summary
**What you can do:** Optimize a product page end-to-end : title, description, attributes, rich content by integrating target SEO keywords, e-commerce best practices, and your brand-specific guidelines from your knowledge base.
**Who it's for:** E-commerce managers, digital product managers, and content managers handling product catalog pages.
**Why it's useful:** The agent applies the same SEO rigor to product pages as to editorial content, while respecting your brand guidelines and the structural standards expected by Google Shopping and online marketplaces.
### What it changes for you
**The problem:** Product pages are often the weakest link in a content strategy. Descriptions copied from suppliers, incomplete attributes, no SEO work, absent brand voice. The result is underperforming pages that do not rank, do not convert, and do not display correctly on Google Shopping or marketplaces. Manually reworking an entire catalog is out of reach for most teams.
**The solution:** The Product Fact-Checker agent optimizes all components of a product page in a single session. It integrates target SEO keywords, applies e-commerce best practices for structure and length, uses your knowledge base to respect your product specifications and brand guidelines, and adapts the tone and format to the type of page being targeted.
**The impact:**
* **Complete, structured pages:** optimized title, engaging description, populated attributes, ready-to-use rich content.
* **Native e-commerce SEO:** target keyword integration, recommended length compliance, structure tailored to Google Shopping requirements.
* **Brand consistency:** tone, vocabulary, and product claims aligned with your guidelines through your knowledge base.
* **Multi-format adaptability:** the agent adjusts its output based on the target page type, whether it is a single product page, a listing page, or a marketplace listing.
### How to use the Product Page specialist agent
#### 1) Access the template from the Discover gallery
From the left sidebar, go to the **"AI"** menu and click on **"Agents"** to access the agents showcase.
Find the **"Product Page specialist"** template and click it to open it on your content.
> **Good to know ℹ️:** The Product Fact-Checker template is available to all workspace members with no prior configuration required. For best results, make sure your Semji knowledge base includes your brand guidelines and product specifications before running the agent.
#### 2) Add custom instructions (optional)
Before running the agent, you can provide specific guidelines to frame its work according to your business constraints.
**Examples of useful instructions:**
* "Optimize this page for Amazon Marketplace distribution"
* "The tone should be premium and technical, not mass-market"
* "Do not modify legally validated claims under any circumstances"
* "The description must be between 150 and 200 words"
* "Target the following primary keyword: \[insert your keyword]"
> **Tip ✅:** Always specify the target page type (single product page, listing page, marketplace) in your instructions. The agent adapts the structure and length of its output accordingly.
#### 3) Run the agent
Click **"Run"** to start the agent. It analyzes the content of your product page, identifies the components to optimize, and generates an improved version of all elements: title, description, attributes, and rich content.
⏱️ **Duration:** 30 to 60 seconds depending on page complexity
**ℹ️ Cost:** 10 AI credits per run, 10 AI credits per follow-up message
#### 4) Review and validate the output
The agent delivers an optimized version structured by component: SEO title, meta description, product description, attribute list, and rich content. Each element includes a short rationale explaining the SEO choices made.
You can request adjustments in conversational mode: change the tone, rephrase a claim, adjust the length of an element, or request a variant for A/B testing.
> **Good to know ℹ️:** If any claims or legal mentions have been modified by the agent, review them before publishing. Use your custom instructions (step 2) to specify which elements must never be altered.
#### 5) Apply the optimizations in your editor
Copy the validated elements directly into your Semji editor or your CMS. For large catalogs, the agent can be relaunched page by page, adjusting the instructions to match the specifics of each product.
### Learn more
An SEO-optimized product page is an immediate performance lever. Combine this agent with our other tools to cover your entire content strategy.
**Continue your optimization with our other available agents:**
**👉 [Content Master agent: your end-to-end AI editorial advisor](/en/ai-agents/agent-content-master)**
**👉 [E-E-A-T Auditor agent: strengthening the credibility and authority of your content](/en/ai-agents/agent-auditeur-eeat)**
**👉 [Top 3 Hunter agent: aligning your content with what actually ranks](/en/ai-agents/agent-chasseur-top-3)**
**👉 [Guide: optimize your SEO/GEO content with AI+ Agents](/en/ai-agents/guide-optimize-your-seo-geo-content-with-ai-agents)**
# Social media assistant agent: Transforming an article into social posts
Source: https://help.semji.com/en/ai-agents/tutorial-automatically-turn-your-articles-into-social-media-posts
Repurpose your content across 5 channels while keeping your brand voice
### In summary
**What you can do:** With one click, transform your blog posts into optimized posts for each social network (LinkedIn, X, Facebook, Instagram, Newsletter) without losing your brand voice.
**For whom:** Content Managers, Social Media Managers and Copywriters who manage multiple communication channels.
**Why it’s useful:** Save hours of manual work while maximizing your content’s reach. The agent automatically adapts tone, format, and hashtags for each platform.
### What this changes for you
**The challenge:** Manually repurposing a 1,500-word article into posts for each social platform is extremely time-consuming. You have to summarize the article, adjust the tone for each network, follow platform-specific formats, add relevant hashtags, and create engaging hooks.
**The solution:** The Social Media Assistant Agent automatically generates all your posts. Simply copy and paste them into your scheduling tools and add your visuals.
### How to set up the Social Media Assistant Agent
#### Step 1: Create your agent
In the Semji editor, click on **"Agents"** in the right sidebar, then select the **"Social Media Assistant"** template.
Click the template to configure and create your agent.
#### Step 2: Name your agent
**Name:** Choose a clear, descriptive name. You can keep the default one.
**Description:** Explain in one sentence what your agent does. Example: "Transforms my blog articles into posts adapted for LinkedIn, X, Facebook, and Instagram".
#### Step 3: Select your platforms
Check the social networks where you want to publish:
* ☑️ LinkedIn: Long posts, professional tone (ideal for B2B)
* ☑️ X / Twitter: Short tweets or threads (280 characters)
* ☑️ Facebook: Medium-length posts, conversational tone
* ☑️ Instagram: Captions + hashtags (150–300 words)
* ☑️ Newsletter: Editorial summary (200–400 words)
#### Step 4: Customize with your examples
**The simple method:** Add 2 to 3 examples of your best posts. The agent will learn your tone, expressions and style to generate posts 100% aligned with your brand.
**How to do it:**
1. Go to your LinkedIn, Facebook, or Instagram page
2. Identify 2–3 posts that performed well (good engagement)
3. Copy the full text of those posts
4. Paste them into the corresponding section of the agent
#### Step 5: Save
Click **Create**: your agent is ready to use! You can now test it on an article to see the magic happen.
> 🚀 **Try it now:** Once your agent is created, run it on a recent article. In a few seconds, you'll get your first ready-to-publish posts!
### How to use the agent in daily practice
#### Launch the article transformation
1. **Finalize your article** in the Semji editor
2. **Click on "Agents"** in the sidebar
3. **Select** your Agent and **click** on it to launch your Agent
ℹ️ **Cost:** 10 AI credits per run
#### Refine with the conversation
You can continue the conversation with the agent to adjust the posts:
> "Can you make the LinkedIn post shorter (max 1,000 characters)?"
> "Propose me 3 variations of the Instagram hook"
> Add the statistic '73% of companies' to the LinkedIn post
ℹ️ **Cost:** 10 AI credits per adjustment message
### Use case example: Black Friday social media expert
**Agent configuration:**
* **Platforms:** Instagram, Facebook
* **Examples provided:** 3 existing Instagram posts that performed well
* **Additional instructions:**
* * "Use a short, impactful tone"
**Generated posts:**
**Result:**
* Automatically generated posts adapted for each channel
* Copy-paste directly into your scheduling tools
* Significant time savings on social media production
Thanks to the Social Media Assistant agent, you industrialize the adaptation of your content across all your channels. Your teams can focus on strategy and performance analysis, while the AI automates post production.\
Result: multiplied reach and immediate time savings for your social media operations.
#### Discover the other agents:
[**👉 Guide: Optimize Your SEO/GEO Content with AI+ Agents - Overview of all available agents**](/en/ai-agents/guide-optimize-your-seo-geo-content-with-ai-agents)
**[👉](/fr/ai-agents/tutorial-automatically-turn-your-articles-into-social-media-posts) [\[How to set up the Legal compliance expert Agent for your articles\]](/en/ai-agents/how-to-set-up-the-legal-compliance-agent-for-your-articles)**
**[👉](/fr/ai-agents/tutorial-automatically-turn-your-articles-into-social-media-posts) [\[How to Strengthen Your Internal Links with AI+ Agent\]](/en/ai-agents/how-to-strengthen-your-internal-links-with-ai-agent)**
**[👉](/fr/ai-agents/tutorial-automatically-turn-your-articles-into-social-media-posts) [\[Create and Configure your Custom AI Agent\]](/en/ai-agents/create-and-configure-your-custom-ai-agent)**
# AI Properties: Topics, Personas & Marketing Funnel
Source: https://help.semji.com/en/analyze-competitors/ai-properties-setup
Automatically classify your content by topic, persona, and funnel stage for actionable SEO insights.
**AI Properties** are at the heart of the Intelligence Hub’s value. They automatically enrich analyzed URLs so you can turn SEO data into insights that are **comparable** and **actionable**.
### What are AI Properties?
AI Properties are **AI-driven automatic classifications** that enrich each URL across three dimensions:
1. **Topics**: the subject covered by the page.
2. **Personas**: the primary audience targeted.
3. **Marketing funnel stages**: where the content sits in the customer journey (Awareness → Retention).
These classifications transform raw data (URLs, keywords, traffic) into **strategic insights**.
### Why is it important?
A solid setup is essential because it determines the quality of the analyses in the Reports, Competition, and Data Explorer screens.
#### What you gain
* More reliable comparisons between you and your competitors.
* A clear view of performance by *topic*, *persona*, and *funnel stage*.
* Faster decisions (editorial priorities, angles to strengthen, gaps to fill).
#### Risks if the setup is imprecise
* **Biased analyses**: pages classified under the wrong topic or for the wrong persona.
* **False signals**: you think you’re leading on a topic while content has been misallocated.
* **Less relevant decisions**: content prioritization based on inconsistent classifications.
### How does AI classification work?
#### Data used
To classify each URL, the AI relies in particular on:
* the page URL
* the top associated keyword
* the Title tag
* the meta description (or SERP snippet)
#### Context provided during setup
Quality also depends on what you define upfront:
* detailed descriptions for each property to classify
* examples and counter-examples of queries for the relevant properties
* additional instructions and rules you provide
### How to customize your AI Properties (step by step)
1. Go to Settings > Workspace > AI Properties.
#### Topics
##### Fields to fill in
For each topic, plan for:
* **Name**: short and explicit.
* **Description**: to define the scope.
* **Keyword examples**: a representative set (at least around twenty example keywords).
* **Counter-examples**: what must not be classified in this topic.
##### Best practices
* **Think business strategy**: topics should reflect your priorities and enable operational decisions.
* Avoid **overlapping topics and duplicate keywords** that would fit into multiple topics.
* Create an **“Other”** topic to group subjects that do not directly concern you (a catch-all category).
#### Personas
##### What makes a good persona?
A persona that’s useful for Intelligence Hub should be:
* **Distinct and identifiable**
* **Actionable** (helps decide which content to produce / optimize)
* **Data-driven** (CRM, customer feedback, studies, analytics, marketing data)
##### Fields to fill in
For each persona, provide:
* **Persona name**
* **Description**: add enough detail so the AI has as much context as possible
* **Keyword examples**: a representative set (at least around twenty example keywords linked to this persona)
* **Counter-examples**: what must not be classified in this persona
##### Best practices
* Avoid personas that are too broad or too narrow.
* Avoid duplicate keywords that would fit into multiple personas.
* Consider adding a **“Multi-persona”** persona to classify pages that do not match a single specific persona. This can also reveal opportunities—for example, if a competitor doesn’t offer content for a given persona or targets personas inconsistently.
#### Funnel stages
Unlike topics and personas, **funnel stages are standardized**. You don’t need to define them.
The AI automatically classifies content into 4 stages:
1. **Awareness**
2. **Consideration**
3. **Decision**
4. **Retention**
##### Industry / business context
Also add a short paragraph (5 to 10 lines) to present your business to the AI.
Specify what you sell, to whom, in which geographies/markets, and what differentiates you. Mention your main offers or product ranges, as well as your customer types (B2B or B2C, industries, company sizes).
If useful, include your brands and key categories. The goal is to help the AI understand your context so it can better classify content across your customer journey.
##### Fields to fill in
For each of the 4 stages, provide:
* **Description**: what types of pages should fall into this funnel stage
* **Keyword examples**: a representative set (at least around twenty example keywords linked to this stage)
* **Counter-examples**: what must not be classified in this stage
##### Best practices
* Avoid duplicate keywords that would fit into multiple funnel stages.
#### Custom instructions
For each property, you can add **custom instructions**. These are simple, reusable rules that apply to all your URLs and help the AI decide in ambiguous cases and apply your business rules.
##### When to use them
* When certain pages follow recurring patterns (templates, folders, parameters).
* When you have frequent exceptions (brand pages, support, recruiting, legal notices).
* When you want to prioritize one signal over another (e.g., URL takes precedence over Title).
##### Best practices
* Write rules that are **short, explicit, and unambiguous**.
* Provide a **verifiable criterion** (keyword, folder, URL pattern, recurring expression).
* Add 1–2 **examples** and, if useful, a **counter-example**.
* Avoid contradictory rules. If needed, specify priority (e.g., “this rule overrides…”).
##### Example instructions
* If the URL matches the `/city/` pattern or contains a **“brand + city”** combination, then classify as the **“Local”** topic.
* If the URL contains `/pricing`, `/rates`, or “price”, then set the funnel stage to **“Decision”**.
* If the page contains “FAQ” or the URL contains `/faq`, then set the funnel stage to **“Consideration”**.
* If the URL contains `/careers`, `/recruitment`, or “jobs”, then classify as **“Recruitment”** (or **“Other”**).
### Auto-completion and classification quality
#### Auto-completion for new URLs
Once the setup is finalized and validated, auto-completion can be enabled in the AI Properties settings.
**What it does:**
* Each time a monthly report is generated, **new URLs** that are detected are automatically classified.
* Classifications remain consistent from one month to the next.
**Where to enable it:**
* In AI Properties, enable “Auto-completion” for each dimension (Topics, Personas, Marketing funnel).
#### Why does the AI sometimes get it wrong?
* **Ambiguous content**: a page can cover multiple subjects or target multiple audiences.
* **Insufficient definitions**: not enough examples, scope too vague.
* **Atypical content**: unusual or highly technical formats.
* **Incomplete base data**: weak Title/meta description, uninformative URL.
#### What to do in case of recurring errors
Refine your settings (description, examples, counter-examples) based on the errors you observe.
For example, if a keyword is misclassified:
* Add it to the **examples** of the correct topic / persona / funnel stage.
* Add it to the **counter-examples** of the option where it was wrongly classified.
* Add a simple, **verifiable rule** in the custom instructions (URL pattern, presence of a term in the Title, folder, etc.) to help the AI decide.
* Check that there is no **overlap** (similar keywords in multiple options) and, if needed, tighten scopes or merge options that are too close.
### Q\&A
#### Can I edit/delete my topics or personas after rollout?
Yes, it’s possible, but it’s not recommended once your setup is stable.
Editing existing topics or personas affects classifications already applied.
If you delete a topic or persona, URLs already classified under that item will no longer have a category/persona.
If you add a new topic or persona, a new classification will be required.
**Note:** funnel stages are fixed and cannot be deleted.
#### Do classifications change from one month to the next?
**For existing URLs:** No, the classification does not change.
**For new URLs:** Yes, they are classified when they first appear in a report.
# AI Visibility: read and interpret your AI visibility dashboard
Source: https://help.semji.com/en/analyze-competitors/ai-visibility
Get an instant overview of your mention rate and citation rate in LLMs, track their evolution over time, and identify the topics where your competitors outrank…
### At a glance
* **What you can do**: read your overall AI visibility score and score by LLM platform, track your trends over time, and benchmark your brand against competitors by topic.
* **Who it's for**: heads of SEO, content managers, CMOs, and SEO project leads.
* **Why it matters**: the AI Visibility screen centralizes all your GEO metrics in a single view, from a synthetic score readable by anyone to the full breakdown by brand and topic, with automatic comparison to the previous period.
### What changes for you
Before Intelligence Hub GEO, getting a consolidated view of your LLM visibility meant manually querying each tool with no history and no competitive context.
**Before**: no aggregated data, no synthetic KPI, no competitive benchmark on your presence in generative AI.
**Now**: a single dashboard centralizing an AI visibility score readable by any stakeholder, your mention rate, citation rate, their trends over time, and your competitor ranking by topic.
> **Good to know ℹ️**: all charts on the AI Visibility screen are clickable. Clicking an element automatically filters the data and switches you to the corresponding view in the Prompts screen.
### What you'll get
The AI Visibility screen is now made up of six graphic widgets and a ranking table.
* **Visibility Score**: a synthetic score from 0 to 100 combining mention rate and citation rate, calculated for you and your competitors.
* **Visibility Score by platform:** the same score broken down by LLM (ChatGPT, Google AI Overviews…) to identify which model your brand is most or least visible on.
* **Mention rate** (horizontal bars): the rate at which each brand appears in the text of LLM responses over the period, for you and your competitors.
* **Citation rate** (horizontal bars): the rate at which each brand's domain appears in the sources cited by LLMs.
* **Mention rate trend** (line chart): the day-by-day evolution of the mention rate for all tracked brands over the period.
* **Citation rate trend** (line chart): the day-by-day evolution of the citation rate for all tracked brands over the period.
* **Competitor ranking by topic**: the ranking of each brand (#1 to #10) for each configured topic, switchable between the Visibility, Mention, and Citation views. The Visibility view, based on the synthetic score, is shown by default.
### How to use it (step by step)
#### 1) Read the Visibility Score
The **Visibility Score** widget shows a synthetic score from 0 to 100 for each tracked brand. This score combines mention rate (weighted at 65%) and citation rate (weighted at 35%) over the selected period.
It's the most readable KPI for communicating your GEO performance internally: a single number, comparable over time and against competitors, without having to explain how LLMs work.
The **Visibility Score by platform** widget breaks down that same score by LLM.
> **Good to know ℹ️:** if no prompts were analyzed in the period, the score displays "-". A score of 0 means at least one prompt was analyzed but your brand is neither mentioned nor cited.
#### 2) Read the mention rate and citation rate
The two horizontal bar widgets at the top of the screen give you an instant read of your relative position against competitors over the selected period.
**Mention rate** measures how often your brand appears in the text of LLM responses. If your brand is mentioned in 40 out of 100 queries, your mention rate is 40%.
**Citation rate** measures how often a URL from your domain appears in the sources cited by LLMs. It is independent from the mention rate: a brand can be cited as a source without being mentioned in the text, and vice versa.
> **Good to know ℹ️**: these rates are averages calculated across all queries in the period. If your mention rate over 5 days is 4% / 5% / 4% / 0% / 8%, the displayed value will be 4.2%.
#### 3) Analyze trends over time
The two line charts at the bottom of the page let you track the day-by-day evolution of your mention rate and citation rate over the selected period.
Each brand is represented by a color. Use the legend checkboxes to show or hide brands and make the chart easier to read.
> **Tip 💡**: hold Ctrl (or Cmd on Mac) and click a brand in the legend to isolate a single competitor and focus on its trend.
#### 4) Identify your gaps by topic
The **Competitor ranking by topic** table at the bottom of the page shows the ranking of each brand from #1 to #10 for each configured topic.
Use the **Visibility / Mention / Citation** toggle in the top right of the table to switch between the three metrics. The **Visibility** view is shown by default: it ranks competitors on the synthetic score rather than a single metric, so you can see at a glance who dominates each topic and where to focus your efforts. Hover over a competitor's logo to display their score on that topic. Click a logo to automatically filter the Prompts screen on that topic and that competitor. Click a topic name to go directly to the list of associated prompts.
#### 5) Use filters and export
The **AI platform**, **Topic**, **Persona**, and **Funnel stage** filters at the top of the screen apply to all widgets. Combine them to narrow your analysis to a specific segment.
The **Show labels** toggle (top right) displays values directly on chart bars and data points. Each chart can also be downloaded individually in PNG or SVG format via the menu in the top right of each widget.
Use the **Export** button to extract all screen data in CSV format.
> **Tip ✅**: enable Show labels before taking screenshots to produce visuals ready to use without any editing.
### Tips for getting the most out of it
Start with the topic ranking. It's the fastest way to identify which query universes expose you most to competition. Once you've spotted priority topics, filter on them to dig deeper in the graphic widgets.
Compare both metrics separately. A competitor may have a high mention rate but a low citation rate — meaning they're often named in responses but their pages aren't cited as sources. This distinction shapes your content strategy differently.
Adjust the period to your goal. A short window (7 to 14 days) reveals recent variations. A longer window (90 days or more) smooths out fluctuations and gives a more reliable baseline trend.
> **Tip 💡**: the comparison period is automatic — it always matches the previous period of the same duration. All deltas displayed in the interface reflect this gap.
### Go further
The AI Visibility screen tells you "where do I stand". To move to "what should I do", go to the Prompts screen to explore your results query by query and act on the gaps you identify.
**Useful links:**
* **[\[GEO Prompts: monitoring your queries and reading your metrics\]](/en/analyze-competitors/prompts-geo)**
* **[\[Analyzing a prompt in detail and taking action\]](/en/analyze-competitors/prompt-view-analyze-a-prompt-in-detail-and-take)**
* **[\[Intelligence Hub GEO: understanding metrics and key concepts\]](/en/analyze-competitors/intelligence-hub-geo)**
# Competitor analysis
Source: https://help.semji.com/en/analyze-competitors/competitor-analysis
Benchmark your visibility against competitors, on both search engines and AI answers, with Intelligence Hub.
* [Track and analyze your competitors](/en/analyze-competitors/overview)
* [What is Intelligence Hub?](/en/analyze-competitors/what-is-intelligence-hub)
* [Intelligence Hub: Choose your competitors](/en/analyze-competitors/intelligence-hub-choose-your-competitors)
* [Identify opportunities through your data](/en/analyze-competitors/identify-opportunities-through-your-data)
* [AI Properties: Topics, Personas & Marketing Funnel](/en/analyze-competitors/ai-properties-setup)
* [Intelligence Hub: Understanding the main screens](/en/analyze-competitors/intelligence-hub-understanding-the-main-screens)
* [Intelligence Hub: Automatic reports and exports](/en/analyze-competitors/intelligence-hub-automatic-reports-and-exports)
* [SEO](/en/analyze-competitors/seo)
* [GEO](/en/analyze-competitors/geo)
* [GEO Sources: analyze the domains cited by LLMs on your prompts](/en/analyze-competitors/sources-geo)
* [Prompt view: analyze a prompt in detail and take action](/en/analyze-competitors/prompt-view-analyze-a-prompt-in-detail-and-take)
* [Intelligence Hub GEO: measure and manage your visibility in generative AI](/en/analyze-competitors/intelligence-hub-geo)
* [GEO configuration: set up your AI visibility monitoring](/en/analyze-competitors/configuration-geo)
* [AI Visibility: read and interpret your AI visibility dashboard](/en/analyze-competitors/ai-visibility)
* [GEO Prompts: monitor your queries and read your metrics](/en/analyze-competitors/prompts-geo)
# GEO configuration: set up your AI visibility monitoring
Source: https://help.semji.com/en/analyze-competitors/configuration-geo
Add the prompts you want to track in LLMs, organize them by topic, and configure your competitors to start measuring your AI visibility.
### At a glance
* **What you can do**: add prompts to monitor, assign them to a topic, and track up to 10 competitors depending on your plan.
* **Who it's for**: Org Admins and workspace members.
* **Why it matters**: the quality of your GEO monitoring depends directly on the relevance of your prompts. A solid setup from day one means actionable data within the first 24 hours.
### What changes for you
Before Intelligence Hub GEO, there was no way to systematically monitor your brand's presence in LLMs. Configuring the module lets you define exactly which queries you want to be visible on, organize your tracking by topic, and follow your competitors on those same queries.
Each configured prompt is automatically replayed every day across all your monitored LLMs — ChatGPT, Google AI Overviews, Google AI Mode, Gemini, Perplexity, and DeepSeek, plus Claude (Haiku 4.5) if you've added that add-on. Once your setup is in place, there's nothing more to do: data accumulates and your history builds itself.
Setting up your first prompts no longer means starting from scratch. Semji automatically generates prompt suggestions from the GEO analyses available in your Content Hub, aligned with your existing SEO topics. You review, adjust, and monitoring starts the same day.
> **Good to know ℹ️**: the Persona and Funnel stage of each prompt are automatically detected by AI classification at creation. You can edit them manually at any time from the Prompts screen.
### What you'll get
Once your prompts are configured, you'll have for each query:
* a daily tracking of your mention rate and citation rate on that query,
* a ranking of your brand against your competitors,
* the history of responses captured by LLMs, with the full text of each response.
All data starts building within 24 hours of adding a prompt.
### How to use it (step by step)
#### 1) Use prompt suggestions
Before entering prompts manually, review the **suggestions generated by Semji**. From the "Add prompt" window, select a topic to see the list of prompts suggested from your existing GEO analyses and SEO keywords.
Filter this list by **URL** or by **keyword** to keep only the suggestions that are actually relevant to your current need. The keyword filter helps exclude suggestions outside your topic scope that the URL filter alone let through.
Check the prompts you want to activate and click **Import prompts** to add them to your monitoring in one go.
#### 2) Access the configuration
From the sidebar, click **GEO** then **Prompts**. Click the **Add prompt** button in the top right of the screen.
> **Good to know ℹ️**: only Org Admins and workspace owners or members can add and configure prompts.
> **Tip ✅**: suggestions are aligned with your existing SEO topics — they're a solid starting point, not a definitive list. Adjust the wording if needed to make sure each prompt reflects a real user question.
#### 3) Select a topic
In the add prompt window, start by selecting the **Topic** your prompts belong to. The topic is required: it organizes your tracking by query universe and feeds the Competitor ranking by topic table in the AI Visibility screen.
Available topics are those you have defined in your **[AI Properties](/en/analyze-competitors/ai-properties-setup)**. If no topic has been configured yet, create one before adding your first prompts.
#### 4) Enter your prompts
In the **Prompt** field, type your queries, one per line. You can add multiple prompts at once for the same topic.
The counter at the top of the field shows how many prompts you are adding against your plan's total (e.g. 322/1000).
> **Tip ✅**: write your prompts as real user questions, without mentioning your brand. Use "What is the best home insurance in France?" rather than "Axa home insurance". LLMs respond to natural questions — your prompts should reflect what your audience actually asks.
> **Good to know ℹ️**: each prompt is limited to 200 characters.
#### 5) Confirm and save
Click **Add \[N] prompt(s)** to save. Prompts appear immediately in the Prompts screen list. First data is available within 24 hours of adding.
The Persona and Funnel stage of each prompt are automatically assigned by AI classification. If the detected values don't match your context, you can edit them directly from the prompt list.
### Tips for getting the most out of it
Start with 10 to 20 prompts per strategic topic. It's better to begin with a focused, well-chosen scope than to burn through your quota on less relevant queries. Analyze first results before expanding.
Cover different funnel stages. For a given topic, configure Awareness prompts ("What is the best car insurance?"), Consideration prompts ("How to compare car insurance online?"), and Decision prompts ("Where to get affordable car insurance?"). You'll get a complete picture of your visibility across the full user journey.
Keep an eye on your quota. The prompt usage counter is displayed at the top of the AI Visibility screen. Additional prompts are available as an add-on depending on your plan if you reach your limit.
> **Tip 💡**: the competitors tracked in Intelligence Hub GEO are the same as those configured in Intelligence Hub SEO. The competitor counter is shared between both modules — adding a competitor automatically benefits both.
### Go further
Once your prompts are configured and your first data is available, go to the AI Visibility screen to read your overall performance, or to the Prompts screen to explore results query by query.
> **Important ⚠️**: deleting a prompt is permanent. The historical data associated with that prompt cannot be recovered.
**Useful links:**
* **[\[AI Visibility: reading and interpreting your dashboard\]](/en/analyze-competitors/ai-visibility)**
* [**\[GEO Prompts: monitoring your queries and reading your metrics\]**](/en/analyze-competitors/prompts-geo)
# GEO
Source: https://help.semji.com/en/analyze-competitors/geo
Measure your visibility in generative AI and analyze your competitors' prompts, answers, citations, and sources.
* [GEO Sources: analyze the domains cited by LLMs on your prompts](/en/analyze-competitors/sources-geo)
* [Prompt view: analyze a prompt in detail and take action](/en/analyze-competitors/prompt-view-analyze-a-prompt-in-detail-and-take)
* [Intelligence Hub GEO: measure and manage your visibility in generative AI](/en/analyze-competitors/intelligence-hub-geo)
* [GEO configuration: set up your AI visibility monitoring](/en/analyze-competitors/configuration-geo)
* [AI Visibility: read and interpret your AI visibility dashboard](/en/analyze-competitors/ai-visibility)
* [GEO Prompts: monitor your queries and read your metrics](/en/analyze-competitors/prompts-geo)
# Identify opportunities through your data
Source: https://help.semji.com/en/analyze-competitors/identify-opportunities-through-your-data
4 concrete scenarios to detect SEO opportunities in the Data Explorer
### Analyze your data with Intelligence Hub
Data Explorer is Intelligence Hub’s tactical analysis tool. It helps you start from a macro view (charts and breakdowns) and drill down to a list of actionable URLs and keywords so you can create or optimize your content.
In this article, discover 4 concrete scenarios to quickly identify SEO opportunities from your data.
#### Prerequisites
Before you start, make sure that:
* Your site and your competitors are configured.
* You know which scope to analyze (non-brand / brand, country, period, etc.).
### Scenario 1: Spot content opportunities among competitors (from report to keyword list)
Goal: start from a strong signal in charts (traffic increase, accelerated URL production, dominance in a breakdown) and end up with a short list of keywords + pages to replicate or differentiate.
#### 1) Find a signal in the Report screen
1. Filter Traffic type = Non-brand to focus on acquisition.
2. Enable comparison (competitor panel) if available.
3. Identify an interesting signal in the charts:
* Organic traffic trend: a competitor accelerates over a period.
* Trend in number of pages produced: a competitor “scales” (strong URL creation).
* Traffic by themes / personas / stages: a competitor dominates a segment.
* Traffic by page types: a format overperforms (Article, Product, Landing, etc.).
4. Click the most relevant area of the chart to open Data Explorer.
#### 2) Switch to detailed exploration and qualify the opportunity
1. Frame the extraction with filters consistent with your chart:
* Website = competitors (excluding your domain)
* Traffic type = Non-brand
* Add 1 to 2 dimensions max: Theme, Persona, Funnel stage, Page type, Keyword length.
2. Sort by Estimated traffic (descending) to identify contributing URLs.
3. Use the columns to qualify the opportunity:
* Primary keyword, Volume, Difficulty, Position (for the competitor)
* First appearance (spot recent content that is rising)
#### 3) Turn the insight into a “Create” or “Optimize” decision
* Create: if the opportunity doesn’t exist on your site.
* Optimize: if you already have a page.
* Filter Website = your site.
* Use My position and Estimated traffic to spot underperforming pages.
Expected outcome: a short list of opportunities (keywords + competitor URLs) and a clear decision: create or optimize.
### Scenario 2: Understand a competitor’s strategy (diagnosis + key pages and keywords)
Goal: understand how a competitor wins (scaling, optimization, formats, clusters, funnel) and isolate the pages and keywords that drive most of the traffic.
#### 1) Run a quick competitive diagnosis
1. Switch to duel mode (1v1): your site vs 1 competitor.
2. Analyze 2 charts to identify the dynamics:
* Organic traffic trend: steady growth vs spikes.
* Trend in number of pages produced: traffic rising with or without URL creation.
3. Identify 2 to 3 dominant segments via the breakdowns:
* Themes, Personas, Funnel stages, Page types.
4. Click a dominant segment to open Data Explorer.
#### 2) Isolate “driver” content in Data Explorer
1. Filter Website = competitor.
2. Sort by Estimated traffic to surface contributing pages.
3. Qualify what works:
* Page type (format), Funnel stage (intent), Primary keyword (angle)
* Difficulty and Volume (effort vs potential)
4. “Quick wins” option: add a Difficulty filter (low to medium) and/or Keyword length = long-tail.
Expected outcome: a structured read (scaling vs optimization, formats, clusters) and a list of pages/keywords to address.
### Scenario 3: Prioritize gaps for a persona or a funnel stage (coverage vs performance)
Goal: turn a breakdown (persona or funnel) into a prioritized backlog: missing content, content to optimize, format trade-offs.
#### 1) Identify the segment to strengthen in the Report screen
1. Filter the Persona (or Funnel stage) you want to analyze.
2. Compare:
* Traffic trend (you vs competitors)
* Trend in number of pages produced (over-coverage vs under-coverage)
3. Check whether formats align with the page-type breakdown.
4. Open Data Explorer on the weak (or missing) segment.
#### 2) Build an actionable backlog (competitors first, then you)
* Competitors:
1. Website = competitors
2. Sort by Estimated traffic to list the URLs that capture demand
* You:
1. Website = your site
2. Filter My position (e.g., beyond Top 10)
3. Sort by Volume or Estimated traffic to target optimizations
#### 3) Apply a simple prioritization rule
* High volume + reasonable difficulty + weak My position = prioritize optimization.
* High volume + no page = prioritize creation.
Expected outcome: a concrete persona/funnel plan based on your data (URLs, keywords, positions).
### Scenario 4: Grow the long tail (quick wins + cluster structuring)
Goal: detect “low competition” opportunities and build a structured coverage strategy (clusters, formats, pages).
#### 1) Detect long-tail signals in the Report screen
1. Filter Keyword length = Long tail and Traffic type = Non-brand.
2. Spot:
* Who is winning on the long tail (Traffic trend chart)
* Who is producing the most long-tail URLs (Pages produced trend chart)
3. Use Theme / Page type / Funnel stage breakdowns to understand where the long tail pays off.
4. Open Data Explorer.
#### 2) Isolate quick wins and structure by clusters
1. Filter:
* Keyword length = long tail
* Difficulty = low to medium
* Volume ≠ 0
2. Sort by Estimated traffic.
3. Group by:
* Theme (clusters)
* Page type (formats to industrialize)
* Funnel stage (intent)
#### 3) Trigger action
* Create pages to fill missing clusters.
* Optimize existing pages by targeting nearby long-tail queries (same theme / same intent).
Key insight: the long tail often generates qualified traffic with less competition, but it performs best when structured by themes and intents (persona + funnel).
### Best practices for useful (and actionable) analyses
#### 1) Start broad, then refine
* Avoid: too many filters right away (you may miss insights).
* Recommended: start with an overview, identify a pattern, then refine progressively.
#### 2) Compare yourself to the right competitors
Not all competitors are relevant for every analysis.
* Global competitor: high-level overview
* Niche competitor: thematic focus
* Peer competitor: realistic comparison
#### 3) Cross dimensions (where the best insights are born)
Examples:
* Theme “Running shoes” + Persona “beginner”: create a guide “Which running shoes for beginners?” and branch into pronation, weight, budget.
* Page type “E-commerce category” + Funnel stage “consideration”: optimize a category page with a choice-oriented intro, relevant filters, FAQ.
* Competitor + Non-brand: identify pages that capture long-tail demand and replicate the cluster logic.
#### 4) Document your findings
When you identify an important insight:
* Download an image (PNG)
* Export the data
* Write down your recommendations
* Share with the relevant teams
#### 5) Take action immediately
A good analysis should trigger an action:
* Add the opportunities to the Content Hub Planning
* Add due dates
* Assign owners
* Track impact in your monthly reports
# Intelligence Hub: Automatic reports and exports
Source: https://help.semji.com/en/analyze-competitors/intelligence-hub-automatic-reports-and-exports
Automate and share your Intelligence Hub analyses in just a few clicks (CSV/Excel exports and scheduled reports)
### Automatic monthly reports
#### How does it work?
Once your Intelligence Hub configuration is finalized and validated, a new report is automatically generated each month.
#### Schedule
* **Generation:** Between the 4th and 10th of each month
* **Analyzed data:** Previous month (M-1)
* **Example:** A report generated on March 7, 2026, will analyze data from February 2026
#### No action required
* You don't need to do anything, everything is automatic
* AI Properties (themes, personas, marketing funnel stages) are automatically applied to new URLs
* Your analyses are always up-to-date
### Access to reports
Current report: By default, you always see the latest generated report.
Report history: You can view reports from previous months to compare trends and measure the impact of your actions.
#### Export options
Intelligence Hub offers several export possibilities to leverage your data beyond the interface.
#### Exporting charts
**From the Report and Competition screens**
Each chart has an export option:
**Available formats**
* **SVG** (Scalable Vector Graphics)
* **PNG** (image)
**How to export a chart?**
1. Hover over the chart
2. Click the export icon (top right of the chart)
3. Choose SVG or PNG
4. The file is downloaded automatically
#### Exporting data
**From the Data Explorer screen**
Export of all tabular data.
**Available formats**
* Excel (.xlsx)
* CSV (Comma-Separated Values)
**Current limits**
* **Maximum 50,000 rows** per export (current version)
* If your dataset exceeds this limit, use filters to segment your exports
* Example: Export theme by theme
**How to export data?**
* Go to the Data Explorer
* Apply the desired filters (optional)
* Click the **"Export"** button
* Choose Excel or CSV
* The file is downloaded
**Exported data**
The export includes all visible columns:
* URL
* Domain
* Top keyword
* Search volume
* Position
* My position
* Estimated traffic
* Page type
* Theme
* Persona
* Marketing funnel stage
* Traffic type
* Length (short/long tail)
### Q\&A
**Can I generate a report on demand?** No, only automatic monthly reports are generated.
**Can I access historical reports?** Yes, all your monthly reports are kept without any time limit. You can navigate between reports to compare trends.
**Can I share a report with someone else?** You can share a direct link to an Intelligence Hub report with someone in your SEMJI organization.
### To go further:
* Identify opportunities thanks to your data
* **[Understanding the main screens](/en/analyze-competitors/intelligence-hub-understanding-the-main-screens)**
# Intelligence Hub: Choose your competitors
Source: https://help.semji.com/en/analyze-competitors/intelligence-hub-choose-your-competitors
Choose the right sites, define the right scope, and maintain a comparable analysis.
Configuring your competitors is a key step in the Intelligence Hub deployment. It determines which sites are compared, which pages are taken into account, and ensures that you stay within the limits set by your contract.
### Who configures the competitors?
In the current version, your CSM configures competitors directly in the Intelligence Hub platform and assists you in selecting them if needed.
### Choose the right competitors
#### The principle
In SEO, your "real" competitors are the sites **that occupy space on your strategic queries in Google**. This can be:
* a business competitor
* a media outlet
* a comparison site
* a marketplace
* a highly visible niche player
#### Recommended mix (simple)
* 2–3 SEO-comparable sites (same topics, formats, and maturity level)
* 1–2 market leaders (benchmark)
* 1–2 “SEO references” (media, comparison sites, marketplaces) that capture traffic on your topics
#### Best practices
* **Do not limit yourself to direct competitors**: the goal is to understand who captures traffic on your topics.
* **Prioritize clarity**: better to have 5 well-chosen competitors than 10 “just to see.”
#### To avoid
* Choose only “direct” business competitors.
* Add very large domains that **consume your entire page-analysis limit**. Your CSM is here to help you narrow the scope of your competitors.
### Define the scope (domain, subdomain, subfolder, exclusions)
When you submit a competitor, specifying the scope precisely is essential. It’s the best lever to keep the analysis **relevant** and **compatible with your limits.**
It is therefore necessary to specify whether the analysis of your competitors in Intelligence Hub should cover a subfolder, a subdomain, or the entire domain.
#### Root domain
* Example: `amazon.com`
* Use this when you want to analyze the entire site.
#### Subdomain
* Example : `blog.exemple.com`
* Use this when only part of the site is of interest.
#### Subfolder
* Example: `exemple.com/fr`
* To be used to target a specific area, often:
* a language
* a country
* an editorial section
#### Exclusions
To stay focused on priority themes and topics, we can define exclusions.
For example, exclude areas of the site that are **not relevant**: other countries, product categories you do not sell, or low-value sections (service pages, etc.).
#### Example (Leroy Merlin)
Configure `leroymerlin.fr` At the **root-domain** level, a very large volume of pages can be returned (categories, product pages, tips, stores, etc.).
In many cases, it is better to narrow the scope, for example:
* `leroymerlin.fr/produits` (if you want to focus on the e-commerce offering)
* `leroymerlin.fr/conseils-idees` (if your analysis focuses on the editorial section)
* or a subfolder closer to your scope (e.g. a product family)
The goal is not to analyze “as big as possible,” but to analyze what is **most comparable and most useful.**
### Information to provide to your CSM
For each competitor, you will need to specify:
* **The exact scope** to analyze (domain, subdomain, subfolder, exclusions).
* Useful details (languages, countries and/or sections to exclude).
### What to do if a competitor has too many pages?
If a competitor exceeds your contractual limit, you can:
1. **Refine the scope**
* Switch from the root domain to a subdomain or a subfolder.
* Example: `amazon.com` → `amazon.com/fr`
1. **Replace the competitor**
* If the site is too far from your scope or consumes too many pages
### Going further
Once your competitors are configured, you can move on to the next step: [**Understanding the main screens.**](/en/analyze-competitors/intelligence-hub-understanding-the-main-screens)
# Intelligence Hub GEO: measure and manage your visibility in generative AI
Source: https://help.semji.com/en/analyze-competitors/intelligence-hub-geo
Find out whether your brand is mentioned and cited across ChatGPT, Gemini, Perplexity, and other LLMs, and compare your position against competitors directly from…
### At a glance
* **What you can do**: continuously measure your visibility in LLMs and benchmark your brand against competitors, prompt by prompt and by topic.
* **Who it's for**: heads of SEO, content managers, CMOs, and SEO project leads.
* **Why it matters**: generative AI is capturing an ever-growing share of search. Without dedicated monitoring, your brand can disappear from these answers without you knowing. Intelligence Hub GEO closes that blind spot.
### What changes for you
Until now, there was no native way in Semji to know whether your brand appeared in generative AI responses. You had to query ChatGPT manually, prompt by prompt, with no historical data and no competitive benchmarking.
**Before**: you tested questions in ChatGPT with no tracking, no trend data, and no visibility into what competitors were doing on the same queries.
**Now**: Intelligence Hub GEO automatically monitors your prompts every day, measures your mention and citation rates across LLMs, and shows you exactly which topics your competitors outrank you on.
The LLMs covered are ChatGPT, Google AI Overviews, Google AI Mode, Gemini, Perplexity, and DeepSeek. Claude (Haiku 4.5) is also available, sold separately as an add-on.
| Before | With Intelligence Hub GEO |
| - | - |
| Manual queries with no history | Automated daily monitoring across all your prompts |
| No competitive visibility | Brand vs. competitor benchmark by topic |
| Isolated data, no trends | KPIs compared over time, period by period |
| Measurement tools and production tools separate | Action integrated into the same platform |
### What you'll get
Once the module is set up, you have access to two complementary screens.
**AI Visibility** is the module's macro dashboard. It gives you a full overview of your brand's and competitors' presence across all monitored prompts: mention rate, citation rate, trends over time, and a competitor ranking by topic.
**Prompts** is the operational view. It lists all the queries you're monitoring with their individual metrics, and lets you explore each prompt in detail to identify your visibility gaps.
### How to use it (step by step)
#### 1) Access the module
From Semji, click **GEO** in the left sidebar, under the Intelligence Hub section. You land directly on the **AI Visibility** screen.
> **Good to know ℹ️**: the module is accessible to Admins and Members. Guest editors do not have access.
#### 2) Navigate between the two screens
Two entries are available under GEO in the sidebar: **AI Visibility** and **Prompts**. Use AI Visibility for a macro read of your performance and your competitors'. Use Prompts to manage your monitored queries and explore results prompt by prompt.
> **Good to know ℹ️**: the AI platform, [Topic](/en/analyze-competitors/ai-properties-setup#topics), [Persona](/en/analyze-competitors/ai-properties-setup#personas), and [Funnel stage](/en/analyze-competitors/ai-properties-setup#funnel-stages) filters are shared between both screens. A filter applied on AI Visibility stays active when you switch to Prompts.
#### 3) Set your analysis period
The period selector is available in the top right of each screen. Choose a preset range (7d, 14d, 30d…) or a custom period, up to a maximum of 12 rolling months.
All metrics and deltas displayed in the interface are calculated for the selected period and automatically compared to the previous period of the same duration.
> **Tip 💡**: hover over the tooltip next to the screen title to see when metrics were first calculated and when data was last updated.
### Tips for getting the most out of it
Configure your prompts first. The module only collects data from the moment your prompts are set up. The earlier you start, the richer your historical data will be for future analysis.
Combine both screens for complete analysis. AI Visibility tells you "where do I stand overall", Prompts tells you "which specific queries do I need to act on". Both views are complementary and share the same filters.
> **Important ⚠️**: collected data covers a rolling 12-month history from your activation date. It is not possible to retrieve data prior to when the module was configured.
### Go further
**Useful links:**
* **[\[Configuring your GEO monitoring\]](/en/analyze-competitors/configuration-geo)**
* **[\[AI Visibility: reading and interpreting your dashboard\]](/en/analyze-competitors/ai-visibility)**
* **[\[GEO Prompts: monitoring your queries and reading your metrics\]](/en/analyze-competitors/prompts-geo)**
* **[\[Analyzing a prompt in detail and taking action\]](/en/analyze-competitors/prompt-view-analyze-a-prompt-in-detail-and-take)**
# Intelligence Hub: Understanding the main screens
Source: https://help.semji.com/en/analyze-competitors/intelligence-hub-understanding-the-main-screens
The basics for navigating between Report, Competition, and Data Explorer
### Report screen
#### Objective
Get **an overview** of your organic performance and **compare** it to your competitors from multiple analytical angles.
#### What is it used for?
* Quickly **spot trends** (rises, drops, sudden falls).
* Identify **opportunity areas** (topics, personas, formats, funnel stages).
* Access detailed data using the **Data Explorer**.
#### Available charts
#### Traffic and positioning analyses
* **Organic traffic** evolution: track traffic **trends** monthly and over the last 12 months to position yourself versus competitors
* **Evolution of the number of pages produced**: track the number of pages produced by your competitors monthly and over the last 12 months
* **Branded traffic, other brands vs non-branded**: measure your dependency on your brand and estimate the potential for non-branded growth.
* * **Brand:** queries containing your brand.
* **Non-branded:** generic queries, essential for growing acquisition.
* **Other brands:** queries containing the name of a brand different from yours, but related to products you sell on your site.
* *Example:* you are Zalando and you sell Adidas shoes → a query like “adidas gazelle” is counted as Other brands (because it contains “Adidas”).
* **Traffic by page types:** identify which **formats** (blog, product, landing page, etc.) perform best
* **Short-tail vs long-tail traffic:** understand the nature of the queries that generate traffic and where opportunities lie.
* **Short-tail:** short, highly competitive queries, often with high volume.
* **Long tail:** more specific queries, often easier to capture, with a more precise intent.
* **Number of keywords by position:** view the number of keywords ranked in the TOP 3, TOP 10 and TOP 30+
#### AI-enhanced analyses
Thanks to the model enhanced with AI Properties, you will find enriched charts on your own themes, personas, and stages of the marketing funnel.
* **Traffic by themes:** identify your strengths/weaknesses by theme and compare your coverage versus competitors.
* **Traffic by personas:** understand which audiences drive the most traffic to you, and which are underutilized.
* **Traffic by funnel stages:** check the **balance** of your presence (Discovery → Loyalty) and detect gaps.
#### How to use it?
1. Browse the charts to get an overall view.
2. Use the global filters to frame your analysis.
3. Click on an element in a chart to open the Data Explorer.
4. Export if needed to share or build an action plan.
### Competition screen
#### Objective
Set up and analyze your competitive landscape, then compare your performance in a **head-to-head (1v1) matchup.**
#### What is it used for?
* Make a targeted comparison with a competitor (view in “Battle” mode).
* Switch to the Data Explorer to analyze the URLs behind any gap.
#### What you'll find there
* Find all the charts available in the Report tab
### Data Explorer screen
#### Objective
Access the **data details** (URLs, keywords, metrics and dimensions) to move from insight to concrete actions.
#### What is it used for?
* Understand which URLs and which keywords explain a result seen in the Report or Competition.
* Identify opportunities (content to create, content to optimize, angles to strengthen).
* Send the identified keywords directly to the Planning in your Content Hub.
* Export the data (CSV / Excel) for analysis and sharing.
#### Understanding the metrics and dimensions of the data table
* **Top pages:** the page that generated at least 1 unit of traffic
* **Estimated traffic:** the estimated traffic generated by this page
* **Primary keyword:** the keyword that brings the most traffic to this page in search results
* **Volume:** the average monthly search volume for the primary keyword (how many times it is searched per month)
* **Trends:** a mini-chart showing the evolution of search volume over the past 12 rolling months
* **Position:** the current position of the page in Google results for its primary keyword
* **My position:** your own page's position for that same keyword
* **Keyword difficulty:** a score indicating how hard it is to rank for this keyword (the higher the score, the more competitive it is)
* **Funnel stage:** indicates where the page sits in the user journey: Discovery, Consideration, or Loyalty
* **Persona:** the typical user profile targeted by this page
* **First seen:** the date when this page was first detected in Google
#### Dimensions at your disposal
With the different filters at your disposal, cross-reference your data and easily identify your opportunities.
* **Website:** allows you to select one or more competitor websites to include in the analysis.
* **My position:** allows you to filter pages according to your current SEO ranking in search results.
* **Traffic type:** allows you to segment data by the nature of the traffic (Branded, Non-branded, Other brands).
* **Page type:** allows you to filter pages according to their typology (homepage, article, tool, article listing, e‑commerce category, etc.).
* **Theme:** allows you to restrict the display to pages belonging to a specific theme.
* **Persona:** allows you to filter pages based on the target audience profile associated with them.
* **First seen:** allows you to filter pages by the date when they first appeared on Google.
* **Funnel stage:** allows you to filter according to the page’s position in the conversion funnel (Discovery, Consideration, Decision, Loyalty).
* **Keyword length:** allows you to filter for long‑tail or short‑tail keywords.
* **Keyword:** allows you to filter for specific keywords.
* **Keyword difficulty:** allows you to filter by the competitiveness level of the primary keyword associated with the page.
* **Position:** allows you to filter by the rankings of your competitors’ pages.
* **Title:** allows you to filter by titles or terms present in page titles.
* **Volume:** allows you to filter pages according to the monthly search volume of their primary keyword.
* **Estimated traffic:** allows you to filter pages according to their estimated organic traffic.
* **Planning:** allows you to filter content that has already been added or not added to your Planning in Content Hub.
* **URL:** allows you to filter by types of URLs.
### Q\&A
#### What are the different types of pages analyzed (and how are they defined)?
* **News:** a page that covers a recent event, an announcement, or time-sensitive information.
* **Article:** editorial content (often a blog post) that addresses a topic or a search intent.
* **E-commerce category:** a page that lists products belonging to the same category.
* **Forum:** a discussion page where users ask questions and respond via posts.
* **Landing page:** a page designed to convert for a specific offer or action (signup, demo request, purchase).
* **Article listing:** a page that aggregates multiple articles (by theme, tag, date, etc.) in a list format.
* **Local:** a page dedicated to a geographic area, a point of sale, or a localized search.
* **Tool:** a page offering an interactive feature (simulator, generator, calculator, etc.).
* **Homepage:** the site's main homepage.
* **Product:** a page presenting a product or an item for purchase.
* **Video:** a page whose primary content is a video (hosted on the site or via a platform).
#### What is the difference between "Position" and "My position"? Why is there sometimes a discrepancy between these two metrics on pages of my site?
These are two metrics that come from different sources, so they may not necessarily match.
**My position:**
It corresponds to a position observed by Semji by "re-reading" a Google SERP and checking at which position your site appears best at the time the monthly report is calculated.
**Position :**
It corresponds to a position coming from another Semrush data source and generally refers to the previous month.
For concrete examples of opportunities in the Explorer, see: Identifying opportunities using your data.
# Track and analyze your competitors
Source: https://help.semji.com/en/analyze-competitors/overview
Guides and resources for Intelligence Hub: setup, competitive analysis, reading reports, exports and best practices.
Set up Intelligence Hub to analyze your competitors, understand your market, and identify new SEO opportunities.
Measure your visibility in generative AI and analyze your competitors' prompts, answers, citations, and sources.
# Prompt view: analyze a prompt in detail and take action
Source: https://help.semji.com/en/analyze-competitors/prompt-view-analyze-a-prompt-in-detail-and-take
Explore the performance of a specific prompt, review the latest responses captured from LLMs, and act directly on the visibility gaps you identify.
### At a glance
* **What you can do**: review metrics for an individual prompt, read the LLM responses captured, and understand exactly why your brand is present or absent on that query.
* **Who it's for**: content managers, heads of SEO, and SEO project leads.
* **Why it matters**: the Prompt view gives you the deepest level of detail in the module. You can read word for word what ChatGPT or Google AI Overviews responds to a strategic query, and see exactly how your brand and competitors appear in that response.
### What changes for you
Before Intelligence Hub GEO, it was impossible to read the actual responses produced by LLMs on your strategic queries, to know whether your brand was mentioned in the text or cited as a source, or to identify which competitors appeared in those responses.
**Before**: a black box. You knew LLMs were answering questions about your industry, but had no access to the content of those responses or any measure of your presence in them.
**Now**: for every monitored prompt, you have access to the history of captured responses with the full text, your brand's and competitors' presence flags, and the sources cited.
### What you'll get
The Prompt view has three sections.
**Prompt metadata**: the topic, funnel stage, and persona associated with this query.
**Performance widgets**: the same charts as on the AI Visibility screen (mention rate, citation rate, trends over time), but scoped to this prompt only. A dedicated AI platform filter lets you switch between ChatGPT and Google AI Overviews.
**The Latest responses table**: the list of responses recently captured for this prompt, each showing a text preview and four flags: Mentions you, Mentions a competitor, Cites you, Cites a competitor.
### How to use it (step by step)
#### 1) Open the Prompt view
From the **Prompts** screen, click on a prompt row in the table. The **Prompt view** panel opens on the right side of the screen.
#### 2) Read the recommendations and take action
The **Recommendations** section shows the content actions Semji suggests to improve your visibility on this prompt.
A **Content to optimize** card means Semji has identified an existing page on your site that would benefit from being improved for this prompt. Click **Atomic Content** to open that page directly in the editor and start optimizing.
A **Content to create** card means Semji recommends producing a new piece of content targeting this prompt. Click **Add to Planning** to create a task in your Semji editorial planning, or **Atomic Content** to start writing directly.
Click **Show details** under each recommendation to see Semji's reasoning and the elements that justify this recommendation.
> **Tip ✅**: prioritize recommendations on prompts where you are neither mentioned nor cited. These are the most impactful gaps where a content action has the highest chance of improving your visibility.
####
#### 3) Read the prompt's performance metrics
The **Performance** section shows this prompt's individual metrics: mention rate, citation rate, mention rate trend, and citation rate trend for you and your competitors.
Use the **AI platform** filter in the panel to compare results on ChatGPT only or Google AI Overviews only. This lets you know whether your visibility gaps are specific to one LLM or common to both.
#### 4) Analyze the latest captured responses
The **Latest responses** table lists the responses recently retrieved by Semji for this prompt. For each response you can see:
* the **model** that generated it (ChatGPT or Google AI Overviews, identifiable by their icon),
* a **preview** of the opening text of the response,
* four flags: **Mentions you** (your brand appears in the text), **Mentions a competitor** (at least one competitor is named), **Cites you** (a URL from your domain is cited as a source), **Cites a competitor** (at least one competitor is cited as a source),
* the **date** the response was captured.
> **Good to know ℹ️**: when Google AI Overviews did not generate a response for this prompt on a given date, the row displays "No AI Overview" and the flags appear empty.
#### 5) Read a full LLM response
Click on a row in the table to open the **response detail**. This view shows:
* the model and capture date,
* three flags at the top: **Mention** (Yes / No), **Mention position** (rank of your brand's appearance in the text, trophy icon if #1), **Citation** (Yes / No),
* the **full response text** with detected brands highlighted and cited domains displayed as clickable chips,
* the **Mentions panel** (right): all brands detected in the response, listed in order of appearance and categorized (You, Direct competitor, Indirect competitor, Other),
* the **Sources panel** (right): the list of cited URLs with the page title and category (Article, E-commerce page…).
### Tips for getting the most out of it
Start with responses where you're not mentioned. Focus on rows where "Mentions you" is No to quickly identify responses where your brand is absent. Then look at which competitors are present and which sources they cite. This gives you a clear direction for your content strategy on that prompt.
Compare ChatGPT and Google AI Overviews. On the same prompt, the two LLMs can produce very different responses. Use the AI platform filter to isolate each model's responses and check whether your gaps are specific to one or common to both.
Analyze the cited sources. The Sources panel tells you what types of content the LLMs prefer to cite on this query (articles, category pages, guides…). This is a direct signal on which content format to prioritize to gain visibility.
> **Tip 💡**: a brand ranked #1 in mention position is named first in the response text — giving it the highest visibility. If a competitor is consistently #1 on your strategic prompts, study their cited sources to understand what earns them that position.
### Go further
**Useful links:**
* **[\[GEO Prompts: monitoring your queries and reading your metrics\]](/en/analyze-competitors/prompts-geo)**
* **[\[AI Visibility: reading and interpreting your dashboard\]](/en/analyze-competitors/ai-visibility)**
* **[\[Intelligence Hub GEO: understanding metrics and key concepts\]](/en/analyze-competitors/intelligence-hub-geo)**
# GEO Prompts: monitor your queries and read your metrics
Source: https://help.semji.com/en/analyze-competitors/prompts-geo
Review the performance of each monitored prompt, filter by topic, persona, or funnel stage, and quickly identify the queries where your AI visibility is…
### At a glance
* **What you can do**: read individual metrics for each prompt, filter and search your query list, and quickly spot the prompts that need your attention most.
* **Who it's for**: content managers, heads of SEO, and SEO project leads.
* **Why it matters**: where the AI Visibility screen gives you a macro view, the Prompts screen lets you go down to the level of each individual query to pinpoint exactly where your brand is absent from LLM responses.
### What changes for you
Before Intelligence Hub GEO, there was no way to know on which specific query your brand wasn't being mentioned in LLMs, or to compare your performance prompt by prompt against competitors.
**Before**: no granularity, no individual data per query, no way to prioritize actions.
**Now**: every monitored prompt has its own metrics, compared to the previous period, with the ability to filter, search, and sort to identify the most critical queries in seconds.
> **Good to know ℹ️**: the metrics displayed at the top of the screen (mention rate, mention rank, citation rate) apply to your brand only, and are calculated across all currently filtered active prompts.
### What you'll get
The Prompts screen has three main components.
**Three aggregated metrics at the top of the screen**, calculated across all filtered prompts for the active period: overall mention rate, mention rank (your average ranking against your competitors), and overall citation rate. Each metric shows its value, its delta vs the previous period, and the previous period's value in a tooltip on hover.
**A prompt table** with, for each query: its text, its Topic badge, its average mention position, mention rank, mention rate, and citation rate — all with their respective deltas.
**A filter bar and a full-text search** to refine the display by AI platform, topic, persona, funnel stage, and to filter prompts where your brand is mentioned or cited.
### How to use it (step by step)
#### 1) Read the aggregated metrics
The three cards at the top of the screen give you a summary read of your performance across all currently filtered prompts.
**Mention rate** shows the share of LLM queries where your brand appears in the response text. **Mention rank** shows your average ranking against your competitors on those same prompts — a #1 rank means you are the most mentioned brand. **Citation rate** shows the share of queries where a URL from your domain appears as a cited source.
Green and red deltas show the change compared to the previous period of the same duration.
#### 2) Read and sort the prompt table
Each row in the table corresponds to a monitored prompt. Columns shown by default are: average mention position, mention rank, mention rate, citation rate, persona, and funnel stage.
Click a column header to sort the table by that metric. Sort by mention rate ascending to bring the prompts where your brand is least visible to the top of the list.
> **Good to know ℹ️**: the Average mention position column is hidden by default. To display it, click the column configuration icon in the top right of the table and enable it.
####
#### 3) Filter and search
Use the filter bar at the top of the screen to refine your analysis:
* **AI platform**: filter on ChatGPT only or Google AI Overviews only to compare your visibility between the two LLMs.
* **Topic**: isolate one or more topics to focus on a specific query universe.
* **Persona** and **Funnel stage**: segment by user profile or by moment in the purchase journey.
* **Mention** and **Citation**: show only prompts where your brand is mentioned, or only those where it isn't — ideal for quickly identifying your blind spots.
The full-text search bar lets you find a specific prompt by keyword.
> **Tip ✅**: combine the "Mention: No" filter with a strategic topic to isolate in a few clicks all the prompts where you're not mentioned in that topic. This is the ideal starting point for prioritizing your content actions.
#### 4) Open a prompt's detail panel
Click on a prompt in the table to open its detail panel. This panel shows the individual performance of that prompt, the latest responses captured by LLMs, and options to take action.
### Tips for getting the most out of it
Sort by mention rank to find your most critical prompts. A high rank (#8, #9…) on a high-volume prompt means competitors are consistently cited before you on that query. That's where action is most urgent.
Use the Mention and Citation filters separately. Your blind spots may not be the same across both metrics. A prompt where you're not mentioned but your domain is cited as a source means your pages are recognized by the LLM, but your brand isn't named in the response text.
Cross topic with funnel stage. Filter on a strategic topic, then on the Decision stage to identify high-stakes commercial prompts where your visibility is insufficient.
> **Tip 💡**: filters on the Prompts screen are shared with the AI Visibility screen. Apply your filters in Prompts, then switch to AI Visibility to see the impact of that segment on your overall metrics.
### Go further
The Prompts screen tells you which queries to act on. To understand why your brand is absent from a response and decide what action to take, click the prompt to open its detail panel.
**Useful links:**
* **[\[Analyzing a prompt in detail and taking action\]](/en/analyze-competitors/prompt-view-analyze-a-prompt-in-detail-and-take)**
* **[\[AI Visibility: reading and interpreting your dashboard\]](/en/analyze-competitors/ai-visibility)**
* **[\[Intelligence Hub GEO: understanding metrics and key concepts\]](/en/analyze-competitors/intelligence-hub-geo)**
# SEO
Source: https://help.semji.com/en/analyze-competitors/seo
Set up Intelligence Hub to analyze your competitors, understand your market, and identify new SEO opportunities.
* [Identify opportunities through your data](/en/analyze-competitors/identify-opportunities-through-your-data)
* [What is Intelligence Hub?](/en/analyze-competitors/what-is-intelligence-hub)
* [Intelligence Hub: Choose your competitors](/en/analyze-competitors/intelligence-hub-choose-your-competitors)
* [AI Properties: Topics, Personas & Marketing Funnel](/en/analyze-competitors/ai-properties-setup)
* [Intelligence Hub: Understanding the main screens](/en/analyze-competitors/intelligence-hub-understanding-the-main-screens)
* [Intelligence Hub: Automatic reports and exports](/en/analyze-competitors/intelligence-hub-automatic-reports-and-exports)
# GEO Sources: analyze the domains cited by LLMs on your prompts
Source: https://help.semji.com/en/analyze-competitors/sources-geo
Identify which domains are capturing citations in your place in generative AI responses, understand what LLMs trust on your topics, and adjust your editorial…
### At a glance
* **What you can do**: explore the domains cited by LLMs on your monitored prompts, analyze sources by page type and family, and identify the sites most present in AI responses in your sector.
* **Who it's for**: heads of SEO, content managers, and SEO project leads.
* **Why it matters**: knowing you're not cited in LLMs is useful. Knowing which domains are taking your place and on what types of content is what lets you act.
### What changes for you
Until now, Intelligence Hub GEO told you whether your domain was cited in LLM responses. But there was no dedicated view to understand who was taking your place, on which prompts, and with what type of content.
**Before**: you knew you weren't being cited, but couldn't identify which domains were capturing those citations or understand why LLMs trusted them.
**Now**: the Sources view gives you a complete picture of the source ecosystem across your monitored prompts : domains, page types, source families, appearance counts so you can decide where to invest first.
> **Good to know ℹ️**: the AI competitors identified in the Sources view are not necessarily the same as your classic SEO competitors. LLMs cite sources based on their trust in the content, not just Google ranking.
### What you'll get
The Sources view gives you four levels of analysis.
* **The most cited domains**: the list of sources that appear most frequently in LLM responses across your monitored prompts, with total appearance counts per domain. Subdomains of the same brand (`www.`, `blog.`…) are grouped under their root domain: one brand corresponds to one row.
* **The number of prompts each source is cited on**: a sortable **Prompts** column showing how many distinct monitored prompts a source appears on, to spot high leverage sources rather than ones that only weigh on a handful of responses.
* **Analysis by page type**: a breakdown of sources by content type (article, e-commerce page, comparison site, forum, media…) to identify the formats LLMs favor on your topics.
* **Analysis by source family**: a grouping of sources into families built from detected domains, for a more structured reading of the AI competitive landscape.
* **Filters by prompt and AI platform**: the ability to narrow the analysis to a specific prompt or a specific LLM (ChatGPT, Google AI Overviews).
### How to use it
#### 1) Access the Sources view
From the sidebar, click **GEO**. The **Sources** tab is accessible from the screen navigation, alongside AI Visibility and Prompts.
#### 2) Identify the domains capturing citations in your place
The source list shows the domains most cited by LLMs across all your monitored prompts, sorted by number of appearances.
Identify the domains concentrating the most citations on your strategic topics. These are your main AI competitors, regardless of their position on Google.
Sort by the **Prompts** column to tell apart a source cited heavily on a single prompt from one that weighs in across many distinct prompts. For a given competitor, this column shows in one click which of its sources is the most cross-cutting, the one that comes up on the largest number of your monitored prompts.
> **Tip ✅**: compare this list to the SEO competitors you've configured in Intelligence Hub. Domains absent from your SEO radar but heavily present in LLM sources signal an emerging AI competitor worth monitoring.
#### 3) Analyze sources by page type and family
Use the **page type** segmentation to understand which content formats LLMs favor on your topics: articles, comparison pages, product pages, forums, media pages…
Explore **source families** to group domains by category and read the ecosystem more clearly. This view helps you identify whether LLMs trust media outlets, comparison sites, or institutional websites more on your queries.
#### 4) Refine the analysis with filters
Use the **AI platform** filter to compare sources cited by ChatGPT vs those cited by Google AI Overviews. The two LLMs can trust very different source ecosystems.
Use the **Topic** filter to isolate sources cited on a specific query universe and refine your analysis topic by topic.
### Tips for getting the most out of it
Start with the topics where your citation rate is lowest. That's where the Sources view delivers the most value: you identify exactly who is taking your place and with what type of content, which directly informs your editorial decisions.
Analyze page types to adapt your formats. If LLMs massively cite comparison articles on a given topic and you don't produce any, that's a format gap to fill not just a topic gap.
Cross-reference identified sources with your content actions. The most cited domains on your strategic topics are priority targets for your optimization efforts: producing content comparable in quality and depth is the most direct path to earning citations.
> **Tip 💡**: a domain heavily cited across multiple prompts is a strong signal. That site is recognized as a reference by LLMs in your sector. Analyze its most cited content to understand what earns it that trust.
### Go further
**Useful links:**
* [\[AI Visibility: reading and interpreting your dashboard\]](/en/analyze-competitors/ai-visibility)
* [\[Prompt view: analyzing a prompt in detail and taking action\]](/en/analyze-competitors/prompt-view-analyze-a-prompt-in-detail-and-take)
* [\[Intelligence Hub GEO: understanding metrics and key concepts\]](/en/analyze-competitors/intelligence-hub-understanding-the-main-screens)
# What is Intelligence Hub?
Source: https://help.semji.com/en/analyze-competitors/what-is-intelligence-hub
Intelligence Hub is a competitive SEO analysis solution designed for decision-makers (C-level, CMO, CEO) who want to make informed strategic decisions based on…
### At a glance
* Compare your **SEO visibility** with that of your competitors
* Compare **publication velocity** (your content production vs. theirs)
* Identify **where to act first** (topics, page types, funnel stages)
This page presents the problems covered, what the solution analyzes, where the data comes from, and how the monthly reports work.
### What this changes for you
#### You no longer rely on intuition
* You know **where you stand** compared to your competitors, with evidence to back it up.
* You see **who is progressing** and **on what**, so you can anticipate rather than react.
#### You know what to prioritize (and why)
* You identify **content opportunities** and the areas where to act first.
* You clarify **the topics** to push based on market signals.
#### You gain clarity to decide and align
* You have **concrete data** to make informed decisions about SEO investments.
* You facilitate alignment between **the content, marketing, and leadership teams**.
### How does Intelligence Hub help you?
**Clear comparative analysis:** a straightforward overview of your positioning and the gaps to close.
**AI-enriched data:** categorization of your content and your competitors' content by:
* **Page types** (articles, product pages, landing pages...)
* **Topics** (up to 10 custom topics)
* **Personas** (up to 10 targeted personas)
* **Marketing funnel stages** (Awareness, Consideration, Decision, Retention)
**Tangible benefits:**
* **Time savings:** optimize your internal resources by avoiding aimless content creation.
* **Increased responsiveness:** react quickly to market changes.
* **Reduced stress:** with concrete data, you are no longer flying blind.
* **Better synergy:** improve collaboration between production teams and management.
#### Key Benefits
✅ **Automated monthly reports:** Receive your analytics every month with no manual effort.
✅ **AI-powered data:** Topics, page types, personas, and funnel stages classified automatically.
✅ **Easy exports:** Download your charts and data to quickly build your presentations.
✅ **Intuitive visualization:** See how you rank against your competitors at a glance.
✅ **Smart drill-down:** Click on a chart to automatically explore the detailed underlying data.
✅ **Strengths and weaknesses analysis:** Quickly identify where you excel and where you need to improve.
✅ **Publishing velocity tracking:** Visualize your competitors' content production pace.
### Timeline and automatic reports
> **ℹ️ Note:** reports always cover the previous month.
Intelligence Hub reports are based on **data from the previous full month.**
*Example: if a report is generated on March 13, 2026, the data analyzed corresponds to February 2026.*
Once your setup is complete, Intelligence Hub automatically generates a new report every month **between the 4th and the 10th.**
You don't need to take any action; data are refreshed automatically with the information from the previous month.
### How to use it?
1. Set up your competitors.
2. Understand the main screens and the metrics and dimensions needed to read the charts (visibility, topics, page types, funnel).
3. Dive deeper into the AI properties (topics, personas, marketing funnel) and identify opportunities using your data.
4. Use the automatic reports and exports to share your analyses (executive committee, teams, clients).
### Q\&A:
#### Where do the data used in Intelligence Hub come from?
Intelligence Hub relies on reliable sources:
* **Semrush API** for traffic and ranking data
* **LLM** for classification (page types, topics, personas, funnel stages)
The LLM is used only to categorize content and does not generate the metrics (traffic, rankings).
#### Normalized traffic: why do my numbers differ from my Google Search Console?
Intelligence Hub displays **normalized traffic**: we start from Semrush's estimate, then **adjust** it using a coefficient calculated from your Google Search Console.
**How does it work?**
1. We compare, over a past month, the Search Console traffic (real) and the Semrush traffic (estimated).
2. We calculate an adjustment coefficient.
3. We apply this coefficient to all analyzed domains (yours and your competitors').
**Benefit:** more reliable comparisons better aligned with your reality.
#### Do the data include my Analytics connectors (Google Analytics, Adobe Analytics, Piano Analytics...)?
No. Intelligence Hub does **not** use the data from your connectors for competitive analysis.
Only your **Google Search Console** data are used to calculate the traffic **normalization coefficient.**
#### Are my data used to train AI?
**No.** Your data are **never used** to improve models from OpenAI, Anthropic, Google, nor are they shared with third parties.
#### The data don't match my Google Search Console
**This is normal.** Intelligence Hub shows **normalized** traffic: we start from Semrush's estimate, then **adjust** it using a coefficient calculated from your Google Search Console.
**Why?** Semrush's numbers are estimates, while Search Console reflects your real data. Normalization makes it possible to compare your domain and your competitors on a more consistent basis.
**How does it work?**
1. We compare, over a past month, the Search Console traffic (actual) and the Semrush traffic (estimated).
2. We calculate an adjustment coefficient.
3. We apply this coefficient to all analyzed domains.
#### I don’t have access rights to Intelligence Hub, why?
1. Contact an administrator of your workspace to request access to Intelligence Hub.
2. If you are the administrator and owner of the workspace: go to **Settings > Workspace > Users**, then enable **Intelligence Hub** access for your user.
#### Are the competitors informed that I am analyzing them?
No, the analysis is completely invisible to your competitors. We use public data from Semrush.
# All about customizing the Performance tab
Source: https://help.semji.com/en/analyze-performance/all-about-customizing-the-performance-tab
The Reports tab lets you easily track your production efforts and the performance of your content all in one place.
### How to customize the Report Overview
Within the Overview, customize your report view to hide metrics you don't want to see using the arrow to the left of the metric.
For example, if you don't have an e-commerce site, you can hide the "E-commerce" view from the overview.
By clicking on "View details" in the Overview, you are redirected to one of the corresponding Report tabs.
### How to customize the Report with filters
To refine your report, you can also add various filters:
* Title tag
* Content Score
* Date of publication
* Position evolution
* Keyword
* Planning
* Position
* Average position
* URL
* Search volume
* Assigned to a specific editor
* Folder
These different filters allow you to customize the report to your needs.
\
If you're working in a thematic or semantic cocoon logic, you can use the folder filter to isolate the performance of this folder in order to observe the performance of strategic themes in your eyes.
### How to customize the Report with periodicity settings
You can also specify the periodicity of your choice within the Report.
> *Good to know 💡: The export function allows you to export your Performance Report in the file format of your choice. Please note that this export is context-sensitive, depending on the filters you have applied.*
# Everything you need to know about Semji's Position Tracker
Source: https://help.semji.com/en/analyze-performance/everything-you-need-to-know-about-semjis-position-tracker
Semji can help you monitor the results of your optimization work by tracking your keyword positions in (almost) real-time !
### Why should I track my positions?
In Semji, you can monitor the evolution of Google rankings for a main keyword related to published content, and the evolution of keywords positioned in Google's top 100.
In addition to the average ranking, available both in Semji in the Pages tab and in Reports in the Overview tab, this data is updated daily to provide you with more relevant information.
Besides tracking your page traffic, it's also important to monitor your content's ranking. This data lets you know how visible you are on Google, and whether or not your content is keeping up with competitors.
To ensure high SEO performance, you should monitor your content, especially strategic content.
What are the benefits?
With this all-in-one feature, you can track keywords for the content you optimize with Semji. With daily data updates, you'll be able to respond quickly to any drop in ranking for your content. You can also easily view your ranking history over the last 12 months.
> *Note: Be careful when analyzing this data. When an article is published or updated, ranking can drop before reaching a high performance result. Remember that in any SEO strategy, results can take some time to show up!*
### Understanding Position Tracking:
This new feature is available in the:
* Dashboard;
\
\
Position Tracking is accessible from a dedicated tab. This feature allows you to track your positions month by month. Semji also shows you the number of positions gained.
*Example: in February, I have 158 main keywords ranked in Google's Top 100 on 158 product contents. Among these keywords, 38 rank in positions 1 to 3, 52 in positions 4 to 10 and the rest between 11 and 100.*
This means you can easily see the changes in ranking by hovering your mouse over the following months to see the new rankings.
* Reports;
In the Reports tab, the same applies, the only difference being that you can combine Position Tracking with Semji's filter system and, for example, analyze the performance of a topic cluster in terms of ranking.
* and in the editor's "Performance" tab.
For content as a whole, Position Tracking enables you to quickly monitor a content's progress on its main query and its Top 100 keywords. This is essential for the most strategic content, so you can quickly react if you lose your ranking as a result of an optimization that was implemented several months ago!
In terms of data update frequency, "Main keyword" data is updated daily, while "Organic keywords" data is updated weekly.
### How to use this feature - use case :
### **Use case: You want to track the ranking evolution of a content.**
Context: In addition to Semji conversion gain reporting, you'd also like to get a report on your content's ranking trends, so you can see how well-positioned your strategic keywords rank.
**With the Position Tracking feature, you can:**
* Quickly analyze the ranking evolution of new and existing content, both 'macro' and 'micro'
* Build your own reports using screenshots from the Position Tracking feature and CSV/XLS data export.
### **Use case: You optimize a piece of content and notice a drop of 2 positions the next day.**
Context: before optimization, a 400-word content was ranked 8th on the keyword "how to lose belly fat".
* You add 300 words by updating the content plan.
* You also change the title tag.
* The next day, you notice that the content has moved down the SERP to rank 10th, at the bottom of the page.
* You wait 1 week to see how it evolves.
**With the Position Tracking feature:**
* After one week, you see that your content is back at ranking in position 8.
* You'll also notice that the number of TOP 100 keywords has increased from 125 to 148.
* After two weeks, the content moves up to the 6th position in Google.
* In addition, the number of clicks has increased by 20%, thanks to new TOP 100 keywords.
This feature provides you with a broader overview of the URL and all its keywords, rather than just the position of the main keyword.
Now you can take full advantage of the Position Tracking feature!
# Glossary of Performance Indicators in Semji
Source: https://help.semji.com/en/analyze-performance/glossary-of-performance-indicators-in-semji
Discover the definition of the main terms and metrics used in Semji's Performance tab.
This glossary helps you understand the main terms and metrics you will encounter in your Performance dashboard.
#### 1. General Terms & Content
* **Content Score:** This is the SEO quality score that Semji assigns to your content, on a scale of 0 to 100. It evaluates the relevance and optimization of your page in relation to your main keyword. The higher the score, the better your content is optimized for search engines.
* **New content**: Refers to content published during the analysis period you have selected. This filter is ideal for measuring the impact of your recent production.
* **Existing content:** Concerns content that was already published before the start of the analysis period. Use this filter to track the effectiveness of your optimization efforts on your content catalog.
#### 2. Acquisition Channels
An acquisition channel is the "gateway" through which a visitor arrives on your site.
* **Organic search:** Visitors coming from a click on a "natural" (non-paid) result in a search engine like Google or Bing. This is the main indicator of your SEO performance.
* **AI search / GEO (Generative Engine Optimization):** Visitors coming from answers or links provided by generative AI (like ChatGPT, Perplexity, Gemini, etc.). This channel allows you to **measure your visibility in new search experiences.**
* **Paid (Paid Search):** Visitors arriving via a click on a paid advertisement in search engines (e.g., Google Ads).
* **Direct:** Visitors who have typed your site's URL directly into their browser or used a bookmark. They already know your brand.
* **Social:** Traffic coming from social networks (LinkedIn, Facebook, Twitter, etc.).
* **Referral:** Traffic coming from a click on a link present on another website (excluding search engines). This could be, for example, a partner blog article that mentions your content.
#### **3. Google Search Metrics (SEO)**
This data comes directly from your Google Search Console.
* **Impressions:** The number of times a page from your site appeared in Google search results. An impression doesn't mean the user clicked, just that they potentially saw your link. This is an indicator of your **visibility**.
* **Clicks (SEO):** The number of times a user clicked on your page's link from Google search results.
* **Positions:** The average ranking of your page in Google search results for keywords that generated impressions.
* **CTR (Click-Through Rate):** The percentage of impressions that resulted in a click. **Formula: (Clicks / Impressions) x 100.** A good CTR indicates that your page title is attractive and relevant to users.
#### **4. Traffic & Engagement Metrics**
This data comes from your Analytics tool (e.g., Google Analytics).
* **Sessions:** A session corresponds to a visit to your site. It begins when a user arrives on a page and ends after 30 minutes of inactivity. The same user can generate multiple sessions. Not to be confused with SEO Clicks, which is just the starting point from Google.
* **Bounce Rate:** The percentage of sessions where the user left your site after viewing only one page, without interacting. A high rate may indicate that the content did not meet expectations.
* **Average Session Duration:** The average time visitors spend on your site during a visit. This is a good indicator of the engagement generated by your content.
#### **5. Conversion & E-commerce Metrics**
This data measures the business impact of your content.
* **Conversions:** The number of times a visitor accomplished a goal you defined (e.g., filling out a form, downloading a white paper, subscribing to a newsletter).
* **Conversion Rate:** The percentage of sessions that resulted in a conversion. This is the metric that measures the effectiveness of your content in achieving your business objectives.
* **Revenue:** The revenue generated and attributed to content viewed by visitors.
* **Transactions:** The number of orders or purchases made on your site.
#### **6. Where does the data come from?**
Semji collects and centralizes the performance data of your content from several reliable sources:
* Engagement and conversion metrics of the published page (sessions, conversions, revenue, bounce rate, duration, etc.) come from the Analytics tool connected to the workspace, such as [GA4](/en/connect-your-tools/how-to-connect-my-google-analytics), [Adobe](/en/connect-your-tools/why-and-how-to-connect-your-adobe-analytics), [Piano](/en/connect-your-tools/how-to-connect-my-piano-analytics-account), [Matomo](/en/connect-your-tools/why-and-how-to-connect-your-matomo), or [Piwik PRO](/en/connect-your-tools/why-and-how-to-connect-your-piwik-pro).
* SEO metrics (clicks, impressions, CTR, position) come from Google Search Console, including Google Discover.
* In the interface, Semji automatically reclassifies this data by homogeneous channels for clear comparison between sources: Organic Search, Paid, Direct, Social, Referral, [AI Search and Others.](#ai)
#### **7. Is there any calculation/reprocessing on Semji’s side?**
Yes, but it mainly involves normalization and aggregation, not the creation of new metrics:
* Channel mapping: we reclassify the channels from each connector into our standard groups for consistent reading. The “All” channel aggregates all data.
* Time windows: tables are always based on rolling 30‑day periods, regardless of the graph’s timeframe. Comparisons use the previous period or year-over-year. Displayed values are rounded, but changes are calculated on raw values.
* Totals vs. averages: “Total” for absolute metrics, “Average” for relative metrics.
* Share per channel: in the channel view, we calculate each channel’s share of the metric vs. the “All” total.
* Content Score: the latest published Content Score is carried forward until a new publication, to avoid gaps.
#### **8. Specific to “AI Search”**
For “AI Search” traffic, Semji does not invent new metrics. We attribute sessions, conversions, and revenue based on referrers from the main identified AI engines. The display is standardized with a stable TOP 4 — ChatGPT, Perplexity, Copilot, Gemini — to ensure clear comparisons over time. Other sources are grouped under “Other.”
Channel shares are then calculated page by page, over rolling 30 days, from the raw values provided by your Analytics tools and Search Console, and presented consistently in the interface.
#### **In summary**
Semji does not create new metrics. We standardize, aggregate, and compare data from your Analytics tools and Search Console, with specific and documented mapping for “AI Search” based on AI engine referrers, a stabilized TOP 4, and transparent rules on temporal display and rounding.
# Measuring the impact of your content production
Source: https://help.semji.com/en/analyze-performance/guide-1-measuring-impact-of-your-content-production
Learn to measure the impact of your content production through volume and quality indicators (Content Score).
Learn to measure the impact of your content production through volume and quality indicators (Content Score). Identify whether your editorial efforts are generating the expected results and optimize your strategy by combining quantity and SEO performance.
### In summary
**What you can do:** Evaluate the effectiveness of your publication \
frequency and the quality of your content using production indicators and Content Score
**For whom**: Content managers and editorial managers who oversee content production and want to optimize their editorial strategy
**Why it's useful**: Finally answer the question "are our publishing efforts generating the expected results?" with concrete data on your production volume and quality
### What it changes for you
**You publish regularly, but it's difficult to know if this pace really pays off.** How do you evaluate whether your editorial investment is generating the expected impact? This question often comes up in marketing teams, especially when you need to justify the resources allocated to content production.
**Semji gives you the keys to objectively measure your editorial performance**. Thanks to integrated production and quality indicators, you have a clear vision: publication volume, SEO quality evolution, and correlation with your traffic performance.
**Concrete result:** you optimize your editorial calendar based on factual data and easily demonstrate the value of your editorial work.
### Analyze your content production and quality
#### Step 1: Analyze publication volume
**First step**: understand your production rhythm. The "Content Production" graph reveals two essential pieces of information about your editorial activity.
**New content vs Existing content**: This distinction is fundamental for analyzing your strategy. "New content" represents your fresh creations - blog articles, new product pages, original guides. "Existing content" corresponds to your optimization efforts - updates to performing articles, enrichment of existing pages, SEO corrections.
**Why this metric is strategic**: It allows you to identify your periods of high editorial activity and correlate this intensity with your traffic performance a few weeks later. You can thus validate whether your production peaks actually generate measurable results.
**Our recommendation**: Aim for a balance between creating new content (to target new queries) and optimizing existing content (to maximize the potential of your already indexed pages). A 50/50 ratio often constitutes a good starting point.
#### Step 2: Track average quality with the Content Score
**Second step: evaluate the SEO quality of your publications.** The "Average Content Score" graph acts as your quality barometer, indicating whether your content follows SEO optimization best practices.
**Understanding the Content Score:** This Semji metric evaluates the technical and semantic quality of your content on a scale of 0 to 100. It takes into account your heading structure, semantic richness, keyword optimization, and completeness relative to search engine expectations.
**Interpreting trends**: An upward curve indicates that your team is improving their skills in SEO optimization. Stagnation may reveal a need for training or adjustment of your editorial processes. A temporary decline can be explained by the integration of new writers or a process change.
### Good to know:
> #### Reference thresholds:
>
> **Our recommendation: aim for a minimum Content Score of 75 to ensure the performance of your content.** This threshold constitutes the best practice expected to maximize your chances of ranking and organic traffic.
>
> * **Score > 80**: Excellent optimization, your content has strong performance potential
> * **Score 75-80**: Expected performance threshold, your content is well optimized
> * **Score 60-75**: Additional optimizations recommended to reach optimal performance level
> * **Score \< 60**: Significant room for improvement, focus on training recommended
### Use case: Correlating production and performance
**Concrete scenario**: You published 15 new articles in September with an average Content Score of 75. How do you measure the impact of this effort on your SEO performance?
**Analysis Method:**
1. **Isolate the production period**: Use the date filter to select September and note your production peak.
2. **Analyze the delayed impact**: Shift your analysis by 4-8 weeks (usual Google indexing and ranking delay) to measure the impact on your organic clicks and sessions.
3. **Segment by quality**: Compare the performance of content with a Content Score > 80 versus those \< 60 to validate the importance of quality.
**Actionable insight**: If your high-quality content (Score > 80) generates 3x more organic traffic than average-quality content, you validate the importance of investing in training your team rather than simply increasing production volume.
### Optimize your editorial strategy
**You now have the key indicators to effectively manage your content production.** The intersection of publishing volume and Content Score helps you identify the sweet spot between quantity and quality that maximizes your performance
**Our recommendation**: Start by analyzing your last 3 months of production to identify your performance patterns. Use these insights to adjust your editorial calendar and quality standards.
**Next step**: Once your production is optimized, analyze how your content performs specifically on Google to identify your priority SEO opportunities.
➡️ [**Guide 2: Analyze your SEO performance on Google**](/en/analyze-performance/guide-2-analyze-your-seo-performance-on-google) \
Track your positions, clicks and optimize your organic visibility
# Analyze your SEO performance on Google
Source: https://help.semji.com/en/analyze-performance/guide-2-analyze-your-seo-performance-on-google
Learn to analyze your SEO performance directly in Semji through the centralization of Google Search Console and Analytics data.
### In summary
**What you can do**: Track and analyze your SEO performance (positions, clicks, impressions) directly in Semji without switching back and forth between Search Console and Analytics
**For whom**: Content managers, SEO managers and marketing teams who manage the organic visibility of their content
**Why it's useful**: Centralize all your essential SEO metrics in one place to quickly identify your optimization opportunities and measure the impact of your efforts
### What this changes for you
**SEO often forms the core of your acquisition strategy**. But navigating between Google Search Console for rankings and Google Analytics for traffic complicates the overall analysis of your organic performance. How can you quickly know which content generates the most clicks, which content is progressing in rankings, or identify your next priority optimizations?
**Semji centralizes all your essential SEO indicators in a unified interface**. Keyword positions, click evolution, click-through rates, impressions... you have a complete view of your organic performance to make informed optimization decisions.
**Concrete result**: you identify your top-performing content in just a few clicks, spot your improvement opportunities, and track the impact of your SEO optimizations.
### In-depth analysis of SEO performance by organic channel
#### Step 1: Isolate "Organic Search" data
**First step: access your SEO data.** To specifically analyze your performance on search engines, go to the "Channel Analysis" section and click on the **"Organic Search"** tab.
**Why this segmentation is crucial**: By isolating the "Organic Search" channel, you eliminate the noise generated by other traffic sources (social, direct, paid, etc.) to focus solely on the effectiveness of your SEO strategy. This allows you to objectively evaluate the impact of your content optimizations.
**Available data**: Once on this channel, you access metrics specific to organic search: keyword positions, organic clicks, impressions, click-through rate (CTR), and temporal evolution of these indicators.
#### Step 2: Visualize your Google performance at a glance
#### Track your keyword positions
**The reference indicator for measuring your visibility.** Two complementary metrics give you a precise view of your positioning:
**Main keyword position:** Tracks the evolution of your focus keyword's position on Google. This metric allows you to directly measure the impact of your on-page optimizations on the ranking of your priority content.
**Organic keywords**: Shows the total number of keywords for which your content ranks within Google’s top 100 results. This metric reveals the extent of your semantic visibility and your ability to capture traffic on varied queries.
**Our recommendation**: Pay particular attention to content positioned between 4th and 10th position - they often represent your best opportunities for quick traffic gains with some targeted optimizations.
#### Measure clicks, impressions, and CTR
**The performance metrics that truly matter**. Beyond positioning, these indicators reveal the real attractiveness of your content in search results:
**Clicks**: Number of visitors who actually clicked on your Google results. This is your SEO conversion metric: it measures your ability to transform visibility into qualified traffic.
**Impressions**: Number of times your content appeared in search results. This metric reveals your visibility potential: content with many impressions but few clicks may indicates an opportunity to optimize titles and meta-descriptions.
**CTR (click-through rate)**: Percentage of people who click on your result after seeing it. A low CTR compared to your average position often indicates an unattractive title or meta-description.
**Comparative analysis**: Use the annual comparison function to identify your progression trends and measure the impact of your optimizations over time.
#### Step 3: Refine the analysis by page
**Dive into the details of your performance**. To precisely identify which content to optimize as a priority, click on **"Clicks"** or **"Positions"** in the left menu. You will then access the detailed table of your pages with their individual metrics.
**The table adapts according to the selected metric**. The main columns give you the essential information to prioritize your optimizations:
* **Page**: URL of your content with direct access to the editor
* **Content Score**: Current SEO quality of the page
* **Main keyword**: Priority query targeted by this content
* **Volume**: Number of monthly searches for this keyword
* **Average position**: Current ranking on Google
* **Specific metric**: Clicks, CTR, Impressions or Positions depending on your selection
* **Evolution**: Progress trend of the chosen metric
**Sorting features**: Use column headers to sort your data - for example, sort by "Impressions" in descending order to identify your most visible content, or by "CTR" in ascending order to spot your optimization opportunities.
### Use case: Identifying a priority optimization opportunity
**Concrete scenario**: You're looking to quickly boost your SEO traffic without creating new content. This method consists of identifying pages with strong potential for immediate improvement.
**3-step method:**
1. **Filter by high impressions**: In the page table, sort by "Impressions" in descending order. Focus on pages that generate more than 1,000 monthly impressions: they have already proven their visibility potential.
2. **Identify low CTRs**: Among these visible pages, spot those with a CTR below 2%. These are your priority opportunities - visible but not very attractive.
3. **Optimize title and meta-description**: For these identified pages, rewrite more compelling titles and more enticing meta-descriptions. This optimization can double your CTR within a few weeks.
**Example**: A page with 2000 impressions and 1% CTR (20 clicks) can increase to 2% CTR (40 clicks) simply by optimizing its title. That's a 100% traffic gain without any major technical effort.
**Results tracking**: Measure the impact of your optimizations 2-4 weeks after publication by comparing the evolution of CTR and clicks for the optimized pages.
### FAQ
**Where do position and click data come from?** The data comes directly from Google Search Console, connected to your Semji account. We retrieve official information from Google about your organic performance, without estimation or approximation.
**What is the difference between Google Search and Google Discover?**
* **Google Search**: Traffic generated by active user queries on the search engine
* **Google Discover**: Traffic coming from Google's personalized feed that proactively suggests content to users based on their interests
You can switch between these two sources in the interface to specifically analyze each type of organic traffic.
**Why does my average position sometimes differ from my manual observations?** The average position is calculated across all your keywords and over the entire selected period. It may differ from a spot check because it takes into account daily ranking variations and the keyword set of your page.
### Optimize your organic visibility
**You now master the essential metrics to effectively manage your SEO**. Analyzing your organic performance becomes a systematic process: identify your most visible content, optimize those with the best potential for gains, and measure the impact of your actions.
**Our recommendation**: Perform this analysis monthly to maintain a trajectory of continuous improvement of your SEO performance. Focus on 3-5 optimizations per month rather than spreading your efforts.
**Next step:** Now that you have mastered your SEO performance, analyze how your other acquisition channels contribute to your overall content strategy.
➡️ [**Guide 3: Understand the performance of each acquisition channel**](/en/analyze-performance/guide-3-understanding-the-performance-of-each-acquisition-channel) \
Identify your most profitable traffic sources and optimize your marketing mix
# Understanding the Performance of Each Acquisition Channel
Source: https://help.semji.com/en/analyze-performance/guide-3-understanding-the-performance-of-each-acquisition-channel
Analyze and compare the performance of your content according to each acquisition channel (SEO, social, paid, etc.) in order to identify the most effective…
### In summary
**What you can do**: Analyze and compare the performance of your content according to their acquisition channels (social, paid, direct, referral) to optimize your overall marketing mix
**For whom**: Content managers, traffic managers and marketing managers who run a multi-channel strategy and want to understand the contribution of each traffic source
**Why it's useful**: Identify your top-performing channels in terms of engagement and conversion to redirect your marketing efforts where they are most profitable
### What this changes for you
Your content attracts visitors from multiple channels: SEO, social media, paid campaigns, partner sites... But juggling between Facebook Ads, Google Ads, and Analytics to compare the traffic quality from each source quickly becomes tedious and time-consuming.
Semji centralizes all your acquisition metrics in a unified interface. You finally have a clear comparative view to identify your best-performing channels and readjust your marketing strategy.
**Concrete result**: you identify in just a few clicks which channels generate your most engaged visitors, optimize your marketing budget, and focus your efforts on the sources that convert best.
### Multi-channel traffic acquisition analysis
#### Step 1: Navigate between different acquisition channels
First step: access the multi-channel view. In the "Channel Analysis" section, you discover the tabs representing your different traffic sources: Organic Search, Paid, Direct, Social, Referral, AI Search, and Other.
**Why this segmentation is crucial**: Each channel attracts visitors with different intentions. Organic visitors actively search for your content, social visitors are more in exploration mode, and direct visitors already know your brand. This segmentation allows you to adapt your analysis to each context.
**Available data**: For each channel, you have access to engagement metrics (sessions, duration, bounce rate), conversion, and temporal evolution. The interface automatically adapts according to the selected channel.
#### Step 2: Analyze a specific channel in detail
#### Understanding channel metrics
Let's take the example of the "Social" channel to illustrate the in-depth analysis of an acquisition channel. Click on the "Social" tab to access the specific metrics:
**Sessions**: Total number of visits from social networks. This metric reveals the scope of your social audience and the effectiveness of your posts in generating traffic.
**Average session duration**: Average amount of time spent by social visitors on your site. A long duration (over 2 minutes) indicates that your content matches the expectations of your social audience.
**Bounce rate**: Percentage of social visitors who leave after viewing only one page. A bounce rate above 70% may indicate a disconnect between your social posts and the destination content.
**Pages per session**: Average number of pages viewed per visit. This metric reveals the engagement and curiosity of your social audience for your content.
#### Interpreting engagement signals
**Positive signals**: High session duration + low bounce rate = qualified audience that finds value in your content
**Warning signals**: High bounce rate + low duration = possible disconnect between social promise and delivered content
**Opportunities**: High sessions + average engagement = potential to optimize the user journey
#### Step 3: Compare performance between channels
Analyze your data in comparative mode. To identify your best-performing channels, navigate between the "All", "Organic Search", "Social", "Paid", etc. tabs, observing the same metrics.
\[Capture d'écran montrant la comparaison entre canaux]
**The comparative table reveals to you**: Sessions per channel, their evolution, and their relative contribution to your overall traffic. Use the toggle between "Over a period" view and "Distribution by channel" to alternate between temporal analysis and volume distribution.
Key metrics to compare:
* **Session volume**: Which channel generates the most traffic?
* **Engagement quality**: Which channel best retains attention?
* **Conversion rate**: Which channel best converts your visitors?
**Advanced features**: Sort by decreasing performance to quickly identify your champion channels, or use temporal filters to observe the seasonal evolution of each channel.
### Use case: Comparing the engagement of two channels to optimize your strategy
**Concrete scenario**: You invest time on social media and budget in SEO, but you want to know which one generates more engaged visitors to readjust your priorities.
**4-step method:**
1. **Analyze the "Organic Search" channel**: Note the average session duration and bounce rate. Typical example: 3 min 30 s duration, 45% bounce rate.
2. **Switch to "Social"**: Compare the same metrics. Example: 1 min 45 s duration, 65% bounce rate.
3. **Interpret the gap**: In this example, organic traffic is more engaged - logical since these visitors were actively searching for your type of content.
4. **Adjust your strategy**: To improve social engagement, create content specifically adapted to social networks or develop landing pages dedicated to social traffic.
**Optimization exampl**e: If your social traffic has a bounce rate of 70% vs 45% for organic, test different content formats on social media (videos, carousels) or create more targeted hooks to better qualify your social audience.
**Results tracking**: Measure the impact of your adjustments by comparing the evolution of engagement metrics 4-6 weeks after optimization.
### FAQ
**Why do certain channels display different metrics?** We have two groups of metrics: Search Console metrics (clicks, impressions, CTR) available only for "Organic Search" and "AI Search", and Analytics metrics (sessions, conversions, revenue) available for all channels. The interface automatically switches to compatible metrics based on the selected channel.
**What exactly does the "Other" channel represent?** The "Other" channel groups all traffic sources that don't correspond to the main categories (newsletter, mobile applications, QR codes, etc.). If this channel represents more than 15% of your traffic, it may be interesting to investigate these sources in your main Analytics tool.
**Can I see the detail of sources within a channel?** Yes, for the "Organic Search" and "AI Search" channels, you can see the breakdown by source (Google, Bing for organic; ChatGPT, Perplexity for AI). This granularity helps you identify the best-performing search engines for your content.
### Optimize your marketing mix through multi-channel analysis
You now master the comparative analysis of your acquisition channels. Focus your efforts on the most engaging channels and adjust your content according to each audience to optimize your marketing ROI.
**Our recommendation**: Perform this analysis bi-monthly. Focus on improving 1-2 priority channels rather than spreading your efforts thin.
**Next step**: Now discover how to measure the business impact of your content with conversion and revenue tracking.
➡️ [**Guide 4: Track engagement, conversions and revenue from your content**](/en/analyze-performance/guide-4-track-engagement-conversions-and-revenue) \
Measure the real business impact of your content strategy
# Track engagement, conversions and revenue
Source: https://help.semji.com/en/analyze-performance/guide-4-track-engagement-conversions-and-revenue
Learn to measure the real impact of your content by tracking engagement, conversions, and generated revenue.
### In summary
**What you can do**: Measure the business impact of your content by tracking visitor engagement, conversions and the revenue generated to prove the ROI of your content strategy
**For whom**: Content managers, marketing managers and executives who want to demonstrate the commercial value of their content beyond simple traffic
**Why it's useful**: Turn your vanity metrics into concrete business indicators to justify your content investments and identify your most profitable content
### What this changes for you
Generating traffic is good. But converting those visitors into prospects, customers or subscribers is better! How do you know if your content truly engages your audience and contributes concretely to your business objectives?
Navigating between Google Analytics for conversions, your CRM for leads, and your e-commerce dashboards to measure the overall impact of your content complicates ROI analysis. Even more difficult: precisely identifying which content generates the most value.
Semji centralizes your engagement and conversion metrics in a unified view. Sessions, visit duration, conversions, revenue... you finally measure the complete impact of your content strategy.
**Concrete result**: you identify your most profitable content, optimize underperforming content, and clearly demonstrate the business value of your work.
### Traffic, Engagement, and Conversion Analysis
#### Step 1: Analyze traffic and visitor engagement
First step: understand how your visitors interact with your content. In the "Traffic & Engagement" section, you access the metrics that reveal the quality of the user experience.
**Why these metrics are crucial:** Engagement precedes conversion. A visitor who spends time on your site and explores multiple pages is more likely to take action. These indicators reveal whether your content truly captures attention.
**Essential engagement metrics:**
**Sessions:** Total number of visits to your content. This metric measures your ability to attract qualified traffic to your strategic pages.
**Average session duration:** Average time spent per visit. A long duration (more than 2 minutes) indicates engaging content that retains attention and builds trust.
**Bounce rate:** Percentage of visitors who leave after viewing only one page. A low bounce rate (below 50%) indicates content that encourages exploration and keep visitors engaged.
**Pages per session:** Average number of pages viewed per visit. This metric reveals the curiosity generated by your content and the effectiveness of your internal linking.
#### Step 2: Measure your content conversions
Analyze your business objectives. The "Conversion" section reveals how your content concretely contributes to your marketing and commercial objectives.
**Important prerequisite:** This data comes from objectives configured in Google Analytics. Make sure you have defined your priority conversions: newsletter subscriptions, resource downloads, quote requests, appointment bookings...
**Key conversion metrics:**
**Conversions:** Total number of important actions completed by your visitors. This metric directly measures the effectiveness of your content in converting visitors into prospects or customers.
**Conversion rate:** Percentage of visitors who perform a desired action. A good conversion rate (2-5% depending on your sector) indicates persuasive content and well optimized user journeys.
**Examples of conversions to track:**
* Newsletter subscription
* White paper or guide download
* Product demonstration request
* Sales appointment booking
* Webinar registration
**Comparative analysis:** Use time filters to compare your conversion performance across different periods and identify your improvement trends.
#### Step 3: Track e-commerce impact and revenue
Measure direct profitability. If you sell online, the "E-commerce" section reveals the exact financial contribution of your content to your revenue.
**Strategic e-commerce metrics:**
**Revenue:** Total amount of sales generated through your content. This ultimate metric allows you to precisely calculate the ROI of your content strategy.
**Transactions:** Total number of completed orders. This metric reveals your ability to transform readers into effective buyers.
**Transaction rate:** Percentage of sessions that result in a purchase. This metric measures the commercial effectiveness of your content and the optimization of your conversion funnels.
**Content ROI calculation:** Divide the revenue generated by your content production costs (time, tools, service providers) to obtain your return on investment (ROI).
### Use case: Identify your best-performing content for conversion
**Concrete scenario:** You want to optimize your content promotion budget by identifying your most profitable articles to focus your efforts on what works.
**4-step method:**
1. **Access the detailed table**: Click on "Conversions" in the left menu to display the table of your pages with their individual performance.
2. **Sort by conversions in descending order:** Click on the "Conversions" header to rank your content from highest to lowest performing in terms of achieved.
3. **Analyze the top 10:** Identify the common characteristics of your highest-converting content: topics, formats, length, call-to-action used.
4. **Optimize and replicate:** Apply these high-performing elements to your other content and create new articles following these winning patterns.
**Analysis example:** If your practical guides generate 3x more conversions than your news articles, reorient your editorial calendar toward more pratical content and promote these formats more.
**Recommended optimizations:** For content with high traffic but few conversions, test new call-to-actions, add contact forms, or create complementary downloadable resources.
### FAQ
**Why don't some contents display conversion data?** Conversions must be configured upstream in Google Analytics as goals or events. If you don't see data, check your Analytics configuration or consult your technical team to set up your priority goals.
**How do I interpret a conversion rate of 0.5%?** Conversion rates vary enormously depending on sectors and types of objectives. A rate of 0.5% can be excellent for a B2B quote request, but relatively low for a newsletter signup. Compare your performance to your own historical data rather than generic benchmarks.
**Can I track custom conversions specific to my business?** Yes, all conversions configured in your Analytics tool (GA4, Adobe Analytics, etc.) automatically feed into Semji. You can track custom objectives: session duration, page views, custom events, specific product purchases...
### Measure the complete ROI of your content strategy
You now master the complete analysis of your content performance: from attracting visitors to converting them into prospects and customers. This comprehensive approach allows you to demonstrate the business value of your work and continuously optimize your results.
**Our recommendation:** Perform this analysis monthly to identify your most profitable content. Then focus your promotional efforts and budget on these high-performing formats and topics.
**Close the loop**: You can now measure the complete impact of your content strategy, from production to revenue generation. Leverage these insights to create even more effective content.
# How to export data from the Performance tab?
Source: https://help.semji.com/en/analyze-performance/how-to-export-data-from-the-performance-tab
Semji also offers the option of exporting performance data directly from the Report tab, for use outside the platform.
\*\*\
Here's how to export your Performance Report:\*\*
**Step 1: Select the view you wish to export**
* All Contents export existing and new content.
* News Contents View
* Existings contents view
**Step 2: Add the filters you want to customize your Report as required**
> *Good to know 💡: The export is contextual, i.e. it adapts according to all the filters you apply to your view. You can filter on the tab of your choice or obtain an overview of your earnings.*\
> *You can also filter by folder to analyze the performance of a particular folder/theme, for example.*
**Step 3: Click on "Export" on the right of the screen**
**Step 4: Select the desired format: you will then be able to export using two file formats, Excel or CSV.**
\
**Step 5: Click on "Export".**
The export will be saved directly to your downloads. If the file size is too large, it will be automatically emailed to you.
It's easy to export and measure your performance!
# How to set the objectives of your SEO content strategy?
Source: https://help.semji.com/en/analyze-performance/how-to-set-the-objectives-of-your-seo-content-strategy
To take the shortest route, you need to know the destination...
### Why set goals?
Semji has been designed to help you improve the SEO performance of your content. Thanks to its relevant [recommendations](/en/create-optimize-and-publish/everything-you-need-to-know-about-the-semji-editor-and-its-features) and playful interface, you can either optimize existing content to increase its ability to attract traffic, or create new, well-optimized content.
In addition to providing you with concrete SEO recommendations for writing each and every piece of content, Semji enables you to build your SEO Content strategy:
* Identify which of your site's URLs to optimize in priority to maximize your earnings
* Find new content ideas to enrich your site, improve your visibility, semantic authority and traffic acquisition.
Before you start, here's what you need to keep in mind to make sure you're moving in the right direction.
### Define your macro objectives
First, you need to have a pretty clear idea of your business goals. Do you want to increase sales? Capture more leads? Gain awareness and visibility on your key topics?
Once you have listed and prioritized them, they can be translated into production objectives and clear monitoring KPIs.
As an example, your content strategy will be different depending on whether you want to trigger product purchases via **transactional** pages or reinforce your brand awareness using **informational** pages.
**Are you familiar with the SMART method of defining objectives?**
This method summarizes the right definition of an objective by the following criteria:
* S for Specific and Simple
* M as in Measurable
* A is for Ambitious and Accepted
* R is for Realistic
* T is for Temporal, Time limited
Use this method to define your goals effectively.
#### 1. Know your target
In a previous content, we explained how important it was to know your target audience and [identify users' search intent](/en/create-optimize-and-publish/understanding-google-and-user-search-intent), a notion that is increasingly key in the Google algorithm.
For example, it is crucial to know if you are targeting a large part of the population or a niche group: this will allow you to define your maximum audience. By also understanding how your target audience searches the internet, what they want to find and what motivates them, you will have a better chance of catching their attention and starting a fruitful relationship.
The first distinction to be made is to divide your business according to your audience type:
* **B to C (Business to Consumers)**: your customers are the final consumers
* **B to B (Business to Business)**: your customers are companies and professionals with business issues
End consumers and professionals within companies do not have the same needs, nor the same issues. They will not use the same search terms on Google for a similar product or service. Make sure you understand your future customers and their online behavior to be able to set SMART goals for your SEO content production!
#### 2. Know your market and your competitors
You also need to know your market and your competitors.
Who are the players trusting the first positions on Google on your topic? Do you know their turnover? How many clients they have? The monthly traffic of their site? Do you know which keywords are most profitable for them in terms of sales or views?
With these data, you will get a first idea of your growth potential.
Then look in detail at their content production, it will also give you good indications on behaviors and practices that Google likes and that you can learn from:
* What are the keywords your competitors are ranking for ?
* What type of content (text, video...) seem successful?
* What length of text? How often do they publish ?
* Are articles written by experts? ...
They are plenty of opportunities. **One thing for sure: as long as you aren't number one, you can do better!**
*Note: depending on your subscription package, your Customer Success Manager can provide you with a complete competitive analysis. It will give you a good vision of your competitors' SEO performance and will help you identify their best practices in terms of content production. You will then be able to create a new strategy with a clear action plan.*
### Define your micro objectives
With a good vision of your business challenges and your growth potential, setting clear objectives for your SEO content production becomes easier.
#### 1. Formalize your strategic objectives
With your competitors' performance in mind, list the objectives that seem desirable and realistic: capture X% more market share, catch up with competitor Y, overtake it...
What gains to expect and how to measure them?
* Sales generation, conversion rate / number of triggered events
* Volume of additional traffic (per content or for your global site) Example: +20% of global organic traffic in 12 months
* CTR (click-through rate on the SERP)
* Other user behavior indicators: time spent on the page, number of pages per session, bounce rate...
Don't forget to set a deadline for reaching these objectives.
#### 2. Formalize your operational objectives
With these profit objectives in mind, you will have a better idea of what to do:
* How much content per month can you optimize?
* How much new content per month can you create?
* How many writers do you have? How many experts in your field ?
* How often can you update your content? (Example: every 6 months)
Of course, if these operational criteria are too restrictive - and production resources often are - they can help you rethink your goals. Keep in mind that these objectives must **be ambitious, but remain realistic**! There is no point in planning 50 pieces of content per month if your writer can only produce one per day...
Once your objectives are set, all you have to do is to define your editorial planning, including content optimization actions and new content creation.
Your Customer Success Manager will regularly provide you with **ideas of new content to produce**. He will also make sure you work primarily on profitable content. Don't hesitate to share your priority topics to get useful insights.
Thanks to its Prioritization score, Semji Platform helps you identify, at a glance, existing content you should optimize first for more gain. Want to know more? Check out [How to optimize existing content with Semji?](/en/identify-opportunities/how-to-optimize-an-existing-content-updated-content)
# How to set up the sending of email reports?
Source: https://help.semji.com/en/analyze-performance/how-to-set-up-the-sending-of-email-reports
Get your workspace performance updates sent by email.
### Why receive a report by email ?
This **new feature** provides you with a weekly or monthly summary of your actions and performance via email.
It allows you to review the team’s schedule and track the performance of your content.
You will also discover new content ideas and identify pages that need optimization. This will help you manage your content more efficiently and maximize your results.
Here’s a **preview** of the summary email you will receive :
### How to set up a performance report by email ?
> Note: You will automatically receive your performance report by email. If you no longer wish to receive it, you can follow the steps below to deactivate this feature
#### Here are the steps to set up your performance report
* Go to the SEMJI settings
* Click on "notifications"
* Choose the sending frequency (weekly or monthly)
* Select the workspace(s) where you would like to receive the reporting
* And then activate or deactivate based on your choice
Your choices will automatically be saved
You can now receive your reporting emails at your email address and track your performance.
If you are set up monthly
* You will recieve your emails on the first day of each month
If you are set up weekly
* You will recieve your emails every monday
# How to track custom conversion goals with Semji?
Source: https://help.semji.com/en/analyze-performance/how-to-track-custom-conversion-goals-with-semji
To view profits generated by "optimized-with-Semji" contents on specific conversions
### Why track custom conversion goals with Semji?
#### **To track the performance of your contents**
The Semji platform allows you to track a set of metrics (also called KPI - Key Primary Indicators) to **monitor the SEO performance** of your content. Among these key metrics, we find the organic traffic, which allows us to know the number of visitors to the site from the Google search engine, and we also find the conversions.
#### To prioritize your content optimization actions
Semji allows you to quickly see which content should be optimized first to get the maximum benefit with the minimum effort.
To do so, go to the Pages tab where your existing contents are listed.\
By clicking on "All Conversions" in the left side menu, you will find the Conversion Goals set up in Google Analytics (we will see how below).
Your existing contents are then sorted by Conversions Potential. The more colored circles, the more interesting the ratio "conversions gains / efforts to be made".
The same logic applies to the Transactions and Revenues sections (left column in the Opportunities section).
#### What is a conversion?
A conversion is the name given to **a high-value action in your marketing strategy**. This action is performed by your visitors. On a website, visitors are often prospects, potential customers. Some of the actions they perform on the site demonstrate a particular interest or commitment to your products or services. It can be very important for you to track these actions, to know where they come from, how many there are and to observe the general trend: are conversions increasing or decreasing? **This allows you to know if your marketing strategy is successful** and if your user journey is conclusive in order to transform a maximum of visitors into customers.
The ratio between the number of visitors and the number of conversions is called the conversion rate. **The conversion rate is also an indicator that you can track with Semji**. Discover all the KPIs you can track in your Reports tab!
#### What is a custom conversion goal?
To monitor conversions, you need a web analytics tool, like [Google Analytics](/en/connect-your-tools/how-to-connect-my-google-analytics) or [AT Internet](/en/connect-your-tools/how-to-connect-my-piano-analytics-account). You can thus visualize in the interface the number of conversions over a given period, and on a page or a set of pages.
In order to display the data you are interested in, your analytics tool requires you to define the nature of high-value actions, the so-called conversions. Is it a click on the "Submit" button after the visitor has filled out a form to request documentation or a quote? Is it the number of times an item was placed in the shopping cart? Where an order was placed?
Generally, we track several types of conversions, more or less engaging in the user's decision path. This makes it possible to **analyze and understand the stages during which the visitor leaves the path** and does not take action. We can then deduce what needs to be improved to remove the obstacles and help them make a decision.
For example:
*The visitor searches for "semantic cocoon" on Google. He clicks on a natural result and arrives on an advice article from an SEO content agency that defines what a semantic cocoon is. He reads it to the end and clicks on a button that encourages him to download a white paper on the subject.*
→ This download action is engaging: the visitor expresses an interest in cocoons and in the content provided by the company.
*If the visitor is convinced by the agency's expertise and wants to get in touch to get help with his marketing strategy, he goes to the contact page of the website and fills in a form to express his need.*
→ Here too, the contact request is very engaging. The visitor expresses his interest in the offered services. We assume that he is very advanced in his decision process and likely to take action (meaning that he is ready to pay to be helped on its SEO strategy).
These two actions can be defined in your web analytics tool as **conversion objectives**. These are actions you are trying to generate through your marketing strategy (SEO, content production...), and that **you will therefore need to monitor regularly**. Hence the term "objectives".
### How to define a custom conversion goal?
Google Analytics has documentation that allows you to set up custom conversions. Check it out for more details.
> [Documentation Google Analytics](https://support.google.com/analytics/topic/1007030?hl=fr\&ref_topic=1631741)
### How to track Custom conversions with Semji?
The content you create or optimize with Semji can have several objectives: to be read, but also to direct to a file to download, a contact page, to trigger a purchase, to make people click on an ad...
You therefore need to monitor these objectives **with a macro and micro view** of the content created. How many conversions did the content generate last month? But also, which content is the most relevant, the most effective to generate quote requests? Which content is most successful at driving downloads? In short, **did the content you wrote meet the objectives** you set?
### Setting up the data upload in Semji
*Note: for the moment, Semji manages the display of custom conversion goals that you have set up with Google Analytics. If your tracking tool is AT Internet, contact our team to know when Semji will be updated on the subject.*
Once your conversion objectives have been set up in Google Analytics, you must indicate them to Semji so that they appear in your Reports tabs.
To do so, go to the Settings of your workspace.
In Settings, click on “**Integrations**” :
Your data provider tools appear. Next to the [Google Analytics](/en/connect-your-tools/how-to-connect-my-google-analytics) property, which you must have connected beforehand, click on the "**Manage Goals**" button.
A pop-up appears: it allows you to select up to 3 conversion objectives.
Semji immediately recognizes the goals you have set in your Google Analytics account.
*Note: this feature is enabled for Universal Analytics users. We are currently integrating Google Analytics 4 into the platform.*
Save your selection. Come back at any time to select other priority conversion goals to monitor on your content.
### How to view custom conversions in Semji?
In Semji, you always have several ways to view the performance of your content. You can track custom conversion goals in a macro or micro way.
**Please note:** conversion goal data may **take several minutes to display** after you select it in the workspace settings. This delay may be due to the amount of content involved in retrieving this new conversion data and the ongoing load on our platform related to all users. If some of the global metrics start to appear, they may be out of sync with their actual configuration during this time. We suggest that you reanalyze them later.
### Conversions in the Reports tab
Choose the New Content or Updated Content view, then simply click on the **"Conversions" tab** of the main graph to see the conversions generated over the period, as a graph.
[](https://downloads.intercomcdn.com/i/o/317416944/a48184d2db335ff99d58c8a2/courbe-reports-conversions.png?expires=1619604000\&signature=82f7e184f9bc1c6f81738b07ad098f054be0d76614309ee2436bd93875ea197f)
Customize the conversions you want to see using the selection button :
The table below the graph allows you to **see in detail the number of monthly conversions** generated by each published content, as well as the evolution of conversions compared to the previous year.
[](https://downloads.intercomcdn.com/i/o/317417216/7998f528a530b23d78c9a0a4/tableau-contenus-conversions.PNG?expires=1619604000\&signature=eb5754d6d6f1a52e26411aa9a42c89567bdac72d06d81e436338ef0237cd9918)
You can sort the content in this table by clicking on a column heading. For example: classify the content in ascending order of conversions and identify those that do not generate enough conversions to re-optimize them or work on their UX.
On the other hand, identify the content with the best evolution compared to the previous year, and congratulate yourself!
### Conversions in the Content Performance tab
Go to the Planning tab and the Published sub-tab.
[](https://downloads.intercomcdn.com/i/o/317417335/60251a883d9a5c35d7fb0c95/planning-published.png?expires=1619604000\&signature=4ef5616bde0b7e81dc49907898c3626c06e1bffb09acb51d231ad758b923e443)
If necessary, search for your content using the search engine, symbolized by the magnifying glass at the top right. Click on the content you want to analyze in detail to enter the editor.
Once in the content editor, click on the Performance tab in the recommendations sidebar.
Select the **"Conversions" metric** to display the corresponding graph. Vary the analysis period as needed, as well as the granularity of the graph (to display more or less data).
**Remember:** the red dot on the timeline represents the publication date. This allows you to observe its previous performance and compare it to the post-optimization results - when it is an Updated Content.
By clicking on the three vertical dots to the right of the value, you can access a drop-down menu from which you can select one of your specific conversion objectives.
# SEO performance & reporting
Source: https://help.semji.com/en/analyze-performance/managing-your-seo-performance
Set your goals, analyze the impact of your production, and share your results through reports and exports.
* [Track engagement, conversions and revenue](/en/analyze-performance/guide-4-track-engagement-conversions-and-revenue)
* [Understanding the Performance of Each Acquisition Channel](/en/analyze-performance/guide-3-understanding-the-performance-of-each-acquisition-channel)
* [How to set up the sending of email reports?](/en/analyze-performance/how-to-set-up-the-sending-of-email-reports)
* [How to export data from the Performance tab?](/en/analyze-performance/how-to-export-data-from-the-performance-tab)
* [How to set the objectives of your SEO content strategy?](/en/analyze-performance/how-to-set-the-objectives-of-your-seo-content-strategy)
* [Analyze your SEO performance on Google](/en/analyze-performance/guide-2-analyze-your-seo-performance-on-google)
* [Measuring the impact of your content production](/en/analyze-performance/guide-1-measuring-impact-of-your-content-production)
# Analyze performance & competitors
Source: https://help.semji.com/en/analyze-performance/overview
Analyze the results of your optimized content with Semji's KPIs and dashboards.
Master Semji's KPIs to track your rankings, traffic, conversions, and content results.
Set your goals, analyze the impact of your production, and share your results through reports and exports.
Benchmark your visibility against competitors, on both search engines and AI answers, with Intelligence Hub.
# Track and analyze the performance of your content with Semji
Source: https://help.semji.com/en/analyze-performance/track-and-analyze-the-performance-of-your-content-with-semji
With Semji, centralize your SEO, traffic, and conversion data in a single dashboard.
### In summary
**What you can do:** Centralize the analysis of your content performance in a unified dashboard that aggregates your SEO, traffic and conversion data.
**For whom:** Anyone who wants to measure the real impact of their content production
**Why it's useful:** Stop switching between Google Analytics, Search Console and other tools. Get a clear view of your content ROI and actionable insights to optimize your strategy.
### What this changes for you
Gone are the days of wasting time manually reconstructing your performance data. With Semji, you have a single, consistent view of your content’s impact across all acquisition channels. This allows you to easily compare the effectiveness of your editorial investments and continuously showcase the value of your work.
**Semji's Performance section solves this equation** by centralizing all your essential metrics in an interface designed for content professionals. You can now visualize the impact of your publications, quickly identify your best-performing content, and have data-driven arguments to justify your editorial choices.
**Concrete result:** you spend less time searching for your data and more time using it to optimize your strategy. You can finally answer your management’s questions about the ROI of your content efforts with precision
### Understanding the dashboard structure in 3 levels
We designed the Performance dashboard according to an analytical funnel logic that naturally guides you towards the most relevant insights.
#### Level 1 - Main filters: What content are we talking about?
**First step: define your analysis scope.** You can choose to analyze:
* **"All content"**: Global view of your entire site to identify macro trends
* **"New content"**: Focus on your recent publications to measure the effectiveness of your fresh production
* **"Existing content"**: Performance of your already published pages, particularly useful after optimizations
This segmentation allows you to clearly distinguish the impact of your content creation strategy versus your optimization efforts.
#### Level 2 - Channel analysis: Where do your visitors come from?
**Second step: understand your performance sources.** The acquisition channel tabs reveal to you:
* **Organic search**: Performance of your content on Google, Bing, and other search engines
* **Paid**: Impact of your advertising campaigns on the discovery of your content
* **Social**: Engagement generated by your content on social networks
* **Direct**: Visitors who access your content directly (bookmarks, direct URL)
* **Referral**: Traffic coming from other websites that reference your content
* **AI search**: New channel to track traffic coming from AI search engines (ChatGPT, Perplexity, Gemini)
* **Other**: All traffic sources not classified in the previous categories
This multi-channel approach helps you optimize your investments by precisely identifying which marketing efforts generate the best results.
#### Level 3 - Detailed metrics: What do you want to analyze?
**Third step: zoom in on the metric that interests you.** The left menu gives you access to key indicators:
* **SEO**: Clicks, Impressions, Positions to evaluate your organic visibility
* **Engagement**: Sessions, Average Duration, Bounce Rate to understand your visitors' interest
* **Business**: Conversions, Revenue to measure the impact on your objectives
Each metric is broken down into temporal charts and detailed tables by page, allowing you to identify with precision your best-performing content.
### Your first steps: Guides to analyze your performance
We have structured your learning around 4 practical guides, each answering a specific business question:
[➡️ **Guide 1: Measure the impact of your content production**](/en/analyze-performance/guide-1-measuring-impact-of-your-content-production)\
Evaluate whether your publishing efforts are generating the expected results
➡️ **[Guide 2: Analyze your SEO performance on Google](/en/analyze-performance/guide-2-analyze-your-seo-performance-on-google)** \
Track your positions, clicks and optimize your organic visibility
➡️ **[Guide 3: Understand the performance of each acquisition channel](/en/analyze-performance/guide-3-understanding-the-performance-of-each-acquisition-channel)** \
Identify your most profitable traffic sources and optimize your marketing mix
➡️ **[Guide 4: Track engagement, conversions and revenue from your content](/en/analyze-performance/guide-4-track-engagement-conversions-and-revenue)** \
Measure the real business impact of your content strategy
[**➡️ Glossary of Performance Indicators in Semji**](/en/analyze-performance/glossary-of-performance-indicators-in-semji)\
*Find clear definitions of all key metrics (traffic, engagement, conversions, e‑commerce, SEO) to interpret results and prove content ROI in one place*
### Good to know:
> #### Technical prerequisites
>
> To fully leverage the features of the Performance section, make sure you have connected:
>
> * **Your analytics tool** ([Google Analytics 4](/en/connect-your-tools/how-to-connect-my-google-analytics), [Adobe Analytics](/en/connect-your-tools/why-and-how-to-connect-your-adobe-analytics), [Piano Analytics](/en/connect-your-tools/how-to-connect-my-piano-analytics-account), [Matomo](/en/connect-your-tools/why-and-how-to-connect-your-matomo)...): Essential for traffic, engagement and conversion data
> * [Google Search Console](/en/connect-your-tools/how-to-connect-my-google-search-console): Necessary for tracking positions and SEO performance
### Transform your data into actions
You now have all the keys to effectively navigate Semji's Performance section. **The logic is simple: always start with a precise business question** - for example "are my new SEO articles generating traffic?" - then use the 3 levels of the dashboard to progressively refine your analysis until you get a clear and actionable answer.
**We recommend starting with one of the 4 practical guides above** according to your current priority. Each guide accompanies you step-by-step with concrete use cases to transform your data into concrete optimizations of your content strategy.
Performance analysis thus becomes a pillar of your operational excellence: you know what works, why it works, and how to reproduce this success on a larger scale.
# Content performance
Source: https://help.semji.com/en/analyze-performance/understanding-performance-metrics
Master Semji's KPIs to track your rankings, traffic, conversions, and content results.
* [Glossary of Performance Indicators in Semji](/en/analyze-performance/glossary-of-performance-indicators-in-semji)
* [Track and analyze the performance of your content with Semji](/en/analyze-performance/track-and-analyze-the-performance-of-your-content-with-semji)
* [All about customizing the Performance tab](/en/analyze-performance/all-about-customizing-the-performance-tab)
* [Everything you need to know about Semji's Position Tracker](/en/analyze-performance/everything-you-need-to-know-about-semjis-position-tracker)
* [How to track custom conversion goals with Semji?](/en/analyze-performance/how-to-track-custom-conversion-goals-with-semji)
# All you need to know about SemjiBot
Source: https://help.semji.com/en/connect-your-tools/all-you-need-to-know-about-semjibot
To give Semji access to your content
### Why does Semji use a bot?
Semji uses a crawler, commonly called a bot (or crawler, web crawler, web spider) in order to analyze and extract the content of your website as well as the pages that rank for your keywords.
This bot, called SemjiBot, developed specifically for Semji's needs, **has to be authorized to visit your website to extract its content**, analyze it and show it within the platform.
If this is not possible, some of Semji's features will be restricted.
**Technical limitation:** If your website content is rendered in JavaScript, it will not be visible to SemjiBot. The content must be present in the DOM without JavaScript rendering to be accessible to the bot. This limitation is similar to that of other crawlers like ChatGPT's.
### When does SemjiBot access my website?
* As a client, SemjiBot accesses your site when you import one or more pages into the platform.
* SemjiBot comes back when you request a synchronization of your content.
* SemjiBot can also come back in other cases and at **different times of the week** in order to improve the performance of your content.
### How do I allow SemjiBot to browse my site?
#### Allow Semji's user agents
The SemjiBot identifies itself to the websites it visits using one of the following User-Agent strings:
* Mozilla/5.0 (compatible; SemjiBot/1.0; +[http://semji.com](http://semji.com))
* AppleWebKit/537.36 (KHTML, like Gecko; compatible; SemjiBot/1.0; +[http://semji.com](http://semji.com)) Chrome/W\.X.Y.Z Safari/537.36
In this context, `"Chrome/W.X.Y.Z"` is a placeholder that evolves with updates to the SemjiBot and may, for example, appear as `"Chrome/79.0.3945.88"`.
This information should be processed by your technical team, who can then explicitly authorize SemjiBot for website access.
#### Allow Semji's IP adresses
On the other hand, if you have the possibility to allow public IP addresses used by SemjiBot, here they are:
* 63.34.75.122
* 63.35.78.179
* 54.228.104.165
* 18.200.156.37
* 34.248.117.83
* 52.213.28.177
### Geolocated Redirects Management
#### SemjiBot Behavior Regarding Geolocated Redirects
The SemjiBot can detect 301 or 302 redirects when crawling your pages, which may sometimes be related to IP geolocation. These redirects may not be visible to you locally.
#### Why Does This Happen?
The SemjiBot uses IP addresses based in Europe (Ireland) and identifies itself with an accept-language header: `fr-FR`.\
If your site performs redirects based on IP geolocation, the bot may be redirected to a different version of your site (e.g., `https://site.com/page1` → `https://site.com/FR-intl/page1`).
#### Recommended Best Practices
To avoid indexing issues and ensure that the SemjiBot can access your content correctly:
**1. Avoid Redirects Based Solely on IP**
Google recommends not using automatic redirects based solely on IP geolocation.
These practices can harm your SEO and the indexing of your content.
\*\*2. Implement Proper Multilingual Management
\*\*It is crucial to implement proper multilingual management to ensure optimal indexing. Google recommends using hreflang tags to indicate the language versions of your pages and structuring your URLs by language or region. For more details on this approach, you can refer to [Google's official documentation on managing multi-regional and multilingual sites](https://developers.google.com/search/docs/specialty/international/managing-multi-regional-sites).
Here are some best practices to follow:
* Use **hreflang** tags to indicate the language versions of your pages.
* Create dedicated URL structures by language or region (e.g., `/fr/`, `/en/`).
* Offer a manual language selector for users.
**3. Maintain Universal Access**
Ensure that a default version of your site remains accessible without forced redirection.
Allow bots to crawl all of your content.
#### Impact on Your Semji Analysis
When the SemjiBot detects geolocated redirects:
* The URLs imported may differ from those you see locally.
* The analysis may focus on a different version of your content.
* Metrics may be affected if the bot cannot access the desired content.
#### Technical Recommendations
Before importing your pages into Semji, make sure your site:
* Does not automatically redirect based solely on IP.
* Allows bots to access all language versions.
* Correctly uses **hreflang** tags for international SEO.
> *Good to Know **💡:** Test access to your site from different locations or use crawl testing tools to ensure your content is universally accessible.*
#### Need Help?
If you notice unexpected redirects when importing your pages, contact our technical support. We can assist you in optimizing your setup to ensure optimal content analysis.
# Semji API: automate and integrate Semji into your workflows
Source: https://help.semji.com/en/connect-your-tools/api-semji
Control Semji from any external tool via the REST API. All technical documentation is available on the developer portal.
### At a glance
* **What you can do**: trigger analyses, manage the planning, generate and retrieve content via standard API calls
* **Who it's for**: high-volume SEO teams, developers, and no-code tool users (Make, Zapier, N8n)
* **Why it matters**: automate repetitive operations without going through the interface
### What changes for you
Without an API, every action in Semji required manual interaction in the interface. For teams managing large content volumes, this made any automation logic impossible.
The Semji API turns the platform into an engine you can plug into your stack: CMS, scripts, no-code tools, or external AI agents.
> **Good to know ℹ️**: API key generation is restricted to Admin and Owner roles. The key is generated from **Settings > Integrations > API**.
### What you'll get
The API exposes Semji's core services: planning, SEO analyses, content read/write, and keyword data. It is standard (REST, JSON, API key authentication) and compatible with any programming language or no-code tool.
### How to use it
#### 1) Generate your API key
In your Semji workspace, go to **Settings > Integrations > API** and click **"Generate API Key"**.
#### 2) Read the documentation
All technical documentation, code examples, and the quickstart guide are available right here, in the **API** tab at the top of this Help Center:
**👉 [API quickstart](/quickstart)**
#### Tips and best practices
Start with the **Quickstart**: it walks you through making your first API call in minutes, no advanced development skills needed.
> **Pro tip 💡**: actions performed via the API consume the same credits as actions in the interface — no extra cost.
### Go further
**Useful links:**
* Full API reference: [API Reference](/api-reference/overview)
* Webhooks: [Semji webhooks](/integrations/overview)
# Automate Your Content Publishing with Webhooks
Source: https://help.semji.com/en/connect-your-tools/automate-your-content-publishing-with-webhooks
Manually publishing your content can be time-consuming and tedious. Automate this process and send your articles directly to your CMS with just one click.
### What is a Webhook?
A **webhook** is a mechanism that allows one application to automatically send data to another when a specific event occurs.
In our case, when a piece of content is marked as published in **Semji**, a webhook sends its data (title, HTML content, Content Score, etc.) to your **CMS** or any other connected tool.
### **Why use a Webhook?**
✅ **Automated publishing** – No more copying and pasting articles into your CMS.
✅ **Seamless tool integration** – Automatically update **Google Sheets, Notion, Asana**, and more.
✅ **Time savings & error reduction** – Avoid repetitive manual tasks.
### **Available data**
### **Key fields:**
* `created_at`: Content creation date
* `due_date`: Due date (if applicable)
* `content_score`: SEO optimization score
* `html`: HTML content of the article
* `text`: Plain text content
* `title`: Title of the article
* `meta_description`: Meta description of the article
* `words_count`: Number of words in the article
* `assigned_to`: Assigned author (ID, first name, last name, email)
* `published_at`: Publication date
* `published_by`: Information about the person who published the article (ID, first name, last name, email)
* `content_status`: Content status
* `folder`: Folder where the article is stored (ID, name)
* `page`: Page details (ID, URL, source, etc.)
* `page_focus_keyword`: Primary keyword (term, search volume, position, etc.)
* `workspace`: Workspace information (ID, name, website URL, language)
* `organization`: Organization information (ID, name, creation date)
### **How to configure a Webhook in Semji?**
#### **1. Check Your CMS Compatibility**
There are two methods available:
* **CMS compatible with Make, Zapier, or N8n** – You can set up automation **without coding**.
* **CMS not compatible** – A developer will need to set up an **API endpoint** to receive the data from Semji and integrate it into your website.
#### **2. Create a Webhook in Semji**
1. **Go to Settings** – Navigate to the **General** tab in your workspace.
2. **Add a Webhook** – Click on “Add a Webhook.”
3. **Configure the URL** – Paste the **Webhook URL** generated by Make, Zapier, or your custom API.
4. **Test your Webhook** – Publish a test article to ensure that the data is successfully transmitted.
#### **3. Configure Integration with an Automation Tool (e.g., N8n)**
****
For example, if you use **N8n**, follow these key steps:
1. **Create a Workflow in N8n**
* Add a **Webhook Trigger**
* Configure the HTTP method as **POST**
* Copy the generated URL and paste it into **Semji**
2. **Retrieve Data from Semji**
* Extract essential details: **HTML content, title, meta description, publication date, etc.**
3. **Send Data to Your CMS**
* Check if the article already exists
* Create a **new article** or update an **existing article** in **WordPress** using the REST API (`/wp-json/wp/v2/posts`)
4. **Test and Activate Your Workflow**
* Publish an article in **Semji** and check if it appears in your CMS.
> **📌 Download our N8n workflow example for WordPress**: This file allows you to directly integrate automated publishing of your articles into WordPress.
>
> [👉N8N: Download now👈](https://drive.google.com/file/d/136_mfdhWA9dSwc4TJPvmbOUkOdCBwCzZ/view?usp=sharing)
>
> [👉Make : Download now👈](https://drive.google.com/file/d/1ZJMnbwcguYeOwIUw9pIRI2AQLN0Yy7QV/view?usp=sharing)
>
> If you’re not familiar with setting up webhooks on these platforms, refer to their official documentation:
>
> * [**N8n Webhook Documentation**](https://docs.n8n.io/integrations/builtin/core-nodes/n8n-nodes-base.webhook/)
> * [**Zapier Webhook Documentation**](https://zapier.com/help/create/code-webhooks)
> * [**Make Webhook Documentation**](https://www.make.com/en/help/integrations/webhooks)
### Example of JSON sent by Semji
Download Copy
`{ "data": { "created_at": "2025-05-22T12:37:29+00:00", "due_date": null, "content_score": 0.40853528911565, "html": "
AI Agents in 2025: Transforming Business Operations and Autonomous Decision-Making
AI agents represent a groundbreaking evolution in artificial intelligence technology. These autonomous software systems perceive their environment, make decisions, and take actions to achieve specific goals with minimal human intervention. From streamlining business operations to enhancing customer service, AI agents are transforming how organizations work in 2025. With advanced capabilities in reasoning, planning, and self-improvement, these intelligent systems are becoming essential tools for companies seeking to automate tasks and improve operational efficiency.
The Evolution of Intelligent Software Systems
Core Components of Modern AI Agents
[...]
How Autonomous Decision-Making Works
[...]
The Role of Machine Learning in Agent Development
[...]
Understanding Different Types of AI Agents
Simple Reflex Agents in Business Applications
[...]
Goal-Based Intelligent Systems
[...]
Learning Agents with Advanced Capabilities
[...]
Utility-Based Decision Making Platforms
[...]
Major Players Shaping the AI Agent Landscape
Microsoft's Copilot and Enterprise Solutions
[...]
Google's Advanced Agent Architecture
[...]
AWS Agent Development Tools
[...]
", "text": "AI Agents in 2025: Transforming Business Operations and Autonomous Decision-MakingAI agents represent a groundbreaking evolution in artificial intelligence technology. These autonomous software systems perceive their environment, make decisions, and take actions to achieve specific goals with minimal human intervention. From streamlining business operations to enhancing customer service, AI agents are transforming how organizations work in 2025. With advanced capabilities in reasoning, planning, and self-improvement, these intelligent systems are becoming essential tools for companies seeking to automate tasks and improve operational efficiency.The Evolution of Intelligent Software SystemsCore Components of Modern AI Agents[...]How Autonomous Decision-Making Works[...]The Role of Machine Learning in Agent Development[...]Understanding Different Types of AI AgentsSimple Reflex Agents in Business Applications[...]Goal-Based Intelligent Systems[...]Learning Agents with Advanced Capabilities[...]Utility-Based Decision Making Platforms[...]Major Players Shaping the AI Agent LandscapeMicrosoft's Copilot and Enterprise Solutions[...]Google's Advanced Agent Architecture[...]AWS Agent Development Tools[...]", "title": "AI Agents: Understanding Their Role and Impact", "meta_description": "AI agents autonomously perform tasks, enhance efficiency, and transform industries. Learn how they impact our world and drive innovation.", "words_count": 145, "assigned_to": { "id": "d63553ad1ec0", "created_at": "2020-12-11T09:57:09+00:00", "first_name": "Olivier", "last_name": "B", "email": "example@semji.com" }, "published_at": "2025-05-22T00:00:00+00:00", "published_by": { "id": "d63553ad1ec0", "created_at": "2020-12-11T09:57:09+00:00", "first_name": "Olivier", "last_name": "B", "email": "example@semji.com" }, "content_status": null, "folder": null, "page": { "id": "768c707ec3c6", "created_at": "2025-05-22T12:37:29+00:00", "url": "https://blog.overnetcity.com/agents", "is_existing_content": false, "source": "semji_content", "redirection_url": null, "last_status_code": null }, "page_focus_keyword": { "created_at": "2025-05-22T12:37:31+00:00", "keyword": "ai agents", "impressions": null, "clicks": null, "position": null, "ctr": null, "search_volume": 18100 }, "workspace": { "id": "17a22e3a934e", "name": "Blog Overnetcity", "website_url": "https://blog.overnetcity.com", "country_code": "US", "language_code": "en" }, "organization": { "id": "64cb7880383f", "name": "Olivier B - Custom", "created_at": "2022-03-23T13:12:12+00:00" } }, "event_type": "content_published", "occurred_at": "2025-05-22T12:47:36+00:00" }`
### **Other practical use cases**
* **Update a Google Sheets Dashboard**➡️ Automatically add each published article along with its SEO data (title, score, date, main keyword, etc.) to a Google Sheets file for easy tracking.
* **Create an Asana Task for Follow-up** ➡️ Every new published article automatically creates an Asana task to inform the marketing team that the content is ready for email campaigns, social media posts, etc.
* **Send a Slack / Microsoft Teams notification**➡️ Automatically notify your team when an article is published by sending a notification to Slack or Microsoft Teams, improving internal communication.
* **Automatically create a Tweet or LinkedIn post**➡️ Instantly share your newly published content on Twitter and LinkedIn to boost visibility and drive traffic to your website.
# CMS & publishing
Source: https://help.semji.com/en/connect-your-tools/cms-and-publishing
Connect WordPress, Drupal, Contentful, Strapi, Magento, or Shopify to send and publish your content without leaving Semji.
* [CMS Integration](/en/connect-your-tools/cms-integration)
* [CMS Publisher: publish your content to your CMS without leaving Semji](/en/connect-your-tools/cms-publisher)
* [WordPress integration: connect your CMS to publish from Semji](/en/connect-your-tools/integration-wordpress)
* [Drupal integration: connect your site to publish from Semji](/en/connect-your-tools/integration-drupal)
* [Magento integration: connect your CMS to publish from Semji](/en/connect-your-tools/integration-magento)
* [Shopify integration: connect your store to publish from Semji](/en/connect-your-tools/integration-shopify)
* [Contentful integration: connect your space to publish from Semji](/en/connect-your-tools/integration-contentful)
* [Strapi integration: connect your instance to publish from Semji](/en/connect-your-tools/integration-strapi)
* [Semji & your CMS](/en/connect-your-tools/semji-and-your-cms)
* [All you need to know about SemjiBot](/en/connect-your-tools/all-you-need-to-know-about-semjibot)
* [How can you easily exclude or include elements from your pages when extracting your content to Semji?](/en/connect-your-tools/how-can-you-easily-exclude-or-include-elements-from-your-pages-when-extracting-your-content-to-semji)
# CMS Integration
Source: https://help.semji.com/en/connect-your-tools/cms-integration
Connect WordPress, Drupal, Contentful, Strapi, Magento, or Shopify to send and publish your content without leaving Semji.
* [CMS Publisher: publish your content to your CMS without leaving Semji](/en/connect-your-tools/cms-publisher)
* [WordPress integration: connect your CMS to publish from Semji](/en/connect-your-tools/integration-wordpress)
* [Drupal integration: connect your site to publish from Semji](/en/connect-your-tools/integration-drupal)
* [Magento integration: connect your CMS to publish from Semji](/en/connect-your-tools/integration-magento)
* [Shopify integration: connect your store to publish from Semji](/en/connect-your-tools/integration-shopify)
* [Contentful integration: connect your space to publish from Semji](/en/connect-your-tools/integration-contentful)
* [Strapi integration: connect your instance to publish from Semji](/en/connect-your-tools/integration-strapi)
* [Custom MCP server: connect your own tools to Semji agents](/en/connect-your-tools/custom-mcp-server)
# CMS Publisher: publish your content to your CMS without leaving Semji
Source: https://help.semji.com/en/connect-your-tools/cms-publisher
A new agent connects your CMS to Semji and publishes your content straight from the editor, on your terms.
## At a glance
* **What you can do**: publish your content to your CMS straight from the Semji editor, with no copy-pasting.
* **Who it's for**: content managers, writers, and SEO project managers.
* **Why it helps**: the final step of your workflow, going live, becomes seamless and closes the loop from idea to publication.
## What changes for you
**Before**: publishing content produced in Semji meant copying it into your CMS by hand. That manual step ate into the time you saved upstream and added the risk of formatting mistakes or missed publications.
**Now**: your content lands directly in the right place, in the right format. You stay in control of going live: by default, the agent creates a draft in your CMS and only publishes when you explicitly ask it to.
| Before | With CMS Publisher |
| - | - |
| Manual copy-paste from Semji to your CMS | Direct publishing from the editor |
| Reformatting with every publication | Semji respects your CMS structure |
| Risk of a missed or mis-published page | Draft by default, go live on your request |
CMS Publisher is a new agent template. Like other Semji agents, it accepts custom instructions. Its core job is to set up the connection to your CMS and publish your content from the editor.
Connecting a CMS happens once, at the workspace level, and is done by a workspace owner. The connection is then shared with the whole team.
## What you will get
Once your CMS is connected and your agent is created, you have a publishing channel built into the editor:
* a CMS Publisher agent linked to your CMS,
* your content created as a draft directly in the CMS,
* a go-live triggered on your request, never automatically,
* a structure that's respected: your CMS content types, fields, categories, and tags.
## How to use it
A workspace owner opens Settings → Integrations, then the CMS tab, and clicks Connect next to their CMS. Four CMS platforms are supported, plus the option to plug in your own MCP server.
* **WordPress** (native): connects through the REST API with an application password. You provide the site URL, username, and application password. Compatible from WordPress 5.6.
* **Drupal** (native): connects through the JSON:API module and Basic Auth. You provide the site URL, username, and password. Compatible from Drupal 8.7.
* **Contentful**: one-click connection via OAuth, through Contentful's hosted MCP server. Nothing to copy, you simply sign in and approve access.
* **Strapi**: connects to your instance's MCP endpoint with an admin token. Compatible from Strapi 5.47.0.
WordPress and Drupal connect natively. Contentful and Strapi go through an MCP server.
Create an agent from the CMS Publisher template. You can add custom instructions, for example the target content type or formatting rules specific to your site.
From the editor, ask the agent to publish your content. By default, it creates a draft in your CMS, in the right format and the right place. Nothing goes live at this stage.
When you're ready, explicitly ask the agent to publish. The content then moves from draft to published in your CMS. Until you ask, it stays a draft.
## Usage tips
Use the agent's custom instructions to shape its behavior: default content type, categories, formatting rules. The agent then follows them on every publication.
Always review the draft in your CMS before going live. It's the best way to check the final rendering, images, and structure before you publish.
Managing several sites or content types? Create one CMS Publisher agent per context, each with its own instructions, to avoid reconfiguring things back and forth.
## Going further
CMS Publisher completes your production chain. Pair it with Atomic Content to generate optimized content, then publish it as a draft to your CMS without leaving the editor.
WordPress and Drupal are supported natively. Contentful and Strapi go through an MCP server, which must be reachable from the public internet and served over HTTPS. If a firewall or WAF (Cloudflare, Akamai, Sucuri) protects your site, it can block Semji's requests before they reach your CMS. This is the most common cause of failed connections.
**Useful links:**
* [WordPress integration](/en/connect-your-tools/integration-wordpress)
* [Drupal integration](/en/connect-your-tools/integration-drupal)
* [Magento integration](/en/connect-your-tools/integration-magento)
* [Shopify integration](/en/connect-your-tools/integration-shopify)
* [Contentful integration](/en/connect-your-tools/integration-contentful)
* [Strapi integration](/en/connect-your-tools/integration-strapi)
# Analytics & Search Console
Source: https://help.semji.com/en/connect-your-tools/connect-analytics-and-gsc
Connect your analytics tools and Search Console to centralize your traffic, ranking, and conversion data in Semji.
* [Why and how to connect my data sources to Semji?](/en/connect-your-tools/why-and-how-to-connect-my-data-sources-to-semji)
* [Why and how to connect your Google Analytics 4 account to Semji?](/en/connect-your-tools/how-to-connect-my-google-analytics)
* [How to connect my PIANO Analytics account?](/en/connect-your-tools/how-to-connect-my-piano-analytics-account)
* [Why and how to connect your Matomo](/en/connect-your-tools/why-and-how-to-connect-your-matomo)
* [Why and how to connect your Piwik Pro account?](/en/connect-your-tools/why-and-how-to-connect-your-piwik-pro)
* [Why and how to connect your Adobe Analytics](/en/connect-your-tools/why-and-how-to-connect-your-adobe-analytics)
* [How to plug in or change your Google Search Console?](/en/connect-your-tools/how-to-connect-my-google-search-console)
# Custom MCP server: connect your own tools to Semji agents
Source: https://help.semji.com/en/connect-your-tools/custom-mcp-server
Bring your own MCP server, like a custom CMS bridge or an internal tool, and let Semji's AI agents use its tools via OAuth or an API key.
## At a glance
* **What you can do**: connect any MCP server you host, such as a bridge to a custom CMS, an internal tool, or a third-party service, and let Semji's AI agents use its tools.
* **Who it's for**: workspace owners and the developers who run the MCP server.
* **How it works**: you register the server once for the workspace, connect it with OAuth or an API key, then enable it on the AI agents that should use its tools.
Beyond the built-in CMS integrations, this is the way to plug in anything Semji doesn't cover natively.
## Requirements for your MCP server
* Served over HTTPS and reachable from the public internet. Servers on private networks cannot be connected.
* Speaks the MCP streamable HTTP transport.
* **If you use OAuth**, the server must implement the MCP authorization specification:
* It advertises its protected-resource metadata (RFC 9728), either via a `WWW-Authenticate` header on unauthenticated requests or at `/.well-known/oauth-protected-resource`.
* Its authorization server publishes standard discovery metadata (RFC 8414 or OpenID Connect discovery).
* Its authorization server supports Dynamic Client Registration (RFC 7591). Semji registers itself automatically, manually pre-registered client IDs are not supported.
* It accepts the redirect URI `https://app.semji.com/integrations/mcp/callback`.
* **If you use an API key**, the server must accept it as `Authorization: Bearer ` on every request.
You must also be a workspace owner in Semji to add a server.
## How to add your MCP server
In Semji, open Settings → Integrations, go to the MCP tab, and click Add server. You must be a workspace owner.
Fill in the form:
* **Name**: a display name. Agents see it as the server's name.
* **Description**: optional.
* **URL**: the HTTPS URL of your MCP server, for example `https://mcp.example.com`. The URL cannot be changed after creation.
* **Authentication method**: OAuth (sign in through the provider's consent screen) or API key (paste a token). With API key, paste it into the API key field.
Click Connect.
* **OAuth**: a new tab opens on your provider's consent screen. Sign in and approve within 10 minutes.
* **API key**: the key is stored immediately, without a live test against your server.
Back on the MCP tab, the server row shows its status: Connected, Not connected, or Expired.
Open the agent's configuration, go to Enhancements → Custom MCP Servers, and toggle your server on. The agent discovers the server's tools at run time.
Depending on your Semji configuration, connections are shared by the whole workspace or made per user ("Each team member connects their own account."). With per-user connections, each teammate connects from the MCP tab or from their profile settings. Agents silently skip servers the current user hasn't connected, and the chat shows "You are not connected to …. Connect it to let this agent use it."
## Manage the server
From the MCP tab, each server row offers:
* **Connect / Disconnect**: manage the stored credentials.
* **Edit**: change the name and description. The URL is immutable, so to change it, delete the server and add it again.
* **Delete**: permanently removes the server from the workspace. Every connected member loses access.
## Firewalls and IP allowlisting
Your MCP server must be reachable from the public internet. Semji's own servers call it for connection and OAuth flows (discovery, client registration, token exchange).
Semji's servers reach the internet through a fixed set of outbound IP addresses. If a firewall, WAF, or anti-bot protection (Cloudflare, Akamai, Sucuri, …) sits in front of your site, it can block Semji's requests — typically with a `403 Forbidden` — before they ever reach your CMS, even when your credentials are correct.
Allow the following Semji IP addresses:
```text theme={null}
63.34.75.122
63.35.78.179
54.228.104.165
18.200.156.37
34.248.117.83
52.213.28.177
```
Do not restrict access to your MCP server to the IP list above alone. AI agent tool calls run from Semji's AI provider infrastructure, whose addresses are not fixed. Rely on OAuth or the API key for authentication, and use the IP list to exempt Semji from WAF or anti-bot challenges, not as an exclusive allowlist.
## Troubleshooting
Semji discovers your server's OAuth configuration live. Frequent causes, surfaced with explicit error messages:
* The server does not support Dynamic Client Registration (RFC 7591). Pre-registered clients are not supported.
* The protected-resource metadata is missing or declares no authorization servers.
* The authorization-server metadata lacks an `authorization_endpoint` or `token_endpoint`, or is not served over HTTPS.
* Discovery requests time out (10-second limit per request).
Allow popups for the Semji app domain and connect again.
The server's authorization stopped accepting Semji's stored credentials (for OAuth, the refresh token was rejected). Click Connect to re-authenticate. API-key servers ask for the key again.
* The server isn't enabled on the agent (Enhancements → Custom MCP Servers).
* The server isn't connected for the current user (per-user mode) or the workspace.
* The API key is wrong. It is stored without a live test, so a bad key only surfaces at run time.
* A firewall blocks tool calls (see the firewall section above).
Each URL can only be registered once per workspace. Reuse the existing server, or delete it first if you need to recreate it.
## Related
* [MCP: connect Claude or another AI assistant to Semji](/en/connect-your-tools/mcp): the reverse direction, use Semji's tools from Claude and other assistants.
* [CMS Publisher: publish your content to your CMS without leaving Semji](/en/connect-your-tools/cms-publisher)
# Everything you need to know about the Semji extension
Source: https://help.semji.com/en/connect-your-tools/everything-you-need-to-know-about-the-semji-chrome-extension
The extension allows you to access Semji's features and capabilities within your own tool, such as your CMS or online collaborative tool.
optional
❌
optional
✅
This extension is compatible with Chrome, but also with Edge, and installs in just a few steps from your browser's extension store.
### Why use the Semji extension?
The extension allows you to take advantage of Semji's features directly on your CMS or collaborative tool you work with.
This plugin adds to the use of the platform and cannot be used independently of it.
In a few clicks, you can directly access the recommendations adapted to the tool you are using.
The purpose of this extension is to adapt to your working process and to save you time.
> *Note: The extension is, by default, displayed on the right side of your screen. Now it is possible to move the extension within your screen to ensure better information display on your CMS or Notion. This feature is currently not available on Google Doc.*
What are the benefits of the extension?
The Semji extension allows you to overcome some of the limitations that the platform may have.
Time saving is essential, so here are the main benefits of the extension:
* The platform adapts to your workflow, it can be easily integrated with your CMS or any other collaborative tools. Find all the Semji recommendations;
* It saves time, it discreetly remains in the bottom right corner of your screen to quickly optimize your content;
* You no longer waste time copying and pasting, your optimizations are directly integrated into your CMS;
* You work on the text editor that suits you best;
* You can launch a real-time analysis of a page of your website by going directly to your website.
> *Note: The analysis launch only applies to the website that is attached to your Semji platform account.*

> *Note: Don't forget to assign a person in charge of assigning drafts but also in charge of "Marking them as published" in the Semji app to track the different KPIs provided in the platform!*
### Tools Compatible with the SEMJI Extension
#### CMS Platforms
Our extension is compatible with numerous CMS platforms. It easily integrates with your workflow, allowing you to save time by writing directly in your editor.
SEMJI's recommendations are automatically applied as you write within your CMS..
> Feel free to reach out to our team if you'd like to know the list of compatible CMS platforms.
#### Google docs
Our extension is compatible with the Google Docs text editor. You can easily integrate the recommendations directly within the editor.
> Note : You can ignore certain parts of your text and exclude them from SEMJI's content score analysis.
>
> \[semji\_ignore]
>
> Test to ignore
>
> \[/semji\_ignore]
>
> This tag can be used in Google Docs and certain CMS platforms.
>
>
#### Notion
Just like with Google Docs, our extension is also compatible with Notion.
### \*\*The different tabs of the extension
Planning Tab
\*\*
By clicking on the extension in the bottom right corner of your browser, the extension appears as a sidebar like in the Semji editor. If you have several workspaces, select the one you want to work on.
Different tabs will allow you to improve the SEO performance of your content:
* The **Planning** tab: Here you will find all the drafts that have been assigned to you as well as all the drafts in progress.

* You can directly edit them within your internal collaboration tools, your CMS. By clicking on the draft, you will access the list of Semji's recommendations. Find all the recommendations to optimize your content and get the best Content Score. It will save you time!
* By clicking on “Planning”, you will be redirected to the "Planning” tab of the platform to "Mark as published" the draft and start tracking your performance.

> Note: You can now create a draft directly from the extension.
#### *Here are the steps for working with content via the extension:*
**Setp 1: Click on the "Create Draft" button at the bottom left of the extension.**

**Step 2: Fill in all the information requested: the main keyword, the draft title, the person assigned, the deadline, the status, and even the file!**
**Step 3: Click on "Create", you can now start writing your new draft!**
**Step 4: Get the draft related to your keyword**
* Optimizations tab: Find all Semji recommendations in your CMS or collaborative tool. You can integrate them directly! You can easily add the Search Intentions and Questions recommendations to your content, using copy-and-paste to easily integrate them into the editor.

**Step 5: Upload your content using the "Upload" button to repatriate your optimization work directly into the platform editor.**
**Step 6: Once your content is online, you can "Mark as Published" it directly in the extension!**
> *Reminder: We prefer a* [*Content Score*](/en/create-optimize-and-publish/all-about-content-score) *of at least 75 to make sure your content is well optimized.*
#### Analyze Tab
* The Analyze tab: This tab makes it easy to launch analyses around a main keyword and obtain the associated recommendations.
**It can be used in several ways:**
* On the website associated with your Workspace: launch an analysis directly on one of your pages and obtain the Content Score for that page.
* You can also consult the history of keyword analyses.
> *Reminder: We prefer a* [*Content Score*](/en/create-optimize-and-publish/all-about-content-score) *of at least 75 to make sure your content is well optimized.*
#### Analyze Tab
> *Good to know: The "Analyze" tab allows you to quickly obtain a page's Content Score. If you optimize your content from this tab, you won't be able to upload it or "Mark as Published" it.*
* **AI Chat** tab : [Semji's AI Chat](/en/work-faster-with-ai/how-to-use-semjis-ai-chat) allows you to easily come up with new ideas for your articles but also help you with your social media posts and much more. The possibilities are endless!
You can now write your content directly in your CMS or collaboration tool and to become more efficient!
# Other integrations
Source: https://help.semji.com/en/connect-your-tools/extension-and-api
Extend Semji with the browser extension, the API, or MCP.
* [Everything you need to know about the Semji extension](/en/connect-your-tools/everything-you-need-to-know-about-the-semji-chrome-extension)
* [Semji API: automate and integrate Semji into your workflows](/en/connect-your-tools/api-semji)
* [MCP: connect Claude or another AI assistant to Semji](/en/connect-your-tools/mcp)
# How can I connect to Semji with my Google account?
Source: https://help.semji.com/en/connect-your-tools/how-can-i-connect-to-semji-with-my-google-account
So you don't have to remember a new password ;-)
Why connect to Semji with your Google account?
When you want to create an account on the Semji platform, you can decide to choose a login email associated with a password. You can also choose to connect to Semji using your Google account. This second option means you don't need to create a new password specifically for Semji. In this way, you centralize access to your various tools and software on the same email-password pair, which has the advantage of being particularly secure.
### How do I connect to Semji with my Google account?
####
Logging in for the first time
If you're logging in for the first time, you'll be asked to create an account. A "Connect with Google" button appears.
\
You are then invited to choose the associated Google Account (you can have more than one).
\
Once you've chosen the account you want, you'll be asked to confirm the association in a new window.
Congratulations, you've created your Semji account!
Reconnecting to Semji after registration
For all future use of Semji, you will be prompted to sign in using your Google account. You'll then be taken to a login screen, and a "Sign in with Google" button will appear.
####
#### I can't connect to Semji with my Google account. What should I do?
Are you getting an error message when trying to register or reconnect to Semji with your Google Account?
Please note that logging in with your Google Account may be blocked by **specific browser settings.**
Blocking third-party tools and data
#### The solution proposed by Google is as follows:
> *When enabled, this privacy feature disables all cookies and iframe storage, which is required by Google to securely authenticate the user.*
>
> *One solution is to ask users who have disabled third-party data to create an exception for [https://accounts.google.com](https://accounts.google.com) by adding accounts.google.com to the allowed domains. In Chrome, this is done in chrome: // settings / content / cookies.*
>
> *If this feature is enabled for many users (some companies apply this setting to all their employees), another workaround is to implement a server-side OAuth 2.0 flow*
**Private browsing with Chrome on iOs**
> Google Connection is currently not supported in private browsing mode on Chrome on iOS.
**Using Safari with Intelligent Tracking Prevention**
> This new feature in macOS High Sierra and iOS 11 disables third-party cookies every 24 hours, unless the user is interacting with one of the third-party domain pages. As the Google login library relies on cookies to securely authenticate the user, it will potentially detect that the user is logged out every 24 hours. The user must restart the login process to reactivate the cookies.
*(Source : [https://developers.google.com/](https://developers.google.com/))*\
\*\*\
If you encounter a problem outside these identified limits, don't hesitate to contact our teams on online chat!\*\*
# How can you easily exclude or include elements from your pages when extracting your content to Semji?
Source: https://help.semji.com/en/connect-your-tools/how-can-you-easily-exclude-or-include-elements-from-your-pages-when-extracting-your-content-to-semji
The objective of this mechanism is to improve the quality of your content extraction.
The content extractor allows Semji to efficiently integrate your articles directly into the Semji editor. We analyze your site's pages to extract the editorial content.
This successful retrieval of your content enables you to work efficiently with your texts in Semji.
This operation is carried out by Semji, but there may be errors in content retrieval. From now on, your technical teams can customize the extraction of your content using specific attributes to exclude or include parts of your content.
How do these attributes work?
These attributes are inserted directly into your HTML tags
To include elements, you need to specify the attribute: data-content-include
> *`
` children `
`*
To exclude elements, set the attribute: data-content-exclude
> *`
` children `
`*
> *Good to know: To ensure that these attributes work properly, they should be placed as close as possible to the element (HTML tag) you wish to include or exclude, so that the rule takes precedence over any other inclusion or exclusion rules you set up yourself.*
**Some examples of rules for excluding or including :**
**I want to exclude an item :**
> `
`
>
> Content to exclude
>
> `
`
**I would like to include an item :**
> `
`
>
> Content to include
>
> `
`
**I want to exclude an item that was previously included :**
> `
`
>
> `
` This paragraph `
`
>
> `
` The paragraph I wish to exclude.`
`
>
> `
`
>
> The `` element will be excluded.
**I would like to include an item that was previously excluded:**
> `
`
>
> `
`Paragraph that will be excluded `
`
>
> `
` The paragraph I want to keep.`
`
>
> `
`
>
> The `
` element will be retained.
> *Good to know: If an element contains both attributes (data-content-include and data-content-exclude), the exclusion takes precedence and the content is deleted.*
Your technical teams can now work autonomously to improve your content extractor.
# Why and how to connect your Google Analytics 4 account to Semji?
Source: https://help.semji.com/en/connect-your-tools/how-to-connect-my-google-analytics
To view the performance of your content in Semji
### Why track your content’s performance ?
In addition to helping you create and optimize your content, Semji lets you track your results and performance at a glance. The platform pulls various data from tools like Google Analytics and Search Console to display the performance of the content you're working on.
Without a connection to these analytics tools, you cannot track your KPIs (Key Performance Indicators) directly within your interface.
If you don't use [Google Analytics](/en/connect-your-tools/how-to-connect-my-google-analytics) but instead use [PIANO Analytics](/en/connect-your-tools/how-to-connect-my-piano-analytics-account), [Adobe Analytics](/en/connect-your-tools/why-and-how-to-connect-your-adobe-analytics), [Piwik Pro](/en/connect-your-tools/why-and-how-to-connect-your-piwik-pro), or [Matomo](/en/connect-your-tools/why-and-how-to-connect-your-matomo), don't worry! Semji is also compatible with these web analytics solutions.
### How to connect your Google Analytics 4 account?
#### **Step 1**
Go to the left-hand side menu, click on "Settings" and then click on "Workspace"
#### **Step 2**
In the Workspace Settings tabs, click on "Integrations"
#### **Step 3**
From this tab you can connect your web analytics tools. Click on the Google Analytics "Connect" button.
#### **Step 4**
Click on the confirm button and follow the step-by-step guide.
[](https://downloads.intercomcdn.com/i/o/223868386/4884ab4740355a6e05f8062a/connexion-GA-step1.PNG?expires=1619362800\&signature=7e2c9f0204120791d3d7f457d178549c3aa759713ce4c53944007eef2049a1b3)
#### **Step 5**
If you have more than one Google Account, a screen will ask you to select the one that manages the Google Analytics property you want to connect.
[](https://downloads.intercomcdn.com/i/o/223866440/5495196db2da0fab155b0bd0/selection-compte-Google.PNG?expires=1619362800\&signature=24d4eb1af7f201801d0dca587ec8f48ec5a7469bbf3812628089886de3bd39c2)
Then click on "Authorize" so that the Semji platform can retrieve the data.
[](https://downloads.intercomcdn.com/i/o/223866893/5ad0559113ee29f181cceb43/autorisation-connexion-GA-Semji.PNG?expires=1619362800\&signature=8ef1c04eb96025e49aa2c20de82805b0da114efa1350158b9e594a79d72f6c07)
> *Tip*: At this stage, you encounter a "Something went wrong" error message? This can happen if you are using an ad blocker plugin in your browser. Disable it temporarily and try again to allow Semji to connect to your Google Analytics account. If the error persists, please contact our teams directly on the online chat!
#### **Step 6**
Use the search bar to find the **Google Analytics account** you want to connect to Semji. Click on "next" at the bottom left of the page to go to the next step.
[](https://downloads.intercomcdn.com/i/o/223867144/6ddee9b5112e7511ede58d29/connexion-GA-step2.PNG?expires=1619362800\&signature=6f7534e15922796cc760850d815d7d82934a402c06d378b57c31c96abe0848f1)
#### **Step 7**
Use the search bar to find the Google Analytics view you want to connect to Semji. Click on "next" at the bottom left of the page to go to the next step.
[](https://downloads.intercomcdn.com/i/o/223867544/b89a4928b86b7c19d95a3fb4/connexion-GA-step3.PNG?expires=1619362800\&signature=a0db738dae28d621b7d681929a4c4a824433df2aa04cd989298f81a136e1a2b7)
> ***Tip:** make sure you choose a large view, preferably unfiltered, which will include the data you want to see in Semji (sessions, conversions, sales...) for each url you want to work on. The default configuration of Semji allows you to select organic traffic (from search engines) without the need to build a dedicated view.*
Your Google Analytics account is now connected to Semji! In the Semji interface dedicated to integrations, you can now see when you connected to Google Analytics (Connected) and when the last data synchronization was (Last Synced).
You'll notice a new button to the left of the "Disconnect" button: "Manage goals". This button allows you to set up the conversion goals you have defined in your Google Analytics account.
Find out [how to track these custom conversion goals](/en/analyze-performance/how-to-track-custom-conversion-goals-with-semji) in Semji!
# How to plug in or change your Google Search Console?
Source: https://help.semji.com/en/connect-your-tools/how-to-connect-my-google-search-console
To view the performance of your content in Semji
### Why connect Google Search Console?
Connecting Google Search Console to Semji allows you to:
1. **Monitor the performance of your content** within the platform: number of clicks from Google, position of the URL on its keywords, click rate, etc.
2. **Cross data to facilitate analysis and decision-making**. Google Search Console data is considered in the calculation of the Content Score, which allows you to estimate the level of optimization of your content. Search console data is also used in the calculation of the priority score, which allows you to identify which content to work on first. Thanks to Semji, you can also connect [Google Analytics](/en/connect-your-tools/how-to-connect-my-google-analytics) or [Piano Analytics](/en/connect-your-tools/how-to-connect-my-piano-analytics-account) data.
### How to connect Google Search Console?
#### **Step 1**
Go to the left sidebar menu, click on Settings -> Workspace
####
#### **Step 2**
Once you have access to your workspace settings, click on "Integrations".
#### **Step 3**
Here you can connect your web analytics tools. Most of the time, your Search Console is already connected because this operation was necessary to create your workspace.
Depending on the button that appears, click on the "Connect" button corresponding to Google Search Console to connect your property for the first time, or click on the "Disconnect" button to change the property that is connected to your workspace and replace it.
> **Tip**: If you don't have the right access to connect Search Console to other tools, such as the Semji application, you may need to ask a colleague with a higher level of access to help you. In this case, don't hesitate to ask them to grant you the same level of access or simply invite them to Semji to connect your Search Console property themselves.
>
> Here are the 3 possible levels of access in Google Search Console:
>
> * Owner: allows you to connect Search Console to Semji
> * Full access: allows you to connect Search Console to Semji
> * Limited Access: does NOT allow you to connect Search Console to Semji
#### **Step 4**
Continue by clicking on the "Connect Search Console" button
#### **Step 5**
Select the Google account linked to the Google Search Console property that you wish to connect. Then click "Allow" to allow Semji to access your data.
[](https://downloads.intercomcdn.com/i/o/223908804/fd12cdd2a69e869682f7ede4/autorisation-connexion-GA-Semji.PNG?expires=1619377200\&signature=85a5d9209acf38d46821e865f68e1aad61fb60739b081888cb3ee609908d7290)
#### **Step 6**
Use the search bar to find the Google Search Console property you want to connect to Semji. Click on "Activate" at the bottom left of the page to go to the next step.
#### **Step 7**
Your Google Search Console property is now connected to Semji! In the Semji interface dedicated to integrations, you can now see the date when you connected with Google Search Console (Connected) and when the last data synchronization was (Last Synced).
# How to connect my PIANO Analytics account?
Source: https://help.semji.com/en/connect-your-tools/how-to-connect-my-piano-analytics-account
To view the performance of your content in Semji
Integrate your analytics data into the platform. Find out how to connect your account and activate this feature.
### Why connect your PIANO Analytics account?
Piano Analytics is an advanced web analytics tool. It allows you to measure traffic and analyze the performance of a website or an application. In this regard, it is similar to other tools like [Google Analytics (UA, GA4)](/en/connect-your-tools/how-to-connect-my-google-analytics), [Matomo](/en/connect-your-tools/why-and-how-to-connect-your-matomo) or [Adobe Analytics](/en/connect-your-tools/why-and-how-to-connect-your-adobe-analytics).
In addition to helping you create and optimize your content, Semji helps you track your results and performance at a glance. The platform retrieves data from such tools, in order to display the performance of the worked contents.
*Without a connection to your statistical tools, you cannot follow your KPIs (Key Primary Indicators) directly in your interface.*
The advantages of using Piano Analytics with Semji :
* Easily upload your data to the platform
* Select your KPIs to track
* Take advantage of detailed reporting following the optimization of each content
[](https://downloads.intercomcdn.com/i/o/223902749/8213f318a3807b36ffd7d971/logo-AT-Internet.png?expires=1619362800\&signature=d8a32214853dff1f0fe78198a8d0af3c555d07c9ce7f12e33014931885230f6b)
### How to connect your PIANO Analytics account to Semji?
#### **1) Pre-requisites**
* **An PIANO Analytics API key**
Before starting, it is essential to have access to your API key on PIANO Analytics. This is what will allow Semji to access your data.
See here for all the information you need to generate your API key: [https://helpcentre.atinternet-solutions.com/hc/en-gb/articles/360013277119-API-Keys](https://helpcentre.atinternet-solutions.com/hc/en-gb/articles/360013277119-API-Keys)
Any questions? Contact your account manager at PIANO Analytics.
* **The Custom plan on Semji**
The PIANO Analytics connection feature is available with some Semji subscription packages. To benefit from it, contact the support or your Customer Success Manager.
* **An Owner Account**
In order to connect PIANO Analytics to Semji, you must have an Owner account. If necessary, contact your Semji Customer Success Manager to modify the access rights and status of your user account.
#### **2) Set up**
\*\*Step 1
\*\*Go to the left sidebar menu, click on Settings -> Workspace
####
**Step 2**
Once in the Workspace settings, click on "Integrations" then click on the "Connect" button in front of the PIANO Analytics logo
**Step 3**
Enter your "access key" and your "secret key" created from your PIANO Analytics account interface.
And that's it! You can track the performance of optimized content with the help of Semji.
### Where to view PIANO Analytics data in the Semji platform?
Once your PIANO Analytics account is connected to the Semji platform, you can view the traffic generated by each content in :
* The Overview tab
* The Performance tab
* The Performance tab accessible from the [editor](/en/create-optimize-and-publish/everything-you-need-to-know-about-the-semji-editor-and-its-features) of a content draft
You will find the same data from PIANO Analytics: it is displayed as a graph and the historic data is recovered.
# How to use the SSO connection via SAML?
Source: https://help.semji.com/en/connect-your-tools/how-to-use-the-sso-connection-via-saml
For a safe connection to Semji
### What is SSO via SAML?
SSO (Single Sign-On) enables a user with a login and password on a dedicated platform to authenticate on several other applications or websites using the same login and password. These third-party applications or sites only have access to a small part of the user's personal information and data.
Example: I connect to an application or e-commerce site using my Google or Facebook account.
SAML (Security Assertion Markup Language) is a standard created to describe and exchange secure information.
In this exchange of information via SAML, there are three parties:
* users
* entity providers
* service providers
The Identity Provider manages the identification of your users within your company or organization. It is the Identity Provider who chooses which information is transmitted to the Service Provider, and which is not.
The Service Provider is the publisher of the service provided to the user, such as the application or website. In your case, it's Semji.
### Why use SSO via SAML?
Some companies require their employees to use a SAML SSO mechanism for secure, single sign-on to the various web tools and platforms they use. This mechanism provides greater security for employee access to their online tools, and centralizes user management.
### Who can configure an organization's SSO?
In Semji, users with the role of Organization Admin can activate and configure SSO. Find out more about user roles
### How do I configure an SSO connection via SAML in Semji?
As an Admin user, log on to the Semji application:
* Click on your profile, then click on Settings
* Select Security in Organization settings to access the SAML SSO configuration screen.
Semji positions itself as a SAML service provider.\
Semji is configured so that only users with e-mail addresses belonging to domains linked to your organization can use SAML SSO authentication.
For example, if your organization is associated with the domain monsite.com :
* the address [utilisateur@monsite.com](mailto:utilisateur@monsite.com) will be able to log in
* the address [utilisateur@sous-domaine.monsite.com](mailto:utilisateur@sous-domaine.monsite.com) will not be able to connect using SSO
* the address [utilisateur@mon-autre-site.com](mailto:utilisateur@mon-autre-site.com) will not be able to connect with SSO
If you wish to add a new domain to your organization, please contact support.
#### **1. Setup your Identity Provider**
You need to configure your SAML identity provider to authenticate your users on the Semji application.
You must first configure how you will allow SSO connection via SAML to Semji:
* **Off** : only classic authentication is allowed
* **Optional** : your users will be able to choose either classic authentication or authentication via your SAML identity provider
* **Required for all members with an organization email address / Mandatory** : your users will only be able to authenticate to Semji through your identity provider
[](https://downloads.intercomcdn.com/i/o/223798694/5a38209ae29f6f230c8262e7/config-sso-fournisseur-id.png?expires=1619611200\&signature=67e5bb06d44fb5099c8ce0985335f8b4598ab73fc27c7eb492c47a6b76e7c6f4)
*Even with a mandatory SSO connection, users with the OWNER role on the organization will still be able to authenticate on Semji with their classic dedicated credentials. They will be able to administer the SAML configuration.*
Then, Semji provides you with two pieces of information, required when configuring your identity provider:
* the ACS URL of the service provider (**Semji ACS URL**),
* the Service Provider Entity Identifier (**Semji Entity Identifier**).
[](https://downloads.intercomcdn.com/i/o/223798771/a275d3c0abc358a31949a582/config-sso-fournisseur-id-2.png?expires=1619611200\&signature=3e5e5eb391190a8957696ec4cea8c5bc89bdc25301ffed5b7d262721e0670cbd)
**IMPORTANT** : When configuring your provider, you must **set it to use your users' email address as the primary identifier** (Name Identifier).
Some Identity Providers require the Service Provider to sign their requests when making authentication requests. If your Identity Provider requires this signature, you can enable Service Provider requests signature and copy the Service Provider's public key (**Semji Entity Provider X.509 certificate**) into your Identity Provider's configuration.
[](https://downloads.intercomcdn.com/i/o/235666245/7c928fc3cd4f7672aa516530/sso-enable-service-provider.PNG?expires=1619611200\&signature=2d1c3cfb3c6180d0d9f05aa06ca2bb3979d11c127fee2eb94f15855bce46b966)
#### **2. Setup Semji**
After configuring your Identity Provider, you must enter the following three pieces of information into Semji:
* the URL of the Identity Provider's Sign-in page **(URL)**,
* the Entity Identifier of the Identity Provider, (**Entity Identifier**),
* the public key of the Identity Provider certificate (**X.509 certificate**).
[](https://downloads.intercomcdn.com/i/o/223799559/c991b83e67bf105a715de6f9/config-sso-semji.PNG?expires=1619611200\&signature=476c5f14dbdd66d515a1a1381e37e9d784757f3099ddc81c02baba41f9de077a)
### **Does Semji support IdP-Initiated Login?**
No, Semji only supports **Service Provider Initiated** SSO authentication. This means that the login process must be started from Semji. **Identity Provider Initiated** logins (where a user clicks on an application from an IdP portal) are not supported.
### How do I connect to Semji via my SAML SSO?
1. Go to the Semji login page ([https://app.semji.com/login](https://app.semji.com/login))
2. Click on **Sign In with SAML SSO**, under the "Sign in" button
3\. Enter your email address, then click **Sign in**. Semji checks that the domain linked to your email is configured to use SAML authentication.
4\. If your company or organization's domain is set up correctly, you can authenticate using your identity provider. If you are not yet connected to this identity provider, a screen appears asking you to enter your login and password. You must enter your Identity Provider's credentials here, not your regular Semji credentials. Once entered, your authentication is done on Semji and you access your dashboard.
*Even authenticated with your identity provider, users must have an active account created on Semji to access the application.*
# Contentful integration: connect your space to publish from Semji
Source: https://help.semji.com/en/connect-your-tools/integration-contentful
Connect your Contentful space to Semji in one click. You connect to Contentful, approve the access, and you're done.
## At a glance
* **What you can do**: give Semji's agents read and update access to your Contentful content.
* **Who it's for**: workspace owners with a Contentful account.
* **Compatibility**: all Contentful versions.
The connection runs through Contentful's official hosted MCP server ([https://mcp.contentful.com/mcp](https://mcp.contentful.com/mcp)), over OAuth. With OAuth, you authorize Semji directly from Contentful, without ever copying or pasting a key.
To learn more about this server, see the Contentful MCP server documentation: [https://www.contentful.com/developers/docs/tools/mcp-server/](https://www.contentful.com/developers/docs/tools/mcp-server/)
## Prerequisites
* A Contentful account with access to the space you want Semji to work in.
* You are a workspace owner in Semji. The connection is shared with the whole workspace.
* A browser that allows popups from Semji. The Contentful sign-in screen opens in a new tab.
Availability of the Contentful integration depends on your Semji plan. If the Connect button opens an upgrade dialog instead, contact your account manager.
## How to connect Contentful
You must be a workspace owner, since the connection applies to the whole team.
In Semji, open Settings → Integrations, go to the CMS tab, and click Connect on the Contentful row.
Click Connect Contentful. A new tab opens on Contentful's sign-in and authorization screen.
Sign in with your Contentful account and approve the requested access. Do it within 10 minutes: after that, the attempt expires and you have to start over.
nothing to copy or configure on the Contentful side. All the authorization happens on this screen.
The tab closes and you land back in Semji, where the Contentful row now shows as connected for the whole workspace.
## What Semji can do once connected
The available actions come from Contentful's MCP server, typically reading and updating entries. Agents discover these actions as they use them.
Semji's publishing agents never delete content, even if the server offers a delete action.
## Manage or disconnect
From Settings → Integrations → CMS, the Contentful row offers Disconnect, which removes the access for the whole workspace. To switch Contentful accounts, disconnect, then reconnect with the other account.
## Network
The connection runs only between Semji and Contentful's cloud. Semji never calls your own infrastructure, so there's nothing to allow on your side for Contentful.
## Troubleshooting
Your browser prevented the Contentful tab from opening. Allow popups for the Semji domain, then click Connect Contentful again.
Start the connection again, and complete the authorization within 10 minutes of clicking Connect Contentful. The attempt works only once and expires after that.
The connection didn't go through. You may have denied the access, or the attempt expired. Click Connect Contentful and try again.
Contentful no longer accepts the stored access, and agents skip Contentful in the meantime. A workspace owner must reopen the integration and reconnect.
The connection was removed or expired. A workspace owner must reconnect Contentful under Settings → Integrations → CMS.
## Related
* [CMS Publisher: publish your content to your CMS without leaving Semji](/en/connect-your-tools/cms-publisher)
# Drupal integration: connect your site to publish from Semji
Source: https://help.semji.com/en/connect-your-tools/integration-drupal
Connect Drupal to publish from Semji without copy-pasting. You decide what agents can read, create, or modify.
## At a glance
* **What you can do**: give Semji's agents controlled access to your Drupal content.
* **Who it's for**: workspace owners and Drupal administrators.
* **Compatibility**: Drupal 8.7 and newer, the version that brought JSON:API into Drupal core.
## Prerequisites
* Drupal 8.7 or newer, live, public, and served over HTTPS.
* The JSON:API and HTTP Basic Authentication (basic\_auth) modules enabled. Both ship with Drupal.
* JSON:API set to read-write: check "Accept all JSON:API create, read, update, and delete operations" under `/admin/config/services/jsonapi`. It's read-only by default, which makes it the most common blocker.
* A Drupal account dedicated to Semji, with the permissions listed in [Permissions for the API account](#permissions-for-the-api-account). A plain editor role is not enough, see that section for why.
* To let agents write meta descriptions: the Metatag module, plus a Meta tags field on each content type concerned. See [Meta descriptions](#meta-descriptions).
* If a firewall, WAF, or anti-bot protection (Cloudflare, Akamai, Sucuri, …) sits in front of your site, it must allow Semji's IP addresses. See [Firewalls and IP allowlisting](#firewalls-and-ip-allowlisting).
* You are a workspace owner in Semji. The connection is shared with the whole workspace.
Availability of the Drupal integration depends on your Semji plan. If the Connect button opens an upgrade dialog instead of the connection form, contact your account manager.
## How to connect your Drupal site
Three settings to handle on the Drupal side before connecting Semji.
**Enable the modules.** On the modules page (Extend menu, /admin/modules), enable JSON:API and HTTP Basic Authentication. Both come with Drupal.
**Allow writing.** In Configuration → Web services → JSON:API (/admin/config/services/jsonapi), select "Accept all JSON:API create, read, update, and delete operations". Without this, Semji can read your content but cannot create or edit it.
**Create a role and an account for Semji.** Under People → Roles, create a role (e.g. Semji API) and grant it the permissions listed in [Permissions for the API account](#permissions-for-the-api-account). Then, under People (/admin/people), create a dedicated account, e.g. semji-api, with a strong password, and assign it that role.
Do not reuse a plain editor role: it lacks the permission Semji needs to set the publication status, and every write fails with a `403`.
**Add a Meta tags field, only if you want meta descriptions.** See [Meta descriptions](#meta-descriptions) for the full procedure.
If publishing fails, the first setting to check is almost always JSON:API's write permission.
You must be a workspace owner, since the connection applies to the whole team. In Semji, open Settings → Integrations, go to the CMS tab, and click Connect on the Drupal row.
Fill in the three fields:
* **Site URL**: your site's exact address over HTTPS, e.g. `https://your-site.com`. Enter the address your site actually uses: if it switches from example.com to [www.example.com](http://www.example.com), enter the www version. Semji does not follow redirects.
* **Username**: the Drupal login of the API account created in step 1.
* **Password**: that account's password.
Click Next. Semji tests the connection live by calling `GET /jsonapi` on your site and verifying that Drupal authenticates the account.
Choose what AI agents can do on your site. All three groups are enabled by default:
* **Read**: browse, read, and inspect the site's content and structure.
* **Write**: create and update content.
* **Delete**: delete content. Note that this action is irreversible.
Click Save. The Drupal row now shows as connected.
## Permissions for the API account
Grant these to the role you created for Semji. Replace `article` with each content type agents will work on.
| Permission | Why Semji needs it | Required |
| - | - | - |
| `access content` | Read published content | Always |
| `create article content` | Create new content | To create |
| `edit any article content` | Update content the account did not author | To update |
| `use text format basic_html` | Write the body in the text format Semji targets | Always |
| `administer nodes` | Set the publication status (draft vs published) | On content types without Content Moderation |
| Workflow transition permissions | Move content between moderation states | On content types with Content Moderation |
| `create terms in tags` | Match or create tags in the `tags` vocabulary | If agents attach tags |
| Paragraphs type permissions | Create the paragraphs of a component-based layout | If your site uses Paragraphs |
| `delete any article content` | Delete content | Only if you enable the Delete tool |
| `administer node fields` | Read the field definitions of your content types | Optional, see below |
**`administer nodes` is required on content types that do not use Content Moderation.** Semji always states the publication status explicitly, so content is never published by accident, and Drupal reserves writing the `status` field to that permission. Without it, every create and update fails with "The current user is not allowed to POST the selected field (status). The 'administer nodes' permission is required."
On a content type governed by Content Moderation, Semji writes the moderation state instead, so `administer nodes` is not needed. Grant the transition permissions of your workflow instead.
### About `administer node fields`
This one is optional but recommended. With it, Semji reads your content types' field definitions directly and knows exactly which field holds what. Without it, Semji falls back to inspecting an existing piece of content to infer the structure. That works, but it is less precise and needs at least one existing item per content type.
Drupal flags this permission as restricted, because the same permission also allows adding and deleting fields through the admin UI. If your security policy rules that out, leave it off: the integration works without it.
## Meta descriptions
Drupal core has no meta description field. Semji writes meta descriptions through the [Metatag](https://www.drupal.org/project/metatag) contributed module, which most Drupal SEO setups already use.
Install the module the way you normally install contributed modules, then enable it under Extend.
Go to Structure → Content types → your type → Manage fields → Create a new field, and pick the Meta tags field type. Any label and machine name work: Semji identifies the field by its type, not its name.
Once the field exists, pass the meta description to an agent like any other instruction ("write the meta description too"). Semji formats and stores it for you. On an update it merges into the tags already on the item, so a meta title you wrote by hand is preserved.
If a content type has no Meta tags field, agents write the content normally and tell you the meta description could not be saved. They never fall back to pasting it into the body.
## What Semji can do once connected
| Tool group | What it does |
| - | - |
| Read | List content types, spot their fields and text formats, list and read content as it's stored, for faithful edits |
| Write | Create and update content. New content is created as a draft, unless you explicitly ask an agent to publish. Existing tags are reused, new ones are created. Paragraphs-based layouts are supported |
| Delete | Permanently delete a piece of content. The agent always asks for confirmation first |
### Content defaults
Out of the box, Semji targets the `article` content type with the `basic_html` text format. On sites using Content Moderation, Semji writes the `published` and `draft` moderation states instead of the raw status field. Contact Semji support if your site needs different defaults (another content type, text format, or custom moderation state names).
## Manage or disconnect
From Settings → Integrations → CMS, the Drupal row offers:
* **Manage tools**: enable or disable each tool group.
* **Disconnect**: remove the integration for the whole workspace.
## Firewalls and IP allowlisting
Semji calls your site's JSON:API directly. If a firewall or protection like Cloudflare sits in front of your Drupal, it must let these calls through, or the connection fails.
Semji's servers reach the internet through a fixed set of outbound IP addresses. If a firewall, WAF, or anti-bot protection (Cloudflare, Akamai, Sucuri, …) sits in front of your site, it can block Semji's requests — typically with a `403 Forbidden` — before they ever reach your CMS, even when your credentials are correct.
Allow the following Semji IP addresses:
```text theme={null}
63.34.75.122
63.35.78.179
54.228.104.165
18.200.156.37
34.248.117.83
52.213.28.177
```
On Cloudflare, create a WAF custom rule with the Skip action, matching requests where the source IP is one of the addresses above and the path starts with `/jsonapi/`.
A firewall block looks just like a credentials error. When a protection layer answers "403 Forbidden" on /jsonapi, Semji shows an invalid-credentials error even though your username and password are correct. If you're sure of the credentials, check the firewall first.
## Troubleshooting
Drupal refused the connection. Possible causes: the username or password is wrong, the basic\_auth module isn't enabled (Drupal then treats the request as an anonymous visitor), or a firewall is blocking the request before it reaches Drupal.
Semji couldn't reach your site. The most common causes:
* The JSON:API module is disabled: /jsonapi returns a 404.
* The address redirects. Semji does not follow redirects, so enter the final address, for example the www version.
* The site is unreachable: a DNS problem, host down, or a non-public site.
* A firewall shows an anti-bot verification page that Semji can't get past.
* The site responds too slowly: the response must arrive within 10 seconds.
Publishing fails with a read-only error. An administrator must enable "Accept all JSON:API create, read, update, and delete operations" under /admin/config/services/jsonapi.
An agent reports a permission error. The account created for Semji lacks the needed rights on this content type. On Paragraphs sites, also check its Paragraphs permissions (Paragraphs Type Permissions for the API account).
Check whether the account has `administer nodes`. Drupal reserves writing the `status` field to that permission, and Semji always states the publication status explicitly, so an account without it fails on every create and update, even though reading works fine and the connection test passes. See [Permissions for the API account](#permissions-for-the-api-account).
If your site is in maintenance mode, Drupal answers `503` on `/jsonapi` for every account without the "Use the site in maintenance mode" permission, which the API account normally does not have. You can browse the site yourself because your admin session bypasses it. Turn maintenance mode off under Configuration → Development → Maintenance mode, or grant that permission to the Semji role.
Two distinct cases:
* No meta description field on this content type: install Metatag and add a Meta tags field, as described in [Meta descriptions](#meta-descriptions).
* Drupal accepted the write but stored nothing: Semji could not read your field definitions and guessed the wrong format. Grant `administer node fields` to the API account, or set that one meta description by hand.
In both cases the rest of the content is written normally.
* "Please enter a valid URL." The text you entered isn't a web address.
* "The site URL must start with https\://." HTTP sites cannot be connected.
* "The site URL points to a private or reserved address, which is not allowed." Local or internal sites are rejected, the site must be public.
## Related
* [CMS Publisher: publish your content to your CMS without leaving Semji](/en/connect-your-tools/cms-publisher)
* [Sync drafts to your CMS](/guides/sync-drafts-to-cms): API-based publishing flow, if you prefer to drive the sync yourself.
# Magento integration: connect your CMS to publish from Semji
Source: https://help.semji.com/en/connect-your-tools/integration-magento
Connect Magento to publish from Semji without copy-pasting. You decide what agents can read, create, or modify.
## At a glance
* **What you can do**: give Semji's agents controlled access to your Magento store's CMS pages, CMS blocks, product content, and category content.
* **Who it's for**: workspace owners and Magento administrators.
* **Compatibility**: Magento 2.4, Open Source and Adobe Commerce, self-hosted or on Adobe Commerce on cloud infrastructure (PaaS).
Semji connects to Magento through the REST Admin API, authenticating every request with an Integration access token sent as a Bearer credential.
## Prerequisites
* Magento 2.4.x, Open Source or Adobe Commerce, served over HTTPS with a certificate from a publicly-trusted authority, and reachable from the public internet. Private hostnames, self-signed certificates, and plain HTTP are rejected.
* A dedicated Integration created for Semji — never a personal admin user's token.
* The Integration's API permissions (Resource Access) granted as listed in [API permissions for the Integration](#api-permissions-for-the-integration) below.
* On Magento 2.4.4 and above: the setting "Allow OAuth Access Tokens to be used as standalone Bearer tokens" enabled. Without it, every request returns a 401 even with a valid token.
* If a firewall, WAF, or anti-bot protection (Fastly, Cloudflare, Akamai, …) sits in front of your store, it must allow Semji's IP addresses on the REST API path — see [Firewalls and IP allowlisting](#firewalls-and-ip-allowlisting).
* You are a workspace owner in Semji, since the connection applies to the whole team.
* Availability of the Magento integration depends on your Semji plan. If the Connect button opens an upgrade dialog instead of the connection form, contact your account manager.
Adobe Commerce as a Cloud Service — the newer SaaS offering that authenticates through Adobe IMS OAuth — isn't supported. The connector authenticates exclusively with an Integration access token used as a Bearer credential.
## API permissions for the Integration
On the Integration's API tab, with Resource Access set to Custom, tick the following checkboxes:
| Checkbox to tick | ACL resource | Why Semji needs it | Required |
| - | - | - | - |
| Stores → Settings → All Stores | `Magento_Backend::store` | List store views and their base URLs; validate the connection | Always |
| Stores → Attributes → Product | `Magento_Catalog::attributes_attributes` | Discover which product text fields exist before writing anything (read-only) | For product content |
| Content → Elements → Pages | `Magento_Cms::page` | Read and search CMS pages | For CMS pages |
| Content → Elements → Pages → Save Page | `Magento_Cms::save` | Create and update CMS pages | For CMS pages |
| Content → Elements → Blocks | `Magento_Cms::block` | Read, create, and update CMS blocks | For CMS blocks |
| Catalog → Inventory → Products | `Magento_Catalog::products` | Read and update product content | For product content |
| Catalog → Inventory → Categories | `Magento_Catalog::categories` | Read and update category content | For category content |
| Content → Elements → Pages → Delete Page | `Magento_Cms::page_delete` | Delete CMS pages | Only if you enable the Delete tool |
The product-attributes checkbox lives under Stores, not under Catalog. Stores → Attributes → Product and Catalog → Inventory → Products are two unrelated branches of the permission tree despite the similar names. Ticking the Catalog one without the Stores one breaks content-model discovery for products.
Save Page is a separate permission from Pages. Reading pages and writing pages are distinct ACL resources in Magento. Ticking the parent Pages checkbox selects its children automatically, but if you compose the selection checkbox by checkbox, don't skip Save Page — reads will work and every create or update will fail with a 401.
If the permissions look right but requests still return a 401, re-open the Integration, re-select the resources, and save again. A partially saved custom selection can leave the permission state inconsistent, and a clean re-save repairs it.
## How to connect your Magento store
In the Magento admin, go to System → Extensions → Integrations and click Add New Integration. Give it a recognizable name, for example Semji.
Don't reuse a personal admin account's token: a dedicated Integration can be scoped to exactly the permissions Semji needs, keeps working through admin account changes or offboarding, and can be revoked on its own without affecting any human user.
On the Integration's API tab, set Resource Access to Custom and tick every checkbox listed in [API permissions for the Integration](#api-permissions-for-the-integration) above. Setting Resource Access to All also works if your security policy allows it — you can narrow it down later.
Save, then click Activate on the Integration's row and approve the permission summary. Magento displays four credentials — Semji only needs the Access Token. Copy it.
Since Magento 2.4.4, the REST Admin API rejects Integration access tokens used as bare Bearer tokens unless the store explicitly opts in. Enable it under Stores → Configuration → Services → OAuth → Consumer Settings → "Allow OAuth Access Tokens to be used as standalone Bearer tokens", or via CLI:
```bash theme={null}
bin/magento config:set oauth/consumer/enable_integration_as_bearer 1
bin/magento cache:flush
```
A cache flush may be needed for the change to take effect.
You must be a workspace owner, since the connection applies to the whole team. In Semji, open Settings → Integrations, go to the CMS tab, and click Connect on the Magento row.
Fill in the two fields:
* **Store URL**: the canonical HTTPS base URL of your store, e.g. `https://your-store.com`. Semji does not follow redirects, so use the exact URL your store resolves to — www versus non-www matters.
* **Integration access token**: the Access Token you copied earlier.
Click Next. Semji tests the connection live against your store.
Choose what AI agents can do on your store. Every tool is enabled by default; you can disable any of them:
* **List store views**: read the store views and their base URLs.
* **Describe content model**: inspect the writable fields of pages, blocks, products, and categories.
* **List contents**: browse and search CMS pages, blocks, products, and categories.
* **Read contents**: retrieve a page, block, product, or category and its content.
* **Create & update content**: create and update CMS pages and blocks, update product and category content.
* **Delete content**: delete CMS pages and blocks.
Click Activate. The Magento row now shows as connected.
## What Semji can do once connected
| Content kind | Read | Create | Update | Notes |
| - | - | - | - | - |
| CMS pages | ✓ | ✓ | ✓ | New pages are created disabled (draft); publishing requires an explicit instruction |
| CMS blocks | ✓ | ✓ | ✓ | Same draft-first behavior as pages |
| Product content | ✓ | — | ✓ | Description and SEO fields, written as product attributes |
| Category content | ✓ | — | ✓ | The SEO text of category pages |
| Blog posts | ✓ | ✓ | ✓ | Only if your store has blog functionality enabled; see [Magento Blog](#magento-blog) |
A few guarantees built into the connector:
* **Products and categories are never created or deleted** — Semji only updates the content fields of entities that already exist.
* **Product and category edits go live immediately** (Magento has no draft state for them), so agents show the exact field-by-field change and wait for your explicit validation before writing.
* **Page and block updates are lossless.** Magento's save endpoints replace the whole entity, so Semji reads the current entity, merges only the fields the agent changed, and writes the full payload back — anything the agent didn't touch is preserved.
* **Deletion is never exposed to publishing agents.** Even with the Delete tool enabled, Semji's CMS Publisher agent deliberately isn't given access to it.
### Magento Blog
If your store has blog functionality enabled, Semji detects it automatically and exposes a separate set of tools for blog content, alongside the CMS pages, blocks, product, and category tools above:
* **List blog posts and taxonomies**: browse existing posts, categories, and tags.
* **Read a blog post**: retrieve its content.
* **Create & update blog posts**: write new posts as drafts, or update existing ones.
* **Delete a blog post**: only if you enable the Delete tool.
Blog posts follow the same draft-first behavior as CMS pages: agents create and update them as drafts, and publishing to your storefront requires an explicit instruction. If your store doesn't have blog functionality enabled, these tools simply don't appear — nothing else about the connection changes.
Magento content is per store view: the same page, product, or category can carry different content on each store view. Agents read your store views first and target an explicit one when you name a specific store, language, or locale, and product or category writes never target Magento's shared "all" scope — a [known Magento issue](https://github.com/magento/magento2/issues/11324) can silently reassign website associations on writes scoped to "all".
## Manage or disconnect
From Settings → Integrations → CMS, the Magento row offers:
* **Manage tools**: enable or disable each tool individually.
* **Disconnect**: remove the integration for the whole workspace.
## Firewalls and IP allowlisting
Semji's servers call your store's REST Admin API directly. If your store sits behind Fastly, Cloudflare, or another WAF, it must let these calls through, or the connection fails.
Semji's servers reach the internet through a fixed set of outbound IP addresses. If a firewall, WAF, or anti-bot protection (Cloudflare, Akamai, Sucuri, …) sits in front of your site, it can block Semji's requests — typically with a `403 Forbidden` — before they ever reach your CMS, even when your credentials are correct.
Allow the following Semji IP addresses:
```text theme={null}
63.34.75.122
63.35.78.179
54.228.104.165
18.200.156.37
34.248.117.83
52.213.28.177
```
Allow these addresses on the REST API path (`/rest/*`). On stores where the edge layer rate-limits or challenges API traffic, exempt Semji's addresses from those rules as well.
A WAF answering with an HTML challenge or a 403 on `/rest/*` makes Semji report a security-layer error even though your token and permissions are correct. If the credentials look right, check the firewall first.
## Troubleshooting
Magento returns the same 401 status for three different problems — check them in order:
1. **The token value is wrong.** Re-copy the Access Token from the Integration (System → Extensions → Integrations). Note that re-creating or re-authorizing an Integration generates a new token.
2. **On Magento 2.4.4+, the Bearer setting is off.** Enable "Allow OAuth Access Tokens to be used as standalone Bearer tokens" and flush the cache.
3. **The Integration lacks API permissions.** Magento answers 401 with "The consumer isn't authorized to access %resources", naming the missing ACL resource. Grant every checkbox in [API permissions for the Integration](#api-permissions-for-the-integration), save again, and retry.
A quick way to tell cases 1–2 apart from case 3: if some REST endpoints respond with the token while others return 401, the token and the Bearer setting are fine — the remaining 401s are missing permissions.
`GET /rest/all/V1/store/websites` returned a 404. Frequent causes:
* The store URL is wrong or points to a specific store-view path. Enter the bare base URL of the store.
* The URL redirects. Semji follows no redirects: if `https://example.com` redirects to `https://www.example.com`, enter the www URL.
* A reverse proxy in front of Magento strips or blocks the `/rest` path.
The response came from a WAF or anti-bot layer (a 403, or a non-JSON challenge page) instead of Magento. Allow Semji's IP addresses on `/rest/*` — see [Firewalls and IP allowlisting](#firewalls-and-ip-allowlisting).
* DNS failure or host down.
* The store is too slow — responses must arrive within 10 seconds.
* The URL points to a private or reserved address — localhost and private-network hosts are rejected, the store must be publicly reachable.
The token authenticates, but the Integration lacks the ACL resource for that specific action — for example, pages can be read but not saved (missing Save Page), or products can't be listed (missing Catalog → Inventory → Products). Grant the corresponding checkbox from [API permissions for the Integration](#api-permissions-for-the-integration) and save the Integration again.
That's Magento's behavior, not a bug: products and categories have no draft state, so every write is live on the storefront. Semji's agents show the exact diff and require your explicit validation before each product or category write for this reason. CMS pages and blocks, in contrast, are created as drafts.
* "Please enter a valid URL." The value doesn't parse as a URL.
* "The store URL must start with https\://." HTTP stores can't be connected.
* "The store URL points to a private or reserved address, which is not allowed." The store must be publicly reachable.
## Related
* [CMS Publisher: publish your content to your CMS without leaving Semji](/en/connect-your-tools/cms-publisher)
# Shopify integration: connect your store to publish from Semji
Source: https://help.semji.com/en/connect-your-tools/integration-shopify
Connect Shopify to Semji with a Dev Dashboard app so agents can read, update and translate blog posts, pages, collections and products.
Semji connects to Shopify through the **GraphQL Admin API**, with an app you
create for Semji in your store's **Shopify Dev Dashboard**. You give Semji the
app's **Client ID** and **Client secret**: Semji exchanges them for an Admin
API access token valid 24 hours (Shopify's client credentials grant) and
renews it on its own. Once connected, Semji's AI agents can work on **blog
posts**, **pages**, **collection descriptions**, and **product pages**, in
every language enabled on your store.
Compatible with **all Shopify plans**.
## Prerequisites
* Your store's **myshopify.com domain** (e.g. `your-store.myshopify.com`).
Semji also accepts the store handle alone (`your-store`) or your admin URL
(`https://admin.shopify.com/store/your-store`). Your public domain
(`www.your-store.com`) is **not** accepted.
* Access to your Shopify admin as the **store owner**, or as staff allowed to
develop apps. Collaborator accounts cannot open the Dev Dashboard.
* An app created for Semji **from your store's own Shopify admin**, see
[Step 1](#step-1-create-the-semji-app-in-the-dev-dashboard). Shopify only
lets an app request tokens for stores of its own organization: an app
created in an agency's or partner's organization cannot be used.
* You are a **workspace owner** in Semji. The connection is shared with the
whole workspace, and a workspace connects one Shopify store.
Availability of the Shopify integration depends on your Semji plan. If the
integration does not appear in **Settings → Integrations**, or opens an
upgrade dialog instead of the connection form, contact your account manager.
Since January 1, 2026, Shopify no longer lets you create custom apps
directly in the Shopify admin, and Semji does not take a static Admin API
access token (`shpat_…`). Create the app in the Dev Dashboard as described
below, even if your store still has an older custom app.
## Step 1: Create the Semji app in the Dev Dashboard
In your Shopify admin, go to **Settings → Apps → Develop apps** and click
**Build apps in Dev Dashboard**. Shopify documents this path for apps used
on your own store. The connection requires the app and the store to belong
to the same Shopify organization.
In the Dev Dashboard, open **Apps** and click **Create app**. In the
**Start from Dev Dashboard** section, give it a recognizable name (e.g.
*Semji*), and click **Create**.
On the app's **Versions** page:
* **Scopes** (in the **Access** section): enter the seven scopes listed
in [Access scopes for the app](#access-scopes-for-the-app):
```text theme={null}
read_content,write_content,read_products,write_products,read_translations,write_translations,read_locales
```
* **App URL**: Semji does not use it. If the field is empty, enter
`https://shopify.dev/apps/default-app-home`.
* **Webhooks API version**: any version (Semji uses no webhooks).
Click **Release**, then **Release** again to confirm (the version name
and message are optional). Scopes only apply once the version is
released.
Open the app's **Installs** card, click **Install app**, select your
store, and click **Install**.
Open the app's **Settings** and copy the **Client ID** and the **Client
secret** from the **Credentials** section. Treat the secret like a
password: share it only through the Semji connection form.
Shopify never displays an Admin API access token for a Dev Dashboard app.
There is nothing else to copy: Semji requests its own token with the Client
ID and the Client secret.
## Access scopes for the app
Enter all of the following scopes on the app's version:
| Scope | Why Semji needs it | Required |
| - | - | - |
| `read_content` | Read blogs, blog posts and pages | Always |
| `write_content` | Create, update and delete blog posts and pages, including their SEO title and description | Always |
| `read_products` | Read products and collections (Shopify protects collections behind the product scopes) | Always |
| `write_products` | Update the content and SEO fields of products and collections | Always |
| `read_translations` | Read the existing translations of your content | Always |
| `write_translations` | Register translations | Always |
| `read_locales` | Read the languages enabled on your store | Always |
**All seven scopes are required, even if you plan to disable some tools.**
Semji checks the scopes granted to the app when you connect and refuses the
connection if one of them is missing.
**Changing the scopes later:** add them to a new version of the app and
release it. For a store of your own organization, releasing the version
approves the change. If the error persists, reinstall the app on
the store from its **Installs** card, then try again.
## Step 2: Connect from Semji
In Semji, go to **Settings → Integrations**, find **Shopify** among the
**CMS** integrations and click **Enable**. If Semji opens the Shopify
page first, click **Enable** there.
Fill in the three fields:
* **Store domain**: your myshopify.com domain, e.g.
`your-store.myshopify.com` (the handle alone or your admin URL also
work, your public domain does not).
* **Client ID**: copied in Step 1.
* **Client secret**: copied in Step 1.
Click **Next**. Semji tests the connection live: it requests an access
token from your store with the Client ID and the Client secret, checks
the scopes granted to the app, and reads your store's name and primary
domain. Nothing is written to your store.
Choose what AI agents can do on your store. Every tool is enabled by
default; you can disable any of them:
* **Describe content model**: inspect the languages and writable fields
of pages, collections and products.
* **List contents**: browse and search pages, collections and products.
* **Read content**: retrieve a page, collection or product and its
content.
* **Create & update content**: create and update pages and products,
update collection content.
* **Delete content**: delete pages (destructive).
* **Describe blog model**: inspect the blogs, tags, languages and
writable fields of blog posts.
* **List blog posts**: browse and search blog posts.
* **Read blog post**: retrieve a blog post and its content.
* **Create & update blog posts**: create and update blog posts (drafts
by default).
* **Delete blog post**: delete blog posts (destructive).
* **Register translations**: register the translation of an entry for
a store language.
Click **Connect**. Semji verifies the credentials one more time, then
saves the connection. Shopify now shows as **Enabled**.
## What Semji can do once connected
| Content kind | Read | Create | Update | Delete | Translate | Notes |
| - | - | - | - | - | - | - |
| Blog posts | ✓ | ✓ | ✓ | ✓ | ✓ | New posts are created as **drafts** in the blog you choose |
| Pages | ✓ | ✓ | ✓ | ✓ | ✓ | New pages are created as **drafts** |
| Collections | ✓ | ✗ | ✓ | ✗ | ✓ | Description, SEO title and description, title, handle, template suffix |
| Products | ✓ | ✓ | ✓ | ✗ | ✓ | New products are created as **drafts** with their content only: description, SEO title and description, title, handle, template suffix |
A few guarantees built into the connector:
* **Collections are never created or deleted, products are never
deleted.** A product created by Semji is a **draft** holding its title,
description, handle and search engine listing only: set its price,
inventory, variants and sales channels in Shopify before making it
active.
* **A product's price, inventory, tags and vendor are never written, and its
status is never changed.**
* **New blog posts and pages are drafts** until you ask an agent to publish
them, and a published post or page is never switched back to draft.
* **Some edits go live immediately**: any update to an active product, a
collection, or an already published blog post or page (Shopify keeps no
draft revision), and any translation in a published language. The CMS
Publisher agent tells you the change will be visible at once and waits for
your explicit approval before writing.
* **Updates are partial**: only the fields the agent changes are written,
everything else keeps its current value.
* **Changing a handle redirects the old URL** to the new one.
* **Deletion is limited to blog posts and pages**, and agents ask for your
explicit confirmation of the exact entry before deleting it.
### Languages and translations
* Translations are registered **on the original entry**, for one of the
languages enabled on your store (**Settings → Languages** in Shopify),
never as a separate copy per language. Semji writes translations through Shopify's Admin API.
* The target language must be **enabled** on your store and cannot be its
**primary** language.
* A translation in a **published** language is live immediately. In a
language that is enabled but not published yet, it stays invisible to
buyers until you publish the language.
* Translatable fields: title, content, excerpt (blog posts), SEO title and
description, and handle.
* When the original entry changes, Shopify flags its translations as
outdated; agents see that flag when they read the entry.
## Manage or disconnect
In **Settings → Integrations**, open Shopify:
* **Manage tools**: enable or disable each tool individually.
* **Disable**: removes the connection for the whole workspace. It does not
uninstall the app from your store: uninstall it from your Shopify admin
(**Settings → Apps**) if you no longer need it.
The store domain, the Client ID and the Client secret cannot be edited in
Semji. To connect another store or to change the credentials, disable the
integration and connect again (the tool selection is reset).
**Rotating the Client secret:** in the Dev Dashboard, open the app's
**Settings**, click **Rotate** next to the Client secret and generate a new
secret. Disable the Shopify integration in Semji and connect again with the
new secret (choose the tools again: the selection is not kept), then revoke
the old secret in the Dev Dashboard. Revoking the old secret first breaks
the connection until you reconnect.
## Network and firewalls
Semji only calls Shopify's Admin API on your store's `myshopify.com` domain,
which Shopify hosts. Your storefront's public domain is never called (Semji
only uses it to build links to your content), so a firewall, WAF, or
Cloudflare rule in front of your storefront does not affect the connection,
and there is no IP address to allow.
## Troubleshooting
Shopify refused to issue an access token. Check, in order:
1. **The Client ID or the Client secret is wrong**: copy both again from
the app's **Settings** in the Dev Dashboard. If the secret was
rotated, use the new one.
2. **The app is not installed on the store**: open the app's
**Installs** card in the Dev Dashboard and install it on your store.
3. **The app belongs to another organization**: an app created in an
agency's or partner's organization cannot request tokens for your
store. Create the app from your own Shopify admin (**Settings → Apps
→ Develop apps → Build apps in Dev Dashboard**) as described in
[Step 1](#step-1-create-the-semji-app-in-the-dev-dashboard).
The app's released version lacks at least one of the seven scopes. Add
the missing scopes to a new version of the app, release it, and try
again. If the error persists, reinstall the app on the store from its
**Installs** card. See [Access scopes for the app](#access-scopes-for-the-app).
* **The store domain is your public domain** (e.g. `www.your-store.com`):
enter your `your-store.myshopify.com` domain instead.
* **The store domain is malformed**: a store handle only contains
lowercase letters, digits, and dashes.
* **Shopify returned a temporary error**: wait a minute and try again.
No store exists with this handle. Check the spelling of your
`myshopify.com` domain: it can differ from your store's name or public
domain.
Shopify answered that the store cannot serve API requests, for example a
store frozen for an unpaid bill, or a locked store. Check the store's
status in your Shopify admin, then try again.
The request did not reach Shopify (unknown domain, network error, or
timeout). Check the store domain and try again a bit later.
A workspace connects a single Shopify store. Disable the current Shopify
integration first, then connect the new store.
If you just reinstalled the app or released a new version, ask the agent
again: Semji requests a new token after the first refused request.
Otherwise, the connection worked but Shopify now refuses the requests.
Frequent causes: the app was uninstalled from the store, its Client secret was
rotated or revoked, or its scopes changed. Reinstall the app or release
the missing scopes, and if the secret changed, disable the integration
and connect again with the new secret.
Translations can only target a language enabled on your store. Add the
language under **Settings → Languages** in your Shopify admin, then ask
the agent again.
That is Shopify's behavior, not a bug: collections, active products, and
published blog posts and pages have no draft revision, so every update is
live on the storefront. For this reason, Semji's CMS Publisher agent warns
you and asks for your approval before such a write. New blog posts, pages
and products, in contrast, are created as drafts, and a draft product
stays hidden until you make it active.
## Related
* [Sync drafts to your CMS](/guides/sync-drafts-to-cms): API-based
publishing flow, if you prefer to drive the sync yourself.
# Strapi integration: connect your instance to publish from Semji
Source: https://help.semji.com/en/connect-your-tools/integration-strapi
Connect Strapi to publish from Semji without copy-pasting. You decide what agents can read, create, or modify.
## At a glance
* **What you can do**: give Semji's agents read and update access to your Strapi content.
* **Who it's for**: workspace owners and Strapi administrators.
* **Compatibility**: Strapi 5.47.0 and newer.
Strapi is self-hosted on your side. Semji connects to the MCP endpoint your instance exposes and sends an admin token to authenticate every request. Semji uses Strapi's built-in MCP server.
To enable it on your instance, see the Strapi MCP server documentation: [https://docs.strapi.io/cms/features/strapi-mcp-server](https://docs.strapi.io/cms/features/strapi-mcp-server)
## Prerequisites
* A Strapi 5.47.0 or newer instance that exposes its MCP endpoint.
* The endpoint served over HTTPS, reachable from the public internet, at a URL ending in /mcp (for example [https://your-cms.example.com/mcp](https://your-cms.example.com/mcp)).
* An admin token for that endpoint, created as described in the Strapi MCP server documentation. Semji sends it as Authorization: Bearer `` on every request.
* You are a workspace owner in Semji. The connection is shared with the whole workspace.
Availability of the Strapi integration depends on your Semji plan. If the Connect button opens an upgrade dialog instead, contact your account manager.
## How to connect your Strapi instance
In Semji, open Settings → Integrations, go to the CMS tab, and click Connect on the Strapi row.
Fill in the two fields:
* **MCP server URL**: your Strapi MCP endpoint, for example [https://your-cms.example.com/mcp](https://your-cms.example.com/mcp). It must use HTTPS and end with /mcp.
* **Admin token**: the token from your Strapi instance.
Click Connect. The Strapi row now shows as connected for the whole workspace.
\[Suggested screenshot: the Strapi connection form in Semji, with the MCP server URL and Admin token fields filled in and the Connect button]
Semji does not test the token or the endpoint when you connect. A mistyped token or an unreachable URL still shows as "Connected". Verify it works by asking an agent to list content from Strapi. If it reports that no Strapi tools are available, or an authentication error, reconnect with a corrected token, or set up the connection again with the right URL.
## What Semji can do once connected
The available actions come from your Strapi MCP endpoint, typically reading and updating content. Agents discover these actions as they use them.
Semji's publishing agents never delete content, even if your instance offers a delete action.
## Manage or disconnect
From Settings → Integrations → CMS, the Strapi row offers Disconnect, which clears the stored token for the whole workspace. Reconnecting asks for the token again.
The MCP server URL cannot be edited in place. To change it, disconnect, then set up the connection again with the new URL.
## Network and IP allowlisting
Your Strapi MCP endpoint must be reachable from the public internet.
Semji reaches the internet through a fixed set of outbound IP addresses. If a firewall or protection like Cloudflare sits in front of your site, it can block Semji's requests, usually with a "403 Forbidden", before they ever reach your CMS, even when your credentials are correct.
Semji's servers reach the internet through a fixed set of outbound IP addresses. If a firewall, WAF, or anti-bot protection (Cloudflare, Akamai, Sucuri, …) sits in front of your site, it can block Semji's requests — typically with a `403 Forbidden` — before they ever reach your CMS, even when your credentials are correct.
Allow the following Semji IP addresses:
```text theme={null}
63.34.75.122
63.35.78.179
54.228.104.165
18.200.156.37
34.248.117.83
52.213.28.177
```
Do not restrict access to your MCP endpoint to this IP list alone. AI agent tool calls run from Semji's AI provider infrastructure, whose addresses are not fixed. Rely on the admin token for authentication, and use the IP list to exempt Semji from a firewall's anti-bot checks, not as an exclusive allowlist.
## Troubleshooting
Enter the full MCP endpoint URL, not your Strapi root URL, for example [https://your-cms.example.com/mcp](https://your-cms.example.com/mcp).
The connector could not be created. Check that the URL starts with https\://, that the same URL is not already connected in this workspace, and that you are a workspace owner.
The token could not be stored. Make sure it isn't empty, then try again.
The stored token is wrong or revoked, or the endpoint is unreachable or blocked by a firewall. Check that the endpoint answers at its URL, review your firewall (see the network section), then disconnect and reconnect with a valid token.
## Related
* [CMS Publisher: publish your content to your CMS without leaving Semji](/en/connect-your-tools/cms-publisher)
# WordPress integration: connect your CMS to publish from Semji
Source: https://help.semji.com/en/connect-your-tools/integration-wordpress
Connect WordPress to publish from Semji without copy-pasting. You decide what agents can read, create, or modify.
## At a glance
* **What you can do**: give Semji's agents controlled access to your WordPress content: posts, pages, and custom post types, with taxonomies, ACF fields, and SEO titles and meta descriptions (Yoast SEO, Rank Math, or SEOPress).
* **Who it's for**: workspace owners and WordPress administrators.
* **Compatibility**: WordPress 5.6 and newer.
## Prerequisites
* WordPress 5.6 or newer. Application passwords, which are used for the connection, have existed since this version.
* A live, public site served over HTTPS. A local or internal-network site cannot be connected.
* The WordPress REST API reachable. It's on by default, but a security plugin may have disabled it.
* A WordPress account allowed to manage posts, Author role at minimum. Choose Editor if agents should be able to update posts written by others.
* If a firewall, WAF, or anti-bot protection (Cloudflare, Akamai, Sucuri, …) sits in front of your site, it must allow Semji's IP addresses. See [Firewalls, Cloudflare, and IP allowlisting](#firewalls-cloudflare-and-ip-allowlisting).
* You are a workspace owner in Semji. The connection is shared with the whole workspace.
Availability of the WordPress integration depends on your Semji plan. If the Connect button opens an upgrade dialog instead of the connection form, contact your account manager.
## How to connect your WordPress site
An application password is a dedicated password WordPress generates for an outside service, here Semji. It's tied only to this connection, and you can revoke it at any time without touching the account's normal password.
In wp-admin, open the account Semji will use, via Users → Profile or Users → All Users. Scroll down to the Application Passwords section, enter a name such as Semji, and click Add New Application Password.
WordPress shows this password only once, in the form `xxxx xxxx xxxx xxxx xxxx xxxx`. Copy it right away. You can paste it into Semji with or without the spaces.
Don't see the Application Passwords section? That's because your site isn't on HTTPS, is running a WordPress version older than 5.6, or a security plugin has disabled the feature.
You must be a workspace owner, since the connection applies to the whole team. In Semji, open Settings → Integrations, go to the CMS tab, and click Connect on the WordPress row.
Fill in the three fields:
* **Site URL**: your site's exact address over HTTPS, e.g. `https://your-site.com`. Enter the address your site actually uses: if it switches from example.com to [www.example.com](http://www.example.com), enter the www version. Semji does not follow redirects.
* **Email or username**: the WordPress login or email address of the user who owns the application password. WordPress accepts either: it matches the username first, then falls back to the email address.
* **Application password**: the one generated in the previous step.
Click Next. Semji tests the connection live by calling `GET /wp-json/wp/v2/users/me` on your site with these credentials, and detects which SEO plugin your site runs.
Choose what AI agents can do on your site. All six tools are enabled by default: Create posts, Read posts, List post types, List posts, List taxonomy terms, and Update posts. You can change this selection at any time later.
Update posts also covers the SEO title and meta description, which may need a prerequisite configuration on your WordPress site depending on your SEO plugin. See [Enable SEO title and meta description updates](#enable-seo-title-and-meta-description-updates). And if your content types use ACF fields, expose them to the REST API so agents can read and fill them. See [Expose ACF fields to Semji](#expose-acf-fields-to-semji).
Click Save. The WordPress row now shows as connected.
## What Semji can do once connected
| Tool | What it does |
| - | - |
| List post types | Discover the site's content types (built-in posts and pages plus custom post types like FAQ or news) with the taxonomies attached to each, so agents publish in the right place |
| List posts | Search and list posts of any content type, with status filters and pagination |
| Read posts | Fetch a post's full content: raw editor source, SEO title and meta description, taxonomy terms, and ACF fields when the site exposes them |
| Create posts | Create new posts on any content type, always as a draft unless you explicitly ask an agent to publish, with categories, tags, custom taxonomy terms, and ACF fields |
| Update posts | Update only the fields you change: title, content, status, slug, featured image, categories, tags, custom taxonomy terms, ACF fields, SEO title, and meta description. The SEO fields go through your SEO plugin and may require a [prerequisite configuration](#enable-seo-title-and-meta-description-updates) |
| List taxonomy terms | Search and list the terms of any taxonomy (categories with their hierarchy, tags, or custom taxonomies like authors or thematics), so agents resolve term names to IDs before filing an article |
## Supported SEO plugins
Semji detects your SEO plugin automatically. There is no provider to pick. Detection reads the namespaces advertised by your REST API index (`/wp-json/`), and falls back to inspecting the SEO fields exposed on your posts when a security plugin filters the index. The SEO title and meta description are then read and written through the detected plugin's own fields:
| SEO plugin | SEO title field | Meta description field |
| - | - | - |
| Yoast SEO | `_yoast_wpseo_title` | `_yoast_wpseo_metadesc` |
| Rank Math | `rank_math_title` | `rank_math_description` |
| SEOPress | `_seopress_titles_title` | `_seopress_titles_desc` |
**All in One SEO is not supported.** It stores its metadata in a custom database table instead of standard post fields, so it cannot be updated through the WordPress REST API. On AIOSEO sites, SEO updates report an explicit warning while the rest of the post update still applies. Everything else in the integration works normally.
If several SEO plugins are active at the same time (typically during a migration), Semji picks the first supported one in this order: Yoast SEO, then Rank Math, then SEOPress. Deactivate the plugin you no longer use so updates target the one that actually renders your pages.
## Enable SEO title and meta description updates
Whether a prerequisite is needed depends on your SEO plugin and its version:
* **Yoast SEO 28.1 and newer**: nothing to do. Recent Yoast versions expose their SEO title and meta description fields to the REST API out of the box, and Semji can update them right away.
* **Older Yoast SEO, Rank Math, and SEOPress**: these store the SEO title and meta description in protected custom fields that the REST API does not accept writes on by default. A small PHP snippet must register the fields with the REST API first.
There are two equivalent ways to install the snippet: entirely from the WordPress admin with a snippet plugin (no server access needed), or as a must-use plugin file dropped on the server. Pick one. The same snippet covers all three supported SEO plugins and every public post type (posts, pages, and custom post types alike), so it keeps working if you later switch SEO plugins or add content types.
Writes remain protected by WordPress permissions: only users allowed to edit posts (the `edit_posts` capability) can modify the fields. That is the same permission level as editing the post itself.
Use a snippet plugin such as [Code Snippets](https://wordpress.org/plugins/code-snippets/). It stores the code in the database and runs it on every load, so nothing touches the server's filesystem.
In wp-admin, go to Plugins → Add New Plugin, search for Code Snippets, then install and activate it.
In the new Snippets menu, click Add New, give the snippet a name such as `Semji SEO fields REST support`, and paste the code below. It starts without the opening ` ['_yoast_wpseo_title', '_yoast_wpseo_metadesc'],
'RANK_MATH_VERSION' => ['rank_math_title', 'rank_math_description'],
'SEOPRESS_VERSION' => ['_seopress_titles_title', '_seopress_titles_desc'],
];
foreach ($seo_meta_keys_by_plugin_constant as $plugin_constant => $seo_meta_keys) {
if (!defined($plugin_constant)) {
continue;
}
foreach (get_post_types(['public' => true], 'names') as $post_type) {
foreach ($seo_meta_keys as $meta_key) {
register_post_meta($post_type, $meta_key, [
'type' => 'string',
'single' => true,
'show_in_rest' => true,
'auth_callback' => static function () {
return current_user_can('edit_posts');
},
]);
}
}
}
}, 20);
```
The snippet detects which of the three plugins is active and only registers that plugin's fields, so it keeps working if you later switch SEO plugins.
Keep the scope on Run snippet everywhere. REST API requests must load it too, so do not restrict it to the admin area. Then click Save Changes and Activate.
Deactivating the snippet removes the capability.
A must-use plugin is a single PHP file dropped into `wp-content/mu-plugins/`. WordPress loads must-use plugins automatically: there is nothing to activate, and removing the file removes the capability.
On your server, create the directory `wp-content/mu-plugins/` if it does not exist yet, then create a file named `semji-seo-fields.php` inside it.
```php semji-seo-fields.php theme={null}
['_yoast_wpseo_title', '_yoast_wpseo_metadesc'],
'RANK_MATH_VERSION' => ['rank_math_title', 'rank_math_description'],
'SEOPRESS_VERSION' => ['_seopress_titles_title', '_seopress_titles_desc'],
];
foreach ($seo_meta_keys_by_plugin_constant as $plugin_constant => $seo_meta_keys) {
if (!defined($plugin_constant)) {
continue;
}
foreach (get_post_types(['public' => true], 'names') as $post_type) {
foreach ($seo_meta_keys as $meta_key) {
register_post_meta($post_type, $meta_key, [
'type' => 'string',
'single' => true,
'show_in_rest' => true,
'auth_callback' => static function () {
return current_user_can('edit_posts');
},
]);
}
}
}
}, 20);
```
### Verify the fields are exposed
Whichever option you chose, call your REST API with the same credentials Semji uses, on any post ID, checking your plugin's meta description field (here Rank Math, swap in the field from the [table above](#supported-seo-plugins) for Yoast SEO or SEOPress):
```bash theme={null}
curl -s -u 'USERNAME:APP_PASSWORD' \
'https://your-site.com/wp-json/wp/v2/posts/123' | jq '.meta.rank_math_description'
```
A string, even an empty one (`""`), means the field is exposed and Semji can update it. `null` means the code is not running yet.
Without this prerequisite configuration, the SEO part of an Update posts call is skipped. The rest of the post update still applies, and the agent receives an explicit warning naming your SEO plugin and the missing field. Agents will tell you the field is not exposed rather than pretend the update succeeded. Everything else in the integration works normally.
## Expose ACF fields to Semji
Many WordPress sites structure their content with [Advanced Custom Fields](https://www.advancedcustomfields.com/) (ACF), for example a FAQ custom post type whose question and answer live in dedicated fields rather than in the post body. Semji's agents handle those fields natively: Read posts returns a post's ACF values, and Create posts and Update posts fill them.
This only works for fields visible through the REST API, and **ACF does not expose field groups by default**. Out of the box the `acf` key is absent from your site's REST responses, so agents cannot see the fields, let alone fill them, and will tell you so during a publication.
Unlike the SEO fields above, no PHP snippet is needed: ACF (free and Pro, version 5.11 or newer) ships native REST API support behind a single setting. The Secure Custom Fields fork offers the same setting.
### Enable "Show in REST API" on the field group
The setting lives on the field group, not on each individual field:
In wp-admin, go to ACF → Field Groups and open the group attached to your content type (e.g. FAQ).
In the field group's Settings panel, turn on Show in REST API, then save the group.
Do the same for every field group agents should be able to read and fill.
For a custom post type, the type itself must also be visible in the REST API, otherwise agents cannot even list it. If it was created through ACF's Post Types UI, enable Show in REST API in the post type's Advanced settings. If it is registered in code, pass `'show_in_rest' => true` to `register_post_type()`.
### Verify the ACF fields are exposed
Call your REST API with the same credentials Semji uses, on any existing item. Swap `faq` for the rest base of your content type (`posts` for built-in posts):
```bash theme={null}
curl -s -u 'USERNAME:APP_PASSWORD' \
'https://your-site.com/wp-json/wp/v2/faq/123' | jq '.acf'
```
An object listing your fields, even with empty values, means they are exposed and agents can read and fill them. `null` means the field group is not exposed yet.
### Help agents fill the fields correctly
The REST API carries only field names and values. The labels and instructions you see in wp-admin stay invisible to agents. Agents discover a type's fields by reading an existing item, so a few habits make the fills reliable:
* **Use descriptive field names.** An agent understands `answer_short`, it can only guess at `field_2`.
* **Keep at least one well-filled item** of each content type. Agents read it to learn which field holds what, and the expected value shape (plain text vs HTML, media ID for an image field, …).
* **Brief the agent.** When field names are ambiguous, say what each field is for in your instructions, and the agent will map its content accordingly.
## Manage or disconnect
From Settings → Integrations → CMS, the WordPress row offers:
* **Manage tools**: enable or disable each of the six tools.
* **Disconnect**: remove the integration for the whole workspace.
## Firewalls, Cloudflare, and IP allowlisting
Semji calls your site's REST API directly. If a firewall or protection like Cloudflare sits in front of your WordPress, it must let these calls through, or the connection fails.
Semji's servers reach the internet through a fixed set of outbound IP addresses. If a firewall, WAF, or anti-bot protection (Cloudflare, Akamai, Sucuri, …) sits in front of your site, it can block Semji's requests — typically with a `403 Forbidden` — before they ever reach your CMS, even when your credentials are correct.
Allow the following Semji IP addresses:
```text theme={null}
63.34.75.122
63.35.78.179
54.228.104.165
18.200.156.37
34.248.117.83
52.213.28.177
```
On Cloudflare, create a WAF custom rule with the Skip action, matching requests where the source IP is one of the addresses above and the path starts with `/wp-json/`.
A firewall block looks just like a credentials error. When a protection layer answers "403 Forbidden" on `/wp-json/`, Semji shows an invalid-credentials error even though your username and password are correct. If you're sure of the credentials, check the firewall first.
## Troubleshooting
Your site answered `401` or `403`. Possible causes: the login (email or username) or application password is wrong or was revoked, application passwords are disabled on the site, or a firewall (Cloudflare, Wordfence) is blocking Semji before it even reaches WordPress. See the firewall section.
Semji couldn't reach your site. The most common causes:
* The address redirects. Semji does not follow redirects, so enter the final address, for example the www version or the https version.
* The REST API isn't reachable: `/wp-json/` returns a 404, often because of a plugin or a permalink setting.
* The site is unreachable: a DNS problem, host down, or a non-public site.
* The site responds too slowly: the response must arrive within 10 seconds.
* "Please enter a valid URL." The text you entered isn't a web address.
* "The site URL must start with https\://." HTTP sites cannot be connected.
* "The site URL points to a private or reserved address, which is not allowed." Local or internal sites are rejected, the site must be public.
* "WordPress authentication failed. Please check the credentials in the integration settings." The application password was revoked or changed since connection. Reconnect with a fresh one.
* "No WordPress integration configured for this workspace." The integration was disconnected. A workspace owner must reconnect it.
* "The post was updated, but its SEO metadata was NOT: no supported SEO plugin (Yoast SEO, Rank Math or SEOPress) was detected…" Semji found none of the three on the site. Activate one of them, or if one is already active, apply the [prerequisite configuration](#enable-seo-title-and-meta-description-updates) so its fields are visible through the REST API.
* "The SEO metadata was NOT saved: this WordPress site runs … but does not expose its … field(s) for writing through the REST API…" The site does not accept REST API writes on your SEO plugin's fields yet. Apply the prerequisite configuration described in [Enable SEO title and meta description updates](#enable-seo-title-and-meta-description-updates). The rest of the post update was applied.
The field group is not exposed to the REST API, so the `acf` key is absent from your site's REST responses and agents cannot read or write those fields. Enable Show in REST API on the field group. See [Expose ACF fields to Semji](#expose-acf-fields-to-semji). If the content type itself does not show up when the agent lists post types, the post type also needs to be visible in the REST API (same section).
## Related
* [CMS Publisher: publish your content to your CMS without leaving Semji](/en/connect-your-tools/cms-publisher)
* [Sync drafts to your CMS](/guides/sync-drafts-to-cms): API-based publishing flow, if you prefer to drive the sync yourself.
# MCP: connect Claude or another AI assistant to Semji
Source: https://help.semji.com/en/connect-your-tools/mcp
Connect Claude or any other MCP-compatible assistant to your Semji account, and drive your planning, SEO and GEO analyses, and AI generations in plain language.
## At a glance
* **What you can do**: talk to an MCP-compatible AI assistant, such as Claude, in plain language to drive your planning, run SEO and GEO analyses, generate content, and publish, without leaving the assistant.
* **Who it's for**: content managers, SEO project leads, and any team that already uses an AI assistant day to day.
* **Why it matters**: no code, no exports to manage. The assistant works directly on your real Semji data, within your existing access rights.
## What changes for you
**Before**: every action, creating a draft, running an analysis, generating or publishing content, meant opening Semji and navigating to the right screen.
**Now**: you ask your AI assistant in a single sentence, and it acts directly in Semji: it reads your planning, runs analyses, generates drafts, and publishes, all from a plain conversation.
The assistant only ever sees and changes data in the Semji account you sign in with. Its scope follows your existing access rights on your workspaces exactly.
## What you will get
Once connected, your assistant can:
* **Manage your editorial planning**: explore and filter your content, create drafts in bulk from a list of keywords or URLs, organize them into folders, and set owners, statuses, and due dates.
* **Analyze SEO and AI visibility**: set a focus keyword on a piece of content, run the analysis, and get optimization recommendations for Google Search as well as AI answers (Google AI Overview, ChatGPT).
* **Generate and optimize with AI**: launch AI generation or optimization on one or many drafts, follow progress, review the result, and publish once you are happy with it.
* **Stay in context**: pull in your workspaces, team, brand voices, and account status (including remaining credits) so it acts with the right information.
Once connected, talk to your assistant the way you would to a teammate:
* *"List the drafts in my Spanish market workspace that don't have a focus keyword yet."*
* *"Create drafts for these 10 keywords in my US market workspace and start the SEO analysis on each."*
* *"Run the SEO and AI-visibility analysis on my draft about 'content marketing tools' and summarize what I should improve."*
* *"Generate an optimized version of these three drafts, then publish them once I approve."*
* *"How much AI Writing credit do I have left?"*
## How to use it
In Claude Desktop or on claude.ai, go to **Settings** then **Connectors**, and click **Add custom connector**.
Semji is not yet available as a one-click app inside Claude. You add it manually as a custom connector, which takes less than a minute.
Paste the following address and confirm with **Add**:
```text theme={null}
https://mcp.semji.com/mcp
```
Open the newly added connector and click **Connect**. A window opens for you to sign in to your Semji account. If your account belongs to more than one organization, choose which one to grant access to.
Once connected, you can start talking to your assistant.
## Usage tips
**Start with a simple request to check the connection.** Ask for the list of your workspaces or your remaining credit balance before running a more complex action.
**Always name the workspace if you manage more than one.** The assistant has access to every workspace you're authorized on, so naming the right one avoids any ambiguity about what it reads or changes.
**Ask for a summary before publishing.** For a bulk action (generating on several drafts, publishing in bulk), have the assistant walk you through the result before you confirm, exactly as you would with a teammate.
To get started, try: *"Summarize my editorial planning for this week"* or *"Which drafts don't have a focus keyword yet?"*. These are low-risk requests that quickly show what the assistant can see.
## Going further
The Semji MCP server is manual-add only for now, not yet available as a one-click app inside Claude or ChatGPT.
To connect ChatGPT, Cursor, VS Code, or any other MCP client via a JSON configuration, and for troubleshooting details (a connection that stays pending, an authentication error, switching organization), see the full technical documentation.
Advanced setup, other MCP clients, and troubleshooting.
# Connect your tools
Source: https://help.semji.com/en/connect-your-tools/overview
Set up and manage your integrations, such as Search Console, Analytics or your CMS via webhook.
Connect your analytics tools and Search Console to centralize your traffic, ranking, and conversion data in Semji.
Connect WordPress, Drupal, Contentful, Strapi, Magento, or Shopify to send and publish your content without leaving Semji.
Extend Semji with the browser extension, the API, webhooks, or MCP.
# Semji & your CMS
Source: https://help.semji.com/en/connect-your-tools/semji-and-your-cms
Understand SemjiBot, control what gets extracted from your pages, and automate publishing with webhooks.
* [All you need to know about SemjiBot](/en/connect-your-tools/all-you-need-to-know-about-semjibot)
* [How can you easily exclude or include elements from your pages when extracting your content to Semji?](/en/connect-your-tools/how-can-you-easily-exclude-or-include-elements-from-your-pages-when-extracting-your-content-to-semji)
* [Automate Your Content Publishing with Webhooks](/en/connect-your-tools/automate-your-content-publishing-with-webhooks)
# SSO & authentication
Source: https://help.semji.com/en/connect-your-tools/sso-and-authentication
Set up sign-in to Semji with Google, or secure your organization's access with SAML SSO.
* [How to use the SSO connection via SAML?](/en/connect-your-tools/how-to-use-the-sso-connection-via-saml)
* [How can I connect to Semji with my Google account?](/en/connect-your-tools/how-can-i-connect-to-semji-with-my-google-account)
# Why and how to connect my data sources to Semji?
Source: https://help.semji.com/en/connect-your-tools/why-and-how-to-connect-my-data-sources-to-semji
To allow Semji app to work and guide you in the best possible way!
### Summary :
Learn more about connecting your data sources:
* [Search Console](#search-console)
* [What is it ?](#search-console)
* [Is the connexion mandatory?](#is-mandatory)
* [Why connect Search Console to Semji?](#why-connect)
* [How to check if your website already has a Search Console property ?](#is-sc-installed)
* [How to gain access to your site's Search Console property?](#how-to-gain-access)
* [What if I don't have Search Console?](#no-sc)
* [How to create your Search Console account?](#how-to-install-sc)
* [How to connect Google Search Console to semji?](#how-to-connect)
* [Google Analytics / AT Internet](#analytics)
* [What is it ?](#analytics)
* [How to connect Google Analytics to Semji?](#how-to-connect-ga)
* [Is the connexion mandatory?](#is-ga-mandatory)
* [Why connect Google Analytics to Semji?](#why-connect-ga)
### What is the Google Search Console?
The Search Console is a **free service** provided by Google to help website managers **control their visibility in Google's organic search results**. This service also allows you to detect problems of indexing and readability of your content by Google and consequently, by Internet users. In other words, the Search Console is a very useful tool for all those who want to know their **SEO performance**!
**Important:** as Google says, "you don't have to sign up for Search Console to appear in Google search results. However, by registering, you will be able to better understand how your site is displayed on our side and optimize its ranking in search results".
Why create a Search Console property for your site?
Thanks to the Search Console, you can:
1. **Check that Google detects and crawls your site correctly**: you get notifications and error messages, as well as explanations on possible problems and actions to take
2. **Solve indexing problems** and ask Google to reindex content
3. **Know how your content is performing** in search results:
* the keywords that displayed your content,
* the average position of your content in Google results,
* the number of times your content appears on a query (impressions)
* the number of times users clicked on your content from the Google results (clicks)
5. **Discover the sites that reference your website**, i.e. that link to it.
*Source : [https://support.google.com/webmasters/answer/9128668?hl=en](https://support.google.com/webmasters/answer/9128668?hl=fr)*
### Is a Search Console connection mandatory?
Connecting Search Console to Semji is not mandatory, as Semji is particularly suitable for sites that are just being created and do not yet have a Search Console property.
However, if your site has already been in existence for some time, it would be a real shame to do without the added value of Search Console data in Semji!
### Why connect your Search Console when creating Semji's workspace?
Semji allows you to improve the SEO performance of your site and your content. In other words, it is the performance in terms of visibility on search engines. In order to provide you with the best recommendations, Semji needs **to assess your existing performance**: this is what the Search Console does.
From the Search Console data, artificial intelligence and our algorithms offer you :
* priority content to be optimized
* relevant keywords
* qualitative optimization recommendations
If you choose not to connect Search Console, you are missing out on the following features.
**1.Detect existing content that is a priority for optimization**
> ***In short:***
>
> In the Pages tab, find the list of your existing content prioritized according to the gains you want (gains in clicks, conversions ...)
***In detail:***
Semji retrieves from the Search Console all the content that has generated clicks in the last 30 days, at the moment you connect your Search Console to the application. Of course, this is only possible if your Search Console contains at least 30 days of historical data.
Semji records all the keywords on which each of your contents are positioned, as well as their position in Google results.
Semji then calculates, using an algorithm, the ratio of editorial effort to SEO gain for each of these contents. The potential SEO gain is calculated among other things thanks to Search Console data: the position of the keyword and the number of clicks already made.
**2. Suggest relevant Focus keywords for your Updated Content**
> ***In short:***
>
> For the optimization of existing content ([Updated Content](/en/identify-opportunities/how-to-optimize-an-existing-content-updated-content)), Semji pre-selects the keyword with the best gain potential.
***In detail :***
For each keyword on which a content is positioned, Semji retrieves :
* its average position in Google results over the last 30 days (from Search Console)
* the number of clicks generated over the last 30 days (from the Search Console)
* its search volume (from Google Ads)
Based on this combined data, Semji decides whether or not the keyword has good potential to be the main keyword - the Focus Keyword - of your content. Semji then suggests this keyword in the list of possible keywords for analysis. The best keyword, the one with the highest potential to gain clicks, has been pre-selected. You can also choose to add a brand new keyword before starting your analysis.
**3.Display the organic performance of your content**
> ***In short:***
>
> For each content optimized and published with Semji, easily visualize the evolution curve of several indicators from Search Console: clicks, impressions, CTR... You can observe the trend of your SEO performance!
*In detail:*
Impressions and clicks are two very important indicators to know the visits trend on your contents, down or up. You can find them in the Reports tab of the main menu and in the "Performance" tab inside each content. You can then visualize in a curve the past performances of your content, but also the performances following your optimization actions and the publication of your content.
You can also see the evolution of the average position of your Focus Keywords.
In short, the connection between Semji and Search Console is not mandatory but **highly recommended** for an optimal experience!
### How to check if your site already has a Search Console property ?
Not sure if you've already created a Search Console property for your site? It's easy to check: log into your Google Account and go to [https://search.google.com/search-console/welcome](https://search.google.com/search-console/welcome)
At the top left of your interface, click on the menu symbol. If you have one or more Search Console properties, they will appear in the list and you can click on them to access the website data.
If the list is empty, it means that there is no Search Console property associated with your Google Account. It is likely that your site does not yet have a Search Console property.
If you have multiple Google Accounts, consider checking each one.
It's also possible that someone else in your company has created a Search Console property and hasn't given you access to it. Consider asking your colleagues and staff about this.
#### How to gain access to your site's Search Console property?
If someone in your company created the Search Console property on your website, they can grant you access rights to that property. To do this, they must first select the property from the list.
Then, in the features menu at the bottom right, click on "Settings".
The settings list then offers to manage the "Users and permissions" of this property.
By clicking on it, the owner can set your Google account as a new user, set your access right, and notify you so you can receive an email confirmation.
#### What if I don't have Search Console? Can I still use Semji?
If you do not have a Search Console property for your site, you can use Semji. However, some features will be missing. For example, the prioritization of existing content in the Pages tab will not offer you to sort your content according to potential click gains.
We advise you to create your Search Console property as soon as possible: it's free!
> **>How to create your Search Console account?**
>
> Follow the guide, Google explains! It will only take you a few minutes.
>
> 1. [Subscribe to the Search Console](https://search.google.com/search-console/welcome)
> 2. [Add your site's property](https://support.google.com/webmasters/answer/34592?hl=en)
> 3. [Verify your site ownership](https://support.google.com/webmasters/answer/9008080?hl=en)
> 4. [Take your first steps with Search Console](https://support.google.com/webmasters/answer/10267942?hl=en)
>
> **Reminder** :if you are not sure which property to create, we advise you to choose a generic property such as "sc:domain.com" which will be very easy to connect to Semji.
### How to connect your Search Console for the first time?
When you log in to the Semji platform, you will be asked to **connect a Search Console property**. This step is very useful so that you can benefit from the full experience and potential offered by Semji. The connection is very fast, just a few clicks!
1. Click on "Activate Google Search Console" in step 4 'Integrations' of your registration process
2. Choose the Google account that owns the Google Search Console property to link to and log in to that account using your username and password
3. Allow Semji to access the data
4. Choose from the list of Search Console properties that Semji has found then click "Activate". You're done!
**Tip** :If you have created several Search Console properties, to track one or more websites, connect the one that collects the content data you want to work with Semji. This is the property that corresponds to the site you set up earlier. Semji will show you the number of contents that have data in the property.
The suggested properties don't match? Click on "**Show all properties**" to see if Semji has identified any others, and among them, the one you are looking for.
No properties displayed? This may be due to the Google Account selected earlier. Try switching to **another account** that may contain the Search Console property you are looking for.
Otherwise, it is possible that the url of the website set up has an error.
Common errors :
* a version of url in http\:// (not secured) whereas your site is in fact accessible from Google in http**s**://
* a version of url with or without "www\
for example : you have entered [https://entreprise.com](https://entreprise.com) while your site is in fact accessible on https\://**WWW**.entreprise.com
* you have entered a sub-domain when your Search Console property is for the main domain\
for example you have entered https\://**blog**.entreprise.com but your Search Console property is [https://www.entreprise.com](https://www.entreprise.com)
* no Search Console property has been created for your domain or subdomain
In this case, check precisely the url you have entered before continuing.
**Note:** a property of type **"sc:domain.com" works for all cases**. Creating this type of property is therefore a good practice.
If you skip the Search Console connection step when you sign up, you can connect your Search Console at any time from your interface.
### What is Google Analytics ?
Google Analytics is another free service from Google, which provides you with data on your website's audience. Thanks to this tool, you can analyze your website visitors, their behavior, and draw conclusions or action plans to develop your business.
Google Analytics provides you for example with data on :
* the **nature of your audience** (demographics: age, gender, geolocation...)
* its **browsing habits** (device, browser, number of pages viewed, time spent on the pages...)
* the **sources and channels** through which visitors arrived (search engines, social networks, referral sites, advertisements...)
* the **pages (url) visited by the user**
* **actions taken** (click on a button, fill in a form, add to cart...)
* **amounts spent**...
If Google Analytics is a wide data collection and visualization tool, it provides very useful data for an acquisition strategy via the organic channel, i.e. via SEO.
#### Why create an Analytics account?
The analysis of your audience allows you to check if the real audience of your site is the one you want to target, your core target. By analyzing the data provided by Google Analytics in a macro or micro way, you can **deduce user paths that convert**, good practices to reproduce or on the contrary, pitfalls to avoid.
### How to connect your Google Analytics account for the first time?
When you first experience Semji, you are invited to **connect a Google Analytics account**. The data collected by Semji will enrich your experience on the platform and give you more ways to prioritize your "to be optimized content" or to monitor the performance of your published content.
It only takes a few clicks to connect. By choosing to connect your Google Analytics account right away, you ensure a complete exploration and take full advantage of Semji's added value!
*Please note that you can always skip this step during your registration process and* [connect your Google Analytics account later.](/en/connect-your-tools/how-to-connect-my-google-analytics)
> 1. Click on "**Activate Google Analytics**" in step 4 'Integrations' of your registration process
> 2. Choose the **Google Account** that owns the Google Analytics account to be linked and log in to that account using your username and password
> 3. **Allow Semji** to access the data
> 4. Choose an **Analytics account** from among those Semji has found and suggests you connect, then click "Next"
> 5. Choose the **view** you want to connect: it must be the view that contains the data of the entire configured domain (desktop and mobile), especially from the organic channel (visits from search engines). That's it!
### Is the connection to Google Analytics mandatory?
The connection between Semji and Google Analytics is **not mandatory**. The lack of data from this tool is not blocking the functioning of the platform. However, we highly recommend you make these extra clicks to add this data to Semji. You won't regret it!
#### What if I don't have a Google Analytics account? Can I still use Semji?
There are several scenarios:
* you use **another solution to collect data on your audience**, such as **AT Internet** for example
* you are not yet using a tool for this purpose
If you are using AT Internet's solution, Semji is compatible and retrieves your account data in the same way as Google Analytics data. In this case, after your registration, go to the connectors interface of your data source and follow the guide :
> [How to connect my AT Internet account?](/en/connect-your-tools/how-to-connect-my-piano-analytics-account)
If you simply don't use any web analytics tool for your site, you can use Semji. However, some features will be missing.
For example, the prioritization of existing content in the Pages tab will not allow you to sort your content according to conversion, transaction and revenue potential (available with the Custom plan of your subscription). Also, you will not be able to track these same indicators as well as sessions, bounce rate or user behavior (time on page, number of pages per session).
We highly recommend that you **create a Google Analytics account**. The data provided will be really useful throughout the deployment of your digital strategy.
> **> How to create your Google Analytics account?**
>
> First steps with Google Analytics? Follow the guide, [it's here!](https://support.google.com/analytics/answer/1008015?hl=en\&ref_topic=3544906)
### Why connect your Google Analytics account to Semji?
#### To monitor the performance of your content using various KPIs
As mentioned above, Google Analytics is a tool to analyze your audience. By connecting it to the Semji application, you can **follow the performance of each optimized content** directly in your "Reports" tab, and in the "Performance" tab of a content.
You have access to different KPIs related to your audience:
* sessions
* conversions and conversion rate
* transactions and transaction rate
* revenue
* bounce rate
* page per session
* average session length
Customize your report by selecting the indicator that interests you!
To prioritize your "to be optimized contents" according to the conversion, transaction or revenue gain
As part of your Custom plan, you have several prioritizations option in the "Pages" tab. Choose a prioritization by gain of clicks from the SERP ( Search Console data) or a **prioritization by conversion, transaction or revenue gain**. These 3 indicators are closely linked to your business and are data from Google Analytics.
Semji tailors its prioritization algorithm according to the KPI you choose and the current performance. You get the list of existing content on your website that should be optimized in priority to significantly improve the gains on the chosen KPI: boost your conversions, your transactions or your sales!
**Note:** Semji allows you to track up to 3 custom conversions, which you have set up in your Google Analytics account. For example, the event triggered when a user fills out a quote form, or when an item is added to the shopping cart. [Customize your conversion goals in a few clicks!](/en/analyze-performance/how-to-track-custom-conversion-goals-with-semji)
# Why and how to connect your Adobe Analytics
Source: https://help.semji.com/en/connect-your-tools/why-and-how-to-connect-your-adobe-analytics
You can now link Adobe Analytics to your Semji workspace and add up to 3 conversion targets!
> *Important: This feature is only available as an option. Please contact your CSM.*
### Why link your Adobe Analytics account?
Semji not only supports you in creating and optimizing your content but also enables you to track your results and performance at a glance. We collect data from different software such as Adobe Analytics and Search Console to display your content's performance.
Without access to these tools, you won't be able to track your KPIs (Key Primary Indicators) directly in Semji.
If you don't use Adobe Analytics, no problem! Semji also supports [Google Analytics](/en/connect-your-tools/how-to-connect-my-google-analytics) (Universal Analytics property, Google Analytics 4), [Matomo](/en/connect-your-tools/why-and-how-to-connect-your-matomo) and [PIANO Analytics](/en/connect-your-tools/how-to-connect-my-piano-analytics-account).
How to link your Adobe Analytics account to Semji?
Follow the steps below if you have subscribed to the Adobe Analytics integration.
#### Step 1:
Access the settings by going to the right sidebar
#### Step 2:
In the workspace settings tabs, click on "Integrations".
Step 3:
To link your Adobe Analytics account to Semji, you must:
* Click on Connect
* Enter your Adobe Analytics Client ID
* Enter your Adobe Analytics secret key
* Select your company:
* Select your project:
* Select your dimension:
To select your dimension, you need to set up an eVar directly in your Adobe Analytics workspace.
This will ensure that your data is correctly uploaded to Semji.
> *Important: Semji will not be able to retrieve the data from your URLs without first setting up an eVar in your Adobe Analytics account.*
[Adobe Analytics resource - eVar](https://experienceleague.adobe.com/docs/analytics/components/dimensions/evar.html?lang=fr#:~:text=Les%20eVar%20sont%20limit%C3%A9es%20%C3%A0,cr%C3%A9dit%20d'un%20%C3%A9v%C3%A9nement%20ult%C3%A9rieur.)
#### Step 4:
Once your Adobe Analytics account is linked, you can track the performance of your content.
You'll notice that a new button has appeared on the left of the "Connected" button: "Manage goals". This button lets you set up the conversion goals you've defined in your Adobe Analytics account to be tracked in Semji.
Find out [How to track these custom conversion goals in Semji](/en/analyze-performance/how-to-track-custom-conversion-goals-with-semji)
# Why and how to connect your Matomo
Source: https://help.semji.com/en/connect-your-tools/why-and-how-to-connect-your-matomo
You can now connect Matomo to your Semji account and add up to 3 conversion goals!
### Why connect your Matomo account
Semji not only helps you create and optimize your content, but also allows you to track your results and performance at a glance. The software retrieves extensive data from different tools such as Matomo and Search Console, to display the performance of the content you are working on.
*If you don't have access to these statistical tools, you won't be able to track your KPIs (Key Primary Indicators) with in the platform.*
However, if you don't already use Matomo, don't worry! Semji is also compatible with [Google Analytics](/en/connect-your-tools/how-to-connect-my-google-analytics) ( Universal Analytics property, Google Analytics 4) and [Piano Analytics](/en/connect-your-tools/how-to-connect-my-piano-analytics-account), [Adobe Analytics](/en/connect-your-tools/why-and-how-to-connect-your-adobe-analytics) and [Piwik Pro](/en/connect-your-tools/why-and-how-to-connect-your-piwik-pro).
###
How to connect your Matomo account to Semji
If you have subscribed to the Matomo integration, you will need to follow the steps below.
**Step 1:**
Access the settings located in the left sidebar.
**Step 2:**
In the Workspace settings tabs, click on "Integrations".
**Step 3:**
This is where you can connect your web analytics tools. Click on the "Connect" button in Matomo.
**Step 4:**
There are two options for connecting your Matomo account to Semji:
1. You can host the Matomo solution yourself:\
Simply enter your Matomo access URL and then your ID token (you can generate a new ID token in Matomo's security settings.
2. Cloud domain hosted by Matomo: \
Provide the Matomo URL ( [https://exemple.matomo.cloud](https://exemple.matomo.cloud/)), then enter your ID token (you can generate a new ID token in Matomo's security settings).
For more information: [https://fr.matomo.org/faq/general/faq\_114/](https://fr.matomo.org/faq/general/faq_114/)
Click on next to connect your Matomo account.
> *Good to know 💡: If you ever get an error message in Semji, remember to check that the "Secure use only" option is deactivated on your Matomo account when you create your identification token.*
\*\*\
Step 5:\*\*
Your Matomo account is now connected, you can monitor your content's performance.
A new button has appeared to the left of the "Connected" button: "Manage goals".
This button allows you to control the conversion goals set in Matomo and to be sent to Semji.
Here is the translation into English, maintaining a professional yet direct tone:
##### ⚠️ **Matomo: Data Retroactivity**
After (re)connecting Matomo, performance data may only be visible from the date of reconnection, even if retroactive data retrieval is actively in progress.
Semji relies on Matomo segments (filters) to classify data. These segments yield immediate results for dates following their creation, but historical data is recalculated progressively on Matomo’s end. Depending on your Matomo infrastructure, this recalculation can take several days or even several weeks. Semji has no control over this processing time.
If you need to restart a full retrieval, disconnecting and reconnecting (or updating) the Matomo integration will trigger a fresh recovery "from scratch."
Find out [how to track these custom conversion goals in Semji!](/en/analyze-performance/how-to-track-custom-conversion-goals-with-semji)
# Why and how to connect your Piwik Pro account?
Source: https://help.semji.com/en/connect-your-tools/why-and-how-to-connect-your-piwik-pro
You can now link Piwik Pro to your Semji workspace and add up to 3 conversion targets!
Why link your Piwik Pro account?
Semji not only supports you in creating and optimizing your content but also enables you to track your results and performance at a glance. We collect data from different software such as Piwik Pro and Search Console to display your content's performance.
Without access to these tools, you won't be able to track your KPIs (Key Primary Indicators) directly in Semji.
If you don't use Piwik Pro, no problem! Semji also supports [Google Analytics](/en/connect-your-tools/how-to-connect-my-google-analytics) (Universal Analytics property, Google Analytics 4), [Matomo](/en/connect-your-tools/why-and-how-to-connect-your-matomo), [Adobe Analytics](/en/connect-your-tools/why-and-how-to-connect-your-adobe-analytics) and [PIANO Analytics](/en/connect-your-tools/how-to-connect-my-piano-analytics-account).
### How to link your Piwik Pro account to Semji?
Follow the steps below if you have subscribed to the Piwik Pro integration.
#### **Step 1:**
Access the settings located in the left sidebar.
####
#### **Step 2:**
In the workspace settings tabs, click on "Integrations".
#### **Step 3:**
Here you can link your web analytics tools. Click on the Piwik Pro "Connect" button.
#### **Step 4:**
To link your Piwik Pro account to Semji, you must:
* Enter the Piwik Pro URL
* Enter the Piwik Pro access key
* Enter the Piwik Pro secret key
* Select your website
####
**Step 6:**
You'll notice that a new button has appeared on the left of the "Connected" button: "Manage goals". This button lets you set up the conversion goals you've defined in your Piwik Pro account to be tracked in Semji.
Once your Piwik Pro account is linked, you can track the performance of your content.\
Find out [How to track these custom conversion goals in Semji!](/en/analyze-performance/how-to-track-custom-conversion-goals-with-semji)
# How to delete your Semji account?
Source: https://help.semji.com/en/troubleshooting-and-support/how-to-delete-your-semji-account
Do you want to delete your Semji account? Please note that this action will delete all access to the platform, whether it is to organizations or workspaces on…
Do you want to delete your Semji account? Please note that this action will delete all access to the platform, whether it is to organizations or workspaces on which you have created content.
### Steps to delete your Semji account:
> *Note: This action will only impact your Semji user profile, it will not remove access to all other users in the workspace.*
1\. Click on the menu in the top right corner of the platform;

2\. Click on “Settings”;
3\. Click on “Security”;
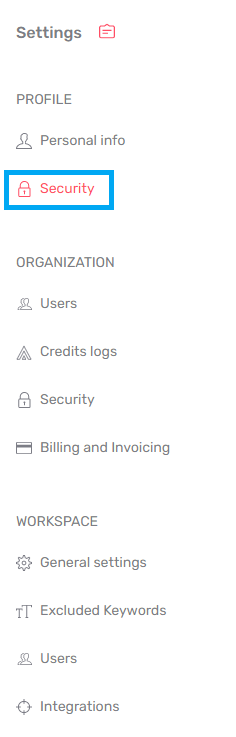
4\. Click on “Delete your account”;

> *Note: If this type of message appears, it means that you are the only user or admin of this workspace. Therefore, another person must be assigned as admin of the workspace to be able to delete your account.*
>
> *If you are the only user, please contact us by chat.*
>
> 
5\. Enter the word "DELETE" in the field provided to confirm you want to delete the account;
6\. Click on "Delete account". Your access to organizations, workspaces and Semji features will now be deleted

You can now delete your access to Semji.
# AI+ Knowledge Base - Roles and Permissions Management
Source: https://help.semji.com/en/work-faster-with-ai/ai-knowledge-base-roles-and-permissions-management
Effortlessly Control Access 🔐
### Why Limit Access ?
Managing roles and permissions in AI+ Knowledge Base is essential to secure your data and ensure that each team member can access the information and features they need.
### Types of Roles in AI+ Knowledge Base 🔑
| Role | Access the Knowledge Base | Download/Delete a document | Use Knowledge Base for AI Content Generation |
| - | - | - | - |
| **Owner** | ✅ | ✅ | ✅ |
| **Member & Guest Writer** | ❌ | ❌ | ✅ |
The owner has full access to the database. They can create, edit, delete files, and manage users.
### 2. Assigning Permissions 🎯
Members can also access and edit databases if granted permission by an administrator, directly from the user submenu in the settings. This configuration applies to a workspace. Therefore, you will need to repeat the process for each workspace if you wish to enable access to AI+ Knowledge Base.
# AI usage: track your credit consumption and the time your teams save
Source: https://help.semji.com/en/work-faster-with-ai/ai-usage-track-your-credit-consumption-and-the-time
The AI usage page brings together the AI credits your organization has consumed since the start of your contract, the time your teams have saved and the content you have published. Available to organization admins.
## At a glance
* **What you can do**: monitor your AI credit consumption, your time saved and your published content on your own, broken down by workspace, by user and by feature.
* **Who it is for**: organization admins only. In practice, the CMOs, SEO project managers and content managers who run a team and answer for a budget.
* **Why it matters**: you always know where you stand against your allowance, so you can set your production pace with confidence instead of holding back just in case.
## What changes for you
**Before:** AI credit consumption was mostly a black box. Finding out where your team stood meant asking your CSM and waiting for an export. Without a reliable reference point, many organizations slowed their use of AI for fear of running out before the end of the contract, even though they were nowhere near exhausting the volume they had purchased.
**Now:** you get a direct, continuous reading of your consumption, set against your credit limit and the actual length of your contract. And the data does more than track a counter. It also shows what AI has returned, in hours saved and content published, which makes it a solid basis for defending your budget internally.
| Before | With AI usage |
| - | - |
| Consumption visible only through a CSM export request | Self service reading, available at any time in your settings |
| No view of how usage splits across workspaces and users | Detailed breakdown and ranked contributors |
| Value of AI hard to quantify internally | Time saved and content published measured since the contract began |
Every figure on this page is cumulative since the start of your contract, not since the
start of the calendar year. The summary line at the top of the screen always restates
that scope.
## What you will get
A single page, organized in three levels of reading.
At the top, three summary metrics:
* **Credits used**, shown against your total allowance, for example 93,262 out of 180,000.
* **Time saved**, expressed in hours and derived from your AI usage.
* **Content published** with Semji over the period.
Below that, two trend charts:
* **Credit consumption**, which plots your credits used against your credit limit across the full contract period.
* **AI usage and time saved over time**, which pairs your monthly usage volume with the matching time saved.
Finally, four breakdown blocks:
* **AI usage by feature**, as a percentage, covering AI+ Content, Atomic Content, Fact-checking, Agents and Ask AI+.
* **Top contributors**, ranked by share of usage, viewable by workspace or by user.
* **Time saved by feature**, as a percentage.
* **Time saved ranking**, expressed in hours saved, also by workspace or by user.
## How to use it
From your Semji workspace, go to **Settings > Organization > AI usage**.
The page opens straight onto your organization's summary. There is nothing to configure first.
The AI usage entry only appears if you hold the organization admin role. If you cannot see it in your settings, ask your account admin for the data, or have the role assigned to you.
Start with the summary line and the three cards. Together they answer the question "where do we stand?" in a second.
Then move down to the **Credit consumption** chart in the AI credits section. Your credits used curve reads against the horizontal line marking your credit limit. The gap between the two is your remaining headroom, and the slope tells you whether your current pace is heading toward exhausting the allowance before your contract ends.
In the AI usage section, three filters let you narrow the scope: **Workspace**, **User** and **Feature**. They apply to the **AI usage and time saved over time** chart and to the breakdown blocks below it.
That chart layers two series. The bars show usage volume, the line shows time saved. Reading them together prevents a common misreading: a high volume month does not automatically mean a high gain, since it all depends on which features were used.
Always start unfiltered to place your organization as a whole, then filter workspace by
workspace. Adoption gaps only become obvious when you compare scopes against each other.
The four blocks at the bottom answer two different questions. **AI usage by feature** and **Top contributors** tell you where your credits go. **Time saved by feature** and **Time saved ranking** tell you where the value comes from.
Both rankings can be viewed by workspace or by user using the toggle at the top right of each block, and sorted in ascending or descending order. **See more** expands the rest of the ranking.
Time saved is not an opaque estimate. It rests on a minutes per usage ratio, defined feature by feature, that you can align with your own reality.
Click the configuration icon at the top right of the **Time saved** card. The **Time saved configuration** window opens with one row per feature and its value in min/usage. The defaults are 180 minutes for Atomic Content, 10 minutes for Agents, 5 minutes for Ask AI+, 5 minutes for AI+ Content and 2 minutes for Fact-checking.
Adjust any value that does not match your process, then click **Save**. The reset icon at the end of each row restores that feature's default.
## Usage tips
**Make it a monthly ritual.** Ten minutes a month is enough to check your consumption trajectory and catch a drift in either direction. That beats an emergency review two months before renewal.
**Treat under consumption as a signal, not as good news.** A workspace that consumes little is a workspace getting little out of what you paid for. If your curve sits far below your limit halfway through the contract, the question is not how to save credits. It is which teams need support to actually put the platform to work.
**Always cross usage with time saved.** A feature can account for a small share of usage volume and still generate most of your hours saved. That cross reading tells you where to focus your internal enablement.
**Calibrate your ratios before you share the numbers.** Time saved only carries weight internally if the assumptions reflect how long these tasks actually took your teams before. Spend ten minutes on the configuration before you put the figure in front of your leadership.
Ahead of a budget review or a renewal discussion, write down your three summary figures,
credits used, hours saved and content published. Set against the cost of your subscription,
they make the shortest and strongest case you have.
## Going further
The AI usage page focuses on consumption and on the value produced. For the detail of your credit lines, including expiration dates and credits added mid contract, open the credit report, right below AI usage in the Organization section of your settings.
If the rankings reveal wide adoption gaps between your teams, managing Semji users lets you review who has access to what and open the right scopes to the right people.
Your credits follow your contract period and do not roll over beyond it. If your
consumption is approaching your limit before the end date, or if a large share of your
allowance is still sitting unused, talk to your CSM early enough to adjust.
# AI credits & usage
Source: https://help.semji.com/en/work-faster-with-ai/general
Understand Semji's AI credit system and track your consumption over time.
* [Understanding the credit system](/en/work-faster-with-ai/understanding-the-credit-system)
* [How to export the credit report?](/en/work-faster-with-ai/how-to-export-the-credit-report)
* [AI usage: track your credit consumption and the time your teams save](/en/work-faster-with-ai/ai-usage-track-your-credit-consumption-and-the-time)
# How to export the credit report?
Source: https://help.semji.com/en/work-faster-with-ai/how-to-export-the-credit-report
Easily export data related to the use of analytics, content ideas and AI credits to your settings
### Why export the credit report?
Within the settings, quickly identify the number of [credits allocated](/en/work-faster-with-ai/understanding-the-credit-system) to your Organization in the "Billing and invoicing" tab.
In the "Credit logs" tab, you can view the credits spent on analysis, AI and content ideas.
**In the various tabs, identify :**
* The debit date
* The workspace concerned
* Focus Keyword
* User
* Quantity of credits
* Credits left
How do you export credit data?
\*\*Step 1: Connect to Semji
Step 2: Go to settings \*\*
**Step 3: Go to the "Credit logs" in Organization tab**
**Step 4: Select the view you wish to export:**
* **Analysis**
* **AI+ Suite**
* **Content ideas**
**Step 5: Click on the "Export" button and select the file type.**
Step 2: Go to settings \*\*
**Step 3: Go to the "Credit logs" in Organization tab**
> *Good to know: If the export is large, it will be sent to you by e-mail.*
**You can now export and analyze credit utilization.**
# Understanding the credit system
Source: https://help.semji.com/en/work-faster-with-ai/understanding-the-credit-system
Control your credit consumption and optimize your use of Semji.
###
Types of credit
There are three types of credit within the Semji platform and extension:
* Credits for launching keyword analyses
* Credits for using the AI+ Suite (Atomic Content, AI+Content, AI+Chat)
* Credits for using the Content Ideas module to identify themes
Each call generates one or more credits that will be deducted from your annual consumption according to your Semji plan.
### Number of credits according to your plan :
To find your way around according to your offer and the number of credits allocated to you, you can consult our Service Booklet for details of your offer.
### How to optimize your use?
An information bubble appears when you are about to use credits.\
You can also view the number of credits remaining before use.
#### Analysis credits:
Each keyword analysis costs an analysis credit. To optimize the use of analysis credits, think carefully before choosing your keyword. If you select a keyword and change it after the analysis, you'll spend an additional credit. Launching a keyword update to obtain the latest link recommendations also costs an analysis credit.
#### Searching for new Content Ideas:
In the Content Ideas module, each query costs a credit of content ideas.\
To obtain many content ideas, enter a broad query and discover a large number of content ideas related to your theme.
Text generation with the AI+ suite:
With AI+Content, you can generate a title, a meta-description, an introduction, an outline, and paragraphs related to your topic.
| Content Type | Credits Required |
| - | - |
| Title | 1 credit |
| Introduction | 1 credit + 1 credit with Fact-Checking |
| Meta description | 1 credit |
| Outline | 3 credits |
| Paragraph | 3 credits + 1 credit with Fact-Checking |
| Atomic Content | 50 credits + 15 credits with Fact-Checking |
| Ask AI+ | 3 credits + 1 credit with Fact-Checking |
| AI+ Template | 1 credit for every 20 words |
| Key Points | 3 credits + 1 credit with Fact-Checking |
| FAQ | 3 credits + 1 credit with Fact-Checking |
| AI Agent | 10 AI credits per action (launch, chat, rewrite) |
> *Good to know 💡: When using the [Fact Cheking feature](/en/work-faster-with-ai/produce-quality-verified-content-with-fact-checking), credit consumption is doubled. + add Fact Checking link*
To optimize your use of AI, we advise you to deactivate any recommendations you don't want to work on.\
The aim is to prevent AI from dealing with subjects or angles you don't want to work on.
> Good to know 💡: You can restrict access to the [AI+ Suite](/en/work-faster-with-ai/how-to-use-semjis-ai-content) (AI+Content, AI Chat and Atomic Content) in the workspace settings.
>
> You can also export data relating to your use of Analysis, AII and Content Idea credits to the Organization.
### How can I see the number of remaining credits?
You can easily see the number of credits remaining for your offer.
In Semji's settings, click on the "Billing" tab and view the number of credits remaining for your offer.
# Authentication
Source: https://help.semji.com/api-reference/authentication
Generate a Semji API key from Settings, send it as a Bearer token on every request, and handle 401 Unauthorized and 403 Forbidden errors in your integration.
Every request to the Semji API must include a valid API key in the `Authorization` header. The API uses HTTP Bearer authentication — there are no sessions, cookies, or OAuth flows. This page explains how to generate a key, attach it to requests, and handle authentication errors.
## Generating an API key
API keys are created in the Semji app. Go to [**Settings > Organization > API Keys**](https://app.semji.com) and click **Create API Key**. Give the key a descriptive name (for example, the name of the integration or tool that will use it) so you can identify and revoke it later.
Each key:
* Begins with `sk_`
* Is scoped to the **user and organization** that created it — it has the same permissions as that user
* Is shown only once at creation time; copy and store it securely before closing the dialog
Never commit API keys to source control. Store them in environment variables or a secrets manager such as AWS Secrets Manager, HashiCorp Vault, or your CI/CD platform's secret store. If a key is accidentally exposed, revoke it immediately from **Settings > Organization > API Keys** and generate a new one.
## Sending the API key
Include the key in the `Authorization` header of every request:
```
Authorization: Bearer sk_your_api_key_here
```
The header value must start with `Bearer sk_` exactly. Any other format — including a bare token without `Bearer`, or a key that doesn't start with `sk_` — will be rejected with `401 Unauthorized`.
```typescript title="TypeScript" theme={null}
const apiKey = process.env.SEMJI_API_KEY;
async function semjiGet(path: string) {
const response = await fetch(`https://api.semji.com/v1${path}`, {
headers: {
Authorization: `Bearer ${apiKey}`,
},
});
if (!response.ok) {
const error = await response.json();
throw new Error(`${response.status}: ${error.error.message}`);
}
return response.json();
}
const user = await semjiGet("/me");
console.log(user.email);
```
```python title="Python" theme={null}
import os
import requests
api_key = os.environ["SEMJI_API_KEY"]
def semji_get(path: str) -> dict:
response = requests.get(
f"https://api.semji.com/v1{path}",
headers={"Authorization": f"Bearer {api_key}"},
)
response.raise_for_status()
return response.json()
user = semji_get("/me")
print(user["email"])
```
```bash title="cURL" theme={null}
curl https://api.semji.com/v1/me \
-H "Authorization: Bearer sk_your_api_key_here"
```
## Verifying your key
Call `GET /v1/me` to confirm your key is valid and inspect the associated user and organization:
```bash title="cURL" theme={null}
curl https://api.semji.com/v1/me \
-H "Authorization: Bearer sk_your_api_key_here"
```
```json title="200 OK" theme={null}
{
"id": "usr_01hx9z3k4m5n6p7q8r9s0t1u",
"firstName": "Alice",
"lastName": "Martin",
"email": "alice@example.com",
"profileImageUrl": null,
"jobTitle": "SEO Lead",
"languageCode": "en",
"organization": {
"id": "org_01hx9z3k4m5n6p7q8r9s0t2v",
"name": "Example Corp",
"createdAt": "2024-01-10T08:00:00Z",
"brandName": null,
"brandImageUrl": null,
"credits": {
"analysis": 47,
"aiWriting": 12,
"contentIdeasSearches": 5
},
"usersCount": 3,
"workspacesCount": 2
},
"createdAt": "2024-03-15T09:12:00Z"
}
```
## Authentication errors
### 401 Unauthorized
Returned when the `Authorization` header is missing, malformed, or contains an invalid or revoked key.
```json title="401 Unauthorized" theme={null}
{
"error": {
"code": "unauthorized",
"message": "A valid API key is required. Use Authorization: Bearer sk_xxx."
}
}
```
**What to check:**
* The header name is `Authorization` (capitalized correctly)
* The value starts with `Bearer ` (note the trailing space) followed by your full key
* The key starts with `sk_` and has not been revoked
* You're not accidentally including extra whitespace or newline characters
### 403 Forbidden
Returned when your key is valid but the authenticated user does not have permission to access the requested resource. This happens if, for example, you request a workspace that your user is not a member of.
```json title="403 Forbidden" theme={null}
{
"error": {
"code": "forbidden",
"message": "You do not have access to this resource."
}
}
```
A `403` is not a key problem — the key itself is recognized. You need to use a key belonging to a user with access to the resource, or ask a workspace admin to grant your user the required permissions.
# Get brand voice details
Source: https://help.semji.com/api-reference/brand-voices/get-brand-voice-details
/api-reference/openapi.json get /v1/brand-voices/{brandVoiceId}
Returns details of a brand voice.
# List brand voices
Source: https://help.semji.com/api-reference/brand-voices/list-brand-voices
/api-reference/openapi.json get /v1/workspaces/{workspaceId}/brand-voices
Returns all brand voices configured for a workspace. Use the brand voice ID in POST /v1/contents/:contentId/atomic settings.
# Cancel a generation
Source: https://help.semji.com/api-reference/content-generations/cancel-a-generation
/api-reference/openapi.json post /v1/contents/{contentId}/generation/cancel
Cancels a generation that is queued, pending, or awaiting review.
# Confirm a generation
Source: https://help.semji.com/api-reference/content-generations/confirm-a-generation
/api-reference/openapi.json post /v1/contents/{contentId}/generation/confirm
Confirms and accepts the generated content. The draft is updated with the generation result. Requires status = "review".
# Get generation status
Source: https://help.semji.com/api-reference/content-generations/get-generation-status
/api-reference/openapi.json get /v1/contents/{contentId}/generation
Returns the current status of the Atomic Content generation attached to a content. Poll this endpoint to track progress.
# Delete a content idea search
Source: https://help.semji.com/api-reference/content-ideas/delete-a-content-idea-search
/api-reference/openapi.json delete /v1/content-idea-searches/{contentIdeaSearchId}
Deletes a content idea search and all of its content ideas.
# Get a content idea search
Source: https://help.semji.com/api-reference/content-ideas/get-a-content-idea-search
/api-reference/openapi.json get /v1/content-idea-searches/{contentIdeaSearchId}
Returns a content idea search and its processing status (pending → success / failed). Use it to poll an asynchronous search started with POST.
# List content ideas of a search
Source: https://help.semji.com/api-reference/content-ideas/list-content-ideas-of-a-search
/api-reference/openapi.json get /v1/content-idea-searches/{contentIdeaSearchId}/content-ideas
Returns a paginated list of the content ideas produced by a completed search. Each idea carries its keyword, URL, search volume, keyword difficulty, estimated traffic, relevance and the workspace's own ranking on the keyword. Supports filtering (keyword, title, url, type, keywordBrand, and gte/lte ranges on searchVolume, keywordDifficulty, urlEstimatedTraffic, similarityScore) and sorting.
# Start a content idea search
Source: https://help.semji.com/api-reference/content-ideas/start-a-content-idea-search
/api-reference/openapi.json post /v1/workspaces/{workspaceId}/content-idea-searches
Launches an asynchronous Content Ideas search for a keyword in the workspace. Consumes one content-ideas-searches credit. Returns immediately with the search id and status 'pending' — poll GET /v1/content-idea-searches/:contentIdeaSearchId until status is 'success', then read the results with GET /v1/content-idea-searches/:contentIdeaSearchId/content-ideas.
# Create a content
Source: https://help.semji.com/api-reference/contents/create-a-content
/api-reference/openapi.json post /v1/workspaces/{workspaceId}/contents
Creates a new content draft in the workspace. Pass pageId to attach the draft to an existing imported page, or omit it to create a blank draft (editorial brief with no URL) — in that case an empty page is auto-created and returned in the response.
# Delete a content
Source: https://help.semji.com/api-reference/contents/delete-a-content
/api-reference/openapi.json delete /v1/contents/{contentId}
Permanently deletes a content. This action cannot be undone.
# Generate Atomic Content
Source: https://help.semji.com/api-reference/contents/generate-atomic-content
/api-reference/openapi.json post /v1/contents/{contentId}/atomic
Launches an AI content generation on the draft. The keyword must have a completed SEO analysis. Poll GET /v1/contents/:contentId/generation to track progress.
# Get content details
Source: https://help.semji.com/api-reference/contents/get-content-details
/api-reference/openapi.json get /v1/contents/{contentId}
Returns full details of a content, including HTML body, version, and embedded relations.
# List contents for a page
Source: https://help.semji.com/api-reference/contents/list-contents-for-a-page
/api-reference/openapi.json get /v1/pages/{pageId}/contents
Returns all content versions associated with a specific page.
# List contents in a workspace
Source: https://help.semji.com/api-reference/contents/list-contents-in-a-workspace
/api-reference/openapi.json get /v1/workspaces/{workspaceId}/contents
Returns a paginated list of contents. Supports filtering by status, assignee, folder, due date, and text search.
# Mark a content as published
Source: https://help.semji.com/api-reference/contents/mark-a-content-as-published
/api-reference/openapi.json post /v1/contents/{contentId}/publish
Marks the content as published in Semji. Call this endpoint after the content has been published on your CMS. If no URL is provided, the associated page URL is used. If no publication date is provided, the current server time is used.
# Update a content
Source: https://help.semji.com/api-reference/contents/update-a-content
/api-reference/openapi.json put /v1/contents/{contentId}
Updates a content. The version field is required for optimistic locking.
# List credit usages
Source: https://help.semji.com/api-reference/credit-usages/list-credit-usages
/api-reference/openapi.json get /v1/credit-usages
Returns the credit consumption history for the organization, paginated. Each entry details a credit consumed with its context.
# Errors
Source: https://help.semji.com/api-reference/errors
Full reference for Semji API error codes, HTTP status codes, error response format, and handling strategies including retries and validation errors.
When a request cannot be completed, the Semji API returns a JSON error object alongside an appropriate HTTP status code. All errors follow the same structure, making them straightforward to handle in code. This page documents every error code the API can return, explains what triggers each one, and provides guidance on how to respond.
## Error response format
Every error response — regardless of cause or status code — uses the following shape:
```json theme={null}
{
"error": {
"code": "string",
"message": "string"
}
}
```
A stable, machine-readable string identifying the error type. Use this field in your error-handling logic — it will not change between API versions.
A human-readable explanation of the error. For `validation_error` responses, this describes the specific field that failed validation. Useful for debugging but not guaranteed to be stable across releases.
## Error codes reference
| HTTP status | `error.code` | Meaning |
| - | - | - |
| 400 | `bad_request` | The request was malformed or a required field is missing |
| 401 | `unauthorized` | API key is missing, invalid, or revoked |
| 403 | `forbidden` | Authenticated but not permitted to access this resource |
| 404 | `not_found` | The resource does not exist |
| 409 | `conflict` | Request conflicts with current state, e.g. version mismatch |
| 422 | `validation_error` | Request body failed schema validation |
| 429 | `rate_limited` | Too many requests — hourly or burst limit exceeded |
| 500 | `internal_error` | Unexpected server error |
| 502 | `bad_gateway` | The upstream service returned an error |
| 503 | `service_unavailable` | Service temporarily unavailable |
***
## Detailed error reference
Returned when the request is structurally malformed — for example, a required query parameter is missing, a path parameter cannot be parsed, or the request body is not valid JSON.
```json title="Example response" theme={null}
{
"error": {
"code": "bad_request",
"message": "The request was invalid."
}
}
```
**How to handle:** Inspect the `message` field for details on what is wrong. Check that all required parameters are present and that your request body is valid JSON with the correct `Content-Type: application/json` header.
Returned when the `Authorization` header is absent, does not begin with `Bearer sk_`, or contains a key that is invalid or has been revoked.
```json title="Example response" theme={null}
{
"error": {
"code": "unauthorized",
"message": "A valid API key is required. Use Authorization: Bearer sk_xxx."
}
}
```
**How to handle:** Verify that your `Authorization` header is formatted correctly (`Bearer sk_...`), that the key has not been revoked in **Settings > Organization > API Keys**, and that you are not accidentally including extra whitespace or newline characters in the header value. See [Authentication](/api-reference/authentication) for details.
Returned when the API key is valid but the authenticated user does not have permission to access the requested resource. Common causes: accessing a workspace the user is not a member of, or attempting an admin-only action with a Member-role key.
```json title="Example response" theme={null}
{
"error": {
"code": "forbidden",
"message": "You do not have access to this resource."
}
}
```
**How to handle:** Confirm that the user associated with your API key has the required role in the workspace or organization. To check your current user and role, call `GET /v1/me` and `GET /v1/users`.
Returned when the resource identified by the URL or a path parameter does not exist, or the authenticated user cannot see it.
```json title="Example response" theme={null}
{
"error": {
"code": "not_found",
"message": "The requested resource was not found."
}
}
```
**How to handle:** Double-check the ID in your request path. Note that resources in workspaces you don't have access to also return `404` rather than `403`, to avoid leaking information about what exists.
Returned when the request conflicts with the current state of the resource. The most common cause is an **optimistic locking conflict** on content updates: the `version` field you submitted does not match the current version on the server, meaning another client updated the resource since you last fetched it.
```json title="Example response" theme={null}
{
"error": {
"code": "conflict",
"message": "The request conflicts with the current state."
}
}
```
**How to handle:** Re-fetch the resource to get the latest `version` value, apply your changes to the fresh copy, and retry the update with the new `version`.
Returned when the request body is structurally valid JSON but fails schema validation — for example, an enum field contains an unrecognized value, a required field is `null`, or a string exceeds its maximum length. The `message` field names the specific field that failed.
```json title="Example response" theme={null}
{
"error": {
"code": "validation_error",
"message": "title: String must contain at least 1 character(s)"
}
}
```
**How to handle:** Read the `message` to identify the offending field and correct the value in your request. Do not retry without fixing the input — the same request will fail again.
Returned when you exceed the rate limit for your API key — either 1,000 requests per rolling hour or 20 requests per second. The response includes a `Retry-After` header indicating how many seconds to wait.
```json title="Example response" theme={null}
{
"error": {
"code": "rate_limited",
"message": "Too many requests. Please try again later."
}
}
```
**How to handle:** Wait at least the number of seconds in the `Retry-After` header before retrying. Use exponential backoff with jitter for repeated 429s. See [Rate Limits](/api-reference/rate-limits) for full retry guidance.
Returned when an unexpected error occurs on the server. This is not caused by your request.
```json title="Example response" theme={null}
{
"error": {
"code": "internal_error",
"message": "An internal error occurred."
}
}
```
**How to handle:** Retry the request using exponential backoff. If the error persists, contact Semji support.
Returned when the Semji gateway successfully received your request but the upstream service returned an error. This is typically a transient infrastructure issue.
```json title="Example response" theme={null}
{
"error": {
"code": "bad_gateway",
"message": "The upstream service returned an error."
}
}
```
**How to handle:** Retry with exponential backoff. A `502` is not caused by your request and will usually resolve within seconds.
Returned when the API is temporarily unavailable, typically due to planned maintenance or an unexpected outage.
```json title="Example response" theme={null}
{
"error": {
"code": "service_unavailable",
"message": "The service is temporarily unavailable."
}
}
```
**How to handle:** Retry after a short delay. Check the Semji status page for any active incidents.
## Handling errors in code
The following pattern covers the most important cases — retry on transient server errors, respect rate limit headers, and surface actionable messages for client errors:
```typescript title="TypeScript" theme={null}
const RETRYABLE_STATUSES = new Set([429, 500, 502, 503]);
async function semjiRequest(method: string, path: string, body?: unknown) {
const url = `https://api.semji.com/v1${path}`;
for (let attempt = 0; attempt < 5; attempt++) {
const response = await fetch(url, {
method,
headers: {
Authorization: `Bearer ${process.env.SEMJI_API_KEY}`,
"Content-Type": "application/json",
},
body: body ? JSON.stringify(body) : undefined,
});
if (RETRYABLE_STATUSES.has(response.status)) {
const retryAfter = parseInt(response.headers.get("Retry-After") ?? "2", 10);
const wait = (retryAfter + Math.random()) * 1000;
await new Promise((r) => setTimeout(r, wait));
continue;
}
if (!response.ok) {
const { error } = await response.json();
throw new Error(`[${error.code}] ${error.message}`);
}
return response.json();
}
throw new Error("Request failed after 5 retries");
}
```
```python title="Python" theme={null}
import time
import random
import requests
RETRYABLE_STATUSES = {429, 500, 502, 503}
def semji_request(method: str, path: str, **kwargs) -> dict:
url = f"https://api.semji.com/v1{path}"
headers = {"Authorization": f"Bearer {API_KEY}"}
for attempt in range(5):
response = requests.request(method, url, headers=headers, **kwargs)
if response.status_code in RETRYABLE_STATUSES:
retry_after = int(response.headers.get("Retry-After", 2 ** attempt))
time.sleep(retry_after + random.uniform(0, 1))
continue
if not response.ok:
error = response.json()["error"]
raise ValueError(f"[{error['code']}] {error['message']}")
return response.json()
raise RuntimeError("Request failed after 5 retries")
```
**Key rules:**
* **Retry** on `429`, `500`, `502`, and `503` using exponential backoff
* **Do not retry** on `400`, `401`, `403`, `404`, `409`, or `422` — these indicate a problem with the request that must be fixed first
* **Re-fetch then retry** on `409` — get the latest resource version before submitting your update again
* **Check `error.message`** on `422` to identify which field failed validation
# Create a folder
Source: https://help.semji.com/api-reference/folders/create-a-folder
/api-reference/openapi.json post /v1/workspaces/{workspaceId}/folders
Creates a new folder in the workspace.
# Delete a folder
Source: https://help.semji.com/api-reference/folders/delete-a-folder
/api-reference/openapi.json delete /v1/folders/{folderId}
Deletes a folder. Contents inside the folder are not deleted — they become unorganized.
# List folders
Source: https://help.semji.com/api-reference/folders/list-folders
/api-reference/openapi.json get /v1/workspaces/{workspaceId}/folders
Returns all folders in a workspace as a flat list. Use parentFolderId to reconstruct the tree.
# Update a folder
Source: https://help.semji.com/api-reference/folders/update-a-folder
/api-reference/openapi.json put /v1/folders/{folderId}
Updates a folder name or parent. Returns the updated folder.
# Add a keyword to a page
Source: https://help.semji.com/api-reference/keywords/add-a-keyword-to-a-page
/api-reference/openapi.json post /v1/pages/{pageId}/keywords
Associates a keyword with a page. Creates the keyword if it does not exist.
# Generate keyword analysis report
Source: https://help.semji.com/api-reference/keywords/generate-keyword-analysis-report
/api-reference/openapi.json post /v1/keywords/{keywordId}/report
Returns an analysis report for the keyword, scoring the provided content against each surface. The report contains the data computed by the keyword analysis — an overall score, typed recommendations (each with its own sub-score and supporting data), and surface-specific context: SERP competitors for Google Search (`googleSearch`); cited sources, mentioned brands, and the markdown preview of the AI response for Google AI Overview (`googleAiOverview`). Provide either `contentId` (by reference) or `title` + `html` (by value), not both.
# Get keyword details
Source: https://help.semji.com/api-reference/keywords/get-keyword-details
/api-reference/openapi.json get /v1/keywords/{keywordId}
Returns full details of a keyword, including analysis status and focus prompt.
# Launch keyword analysis
Source: https://help.semji.com/api-reference/keywords/launch-keyword-analysis
/api-reference/openapi.json post /v1/keywords/{keywordId}/analyze
Triggers an asynchronous analysis on a keyword (Google Search organic SERP scrape, recommendations computation). Poll GET /v1/keywords/:keywordId to track progress via analysisStatus.
# List keywords for a page
Source: https://help.semji.com/api-reference/keywords/list-keywords-for-a-page
/api-reference/openapi.json get /v1/pages/{pageId}/keywords
Returns all keywords associated with a page. Not paginated (pages rarely have more than 50 keywords).
# Update a keyword
Source: https://help.semji.com/api-reference/keywords/update-a-keyword
/api-reference/openapi.json put /v1/keywords/{keywordId}
Updates a keyword (e.g. set or remove the focus GEO prompt).
# Get knowledge document details
Source: https://help.semji.com/api-reference/knowledge-documents/get-knowledge-document-details
/api-reference/openapi.json get /v1/knowledge-documents/{knowledgeDocumentId}
Returns details of a knowledge document.
# List knowledge documents
Source: https://help.semji.com/api-reference/knowledge-documents/list-knowledge-documents
/api-reference/openapi.json get /v1/workspaces/{workspaceId}/knowledge-documents
Returns all knowledge documents in a workspace. Enable knowledge sources in POST /v1/contents/:contentId/atomic settings.
# Get authenticated user
Source: https://help.semji.com/api-reference/me/get-authenticated-user
/api-reference/openapi.json get /v1/me
Returns the user authenticated by the API key, with the linked organization embedded.
# Semji API overview
Source: https://help.semji.com/api-reference/overview
Introduction to the Semji REST API v1 — base URL, authentication, response format, rate limits, and the full list of available resources.
The Semji API is a REST API that lets you integrate Semji's AI-powered content marketing platform into your own tools and workflows. Every endpoint returns JSON, requires a Bearer API key, and lives under `https://api.semji.com/v1/`. This page explains the fundamentals before you make your first request.
## Base URL
All API v1 endpoints share the following base URL:
```
https://api.semji.com/v1
```
There is no version negotiation via headers — the version is part of the path. Every endpoint documented in this reference is prefixed with `/v1/`.
## Your first API call
The quickest way to verify your API key is to fetch your own user record. Replace `sk_...` with your actual key:
```bash title="cURL" theme={null}
curl https://api.semji.com/v1/me \
-H "Authorization: Bearer sk_your_api_key_here"
```
A successful response looks like this:
```json title="200 OK" theme={null}
{
"id": "usr_01hx9z3k4m5n6p7q8r9s0t1u",
"firstName": "Alice",
"lastName": "Martin",
"email": "alice@example.com",
"profileImageUrl": null,
"jobTitle": "SEO Lead",
"languageCode": "en",
"organization": {
"id": "org_01hx9z3k4m5n6p7q8r9s0t2v",
"name": "Example Corp",
"createdAt": "2024-01-10T08:00:00Z",
"brandName": null,
"brandImageUrl": null,
"credits": {
"analysis": 47,
"aiWriting": 12,
"contentIdeasSearches": 5
},
"usersCount": 3,
"workspacesCount": 2
},
"createdAt": "2024-03-15T09:12:00Z"
}
```
Generate your API key in the Semji app at [Settings > Organization > API Keys](https://app.semji.com). See [Authentication](/api-reference/authentication) for full details.
## Authentication
Every request must include an `Authorization` header with a Bearer token:
```
Authorization: Bearer sk_your_api_key_here
```
API keys begin with `sk_`. A missing or malformed key returns `401 Unauthorized`. A valid key without access to the requested resource returns `403 Forbidden`. See the [Authentication guide](/api-reference/authentication) for code examples in Python, Node.js, and more.
## Response format
All responses use `Content-Type: application/json`.
**Single resources** are returned as a flat JSON object:
```json theme={null}
{
"id": "...",
"name": "..."
}
```
**Collections** are wrapped in a standard pagination envelope:
```json theme={null}
{
"data": [
{ "id": "...", "name": "..." }
],
"pagination": {
"total": 84,
"page": 1,
"limit": 25,
"hasMore": true
}
}
```
Use the `page` and `limit` query parameters to paginate. `limit` accepts values from 1 to 100 and defaults to 25.
## Error format
All errors follow the same shape regardless of status code:
```json theme={null}
{
"error": {
"code": "not_found",
"message": "The requested resource was not found."
}
}
```
The `code` field is a stable machine-readable string you can match in code. The `message` field is a human-readable description, useful for debugging. See the [Errors reference](/api-reference/errors) for the full list of codes and HTTP status codes.
## Rate limits
Each API key is limited to **1,000 requests per hour** on a rolling window, with a burst limit of **20 requests per second**. Every response includes `X-RateLimit-Limit`, `X-RateLimit-Remaining`, and `X-RateLimit-Reset` headers. Exceeding the limit returns `429 Too Many Requests`. See [Rate Limits](/api-reference/rate-limits) for details and retry guidance.
## Resources
The API exposes the following resource groups. Click any card to go to the endpoint reference.
Retrieve the authenticated user and their organization, and list members of your organization with their roles.
List and inspect the websites you track in Semji. Each workspace contains pages, contents, keywords, and workflow configuration.
Import URLs into a workspace, trigger crawls to fetch metadata, and associate focus keywords for SEO analysis.
Create and manage SEO content drafts, track their Content Score (0–100), and generate full articles with Atomic Content AI.
Analyze search terms to get SERP-based recommendations: topics, questions, search intents, and links to add.
Analyze questions asked to AI engines (ChatGPT, Google AI Overviews) to get GEO recommendations and AI citation data.
Configure editorial identities that Atomic Content uses to match your writing style, tone, and brand guidelines.
Upload reference materials that the AI draws from during content generation to produce more accurate, brand-aligned output.
Track the status of Atomic Content AI generation jobs, confirm generated drafts, or cancel them.
View your organization's credit consumption history across keyword analyses, AI generation, and content ideas.
# Crawl a page
Source: https://help.semji.com/api-reference/pages/crawl-a-page
/api-reference/openapi.json post /v1/pages/{pageId}/crawl
Triggers an asynchronous crawl to refresh the page metadata (title, meta description, etc.). Poll GET /v1/pages/:pageId to see updated data.
# Delete a page
Source: https://help.semji.com/api-reference/pages/delete-a-page
/api-reference/openapi.json delete /v1/pages/{pageId}
Deletes a page and its associated contents.
# Get page details
Source: https://help.semji.com/api-reference/pages/get-page-details
/api-reference/openapi.json get /v1/pages/{pageId}
Returns full details of a page, including its focus keyword.
# Import a page
Source: https://help.semji.com/api-reference/pages/import-a-page
/api-reference/openapi.json post /v1/workspaces/{workspaceId}/pages
Imports an existing URL into the workspace (crawls it to extract title, meta description, etc.). Use this for pages you already have online and want to track. Optionally sets a URL category and focus keyword. To create a new editorial draft that does not yet have a URL, use POST /v1/workspaces/:workspaceId/contents instead.
# List pages in a workspace
Source: https://help.semji.com/api-reference/pages/list-pages-in-a-workspace
/api-reference/openapi.json get /v1/workspaces/{workspaceId}/pages
Returns a paginated list of tracked pages in the workspace. Supports text search, category filtering, and sorting.
# Update a page
Source: https://help.semji.com/api-reference/pages/update-a-page
/api-reference/openapi.json put /v1/pages/{pageId}
Updates a page focus keyword and/or URL category. The URL category cannot currently be unset once assigned.
# Create a prompt
Source: https://help.semji.com/api-reference/prompts/create-a-prompt
/api-reference/openapi.json post /v1/keywords/{keywordId}/prompts
Creates a GEO prompt for a keyword.
# Generate prompt analysis report
Source: https://help.semji.com/api-reference/prompts/generate-prompt-analysis-report
/api-reference/openapi.json post /v1/prompts/{promptId}/report
Returns an analysis report for the prompt, scoring the provided content against ChatGPT. The report contains the data computed by the prompt analysis — an overall score, typed recommendations (each with its own sub-score and supporting data), the cited sources, the mentioned brands, and the markdown preview of ChatGPT's response. Provide either `contentId` (by reference) or `title` + `html` (by value), not both.
# Get prompt details
Source: https://help.semji.com/api-reference/prompts/get-prompt-details
/api-reference/openapi.json get /v1/prompts/{promptId}
Returns details of a prompt. Useful for polling analysisStatus after launching a GEO analysis.
# Launch prompt analysis
Source: https://help.semji.com/api-reference/prompts/launch-prompt-analysis
/api-reference/openapi.json post /v1/prompts/{promptId}/analyze
Triggers an asynchronous analysis on a prompt (ChatGPT). The parent keyword must have a completed keyword analysis. Poll GET /v1/prompts/:promptId to track progress.
# List prompts for a keyword
Source: https://help.semji.com/api-reference/prompts/list-prompts-for-a-keyword
/api-reference/openapi.json get /v1/keywords/{keywordId}/prompts
Returns GEO prompts associated with a keyword.
# Rate Limits
Source: https://help.semji.com/api-reference/rate-limits
Understand Semji API rate limits, how to read rate limit response headers, handle 429 errors, and implement exponential backoff in your integration.
The Semji API enforces rate limits to ensure fair usage and stable performance for all customers. Understanding these limits and building retry logic into your integration will prevent disruptions in production. This page explains the limits in place, the response headers you can use to track your usage, and recommended strategies for handling errors gracefully.
## Limits
Two rate limits apply to every API key simultaneously:
| Limit | Window | Maximum |
| - | - | - |
| Hourly | 1 hour (rolling) | 1,000 requests |
| Burst | 1 second | 20 requests |
Both limits are enforced per API key. The hourly limit is a rolling window — it tracks requests over the past 60 minutes, not a fixed clock-hour boundary. The burst limit prevents sudden spikes that could affect service reliability even when your hourly budget is healthy.
Health check (`/health`), OpenAPI spec (`/openapi.json`), and documentation (`/docs`) endpoints are excluded from rate limiting.
## Rate limit headers
Every API response includes the following headers reflecting your current hourly limit status:
The maximum number of requests allowed per hour for this API key.
The number of requests remaining in the current rolling hour window.
The number of seconds until the oldest request in the rolling window falls out and your remaining count increases.
You can inspect these headers with curl using the `-i` flag:
```bash title="Inspect rate limit headers" theme={null}
curl -i https://api.semji.com/v1/me \
-H "Authorization: Bearer sk_your_api_key_here"
```
```text title="Response headers (excerpt)" theme={null}
HTTP/2 200
x-ratelimit-limit: 1000
x-ratelimit-remaining: 847
x-ratelimit-reset: 1823
content-type: application/json
```
## When the limit is exceeded
When you exceed either limit, the API responds with `429 Too Many Requests`. The response body follows the standard error format:
```json title="429 Too Many Requests" theme={null}
{
"error": {
"code": "rate_limited",
"message": "Too many requests. Please try again later."
}
}
```
On a `429`, the response also includes a `Retry-After` header indicating the number of seconds to wait before retrying.
## Handling 429 errors
### Exponential backoff
The recommended approach is exponential backoff with jitter. Wait progressively longer between retries, and add a small random delay to avoid synchronized retry storms across multiple workers:
```typescript title="TypeScript" theme={null}
const apiKey = process.env.SEMJI_API_KEY;
async function semjiGet(path: string, maxRetries = 5) {
const url = `https://api.semji.com/v1${path}`;
for (let attempt = 0; attempt < maxRetries; attempt++) {
const response = await fetch(url, {
headers: { Authorization: `Bearer ${apiKey}` },
});
if (response.status === 429) {
const retryAfter = parseInt(response.headers.get("Retry-After") ?? "2", 10);
const jitter = Math.random();
const wait = (retryAfter + jitter) * 1000;
console.log(`Rate limited. Retrying in ${(wait / 1000).toFixed(1)}s`);
await new Promise((resolve) => setTimeout(resolve, wait));
continue;
}
if (!response.ok) {
const error = await response.json();
throw new Error(`${response.status}: ${error.error.message}`);
}
return response.json();
}
throw new Error(`Exceeded ${maxRetries} retries for ${path}`);
}
```
```python title="Python" theme={null}
import os
import time
import random
import requests
api_key = os.environ["SEMJI_API_KEY"]
def semji_get(path: str, max_retries: int = 5) -> dict:
url = f"https://api.semji.com/v1{path}"
headers = {"Authorization": f"Bearer {api_key}"}
for attempt in range(max_retries):
response = requests.get(url, headers=headers)
if response.status_code == 429:
retry_after = int(response.headers.get("Retry-After", 2 ** attempt))
jitter = random.uniform(0, 1)
wait = retry_after + jitter
print(f"Rate limited. Retrying in {wait:.1f}s (attempt {attempt + 1})")
time.sleep(wait)
continue
response.raise_for_status()
return response.json()
raise RuntimeError(f"Exceeded {max_retries} retries for {path}")
```
### Proactively monitoring your budget
Instead of waiting for a `429`, read the `X-RateLimit-Remaining` header on each response and slow down when your budget runs low:
```python title="Proactive throttling (Python)" theme={null}
import time
import requests
def semji_get_with_throttle(session: requests.Session, url: str) -> dict:
response = session.get(url)
response.raise_for_status()
remaining = int(response.headers.get("X-RateLimit-Remaining", 1000))
reset_in = int(response.headers.get("X-RateLimit-Reset", 0))
# Slow down when fewer than 50 requests remain
if remaining < 50 and reset_in > 0:
sleep_time = reset_in / max(remaining, 1)
time.sleep(min(sleep_time, 5)) # Cap at 5s between requests
return response.json()
```
## Best practices
Content generation jobs (`/v1/content-generations`) are asynchronous. Poll their status with a reasonable interval — every 5–10 seconds is sufficient. Polling every second wastes your request budget without providing faster results.
**Cache responses where possible.** Resources like workspaces, brand voices, and knowledge documents rarely change. Cache their IDs and names for the duration of your session rather than fetching them on every run.
**Use pagination efficiently.** Fetch only the pages you need. Use the maximum `limit=100` when you need to process all items in a collection, rather than making many small requests.
**Batch reads before writes.** If your workflow reads several resources before creating or updating one, perform all the reads first. This groups your writes into a smaller time window and leaves more headroom for subsequent operations.
**Avoid retrying 4xx errors other than 429.** Errors in the `400`–`428` range indicate a problem with the request itself (bad input, missing permissions, not found). Retrying them will not help and only wastes your quota. Fix the request and then retry.
# List organization members
Source: https://help.semji.com/api-reference/users/list-organization-members
/api-reference/openapi.json get /v1/users
Returns all members of the organization linked to the API key, with their role.
# Get workspace details
Source: https://help.semji.com/api-reference/workspaces/get-workspace-details
/api-reference/openapi.json get /v1/workspaces/{workspaceId}
Returns details of a specific workspace.
# List content statuses
Source: https://help.semji.com/api-reference/workspaces/list-content-statuses
/api-reference/openapi.json get /v1/workspaces/{workspaceId}/content-statuses
Returns all content statuses for a workspace, ordered by position. Includes system statuses ("to do", "published") which are read-only.
# List workspace members
Source: https://help.semji.com/api-reference/workspaces/list-workspace-members
/api-reference/openapi.json get /v1/workspaces/{workspaceId}/users
Returns all members of a workspace with their role.
# List workspaces
Source: https://help.semji.com/api-reference/workspaces/list-workspaces
/api-reference/openapi.json get /v1/workspaces
Returns all workspaces in the organization accessible to the authenticated user.
# Semji API & MCP Documentation
Source: https://help.semji.com/developers/overview
Integrate Semji into your workflows through the REST API, or let Claude, ChatGPT, or any AI assistant drive your workspace via the MCP server.
Semji helps you scale your organic and AI visibility. This documentation covers everything you need to integrate Semji into your workflows, whether you prefer calling the REST API directly or letting Claude, ChatGPT, or any AI assistant drive your workspace through the MCP server.
Set up your first workspace, import a page, and make your first API call in minutes.
Explore all REST endpoints — workspaces, pages, keywords, contents, and more.
Connect Claude, ChatGPT, or any AI assistant to Semji with natural language.
## Authentication
All API requests require a Bearer API key. Generate one from **Settings > Organization > API Keys** in the Semji app.
```http theme={null}
Authorization: Bearer sk_your_api_key_here
```
See the [Authentication guide](/api-reference/authentication) for detailed instructions on generating keys, rate limits, and error handling.
## Built for AI agents
This documentation is designed to be easily consumed by AI tools like Claude, ChatGPT, or any LLM-powered agent.
* **llms.txt** — A machine-readable index of the entire documentation is available at [`/llms.txt`](https://help.semji.com/llms.txt) and [`/llms-full.txt`](https://help.semji.com/llms-full.txt), following the [llms.txt standard](https://llmstxt.org).
* **Copy as context** — Every page has a **Copy page** button that copies the content as Markdown, ready to paste into your favorite AI assistant.
* **[MCP server](/mcp/overview)** — Connect your AI assistant directly to Semji and interact with your workspace using natural language.
# Webinars & replays
Source: https://help.semji.com/en/resources-and-webinars/general
Webinar replays and recap articles on the latest SEO and AI strategies.
* [Replay SEO Square](/en/resources-and-webinars/replay-seo-square)
* [📢 The ultimate recap of the best SEO & AI webinars: Key strategies & insights!](/en/resources-and-webinars/recap-webinar)
* [Masterclass: Gain Visibility and Performance with Our New GEO and Agents Features](/en/resources-and-webinars/masterclass-gain-visibility-and-performance-with-our-new-geo-and-agents-features)
# Masterclass: Gain Visibility and Performance with Our New GEO and Agents Features
Source: https://help.semji.com/en/resources-and-webinars/masterclass-gain-visibility-and-performance-with-our-new-geo-and-agents-features
Turn ChatGPT into an acquisition channel and multiply your content output with AI agents
Don't lose traffic to AI search engines like ChatGPT. Discover how to capture this new audience and produce 10x more compliant content with Semji AI agents. Mathieu and Melissa reveal two innovations available now to maintain your competitive edge and accelerate your growth.
* **[02:37](https://www.youtube.com/watch?v=Ur6wHr-ANOI\&t=157s) The Double AI Shift Transforming Your Market:** Understand the two unavoidable transformations reshaping digital marketing: AI search engines and agentic AI. Learn why your challenge is no longer whether to adopt but how to stay competitive and defend your market share.
* **[03:16](https://www.youtube.com/watch?v=Ur6wHr-ANOI\&t=196s) The 4-Pillar Strategy to Win with AI:** Structure your AI marketing approach methodically: compare performance vs. competitors, detect growth opportunities with your expertise, optimize SEO/GEO content, and measure ROI across all channels.
* **[06:49](https://www.youtube.com/watch?v=Ur6wHr-ANOI\&t=409s) GEO Tracking: Capture AI Search Engine Traffic:** Measure your visibility on ChatGPT and Google AI Overview with the same KPIs as SEO. Identify where you're losing traffic and which competitors are outranking you on these critical new acquisition channels.
* **[13:32](https://www.youtube.com/watch?v=Ur6wHr-ANOI\&t=812s) GEO Optimization: Win ChatGPT Citations and Mentions:** Access the equivalent of Google's "top 3" for ChatGPT by analyzing sources, browsed sources, and brand mentions. Get actionable recommendations with concrete examples to close content gaps vs. competitors.
* **[31:14](https://www.youtube.com/watch?v=Ur6wHr-ANOI\&t=1874s) Social Media Assistant: Multiply Content Production Effortlessly:** Automatically transform long-form content (guides, articles) into platform-optimized posts (Facebook, LinkedIn, newsletter). Provide a few style examples, add your custom instructions, and the agent reproduces your tone instantly. Save hours per content piece.
* **[33:17](https://www.youtube.com/watch?v=Ur6wHr-ANOI\&t=1997s) Legal Compliance Expert Agent: Validate Content in Minutes vs. Weeks:** Dramatically reduce legal validation cycles by automatically pre-checking content against your reference bodies (insurance, banking regulations, etc.). Get instant audits with identified violations and ready-to-copy corrective solutions to publish faster without compromising compliance.
* **[40:00](https://www.youtube.com/watch?v=Ur6wHr-ANOI\&t=2400s) Custom Agents: Build Tailor-Made AI Assistants:** Customize agents infinitely for your specific needs. Create a SERP analyzer comparing your content to competitors with actionable priority recommendations, a structured data optimizer, or any other use case fitting your workflow. Deploy rapidly without technical AI expertise, integrated directly into your Semji workflow.
# Resources & Webinars
Source: https://help.semji.com/en/resources-and-webinars/overview
Access webinar replays, educational resources and expert insights to improve your SEO and content marketing skills.
Webinar replays and recap articles on the latest SEO and AI strategies.
# 📢 The ultimate recap of the best SEO & AI webinars: Key strategies & insights!
Source: https://help.semji.com/en/resources-and-webinars/recap-webinar
🚀 Exclusive recap of the best SEO & AI Webinars: Trends, expert insights, and actionable strategies to dominate search and engagement.
### AI & SEO 2025: Mastering content, data, reputation and engagement
In a world where AI and SEO are rapidly evolving, this session unveils expert insights on mastering content, reputation, and engagement to dominate search in 2025. Packed with game-changing strategies, it’s a must-watch for businesses looking to stay ahead in the AI-driven digital landscape.
🔹 **[00:19:00 - 00:27:00](https://youtu.be/mTaXD5VV1rU?si=tzYNG1vPKkdnuYeh\&t=1140)** – *AI & Content: The Winning Formula*
Discover how AI can enhance content strategies—not just for automation, but to boost originality, intent targeting, and engagement.
🔹 **[00:50:00 - 00:57:00](https://youtu.be/mTaXD5VV1rU?si=tzYNG1vPKkdnuYeh\&t=3000)** – *Google’s E-E-A-T & Trust in AI Content*\
Why reputation, expertise, and credibility are now essential for ranking—and how AI-generated content can be trustworthy when done right.
🔹 **[01:10:00 - 01:10:59](https://youtu.be/mTaXD5VV1rU?si=tzYNG1vPKkdnuYeh\&t=4200)** – *The Future of Search: AI Agents & Conversational SEO*\
SEO is shifting from keywords to conversations—learn how AI agents and natural language search will redefine content discovery.
### Predicting search intent with AI and A/B testing: revolutionizing customer acquisition in 2025
AI is redefining search intent prediction and customer acquisition, shifting from keyword-based SEO to intent-driven strategies. This session uncovers cutting-edge AI techniques that enhance content, optimize A/B testing, and boost conversions.
🔹 **[07:00 - 09:00](https://youtu.be/LY3iWW3xtCo?si=UV3iUJ4gE-uLMjL-\&t=420)** – *The End of Keyword-Based SEO*\
Search is no longer about simple keywords—learn why AI-driven intent recognition is the future of SEO.
🔹 **[14:30 - 17:00](https://youtu.be/LY3iWW3xtCo?si=UV3iUJ4gE-uLMjL-\&t=870)** – *AI-Powered A/B Testing & Personalization*\
Discover how AI-driven A/B testing enhances personalization and conversion rates by adapting to user intent.
🔹 **[28:00 - 30:30](https://youtu.be/LY3iWW3xtCo?si=UV3iUJ4gE-uLMjL-\&t=1680)** – *AI in Customer Acquisition & Retention*\
Learn how AI refines marketing strategies, from predictive intent modeling to personalized customer journeys.
🔹 **[42:15 - 44:30](https://youtu.be/LY3iWW3xtCo?si=UV3iUJ4gE-uLMjL-\&t=2535)** – *The Future of AI in SEO & Marketing*\
Key insights into how AI will reshape search algorithms, ranking factors, and content strategies in 2025.
### AI-driven link building and content strategy: redefining SEO performance for 2025
AI is revolutionizing link building and content strategy, shifting SEO from traditional methods to smarter, data-driven optimization. This session reveals how AI can enhance link quality, content relevance, and SEO performance in 2025.
🔹 **[06:01 - 09:30](https://youtu.be/REs736NMdQA?si=R8F-IT7tFzJgZg4_\&t=361)** – *AI-Powered SEO: The New Era of Link Building*\
Discover why AI-driven link building is no longer about volume but about precision, authority, and relevance.
🔹 **[14:45 - 18:20](https://youtu.be/REs736NMdQA?si=R8F-IT7tFzJgZg4_\&t=885)** – *Google’s Evolving Algorithm: How AI Shapes Search Rankings*\
Understand how Google’s AI-driven updates prioritize high-quality content and authoritative backlinks over traditional SEO tactics.
🔹 **[28:10 - 31:50](https://youtu.be/REs736NMdQA?si=R8F-IT7tFzJgZg4_\&t=1690)** – *Content Clusters & AI-Optimized Internal Linking*\
Learn how AI helps structure content clusters, build topical authority, and optimize internal linking for maximum search visibility.
🔹 **[42:30 - 46:10](https://youtu.be/REs736NMdQA?si=R8F-IT7tFzJgZg4_\&t=2550)** – *AI-Driven Outreach: Smarter Link Acquisition Strategies*\
Discover how AI can streamline outreach, identify the best link opportunities, and improve link quality without spammy tactics.
### 7 Must-Know SEO Trends for e-Commerce Brands in 2025!
E-commerce SEO in 2025 is evolving rapidly, with AI-driven search, brand familiarity, and multi-channel discovery reshaping consumer behavior. This session unveils the must-know trends to optimize your strategy and stay ahead of the competition.
🔹 **[05:30 - 08:45](https://youtu.be/pgnXeHziHLo?si=7fz7vezxmD2zQmOe\&t=330)** – *From Search to Discovery: How Consumer Behavior is Changing*\
E-commerce is shifting from traditional search-based shopping to AI-driven product discovery across social media and search engines.
🔹 **[14:10 - 17:20](https://youtu.be/pgnXeHziHLo?si=7fz7vezxmD2zQmOe\&t=850)** – *Brand Familiarity: The Shortcut to Higher Click-Through Rates*\
Consumers are more likely to buy from brands they recognize—learn how to integrate SEO and branding to increase visibility and conversions.
🔹 **[28:40 - 32:15](https://youtu.be/pgnXeHziHLo?si=7fz7vezxmD2zQmOe\&t=1720)** – *Google’s AI Overviews: How Search is Changing*\
With AI-generated search results on the rise, discover how e-commerce brands can optimize their content to remain visible and authoritative.
🔹 **[42:50 - 46:30](https://youtu.be/pgnXeHziHLo?si=7fz7vezxmD2zQmOe\&t=2570)** – *Optimizing Category Pages for SEO & Conversions*\
Category pages are more important than ever—learn how to structure content, enhance product visibility, and improve search rankings.
### Webinar -From Google to TikTok: Developing Integrated SEO and Content Strategies
The future of SEO isn’t just about Google—TikTok and social media are reshaping how audiences discover and validate content. This session reveals how brands can integrate SEO with social platforms to maximize reach and engagement.
🔹 **[05:00 - 08:30](https://youtu.be/cAHt7LMlGas?si=86ut8mgvolp709bF\&t=300)** – *Google is No Longer the Only Search Engine*
Younger generations are shifting from Google to TikTok, YouTube, and Reddit for discovery—learn how to adapt your strategy.
🔹 **[14:10 - 17:45](https://youtu.be/cAHt7LMlGas?si=86ut8mgvolp709bF\&t=850)** – *How TikTok Trends Influence Google Search*\
See real data on how viral TikTok trends drive spikes in Google search demand and what that means for SEO strategies.
🔹 **[28:30 - 32:20](https://youtu.be/cAHt7LMlGas?si=86ut8mgvolp709bF\&t=1710)** – *Using AI & Automation to Convert TikTok Trends into SEO Content*\
Learn how AI can transform TikTok video insights into high-ranking, search-optimized content in minutes.
🔹 **[42:50 - 46:30](https://youtu.be/cAHt7LMlGas?si=86ut8mgvolp709bF\&t=2570)** – *Winning with an Integrated SEO & Content Strategy*\
Discover actionable tips to blend social media, search, and AI-driven content to dominate in 2025.
### Guide to SEO & Content leadership: How to secure the top spot in SERPs
SEO success in 2025 requires aligning strategy with business goals, leveraging AI for efficiency, and adapting to an ever-changing search landscape. This session reveals the key strategies for securing the top spot in SERPs through data-driven decisions and content excellence.
🔹 **[07:00 - 09:30](https://youtu.be/UDQG_iQRro4?si=JN4X6WBkcSbQMpQ8\&t=420)** – *SEO as the Best Long-Term Investment*\
Why SEO delivers the highest ROI compared to paid channels and how to convince decision-makers to invest in it.
🔹 **[14:45 - 18:20](https://youtu.be/UDQG_iQRro4?si=JN4X6WBkcSbQMpQ8\&t=885)** – *Using AI & Data to Choose Your SEO Battles*\
Stop relying on intuition—learn how AI and data-driven insights help prioritize SEO efforts for maximum impact.
🔹 **[28:10 - 31:50](https://youtu.be/UDQG_iQRro4?si=JN4X6WBkcSbQMpQ8\&t=1690)** – *The Power of Topic Clusters & Internal Linking*\
Discover why content hubs and internal linking strategies are crucial for building topical authority and ranking higher.
🔹 **[42:30 - 46:10](https://youtu.be/UDQG_iQRro4?si=JN4X6WBkcSbQMpQ8\&t=2550)** – *How to Future-Proof Your SEO Strategy*\
SEO is constantly evolving—learn how to adapt to Google’s changes, optimize for AI-driven search, and maintain top rankings.
### Webinar - Building trust and adoption of AI in newsroom with Arc XP and Mather Economics
AI is transforming newsrooms by streamlining content production, enhancing audience engagement, and optimizing distribution. This session explores how publishers can build trust in AI, overcome resistance to change, and implement automation for sustainable success.
🔹 **[06:00 - 09:30](https://youtu.be/xfHoBoUPRi8?si=6_LVObY3DS5XR-vZ\&t=360)** – *AI in Newsrooms: Efficiency vs. Quality Debate*
Discover how AI is improving newsroom efficiency while ensuring journalistic integrity and content quality.
🔹 **[14:45 - 18:20](https://youtu.be/xfHoBoUPRi8?si=6_LVObY3DS5XR-vZ\&t=885)** – *Overcoming Resistance: How to Gain Buy-in for AI Adoption*\
Learn how to introduce AI workflows without disrupting editorial teams and ensure seamless integration.
🔹 **[28:10 - 31:50](https://youtu.be/xfHoBoUPRi8?si=6_LVObY3DS5XR-vZ\&t=1690)** – *AI-Powered Personalization & Content Automation*\
How leading publishers are using AI-driven recommendations, paywall strategies, and automated content curation.
🔹 **[42:30 - 46:10](https://youtu.be/xfHoBoUPRi8?si=6_LVObY3DS5XR-vZ\&t=2550)** – *Future of AI in Journalism: What to Expect in 2025 & Beyond*\
Explore upcoming trends in AI-powered news production, audience engagement, and revenue generation strategies.
### Webinar - 5 key steps to succeed in your global SEO strategy
Expanding your SEO strategy globally requires more than just translating content—it demands deep market research, technical optimization, and adapting to regional search behaviors. This session breaks down the five key steps to successfully scaling your SEO worldwide.
🔹 **[06:00 - 09:30](https://youtu.be/6ObWTyXFl0o?si=wp18oXHYz_6f3ewH\&t=360)** – *How to Identify the Right Markets for Expansion*\
Discover how to analyze traffic data, competitor presence, and search trends to choose the best regions for global SEO growth.
🔹 **[14:45 - 18:20](https://youtu.be/6ObWTyXFl0o?si=wp18oXHYz_6f3ewH\&t=885)** – *The Role of Search Engines Beyond Google*\
Understand why targeting alternative search engines like Baidu, Yandex, or Bing is crucial in specific markets.
🔹 **[28:10 - 31:50](https://youtu.be/6ObWTyXFl0o?si=wp18oXHYz_6f3ewH\&t=1690)** – *Translating vs. Localizing Content: What Really Works*\
Learn why direct translation isn’t enough and how adapting content to local culture and search intent boosts rankings.
🔹 **[42:30 - 46:10](https://youtu.be/6ObWTyXFl0o?si=wp18oXHYz_6f3ewH\&t=2550)** – *Technical SEO for International Success*\
Best practices for implementing hreflang tags, domain structures, and optimizing site performance for multiple regions.
# Replay SEO Square
Source: https://help.semji.com/en/resources-and-webinars/replay-seo-square
Replay SEO Square
### Zero-Click Marketing: How to Win Attention Without Chasing Algorithms
Amanda Natividad from SparkToro reveals how marketing is fundamentally changing as clicks disappear but attention remains. This session explores the shift from traditional funnel-based marketing to building brand influence through zero-click content, backed by real data on traffic patterns and attribution challenges that every marketer faces today.
* **[02:33](https://www.youtube.com/watch?v=vVQYyULo5Zw\&t=153s) The disappearing click crisis:** Understand why 60% of Google searches now end without clicks, how social platforms are actively penalizing external links, and why attribution tracking is fundamentally broken with dark social hiding up to 100% of referral data.
* **[16:04](https://www.youtube.com/watch?v=vVQYyULo5Zw\&t=964s) From marketing funnel to brand vortex:** Discover the revolutionary shift from pushing people through funnels to creating powerful content that pulls audiences in wherever they are, building trust and intent through consistent visibility rather than click optimization.
* **[20:39](https://www.youtube.com/watch?v=vVQYyULo5Zw\&t=1239s) Audience research vs keyword research:** Learn why traditional keyword research only tells you what people search for, while audience research reveals where they spend time, who they trust, and how their interests evolve - the key to creating resonant content.
* **[24:23](https://www.youtube.com/watch?v=vVQYyULo5Zw\&t=1463s) Practical zero-click strategies:** Master tactical approaches like creating LinkedIn saved searches to monitor audience behavior, leveraging subreddit conversations, and analyzing your own content performance to build sustainable community-driven growth.
### AI-driven SEO: Leveraging Technical & Content Optimizations for Future-Proof Strategies
Charley from Semji and Joshua dive deep into Generative Engine Optimization (GEO), revealing how AI-powered search engines like ChatGPT and Perplexity are reshaping SEO. This technical discussion covers everything from how answer engines actually work to actionable strategies for optimizing content, with insights from analyzing millions of citations and queries.
* **[05:20](https://www.youtube.com/watch?v=1E_XSiZOkoE\&t=320s) How AI answer engines actually retrieve information:** Understand the fundamental differences between Google AI Overviews (built on PageRank), ChatGPT (using Bing API with query regularization), and Perplexity (vector-based proprietary index) - revealing why traditional SEO metrics don't always transfer.
* **[15:29](https://www.youtube.com/watch?v=1E_XSiZOkoE\&t=929s) Game-changing research findings on 177 million citations:** Discover why there's only 12% overlap between ChatGPT and Google results, why listicles dominate with 32.9% of all citations, and how Reddit became ChatGPT's second most cited source with a 400% increase.
* **[21:53](https://www.youtube.com/watch?v=1E_XSiZOkoE\&t=1313s) Critical technical optimizations for GEO success:** Learn why answer engines can't render JavaScript content, how to leverage LMS.txt for accuracy plays, and master log file analysis to reverse engineer AI search patterns and user behavior.
* **[28:09](https://www.youtube.com/watch?v=1E_XSiZOkoE\&t=1689s) Content optimization strategies that actually work:** Master the art of value-preview meta descriptions, understand why ChatGPT appends "2025" to 40-60% of queries, and structure semantic HTML chunks for maximum citation potential in answer engines.
### From Performance to Influence – The New SEO
Kevin Indig presents an in-depth analysis of SEO evolution in the face of Google's AI overviews. Based on data from 5 billion queries and the first-ever AIO usability study, this webinar reveals how marketers must rethink their strategy to shift from performance to influence in this new AI-transformed SEO landscape.
* **[01:33](https://www.youtube.com/watch?v=5USsvp4LgUU\&t=93s) The fundamental shift in SEO due to AI overviews:** Understanding how 2025 presents the biggest change to SEO ever, with the new traffic pattern showing clicks down and impressions up across the entire ecosystem.
* **[05:04](https://www.youtube.com/watch?v=5USsvp4LgUU\&t=304s) Quantitative research revealing the macro impact:** Analysis of over 5 billion queries showing how AI overviews increase Google usage but significantly reduce website traffic, with zero-click searches rising from 72% to 76%.
* **[12:14](https://www.youtube.com/watch?v=5USsvp4LgUU\&t=734s) Groundbreaking usability study insights:** Discover the first-ever AIO usability study with 70 participants, revealing that users love AI overviews but only 20% of final answers come from them, with critical findings about trust, emotions, and demographics.
* **[30:24](https://www.youtube.com/watch?v=5USsvp4LgUU\&t=1824s) Actionable strategies for the new SEO era:** Learn the five key tactics to thrive in the post-click SEO world, from detaching from clicks to leveraging AI for content creation and multi-channel presence on Reddit and YouTube.
### Zero-Click SEO: organic conversion strategies for both AI and traditional search
Comprehensive masterclass by Dale Bertrand (CEO, Fire and Spark) on optimizing for the zero-click era. Learn the VECTOR framework for AI search optimization, understand vector embeddings vs keyword search, master Google AI mode's 6-step process, and discover tactics for expanding relevance, clarifying answers, and creating unconverable interactive tools.
* **[04:03](https://youtu.be/O-8MQe_kAbE?si=gPKHIiWie3bb5Z_J\&t=243s) Semantic vs lexical search revolution:** Understand why keyword search is dead - modern search engines use vector embeddings to find semantically similar content, not keyword matches. Learn the library analogy that explains how AI organizes content by meaning.
* **[10:59](https://youtu.be/O-8MQe_kAbE?si=gPKHIiWie3bb5Z_J\&t=659s) Google AI mode's 6-step process:** Master how AI mode works: query understanding, query fan-out, reasoning chains, context understanding, content selection, and response generation - plus why it's conversation, not ranking.
* **[16:41](https://youtu.be/O-8MQe_kAbE?si=gPKHIiWie3bb5Z_J\&t=1001s) The VECTOR framework revealed:** Discover Dale's comprehensive optimization system: Verify intents, Expand relevance, Clarify answers, Target mentions (digital PR), Optimize for assembly, and Refresh passages for AI visibility.
* **[30:47](https://youtu.be/O-8MQe_kAbE?si=gPKHIiWie3bb5Z_J\&t=1847s) Interactive tools strategy:** Learn how to create unconverable content with AI-generated interactive tools (calculators, assessments) that force users to visit your site, provide first-party data, and can't be summarized by AI.
### How to build an LLM readiness audit: a practical framework
Essential practical guide by Nick Samuel (Head of Technical SEO, Dentsu) for preparing your website for LLM-powered search. Get access to Dentsu's comprehensive LLM readiness audit framework with 5 pillars, downloadable Google Sheet scorecard, and concrete action items to future-proof your SEO strategy in the AI era.
* **[04:02](https://youtu.be/B21YIt50VVY?si=UBgaaGiF96UxMRQd\&t=242s) The new era context:** Understand the fundamental shift to AI-powered search, diversification of search engines, and key milestones like AI mode global launch and agentic AI capabilities that will reshape SEO.
* **[14:56](https://youtu.be/B21YIt50VVY?si=UBgaaGiF96UxMRQd\&t=896s) The 5-pillar LLM readiness framework:** Discover Dentsu's comprehensive audit system covering Analytics & Measurement, Crawling & Indexation, UX & Rendering, Technical Discovery, and Content & Authority with downloadable scorecard.
* **[18:44](https://youtu.be/B21YIt50VVY?si=UBgaaGiF96UxMRQd\&t=1124s) Analytics and measurement essentials:** Learn 5 critical actions including LLM traffic tracking with regex filters, brand share of voice measurement, AI overview tracking, and server log analysis for bot behavior.
* **[24:33](https://youtu.be/B21YIt50VVY?si=UBgaaGiF96UxMRQd\&t=1473s) Technical optimization tactics:** Master crawling optimization (robots.txt for AI bots), indexation verification methods, schema implementation for products, JavaScript rendering issues, and performance improvements for LLM accessibility.
### Bridging the two worlds of AI and traditional search on Google and beyond
Data-driven masterclass by Ray Grieselhuber (CEO, Demandsphere) debunking the AI vs traditional search dichotomy. Discover why everything is already AI search, learn unified data modeling techniques, understand index overlap between ChatGPT and Google, and master attention-based metrics beyond clicks using visual rank and pixel depth analysis.
* **[02:33](https://www.youtube.com/watch?v=EkLJaQWVfIk\&t=153s) The false dichotomy myth:** Understand why "traditional vs AI search" is misleading - everything is AI search now. Google pioneered transformer architecture and LLMs years ago, it's about search experience interfaces, not different technologies.
* **[07:14](https://www.youtube.com/watch?v=EkLJaQWVfIk\&t=434s) Attention over clicks paradigm:** Learn why traffic is just a proxy for attention. Master SERP features as attention magnets, visual rank analysis, and pixel depth measurement to understand true user behavior beyond click-through rates.
* **[12:25](https://www.youtube.com/watch?v=EkLJaQWVfIk\&t=745s) Unified data view case study:** See concrete TripAdvisor example showing 33% CTR explained by AI Overview citations. Learn how combining SERP data with Search Console reveals hidden insights about AI traffic sources.
* **[18:33](https://www.youtube.com/watch?v=EkLJaQWVfIk\&t=1113s) Index overlap revelation:** Discover research across 17 industries showing ChatGPT uses Google's index 50% of the time vs Bing. Understand how improving Google rankings directly impacts AI platform visibility.
### AI search and how to remain findable
Essential masterclass by Ann Smarty on staying visible in the AI search era. Discover the difference between losing clicks but not conversions, master GEO vs AIO strategies, learn why "do queries" are gold, and understand how to engineer your digital footprint for AI platforms including the crucial role of Reddit and co-citations.
* **[01:38](https://youtu.be/eVz3WIY7yRo?si=HLuQ15w-V136h0m2\&t=98s) The 10-year click decline reality:** Understand why we've been losing clicks for a decade (featured snippets, PAA) and how AI accelerates this trend with 30-50% traffic drops, but conversions still happen without clicks.
* **[05:47](https://youtu.be/eVz3WIY7yRo?si=HLuQ15w-V136h0m2\&t=347s) GEO vs AIO strategies:** Master the difference between Generative Engine Optimization (getting cited in AI answers for traffic) and Artificial Intelligence Optimization (converting without clicks through brand mentions).
* **[14:17](https://youtu.be/eVz3WIY7yRo?si=HLuQ15w-V136h0m2\&t=857s) "Do queries" are conversion gold:** Discover why action-intent queries are harder to summarize and drive more clicks. Learn how to identify and optimize for these high-converting search patterns.
* **[19:22](https://youtu.be/eVz3WIY7yRo?si=HLuQ15w-V136h0m2\&t=1162s) Engineering your AI footprint:** Learn relevance engineering tactics: brand knowledge content, co-citations, Reddit strategy, and how to make AI platforms understand your unique value proposition and differentiators.
### **Scaling SEO across borders: wins, fails & WTF moments from 3 global brands**
Gerry's masterclass on international SEO with 25 years of experience at Just Eat, Norwegian supermarket and other global brands. Discover why hreflang isn't enough, Google Merchant Center pitfalls, multilingual AI impact, and localization tricks to avoid the errors that can ruin your international efforts.
* **[02:57](https://youtu.be/Zvvth3_flT8?si=iSJ6kmooxM8CR0lm\&t=177s) Why international SEO is complex:** Discover concrete examples with Meta Quest and Lifestyle Sports showing how Google interprets queries differently based on geographic and linguistic intent.
* **[05:23](https://youtu.be/Zvvth3_flT8?si=iSJ6kmooxM8CR0lm\&t=323s) Beyond hreflang - Local EAT:** Understand why hreflang is just a signal, not a magic solution. Master the importance of localization vs translation and the concept of local EAT (expertise, authority, trust).
* **[20:44](https://youtu.be/Zvvth3_flT8?si=iSJ6kmooxM8CR0lm\&t=1244s) Google Merchant Center neglected:** Revelation about the most underutilized tool in international SEO. Learn why GMC has become crucial for traffic and how to prevent it from falling between SEO and Paid teams.
* **[22:44](https://youtu.be/Zvvth3_flT8?si=iSJ6kmooxM8CR0lm\&t=1364s) Multilingual AI and localization:** Master the challenges of English-trained AI, variable adoption rates by region, and expert prompting techniques to avoid failed literal translations.
### **AI beyond the hype: what's changing in Search, what's not, and what you need to do now**
Inspiring keynote by Perna on AI beyond the hype. Discover the 5 major transformations redefining marketing (B2ME, AI orchestration, responsive content), the 4 unchanging truths (trust, creativity, ethics), and 3 concrete actions to succeed right now in the era of generative AI.
* **[04:28](https://www.youtube.com/watch?v=KR-DI8AUefQ\&t=268s) The 5 shifts changing everything:** Discover the fundamental marketing transformations: from B2B/B2C to B2ME, from human to AI search, from optimization to orchestration, from planned to responsive content.
* **[04:47](https://www.youtube.com/watch?v=KR-DI8AUefQ\&t=287s) The revolutionary B2ME:** Understand how AI transforms marketing from static personas to living "identity graphs." Coca-Cola case study: 8M posts analyzed for 828k personalized coupons.
* **[19:57](https://www.youtube.com/watch?v=KR-DI8AUefQ\&t=1197s) The 4 unchanging truths:** Master what never changes despite AI: trust remains the foundation, your brand becomes AI's memory, human creativity stays irreplaceable, ethics define your boundaries.
* **[26:20](https://www.youtube.com/watch?v=KR-DI8AUefQ\&t=1580s) 3 concrete actions for right now:** Apply immediately: build for the "invisible funnel," prioritize "return on learning" over ROI, and codify your brand for machines with a Brand OS.
### **5 Marketing Trends You Can't Ignore in 2024**
Neil Patel explores 15 key trends shaping the marketing landscape in 2024, backed by data, and offers actionable insights on leveraging these trends for success in the coming year.
* [07:00](https://youtu.be/BcDY3faOYaw?t=420) – **Beyond Content Creation**\
Quality is now paramount in content creation. 15% of daily searches are brand new, presenting a wealth of keyword opportunities to target.
* [12:00](https://youtu.be/BcDY3faOYaw?t=720) – **The Importance of Long-Tail Keywords**\
Despite low traffic volume, ultra-long-tail keywords are increasingly driving revenue and should be prioritized.
* [19:00](https://youtu.be/BcDY3faOYaw?t=1140) – **Social Media Secrets**\
Short-form videos dominate engagement, but text-based content like how-tos and listicles still perform well, particularly on Instagram and TikTok.
* [25:00](https://youtu.be/BcDY3faOYaw?t=1500) – **Leveraging WhatsApp for Marketing**\
With a growing user base, WhatsApp offers significant engagement opportunities for marketers. Utilize it for direct communication and retargeting.
* [31:00](https://youtu.be/BcDY3faOYaw?t=1860) – **Human vs. AI Ads**\
Combining human creativity with AI tools yields the best results, with AI-generated ads outperforming human-only ads by 75.7%.
### **Because No One Lies to Their Search Bar: How Search Insights Leads to SEO Evangelism**
Stefan Bayo discusses how leveraging search insights can transform SEO strategies and help evangelize SEO within organizations by connecting with the business's core goals.
* [10:00](https://youtu.be/jHcntSIN-M4?t=600) – **SEO as a Marketing Tool**\
SEO is not just about rankings; it should be used strategically as part of the broader marketing efforts within the organization.
* [17:30](https://youtu.be/jHcntSIN-M4?t=1050) – **The Power of Search Insights**\
Search queries reflect true user intent, offering valuable insights into what people truly want, and how this can guide SEO and content strategies.
* [24:00](https://youtu.be/jHcntSIN-M4?t=1440) – **SEO Evangelism Within the Organization**\
To succeed, SEO needs to be proactive and integrated into the decision-making process, helping other teams understand the value of SEO beyond just traffic metrics.
### **From Local to Global: Grow Your Business by Mastering SEO**
In this session, the speakers explore essential strategies for expanding your business internationally through SEO, offering actionable tips on localization, technical SEO, and content adaptation.
* [02:00](https://youtu.be/WbluVLOJ9Rk?t=120) – **Setting Up for Global SEO Success**\
Key components for starting international SEO campaigns: research, market understanding, and the importance of local market adaptation.
* [10:00](https://youtu.be/WbluVLOJ9Rk?t=600) – **Localizing Content for Different Markets**\
Strategies for targeting the right keywords and creating SEO briefs for each market to ensure content resonates with the local audience.
* [18:00](https://youtu.be/WbluVLOJ9Rk?t=1080) – **Technical Considerations for Global SEO**\
Best practices for structuring your website with hreflang tags and understanding the impact of technical implementation on different markets.
* [26:00](https://youtu.be/WbluVLOJ9Rk?t=1560) – **Adapting Content to Local Audiences**\
Importance of adapting content based on cultural nuances and search intent, with examples on how content localization differs across markets.
### **Measuring SEO Success for Internal Buy-In**
In this session, industry experts Craig Harkins and Matthew Osuch discuss the challenges and strategies for measuring SEO success and gaining internal support for SEO projects.
* [05:00](https://youtu.be/9i8JgQXdzRM?t=300) – **Challenges in Communicating SEO Value**\
SEO teams often struggle to justify their efforts in terms of revenue, not just traffic. Focusing on driving non-brand, high-intent traffic that converts can be the key to securing buy-in.
* [12:00](https://youtu.be/9i8JgQXdzRM?t=720) – **Aligning SEO with Other Departments**\
By working closely with product, customer service, and marketing teams, SEO teams can demonstrate the broader impact of SEO on different business KPIs, such as reducing customer support calls and improving product conversions.
* [19:00](https://youtu.be/9i8JgQXdzRM?t=1140) – **SEO in the Product Organization vs. Marketing Organization**\
Being embedded in product teams provides SEO teams with greater access to technical resources and early product development, making it easier to influence product features that align with SEO goals.
* [27:00](https://youtu.be/9i8JgQXdzRM?t=1620) – **The Power of Data-Backed SEO Proposals**\
Leveraging data from both SEO tools and analytics teams helps SEO teams present clear, measurable goals. By proving ROI through traffic and revenue metrics, SEO becomes a more strategic partner.
### **Fireside Chat with Eli Schwartz**
Eli Schwartz shares his expert insights on SEO strategies that focus on user experience and business outcomes, as well as how AI is reshaping SEO in a post-rankings world.
* [02:30](https://youtu.be/fh4ljz7QzUA?t=150) – **SEO Beyond Rankings**\
Shifting focus from rankings to product-led SEO: how user experience and business outcomes should drive SEO strategies.
* [08:15](https://youtu.be/fh4ljz7QzUA?t=495) – **AI's Impact on SEO**\
AI tools enable more personalized SEO strategies, enhancing buyer personas and content alignment with user intent.
* [12:45](https://youtu.be/fh4ljz7QzUA?t=765) – **The Future of SEO with Search Generative Experience (SGE)**\
Google's SGE is changing SEO dynamics by providing direct answers in search results, requiring a focus on mid-funnel content optimization.
### **Finding Experimentation Hotspots on Your Website**
This session focuses on uncovering areas of your website that can be optimized through experimentation, helping to drive conversions and improve user experience.
* [02:00](https://youtu.be/X-9FrgFhn5g?t=120) – **Identifying the Right Testing Opportunities**\
Learn how to identify areas on your website where experimentation can yield the highest impact on user engagement and conversions.
* [14:00](https://youtu.be/X-9FrgFhn5g?t=840) – **Homepage Optimization Strategies**\
Understand how testing different aspects of the homepage, such as content layout and navigation, can improve user retention and guide visitors to the next steps.
* [20:00](https://youtu.be/X-9FrgFhn5g?t=1200) – **PLP (Product Listing Page) Tests to Increase Click-through Rates**\
Experiment with product imagery, CTAs, and reviews to drive higher engagement and click-through rates on product listing pages.
* [30:00](https://youtu.be/X-9FrgFhn5g?t=1800) – **Checkout Funnel Optimization**\
Test different strategies to reduce friction and improve conversion rates in the checkout process, focusing on user trust, payment methods, and cart summaries.
### **How Google Fights the AI Content Wave**
Kevin discusses how Google is combating low-quality and AI-generated content, focusing on spam, the shifting algorithms, and what you need to know to stay competitive.
* [02:00](https://youtu.be/Di07a1OE4tY?t=120) – **AI content poses a unique challenge for Google**\
Google's core business model is threatened as AI-generated content increases. Low-quality AI content is harder to detect, making it difficult for Google to maintain quality standards.
* [14:00](https://youtu.be/Di07a1OE4tY?t=840) – **Google's strategy to fight AI-generated content**\
Google is using tactics like labeling, human-generated content prioritization, and user signals to differentiate quality content from AI-generated material.
* [17:00](https://youtu.be/Di07a1OE4tY?t=1020) – **How AI and SGE will change search results**\
Google’s new Search Generative Experience (SGE) is reshaping how results are presented. By integrating AI-driven insights, Google aims to deliver more direct answers, impacting how SEO strategies will need to adapt.
* [32:00](https://youtu.be/Di07a1OE4tY?t=1920) – **The importance of content quality and technical SEO**\
Google is focusing heavily on content quality and the technical aspects of SEO, like reducing low-quality pages and improving site crawlability. This is crucial for maintaining visibility in search results.
### **Towards SEO Leadership: Amplifying Your Market Strategy with AI**
This workshop reveals strategies and tools for becoming an SEO leader by integrating AI into competitive analysis and content creation. Learn how to define, execute, and optimize your SEO strategy with advanced AI features.
* [02:00](https://youtu.be/_JAuxPB5bmU?t=120) – **AI is revolutionizing SEO content strategies**\
72% of companies now use AI for SEO — a game-changing shift from just 10% two years ago. AI is more than content creation; it’s a tool for better strategic decisions.
* [08:00](https://youtu.be/_JAuxPB5bmU?t=480) – **Defining your SEO battlefield**\
Understand your competitors' strengths and weaknesses through AI-powered analysis. This enables you to make informed decisions and capitalize on their gaps.
* [17:00](https://youtu.be/_JAuxPB5bmU?t=1020) – **Focus on content strategy and the marketing funnel**\
Align SEO with your business goals by focusing on the different stages of the marketing funnel — awareness, consideration, conversion — to optimize traffic flow.
* [28:00](https://youtu.be/_JAuxPB5bmU?t=1680) – **Using AI for quick competitive insights and content planning**\
AI can quickly identify competitors' successful content, allowing you to optimize your own pages or create new content to capture missed opportunities.
### **Unveiling the SEO Strategies Behind USA's Fastest Growing Ecommerce Companies**
Discover key SEO strategies that powered the growth of the fastest-growing e-commerce companies in the US. From brand awareness to content-led growth, these real-world examples show how small e-commerce brands are winning big.
* [03:00](https://youtu.be/qKeweHE_wic?t=180) – **Wild Grains: Content-Led SEO**\
By focusing on uncompetitive long-tail keywords and brand awareness, Wild Grains drove a 600% organic traffic increase. A clear example of how content can drive substantial growth.
* [10:00](https://youtu.be/qKeweHE_wic?t=600) – **Entity SEO and Trend Hijacking by Allore**\
Allore capitalized on the rising trend of Korean beauty, using entity SEO to make their brand synonymous with "Korean perfume," leading to strong organic traffic growth in a competitive market.
* [20:00](https://youtu.be/qKeweHE_wic?t=1200) – **Bird Buddy: Leveraging Demand and Product Page Optimization**\
Bird Buddy doubled its organic traffic by optimizing product pages with educational content, seasonal blogs, and meme generators. They also captured 38% of all organic clicks for "smart bird feeder."
* [30:00](https://youtu.be/qKeweHE_wic?t=1800) – **Greenies: Creative PR for Link Building**\
Greenies used a unique PR stunt with a designer collaboration to raise awareness about canine dental health, gaining high-quality links from fashion and pet care media, boosting both brand awareness and organic traffic.
### **Cognitive Biases: How to Use Psychological Theories to Improve Your SEO**
Sarah discusses how cognitive biases shape decision-making and how understanding these biases can enhance SEO strategies by aligning with user behavior and improving content effectiveness.
* [06:00](https://youtu.be/k4gbCaq2jSs?t=360) – **Anchoring bias: First impressions matter**\
People often make judgments based on initial information, even if it's irrelevant. Marketers can leverage this bias with pricing strategies and offer placements.
* [09:30](https://youtu.be/k4gbCaq2jSs?t=570) – **The mere exposure effect: Familiarity breeds trust**\
People tend to favor what they recognize. Marketers can increase engagement by reinforcing brand visibility across different platforms.
* [12:00](https://youtu.be/k4gbCaq2jSs?t=720) – **The framing effect: How information presentation impacts decisions**\
The way information is framed affects how consumers perceive products. For example, presenting "80% fat-free" is more appealing than "20% fat."
* [17:00](https://youtu.be/k4gbCaq2jSs?t=1020) – **Confirmation bias: People search for validation**\
Users often seek information that confirms their existing beliefs, which means marketers must tailor content to resonate with these biases.
### **Marketing Data, Fast and Slow**
Evan Kading (Supermetrics) delivers a high-level roadmap for building a measurement strategy that balances speed, depth, and data complexity — even in a world of AI disruption and cookie deprecation.
* [02:00](https://youtu.be/tiVKX-m2ouk?t=120) – **3 macro trends reshaping marketing measurement**\
Generative AI, third-party cookie loss, and regulatory uncertainty are forcing marketers to rethink how they track performance and prove value.
* [07:00](https://youtu.be/tiVKX-m2ouk?t=420) – **The 3-pillar measurement model: Post-exposure, MMM, and incrementality**\
A flexible framework combining fast insights and long-term attribution to align teams across SEO, paid, and content.
* [17:00](https://youtu.be/tiVKX-m2ouk?t=1020) – **The decision quadrant: Frequency vs. data volume**\
From tactical choices to strategic planning, every marketing decision type requires the right tool and dataset.
* [28:00](https://youtu.be/tiVKX-m2ouk?t=1680) – **How to test SEO’s true impact with incrementality**\
By temporarily cutting paid campaigns, brands can measure the real contribution of organic — and optimize spend accordingly.
* [30:00](https://youtu.be/tiVKX-m2ouk?t=1800) – **Why storing historical data is a competitive advantage**\
With GA4 and GSC deleting data after 14–18 months, brands need their own archives to benchmark performance and build long-term strategies.
### **8 Strange Things on Websites That Still Get Neglected – You Won’t Believe Number 4!**
In this fast-paced and humorous talk, Jerry White highlights overlooked technical elements that can make or break your site's performance — from forgotten files to SEO pitfalls, he covers it all with practical insights and real-world examples.
* [02:00](https://youtu.be/MqWMaC2VysU?t=120) – **The robots.txt file is still misunderstood**\
Many SEOs and devs misuse this simple file, either blocking crucial pages or failing to protect crawl budget effectively.
* [10:00](https://youtu.be/MqWMaC2VysU?t=600) – **XML sitemaps are often a mess**\
Broken URLs, missing multimedia, or outdated entries are common issues that harm crawlability and indexing.
* [17:00](https://youtu.be/MqWMaC2VysU?t=1020) – **RSS feeds aren’t dead — just neglected**\
From newsletters to syndication, RSS still has value, yet many feeds are broken or misconfigured.
* [21:30](https://youtu.be/MqWMaC2VysU?t=1290) – **Manifest.json & PWAs are a huge missed opportunity**\
A well-set manifest file boosts engagement through installable web apps, but most sites get it wrong — or skip it entirely.
* [29:00](https://youtu.be/MqWMaC2VysU?t=1740) – **CSP, schema, and asset linking can make (or break) trust**\
Security layers and structured data need more love — especially when brand reputation and UX are at stake.
### **🇺🇸 Rethink SEO: The modern approach to online growth**
Neil Patel delivers a sharp, data-backed vision of SEO in the age of AI, where growth depends on adapting to new search behaviors and platforms beyond Google.
* [03:00](https://youtu.be/iFyEXEFXubQ?t=180) – **Why most content fails to rank**\
Over 90% of pages get zero traffic — the issue isn’t SEO, it’s poorly optimized, non-competitive content.
* [08:45](https://youtu.be/iFyEXEFXubQ?t=525) – **Search is fragmenting across platforms**\
From Google to TikTok, consumers now search everywhere. Marketers must optimize beyond the classic SERPs.
* [17:00](https://youtu.be/iFyEXEFXubQ?t=1020) – **Ranking in AI-driven results like ChatGPT**\
Authority, relevance, and brand mentions matter more than ever for visibility in generative search.
* [25:20](https://youtu.be/iFyEXEFXubQ?t=1520) – **SEO that drives revenue, not just clicks**\
Focus on commercial-intent keywords and high-CPC terms to align SEO with business results.
* [30:00](https://youtu.be/iFyEXEFXubQ?t=1800) – **Update old content instead of always creating new**\
The fastest-growing sites prioritize refreshing and aligning existing content over constant publishing.
### **🇺🇸 "Ask Barry Anything About the Future of SEO !"**
A candid and insightful AMA session with Barry Schwartz, where he unpacks the real impact of AI on SEO, Google's evolving ecosystem, and how to stay ahead in a fast-changing landscape.
* [03:00](https://youtu.be/PidlaAJBJn0?t=180) – **3 ways AI is reshaping SEO workflows**\
From automation of tasks to content creation and AI-first search engines, Barry outlines how generative AI will redefine SEO over the next five years.
* [07:00](https://youtu.be/PidlaAJBJn0?t=420) – **Standing out in a sea of AI-generated content**\
Personality, storytelling, and original thinking are now key to building trust and visibility.
* [12:00](https://youtu.be/PidlaAJBJn0?t=720) – **How Google handles AI-generated content**\
Google doesn’t penalize AI content but targets manipulative or spammy uses.
* [16:45](https://youtu.be/PidlaAJBJn0?t=1005) – **Can Google lose its dominant position?**\
Despite pressure from ChatGPT, Perplexity, and the DOJ, Google’s search share remains strong—for now.
* [24:30](https://youtu.be/PidlaAJBJn0?t=1470) – **Is Google sharing too much or too little?**\
Transparency comes with risks: too many details fuel distrust and confusion.
* [36:00](https://youtu.be/PidlaAJBJn0?t=2160) – **AI search engines and publisher rights**\
Perplexity, Bing, and Google all face scrutiny for how they source content without proper credit.
* [41:00](https://youtu.be/PidlaAJBJn0?t=2460) – **The real risk of mass AI content production**\
Google is cracking down on mass-generated content designed to manipulate rankings.
* [43:00](https://youtu.be/PidlaAJBJn0?t=2580) – **What’s the future of link building?**\
Links matter less than before, but quality over quantity still applies.
# Access & connection issues
Source: https://help.semji.com/en/troubleshooting-and-support/access-and-connection-issues
Fix login, password, and connection problems.
* [I forgot my password, how do I retrieve it?](/en/troubleshooting-and-support/i-forgot-my-password-how-do-i-retrieve-it)
# Content doesn't appear (or appears partially) in Semji — what to do
Source: https://help.semji.com/en/troubleshooting-and-support/content-doesnt-appear-or-appears-partially-in-semji-what-to-do
Diagnose and fix common causes of incomplete content extraction in Semji
### Content Extraction Verification
First thing to check — relaunch a page crawl
* From Page: click on **Update** and check if your content is being retrieved correctly.
* From the editor: **Gear icon → Sync with website**.
> ⚠️ Any change to your pages or your CMS (e.g. adding a column/block, modifying the template, CSS classes, JS components, URL), the extractor configuration may no longer work and the content may no longer appear in Semji.
### What breaks the extraction (examples)
* Template or HTML markup change
* Renaming CSS classes or IDs
* Adding/removing blocks, columns, sections
* Client-side rendered content (JavaScript)
* Lazy-loading, accordions, carousels, content rendered after interaction
* Access restrictions and security
* Pages behind login, IP allowlist, paywall, SSO
* WAF/CDN, anti-bot, CAPTCHA, User-Agent blocking
* SEO directives and robots
* robots.txt (Disallow), meta robots, X-Robots-Tag
* URL variations and canonicals
* URL change without 301, canonical pointing elsewhere
### What to do if the content no longer appears
* After a template/markup change (even minor: adding a block, a column, modifying a CSS class)
* Share the relevant URLs with [Semji support](mailto:support@semji.com). We will update the extractor configuration.
* If the content is injected via JS
* Prefer server-side rendering of critical blocks or provide the selectors and display conditions.
* If access is restricted
* Allow the extraction User-Agent, add an IP allowlist, or provide dedicated access.
* If robots/canonicals block
* Adjust robots.txt, meta/X-Robots-Tag and canonicals to target the analyzed page.
* If the URL has changed
* Set up stable 301 redirects. Avoid unwanted temporary 302 redirects.
### Information to provide to Semji support
* Affected URLs
* Precise description of the change (template, CSS, robots, redirects) and the blocks/information you no longer see appearing
# Data privacy & security
Source: https://help.semji.com/en/troubleshooting-and-support/data-privacy-and-security
Learn how Semji protects, processes, and stores your personal data as well as the documents used on the platform.
* [What is the treatment of Personal Data by Semji?](/en/troubleshooting-and-support/what-is-the-treatment-of-personal-data-by-semji)
* [FAQ: Protecting Your Data – Security and Storage of Your Documents on Semji](/en/troubleshooting-and-support/faq-protecting-your-data-security-and-storage-of-your-documents-on-semji)
# FAQ: Protecting Your Data – Security and Storage of Your Documents on Semji
Source: https://help.semji.com/en/troubleshooting-and-support/faq-protecting-your-data-security-and-storage-of-your-documents-on-semji
At Semji, the security and confidentiality of your data are our top priorities. Discover the measures we have implemented to protect your documents throughout…
**Introduction:**\
At Semji, we understand the importance of data security. Your documents are hosted on AWS in Ireland, benefiting from advanced security standards and robust encryption. Only authorized personnel can access your information, and we are committed to ensuring data confidentiality and protection through strict compliance standards.
### **Storage**
#### **Document Hosting**
* **What hosting provider is used for uploaded documents?**\
Semji uses Amazon Web Services (AWS) for hosting its platform and uploaded documents.
* **Where are these documents geographically stored?**\
Documents are hosted in the AWS eu-west-1 data center, located in Ireland.
* **Are storage environments isolated per client or shared?**\
Semji applies a logical separation of data for each client on the platform.
#### **Data Retention Policy**
* **How long are uploaded documents retained?**\
Documents are retained for the duration of the contract and up to 180 days after contract termination unless otherwise requested by the client.
* **Is there an archiving process before permanent deletion?**\
Yes. At the end of the contract, a logical deletion is performed prior to permanent deletion, 180 days later.
* **Can clients customize these retention settings?**\
No, retention settings are preset to ensure security and compliance.
### **Encryption and Security**
#### **Encryption Methods**
* **What encryption processes are used to protect documents?**\
Semji applies encryption to data both in transit (during transfer) and at rest (when stored) to ensure enhanced security.
* **What encryption algorithms and standards are used?**\
Semji utilizes AWS Key Management Service (KMS), which employs advanced algorithms compliant with current security standards. More information can be found on the AWS website.
#### **Document Usage**
* **Are uploaded documents used to train the AI model?**\
No, client documents are never used to train our AI.
* **Who can access uploaded documents?**\
Only authorized personnel, including the client's Customer Success Manager (CSM) and select members of the technical team, can access documents if a specific need arises.
### **Compliance and Other Topics**
#### **Regulatory Compliance**
* **What certifications and security standards are upheld?**\
Semji is in the process of obtaining SOC2 Type II certification, a recognized standard for data security systems, demonstrating our commitment to rigorous security and privacy practices.
> **What is SOC 2?**\
> SOC 2 (Service Organization Control 2) is an internationally recognized standard that certifies a service complies with strict requirements for security, availability, data integrity, confidentiality, and privacy. It assures that the processes and systems in place adhere to best practices for safeguarding sensitive data.
#### **Authentication and Access**
* **What authentication options are available for users?**\
The platform supports Single Sign-On (SSO), delegating authentication to the client’s infrastructure.
* **What roles and access rights are available?**\
Semji follows the principle of least privilege: by default, only workspace administrators (OWNER) can grant access rights to users.
#### **Security Audits and Logs**
* **How are security audits and logs managed?**\
Semji maintains logs of each access to uploaded documents to ensure thorough tracking.
# Data & content issues
Source: https://help.semji.com/en/troubleshooting-and-support/frequently-asked-questions
Quickly find solutions to common issues related to data, content imports, and account management.
* [Content doesn't appear (or appears partially) in Semji — what to do](/en/troubleshooting-and-support/content-doesnt-appear-or-appears-partially-in-semji-what-to-do)
* [Why doesn't Semji track my data?](/en/troubleshooting-and-support/why-doesnt-semji-track-my-data)
* [Why doesn't Semji import the entire content of my page?](/en/troubleshooting-and-support/why-doesnt-semji-import-the-entire-content-of-my-page)
* [How to delete your Semji account?](/en/troubleshooting-and-support/how-to-delete-your-semji-account)
# Common errors
Source: https://help.semji.com/en/troubleshooting-and-support/general
SEO data updates and how to recover a forgotten password.
* [Semji SEO data update: what changes for you](/en/troubleshooting-and-support/semji-seo-data-update-what-changes-for-you)
* [I forgot my password, how do I retrieve it?](/en/troubleshooting-and-support/i-forgot-my-password-how-do-i-retrieve-it)
# I forgot my password, how do I retrieve it?
Source: https://help.semji.com/en/troubleshooting-and-support/i-forgot-my-password-how-do-i-retrieve-it
To generate a new password and login to Semji.
When you want to log in to Semji, **go to [https://app.semji.com/login](https://app.semji.com/login)** .The login screen will ask you to enter a username and password.
**If you have forgotten your password, here are the steps to follow.**
### Launch the forgotten password procedure.
When you first logged in, you usually set a password specific to Semji. If you forgot it, click on the link "Forgot your password" in the login screen.
To retrieve your password and log in, **you need to know your login email**, which is your username on the Semji platform.
**You can find it in several ways:**
Your login is the email address to which you received an invitation link for your very first connection to Semji. If you find this message in one of your inboxes, then you know your Semji ID, which is your corresponding recipient address.
*(Example of invitation email received for your first connection to Semji)*
Please note: the "Join now" link contained in the initial invitation email is no longer valid after activation during your first login. If you click on it again, an error message will appear and you will be invited to join the login screen.
You can also contact the Administrator of the Semji Organization to which you belong, so that he/she can connect to his/her [user management interface](/en/admin-and-settings/manage-semji-users) and inform you of the email address he/she initially configured to invite you to join the Semji platform.
Once you know the email that allows you to identify yourself, you can launch the procedure to forget your password.
When you click on "Send me the instructions", you will receive an email at the address you entered. It may take up to 5 minutes to be received. This email will tell you how to set a new password.
In this email, click on the "Choose a New Password" button or the url link below to choose a new password.
By clicking on this link, you will be directed to the Semji interface, and you can enter a new password in the field provided. You will have to confirm this password by entering it a second time, to prevent any typing error.
Once you have changed your password, you can go back to the login interface to connect to Semji.
### Best practices for a secure password
We recommend a minimum password of **8 characters**. This is a prerequisite without which the Semji password change will not be processed.
[](https://downloads.intercomcdn.com/i/o/246755019/6977789b7e049139a13bafa0/longueur-de-caractere-password.PNG?expires=1619305200\&signature=5a4a04750e3c456586eff134b8df45c97ac0756482ef23bb8f1f5effa4559488)
Ideally, your password should also include upper and lower case letters, numbers and special characters ("\*" or "?" or "!" for example).
Finally, be careful about where you write down your password. Don't leave it in plain sight, and make sure it's written down in a secure place (a password-protected storage space in a professional cloud, for example).
### Check if the SSO connection is possible
Your password may not be unique to Semji. If your organization has [enabled SAML SSO](/en/connect-your-tools/how-to-use-the-sso-connection-via-saml), your login password on Semji is exactly the same as your password on the other business tools you use within your organization.
With SSO enabled, your organization has made it possible to log into the Semji platform from an organization-owned email (often yourname\@yourcompanyname), and that email is used to log into many other tools. It is likely that you know or have access to this password (via a password management and memorization solution within your browser for example).
So try to connect to Semji by clicking on the "Sign In with SAML SSO" link and enter your usual business email credentials.
# Troubleshooting & support
Source: https://help.semji.com/en/troubleshooting-and-support/overview
Find answers to frequently asked questions and common issues.
Fix login, password, and connection problems.
Find answers when your data or content isn't showing up as expected.
Quick fixes for common errors, like a stale SEO data update.
# Semji SEO data update: what changes for you
Source: https://help.semji.com/en/troubleshooting-and-support/semji-seo-data-update-what-changes-for-you
Semji is updating its SEO data sources. The main impact is on Intelligence Hub, but some Content Hub features are also affected.
### At a glance
* **What changes:** estimated metrics (traffic, number of pages, search volume, keyword difficulty) may vary compared to previous reports.
* **What stays the same:** your actual ranking ("My position"), the AI classification of your content, and Intelligence Hub's analysis logic remain unchanged.
* **Why:** Semji is updating its SEO data source. This is a technical change and does not reflect a variation in your real traffic.
> **Good to know ℹ️**: this page is temporary and will be removed once the transition period is over.
### What changes in your reports
Starting with the August 2026 report, some metrics may show different values compared to previous months. This is not a bug, and it does not mean your performance has degraded.
The reason is straightforward: every SEO data source relies on its own keyword database, its own crawl, and its own estimation models. Switching sources will mechanically shift the numbers, even for the same site over the same period.
#### Affected metrics
Metric
Impact
Estimated traffic
May vary. For most clients, traffic normalization significantly limits the visible drop.
Number of pages detected
Will change in all cases. This is tied to the crawl methodology, not to any real change on your site.
Search volume
May differ, as keyword databases and estimation methods vary between sources.
Keyword difficulty (KD)
Score recalculated using a different methodology.
Trends (mini-charts)
Temporarily unavailable. A future update will restore them.
> **Good to know ℹ️**: traffic normalization aligns estimated traffic with your Google Search Console data. It absorbs most of the variation at the time of the switch. However, it does not correct the page count, which depends on the data source's crawl.
#### Content Hub recommendations
The impact on Content Hub is more limited than on Intelligence Hub, but a few changes are worth anticipating.
**Search intents:** search intents are generated from a different keyword database. You may notice variations in the suggested search intents, as well as a slightly different number of intents depending on the analysis. The Content Score may change accordingly.
**Questions:** the number of questions surfaced may vary. The expected quality is at least equivalent.
**Related terms and keyword suggestions:** no identified impact.
> **Good to know ℹ️**: Semji's recommendation logic remains unchanged. What changes is only the input database used for certain analyses.
### What stays the same
The change only affects estimated data. The following remain strictly unchanged.
#### "My position" is not affected
"My position" is calculated directly by Semji through a live Google SERP scrape. It is independent of the SEO data source. A change in this metric reflects a real ranking shift, not the migration.
#### AI classification remains unchanged
Content classification (page type, topic, persona, marketing funnel stage) is not affected. The Intelligence Hub analysis layer, which structures and prioritizes your data, works exactly the same way.
#### Your historical data remains accessible
All your monthly reports are still available. They are useful for reading past trends. However, figures from before and after the migration should not be compared line by line as if they came from the same source: they reflect two different estimation methods.
### How to read your data after the migration
#### 1) Don't compare July and August numbers side by side
The July report is the last one based on the previous source. The August report is the first based on the new source. A gap between these two months does not indicate a real traffic increase or decrease — it reflects a change in estimation methodology.
> **Tip ✅**: use August as your new baseline for tracking performance. Month-over-month comparisons will be reliable starting from the September report.
#### 2) Interpreting changes in the page count
If the number of pages detected in Intelligence Hub changes, it is because the new source identifies and groups URLs differently. It does not mean your site gained or lost pages.
\[Suggested screenshot: Intelligence Hub configuration view with the detected page count highlighted, alongside a tooltip explaining it is an estimate]
#### 3) Track trends within the same data source
Starting from the August report, continue steering your analysis in Intelligence Hub by following the evolution of trends, segments, and priorities within a consistent data source. That longitudinal, comparative reading is what matters, not the absolute value of a single number at a given point in time.
#### 4) If a client or colleague asks
The short answer: "Semji is updating its SEO data sources to ensure the continuity and reliability of the service. Any variations you see reflect a change in estimation methodology, not a change in your actual traffic."
### Frequently asked questions
#### Why do my numbers drop (or spike) sharply between July and August?
This is expected. Two SEO data sources will not produce the same values for the same site over the same period, because they use different keyword databases, crawls, and calculation models. The variation does not reflect your actual traffic performance.
#### Is the AI classification (topics, personas, funnel) affected?
No. AI classification remains unchanged. Only the estimated input data (traffic, pages, volume) changes, not the analysis logic.
#### Why are the trends (mini-charts) no longer showing?
Trends are temporarily unavailable due to the technical migration. They will be recalculated in an upcoming update.
#### The number of pages on my site changed. Is this normal?
Yes. The number of URLs detected depends on how the data source crawls and groups pages. The new source and the previous one have different detection logic. This does not mean your site has changed.
#### Are my historical reports still comparable?
Your past reports are still accessible and useful for reading trends. However, figures from before and after the migration are not directly comparable in detail: they come from two different estimation methods.
> **Important ⚠️**: to track your performance over time, treat the August report as your new starting point and follow month-over-month trends within the same data source.
### Learn more
To deepen your understanding of Intelligence Hub and its metrics:
**Related articles:**
* **[What is Intelligence Hub?](/en/analyze-competitors/what-is-intelligence-hub)**
* **[Intelligence Hub: understanding the main screens](/en/analyze-competitors/intelligence-hub-understanding-the-main-screens)**
* **[Intelligence Hub: automatic reports and exports](/en/analyze-competitors/intelligence-hub-automatic-reports-and-exports)**
* [**Identifying opportunities using your data**](/en/analyze-competitors/identify-opportunities-through-your-data)
> **A question or an anomaly?** We do everything we can to maintain a high level of data quality throughout this transition. If you notice unexpected variations, your CSM is available to help. You can also reach our support team directly from within the application.
# What is the treatment of Personal Data by Semji?
Source: https://help.semji.com/en/troubleshooting-and-support/what-is-the-treatment-of-personal-data-by-semji
What is the treatment of Personal Data by Semji?
The processing of personal data carried out on the Personal Data is as follows:
* creation
* storage
* organization and structure of the information in a database
* hosting of the data
* deletion
The purposes of the said processing are the following:
* content analysis
* Setting up and creating an account
The Personal Data processed are the following:
* identification data: login, email address, password, name, first name, country code, language code
* data necessary for the use of the Service
The category of persons concerned is :
* employees of the Customer
* any natural person mentioned in the content analyzed by the Service
The duration of conservation is the following :
* duration of the contract + 6 months
# Why doesn't Semji import the entire content of my page?
Source: https://help.semji.com/en/troubleshooting-and-support/why-doesnt-semji-import-the-entire-content-of-my-page
To understand the behavior of Semji's content extractor
*You have created a Draft from existing content (Updated Content) and you see that Semji has not retrieved all the editorial content?*
In addition to the default extractor, our offers include a customized extractor based on your page templates, to retrieve all your content. In certain cases (change of templates, addition of categories, etc.), the extractor may not be able to retrieve these new elements. Please contact your CSM to make improvements.
### Understanding the extractor
> *IMPORTANT: Semji uses a content extractor robot. This extractor is configured to adapt to the majority of our users' site structures. However, our extractor may not be able to retrieve the editorial content of your pages according to your templates.*
On most CMS (your site manager), with classic page layouts, our extractor **efficiently identifies the editorial content of the page**. It imports Hn title tags (H1, H2, H3...), text paragraphs, internal links within paragraphs, as well as the formatting (bold, italic...) you've used.
Our extractor is configured to **exclude elements such as menus**, footers, sidebar modules... that are not covered by Semji's optimization recommendations.
When faced with more complex templates, layouts or page layouts, the extracted content may be partial. This may be the case on pages such as product sheets, or service pages made up of several distinct blocks, with text located after several scrolls, for example.
You should be aware that some sites block access to our robots, making it difficult to read the content. Certain UX display choices can also limit text retrieval within the HTML code of your page.
It's also important to note that the **Semji Bot does not execute Javascript code within your pages**. This means that if your content is exclusively displayed after Javascript execution and is not present in the DOM at loading, the extractor may only extract it partially or not at all.
### **How do I retrieve my online content in the Semji editor?**
This automatic recovery, which uses the default extractor, takes place when you transform existing content into a draft, i.e. an editable version of your content.
You can easily see whether you're on the online version of uneditable content or on the draft, editable version, thanks to the pictograms at the top of your menu bar.
Click on the pencil icon to transform visible online content into editable content and create a draft in Semji.
Semji then invites you to start optimizing your content: "Start optimization". By clicking on this button, you create the draft and launch the automatic retrieval of your text. Semji asks you to wait a few seconds, displaying the message "Content being retrieved". During this time, your content and its formatting are retrieved and pasted into the editor.
> *Please note: This action doesn't spend any analysis credit. It simply retrieves all your content to save you time. The analysis credit will be spent once you've selected your keyword and run the keyword analysis.*
Once you've retrieved your content, you can view it in the Semji editor. Now you can start optimizing your content.
###
Complete the editorial text using copy and paste
If you notice any discrepancies in the retrieval of your content, please contact your CSM or our Chat to let us know. We will then be able to correct your extractor settings.
Until your problem has been resolved, we recommend that you copy and paste the missing text into the editor to continue your optimization work.
# Why doesn't Semji track my data?
Source: https://help.semji.com/en/troubleshooting-and-support/why-doesnt-semji-track-my-data
Semji lets you track various KPI's using connectors such as Matomo, GA4, Piano Analytics, Adobe Analytics or Piwik Pro.
### Why track your data with Semji?
> *Note: Remember to connect your Search Console to Semji! This step is essential to prioritize the pages to be optimized. If not, you may lose one of the most important benefits of the platform in terms of time-saving.*
In Semji you can monitor different indicators for your SEO performance in the Performance tab.
The purpose of Semji is to allow you to create, optimize and even monitor your performance in a single tool. Therefore, it is essential to connect your analytics tool to Semji.
To learn more about it, we advise you to read this article: ["What is the purpose of the Reports tab"](/en/analyze-performance/all-about-customizing-the-performance-tab)
###
Why doesn’t my data appear in Semji?
You can't see any data coming up in Semji? First, check that your connectors are correctly connected to Semji.
Follow the steps below:
1\. Go to the left sidebar menu and click on Settings -> Workspace;\\
2\. Then click on Integrations in the Workspace settings;
3\. Check if your integration is correctly connected to Semji.
If no integrations are disconnected, it may be due to the access rights granted to Semji in your analytics tools.
There are different types of rights:
* On the account
* On the website
* On the property
> *Note: Semji bases its data feedback on SEO impact. Therefore, it is the inbound pages that trigger the conversion.*
>
> *How? By retrieving conversion data filtered on organic traffic to the targeted page. These are the first positions in the page view order.*
### Why don't my analytics objectives show up in Semji?
To learn more about this, we recommend reading this article: [How to track custom conversion goals with Semji?](/en/analyze-performance/how-to-track-custom-conversion-goals-with-semji)
In Semji, you can track up to three goals previously set in your analytics tool. However, you might get the message "an error has occurred, please try again later" which prevents you from selecting your goals. In this case, you need to check in your analytics tool if the objectives are enabled so they can be displayed in Semji.
If later on your objectives are visible on your tool but not on Semji, then it is a right/view access issue that you have granted to Semji.
Semji needs to get read access to the property in order to access the custom goals. Feel free to check this with your technical team.
> Note: please also see our articles on [Google Analytics 4](/en/connect-your-tools/how-to-connect-my-google-analytics), [Piano Analytics](/en/connect-your-tools/how-to-connect-my-piano-analytics-account), [Matomo](/en/connect-your-tools/why-and-how-to-connect-your-matomo), [Adobe Analytics](/en/connect-your-tools/why-and-how-to-connect-your-adobe-analytics) and [Piwik Pro](/en/connect-your-tools/why-and-how-to-connect-your-piwik-pro) connectors.
Now you know how to manage and track your SEO data and performance and get the most out of our optimization platform!
# Semji API guides overview
Source: https://help.semji.com/guides/overview
End-to-end guides that combine several Semji API endpoints: sync drafts to your CMS and get SEO and GEO recommendations from a keyword.
These guides walk you through complete workflows that combine several Semji API endpoints. Each one assumes you've already followed the [Quickstart](/quickstart) — you have an API key, you know your workspace ID, and you've made at least one successful call.
Poll Semji for drafts ready to publish, push their sanitized HTML to your CMS, then mark them as published — or let Semji drive the sync with webhooks.
Create a draft from a focus keyword, launch the keyword analysis, and retrieve typed SEO and GEO recommendations.
# Get SEO & GEO recommendations from a keyword
Source: https://help.semji.com/guides/seo-geo-recommendations
Create a draft from a focus keyword, run a keyword analysis, and pull back the typed SEO (Google Search) and GEO (Google AI Overview) recommendations.
This guide shows you how to go from a single keyword to a complete brief of SEO and GEO recommendations. The flow uses four endpoints:
1. **Create a draft content** in your editorial planning.
2. **Add the focus keyword** to the draft's page and set it as the focus keyword.
3. **Launch the keyword analysis** asynchronously.
4. **Generate the analysis report** to retrieve typed recommendations.
The same flow powers the *New content* button in the Semji app.
## Prerequisites
* An API key. See [Authentication](/api-reference/authentication).
* The **workspace ID** you want to plan content in. Get it from [`GET /v1/workspaces`](/api-reference/workspaces/list-workspaces).
* A focus keyword you want recommendations for (e.g. `best crm for small business`).
## 1. Create a draft content
Call [`POST /v1/workspaces/{workspaceId}/contents`](/api-reference/contents/create-a-content) without a `pageId` — Semji will auto-create a blank page to host the draft. You only need a `title` to get started.
```typescript TypeScript theme={null}
const API = "https://api.semji.com/v1";
const HEADERS = {
Authorization: `Bearer ${process.env.SEMJI_API_KEY}`,
"Content-Type": "application/json",
};
const WORKSPACE_ID = process.env.WORKSPACE_ID;
const content = await (
await fetch(`${API}/workspaces/${WORKSPACE_ID}/contents`, {
method: "POST",
headers: HEADERS,
body: JSON.stringify({ title: "Best CRM for small business" }),
})
).json();
const contentId = content.id;
const pageId = content.page.id;
```
```python Python theme={null}
import os, requests
API = "https://api.semji.com/v1"
HEADERS = {"Authorization": f"Bearer {os.environ['SEMJI_API_KEY']}"}
WORKSPACE_ID = os.environ["WORKSPACE_ID"]
content = requests.post(
f"{API}/workspaces/{WORKSPACE_ID}/contents",
headers=HEADERS,
json={"title": "Best CRM for small business"},
).json()
content_id = content["id"]
page_id = content["page"]["id"]
```
```bash cURL theme={null}
curl -X POST https://api.semji.com/v1/workspaces/$WORKSPACE_ID/contents \
-H "Authorization: Bearer $SEMJI_API_KEY" \
-H "Content-Type: application/json" \
-d '{"title": "Best CRM for small business"}'
```
A successful response includes both the new content ID and the auto-created page ID:
```json title="201 Created (excerpt)" theme={null}
{
"id": "7c4a1f08b29d",
"title": "Best CRM for small business",
"page": { "id": "5e8d203c7f1a", "url": null },
"contentStatus": { "id": "b3d51e92c804", "label": "to do" },
"version": 1
}
```
Keep both `content.id` and `page.id` — you'll use them in the next steps.
## 2. Attach the focus keyword
Adding a focus keyword is a two-step operation:
1. Add the keyword to the page with [`POST /v1/pages/{pageId}/keywords`](/api-reference/keywords/add-a-keyword-to-a-page).
2. Mark it as the page's focus keyword with [`PUT /v1/pages/{pageId}`](/api-reference/pages/update-a-page).
```typescript TypeScript theme={null}
// 1. Create the keyword on the page
const keyword = await (
await fetch(`${API}/pages/${pageId}/keywords`, {
method: "POST",
headers: HEADERS,
body: JSON.stringify({ keyword: "best crm for small business" }),
})
).json();
const keywordId = keyword.id;
// 2. Set it as the page's focus keyword
const update = await fetch(`${API}/pages/${pageId}`, {
method: "PUT",
headers: HEADERS,
body: JSON.stringify({ focusKeywordId: keywordId }),
});
if (!update.ok) throw new Error(`PUT failed: ${update.status}`);
```
```python Python theme={null}
keyword = requests.post(
f"{API}/pages/{page_id}/keywords",
headers=HEADERS,
json={"keyword": "best crm for small business"},
).json()
keyword_id = keyword["id"]
requests.put(
f"{API}/pages/{page_id}",
headers=HEADERS,
json={"focusKeywordId": keyword_id},
).raise_for_status()
```
```bash cURL theme={null}
# 1. Create the keyword on the page
KEYWORD=$(curl -X POST https://api.semji.com/v1/pages/$PAGE_ID/keywords \
-H "Authorization: Bearer $SEMJI_API_KEY" \
-H "Content-Type: application/json" \
-d '{"keyword": "best crm for small business"}')
KEYWORD_ID=$(echo $KEYWORD | jq -r .id)
# 2. Set it as the page's focus keyword
curl -X PUT https://api.semji.com/v1/pages/$PAGE_ID \
-H "Authorization: Bearer $SEMJI_API_KEY" \
-H "Content-Type: application/json" \
-d "{\"focusKeywordId\": \"$KEYWORD_ID\"}"
```
If the keyword already exists in the workspace, `POST /v1/pages/{pageId}/keywords` reuses it instead of creating a duplicate.
## 3. Launch the keyword analysis
Recommendations are not computed on demand — you have to launch an asynchronous analysis with [`POST /v1/keywords/{keywordId}/analyze`](/api-reference/keywords/launch-keyword-analysis). The analysis scrapes the Google SERP, runs the GEO/AI Overview probe, and stores the typed recommendations on the keyword.
```typescript TypeScript theme={null}
const analyze = await fetch(`${API}/keywords/${keywordId}/analyze`, {
method: "POST",
headers: HEADERS,
});
if (!analyze.ok) throw new Error(`analyze failed: ${analyze.status}`);
```
```python Python theme={null}
requests.post(
f"{API}/keywords/{keyword_id}/analyze", headers=HEADERS,
).raise_for_status()
```
```bash cURL theme={null}
curl -X POST https://api.semji.com/v1/keywords/$KEYWORD_ID/analyze \
-H "Authorization: Bearer $SEMJI_API_KEY"
```
The endpoint returns `202 Accepted` immediately and the analysis runs in the background. Poll [`GET /v1/keywords/{keywordId}`](/api-reference/keywords/get-keyword-details) until `analysisStatus` is `"success"`:
```typescript Polling loop (TypeScript) theme={null}
while (true) {
const keyword = await (
await fetch(`${API}/keywords/${keywordId}`, { headers: HEADERS })
).json();
if (keyword.analysisStatus === "success") break;
if (keyword.analysisStatus === "failed") throw new Error("Keyword analysis failed");
await new Promise((resolve) => setTimeout(resolve, 5_000));
}
```
```python Polling loop (Python) theme={null}
import time
while True:
keyword = requests.get(f"{API}/keywords/{keyword_id}", headers=HEADERS).json()
if keyword["analysisStatus"] == "success":
break
if keyword["analysisStatus"] == "failed":
raise RuntimeError("Keyword analysis failed")
time.sleep(5)
```
`analysisStatus` transitions through `queued` → `pending` → `success` (or `failed`). Most analyses complete within 30 seconds.
Each analysis consumes one **analysis credit** from your organization's balance. Check available credits with [`GET /v1/me`](/api-reference/me/get-authenticated-user) (look at `organization.credits.analysis`).
## 4. Retrieve the SEO & GEO recommendations
Once the analysis is `success`, call [`POST /v1/keywords/{keywordId}/report`](/api-reference/keywords/generate-keyword-analysis-report) to score a content draft against the analysis and pull the typed recommendations.
You have two ways to score:
* **By reference** — pass `contentId` and Semji uses the draft's current `title` + `html`.
* **By value** — pass `title` and `html` inline (useful for previewing recommendations against arbitrary text).
```typescript TypeScript theme={null}
const report = await (
await fetch(`${API}/keywords/${keywordId}/report`, {
method: "POST",
headers: HEADERS,
body: JSON.stringify({ contentId }),
})
).json();
```
```python Python theme={null}
report = requests.post(
f"{API}/keywords/{keyword_id}/report",
headers=HEADERS,
json={"contentId": content_id},
).json()
```
```bash cURL theme={null}
curl -X POST https://api.semji.com/v1/keywords/$KEYWORD_ID/report \
-H "Authorization: Bearer $SEMJI_API_KEY" \
-H "Content-Type: application/json" \
-d "{\"contentId\": \"$CONTENT_ID\"}"
```
The response contains two top-level surfaces:
* `googleSearch` — classic SEO recommendations from the SERP (topics, questions, search intents, internal links to add, SERP competitors).
* `googleAiOverview` — GEO recommendations from the AI Overview answer (topics to cover for citation, cited sources, mentioned brands, markdown preview of the LLM answer).
```json title="200 OK (excerpt)" theme={null}
{
"googleSearch": {
"score": 0.42,
"recommendations": {
"topicsSuggestion": { "score": 0.55, "items": [{ "topic": "pricing", "...": "..." }] },
"questionsSuggestion": { "score": 0.30, "items": [{ "question": "Which CRM is free?" }] }
},
"competitors": [{ "domain": "hubspot.com", "position": 1 }]
},
"googleAiOverview": {
"score": 0.31,
"recommendations": {
"geoTopicsSuggestion": { "score": 0.31, "items": [{ "topic": "integration with email" }] }
},
"sources": [{ "domain": "salesforce.com", "position": 1 }],
"brands": [{ "name": "HubSpot", "count": 4, "category": "software" }],
"preview": "## Best CRM for small business…"
}
}
```
Each `*Suggestion` block carries its own `score` (0.0 – 1.0) and a list of `items` you can render in your brief. The top-level `score` on each surface is the overall match between the content and the recommendations.
Re-call the report endpoint as the draft evolves — the recommendations are fixed (until you re-run the analysis), but the scores change as the `html` improves.
## Putting it all together
```typescript recommendations-from-keyword.ts expandable theme={null}
const API = "https://api.semji.com/v1";
const HEADERS = {
Authorization: `Bearer ${process.env.SEMJI_API_KEY}`,
"Content-Type": "application/json",
};
const WORKSPACE_ID = process.env.WORKSPACE_ID;
async function api(path: string, init: RequestInit = {}) {
const response = await fetch(`${API}${path}`, { ...init, headers: HEADERS });
if (!response.ok) {
throw new Error(`${init.method ?? "GET"} ${path} → ${response.status}`);
}
return response.json();
}
async function createDraft(title: string) {
return api(`/workspaces/${WORKSPACE_ID}/contents`, {
method: "POST",
body: JSON.stringify({ title }),
});
}
async function setFocusKeyword(pageId: string, keyword: string) {
const created = await api(`/pages/${pageId}/keywords`, {
method: "POST",
body: JSON.stringify({ keyword }),
});
await api(`/pages/${pageId}`, {
method: "PUT",
body: JSON.stringify({ focusKeywordId: created.id }),
});
return created.id;
}
async function analyzeAndWait(keywordId: string) {
await api(`/keywords/${keywordId}/analyze`, { method: "POST" });
while (true) {
const keyword = await api(`/keywords/${keywordId}`);
if (keyword.analysisStatus === "success") return;
if (keyword.analysisStatus === "failed") throw new Error("Keyword analysis failed");
await new Promise((resolve) => setTimeout(resolve, 5_000));
}
}
async function getReport(keywordId: string, contentId: string) {
return api(`/keywords/${keywordId}/report`, {
method: "POST",
body: JSON.stringify({ contentId }),
});
}
async function recommendationsFor(keyword: string) {
const draft = await createDraft(keyword.charAt(0).toUpperCase() + keyword.slice(1));
const keywordId = await setFocusKeyword(draft.page.id, keyword);
await analyzeAndWait(keywordId);
return getReport(keywordId, draft.id);
}
const report = await recommendationsFor("best crm for small business");
console.log("SEO score:", report.googleSearch.score);
console.log("GEO score:", report.googleAiOverview.score);
```
```python recommendations_from_keyword.py expandable theme={null}
import os
import time
import requests
API = "https://api.semji.com/v1"
HEADERS = {"Authorization": f"Bearer {os.environ['SEMJI_API_KEY']}"}
WORKSPACE_ID = os.environ["WORKSPACE_ID"]
def create_draft(title):
return requests.post(
f"{API}/workspaces/{WORKSPACE_ID}/contents",
headers=HEADERS, json={"title": title},
).json()
def set_focus_keyword(page_id, keyword):
kw = requests.post(
f"{API}/pages/{page_id}/keywords",
headers=HEADERS, json={"keyword": keyword},
).json()
requests.put(
f"{API}/pages/{page_id}",
headers=HEADERS, json={"focusKeywordId": kw["id"]},
).raise_for_status()
return kw["id"]
def analyze_and_wait(keyword_id):
requests.post(f"{API}/keywords/{keyword_id}/analyze", headers=HEADERS).raise_for_status()
while True:
kw = requests.get(f"{API}/keywords/{keyword_id}", headers=HEADERS).json()
if kw["analysisStatus"] == "success":
return
if kw["analysisStatus"] == "failed":
raise RuntimeError("Keyword analysis failed")
time.sleep(5)
def get_report(keyword_id, content_id):
return requests.post(
f"{API}/keywords/{keyword_id}/report",
headers=HEADERS, json={"contentId": content_id},
).json()
def recommendations_for(keyword):
draft = create_draft(title=keyword.capitalize())
keyword_id = set_focus_keyword(draft["page"]["id"], keyword)
analyze_and_wait(keyword_id)
return get_report(keyword_id, draft["id"])
if __name__ == "__main__":
report = recommendations_for("best crm for small business")
print("SEO score:", report["googleSearch"]["score"])
print("GEO score:", report["googleAiOverview"]["score"])
```
## Reference
* [Create a content](/api-reference/contents/create-a-content)
* [Add a keyword to a page](/api-reference/keywords/add-a-keyword-to-a-page)
* [Update a page](/api-reference/pages/update-a-page)
* [Launch keyword analysis](/api-reference/keywords/launch-keyword-analysis)
* [Get keyword details](/api-reference/keywords/get-keyword-details)
* [Generate keyword analysis report](/api-reference/keywords/generate-keyword-analysis-report)
# Sync drafts to your CMS
Source: https://help.semji.com/guides/sync-drafts-to-cms
Poll Semji for drafts ready to publish, push them to your CMS, then mark them as published in Semji, with a push-based webhook alternative.
This guide shows you how to build a one-way sync from Semji to your CMS (WordPress, Contentful, Webflow, a custom backend, etc.). The flow runs on a schedule — for example every 10 minutes — and uses four endpoints:
1. **List drafts** with a custom workflow status (e.g. *Ready to publish*).
2. **Fetch the full content** (title, sanitized HTML, meta description) for each draft.
3. **Push to the CMS** and immediately transition the draft to a second custom status (e.g. *Sent to CMS*).
4. **Mark each content as published** in Semji once the CMS confirms the article is live.
This main flow is **pull-based**: your worker polls Semji because no webhook fires on custom workflow status changes. Semji *does* fire a webhook when a content is **marked as published** — if your editors manage publication from Semji, see the [push-based alternative](#push-based-alternative-with-webhooks) below.
## Why two custom statuses?
Between *"the editor approved the draft"* and *"the article is live on the public site"*, the article can sit in the CMS for hours or days — review, scheduled publication, legal moderation… You need a status that means **"already handed over to the CMS, don't push it again"** while you wait.
| Stage | Semji status | Set by | Purpose |
| - | - | - | - |
| Editorially approved, ready to push | `Ready to publish` (custom) | Editor, in the app | Signals the worker to pick it up |
| Pushed to the CMS, awaiting publication | `Sent to CMS` (custom) | Worker, right after the CMS accepts it | Prevents re-pushing on the next poll |
| Live on the CMS | `published` (system) | Worker, via `POST /contents/{contentId}/publish` | Records the final URL and `publishedAt` |
Skipping the intermediate status causes one of two bugs:
* **Marking as published right after the push** — `publishedAt` is wrong (the CMS may schedule for next week) and the URL may still change (slug under review).
* **Leaving the draft in *Ready to publish*** — the next poll re-pushes the same article, creating duplicates in the CMS.
## Prerequisites
* An API key with access to the workspace. See [Authentication](/api-reference/authentication).
* The **workspace ID** you want to sync from. Get it from [`GET /v1/workspaces`](/api-reference/workspaces/list-workspaces).
* Two custom workflow statuses: *Ready to publish* and *Sent to CMS*.
## 1. Create the two custom statuses
Workflow statuses are configured per workspace in the Semji app under **Settings > Workflow**. Create two non-system statuses:
* *Ready to publish* — editors move drafts here when they're approved.
* *Sent to CMS* — the worker moves drafts here right after the CMS accepts them.
List every status (with its ID) via the API:
```typescript TypeScript theme={null}
const API = "https://api.semji.com/v1";
const HEADERS = { Authorization: `Bearer ${process.env.SEMJI_API_KEY}` };
const WORKSPACE_ID = process.env.WORKSPACE_ID;
const response = await fetch(
`${API}/workspaces/${WORKSPACE_ID}/content-statuses`,
{ headers: HEADERS },
);
const { data: statuses } = await response.json();
const byLabel = new Map(
statuses.map((status) => [status.label.toLowerCase(), status.id]),
);
const READY_ID = byLabel.get("ready to publish");
const SENT_ID = byLabel.get("sent to cms");
```
```python Python theme={null}
import os, requests
WORKSPACE_ID = os.environ["WORKSPACE_ID"]
headers = {"Authorization": f"Bearer {os.environ['SEMJI_API_KEY']}"}
statuses = requests.get(
f"https://api.semji.com/v1/workspaces/{WORKSPACE_ID}/content-statuses",
headers=headers,
).json()["data"]
by_label = {s["label"].lower(): s["id"] for s in statuses}
READY_ID = by_label["ready to publish"]
SENT_ID = by_label["sent to cms"]
```
```bash cURL theme={null}
curl https://api.semji.com/v1/workspaces/$WORKSPACE_ID/content-statuses \
-H "Authorization: Bearer $SEMJI_API_KEY"
```
A successful response looks like this:
```json title="200 OK" theme={null}
{
"data": [
{ "id": "b3d51e92c804", "label": "to do", "isReadOnly": true, "position": 1, "color": "#9ca3af" },
{ "id": "29f7c6a1d05e", "label": "in progress", "isReadOnly": false, "position": 2, "color": "#3498db" },
{ "id": "8a1c4e6f02b9", "label": "ready to publish", "isReadOnly": false, "position": 3, "color": "#f59e0b" },
{ "id": "d6e90b37a512", "label": "sent to cms", "isReadOnly": false, "position": 4, "color": "#8b5cf6" },
{ "id": "41f8a2c5e7d3", "label": "published", "isReadOnly": true, "position": 5, "color": "#10b981" }
]
}
```
System statuses (`to do`, `published`) have `isReadOnly: true` and can't be renamed or deleted. Cache both custom IDs — you'll use them in the next steps.
See [List content statuses](/api-reference/workspaces/list-content-statuses) for the full schema.
## 2. Poll for drafts ready to publish
Call [`GET /v1/workspaces/{workspaceId}/contents`](/api-reference/contents/list-contents-in-a-workspace) filtered on the *Ready to publish* status:
```typescript TypeScript theme={null}
const query = new URLSearchParams({
"contentStatusId[]": READY_ID,
sort: "-updatedAt",
limit: "100",
});
const { data: drafts, pagination } = await (
await fetch(`${API}/workspaces/${WORKSPACE_ID}/contents?${query}`, {
headers: HEADERS,
})
).json();
```
```python Python theme={null}
response = requests.get(
f"https://api.semji.com/v1/workspaces/{WORKSPACE_ID}/contents",
headers=headers,
params={"contentStatusId[]": READY_ID, "sort": "-updatedAt", "limit": 100},
).json()
drafts, pagination = response["data"], response["pagination"]
```
```bash cURL theme={null}
curl "https://api.semji.com/v1/workspaces/$WORKSPACE_ID/contents?contentStatusId[]=$READY_ID&sort=-updatedAt&limit=100" \
-H "Authorization: Bearer $SEMJI_API_KEY"
```
The collection endpoint returns lightweight content records (no HTML body). You fetch the body in the next step.
The response is **paginated**: `limit` caps at 100 (default 25), and the envelope carries a `pagination` object (`total`, `page`, `limit`, `hasMore`). If `hasMore` is `true`, request the next page with `?page=2`, and so on — the full worker below does this. Don't assume one page is enough: a backlog (worker downtime, a bulk editorial approval) can easily exceed 100 drafts.
Each API key is limited to **1,000 requests per hour** with a burst of 20/s. Polling every 10 minutes (= 6/hour) leaves plenty of headroom even for hundreds of drafts per poll. See [Rate limits](/api-reference/rate-limits).
## 3. Push to the CMS and transition to *Sent to CMS*
For each draft, fetch the full body with [`GET /v1/contents/{contentId}`](/api-reference/contents/get-content-details), push it to your CMS, then **immediately** transition the draft to *Sent to CMS* with [`PUT /v1/contents/{contentId}`](/api-reference/contents/update-a-content).
```typescript TypeScript theme={null}
const content = await (
await fetch(`${API}/contents/${draft.id}`, { headers: HEADERS })
).json();
// Push title, htmlSanitized, metaDescription to the CMS (throws on failure)
const cmsRecordId = await pushToCms(content);
// Mark as handed over so the next poll skips it
const update = await fetch(`${API}/contents/${content.id}`, {
method: "PUT",
headers: { ...HEADERS, "Content-Type": "application/json" },
body: JSON.stringify({ contentStatusId: SENT_ID, version: content.version }),
});
if (!update.ok) throw new Error(`PUT failed: ${update.status}`);
```
```python Python theme={null}
content = requests.get(
f"https://api.semji.com/v1/contents/{draft['id']}",
headers=headers,
).json()
# Push title, htmlSanitized, metaDescription to the CMS (raises on failure)
cms_record_id = push_to_cms(content)
# Mark as handed over so the next poll skips it
requests.put(
f"https://api.semji.com/v1/contents/{content['id']}",
headers=headers,
json={"contentStatusId": SENT_ID, "version": content["version"]},
).raise_for_status()
```
```bash cURL theme={null}
# Fetch the body
CONTENT=$(curl -s https://api.semji.com/v1/contents/$CONTENT_ID \
-H "Authorization: Bearer $SEMJI_API_KEY")
VERSION=$(echo "$CONTENT" | jq -r .version)
# (… push title, htmlSanitized, metaDescription to your CMS …)
# Transition to "Sent to CMS"
curl -X PUT https://api.semji.com/v1/contents/$CONTENT_ID \
-H "Authorization: Bearer $SEMJI_API_KEY" \
-H "Content-Type: application/json" \
-d "{\"contentStatusId\": \"$SENT_ID\", \"version\": $VERSION}"
```
A few important details:
* **Push `htmlSanitized`, not `html`.** The `html` field is the body as authored in the Semji editor and may contain editor-only markers (comments, fact-check annotations). `htmlSanitized` is the same body with all annotations stripped — that's the one that is safe to publish externally.
* **`version` is required on every update**, even when you only change the status. Reuse the `version` from your `GET`. If anything modified the content between your `GET` and your `PUT` (an editor saving, for instance), the API returns `409 Conflict`. A 409 doesn't mean your transition is invalid — refetch to get the fresh `version` and retry the same update.
* **Transition only on CMS success.** If the CMS call fails, leave the draft in *Ready to publish* and the next poll will retry it.
* **Persist the CMS record ID** (e.g. WordPress post ID) on your side, keyed by Semji `content.id`. You'll need it in step 4 to know when the article goes live.
```json title="GET /v1/contents/{contentId} (excerpt)" theme={null}
{
"id": "7c4a1f08b29d",
"title": "How to choose a CRM in 2026",
"html": "
How to choose a CRM in 2026
…
",
"htmlSanitized": "
How to choose a CRM in 2026
…
",
"metaDescription": "A practical guide to picking the right CRM…",
"page": { "id": "5e8d203c7f1a", "url": "https://example.com/blog/choose-a-crm" },
"contentStatus": { "id": "8a1c4e6f02b9", "label": "ready to publish" },
"version": 7
}
```
## 4. Mark as published when the CMS goes live
The CMS publication can happen seconds or days after the push. You need a separate trigger that fires when the article actually goes live. Pick the option that fits your CMS:
* **CMS webhook** *(recommended when available)* — WordPress, Contentful, Webflow, and most modern CMSes can fire a webhook on publish. Wire it to a small endpoint that looks up the Semji `content.id` from the CMS record ID and calls Semji.
* **Second poll loop** — every 10 min, list all your *Sent to CMS* drafts, check each one against the CMS API to see if it's now public, and mark the ones that are.
In both cases, the call is the same: [`POST /v1/contents/{contentId}/publish`](/api-reference/contents/mark-a-content-as-published).
```typescript TypeScript theme={null}
const publish = await fetch(`${API}/contents/${contentId}/publish`, {
method: "POST",
headers: { ...HEADERS, "Content-Type": "application/json" },
body: JSON.stringify({ url: cmsPublicUrl }),
});
if (!publish.ok) throw new Error(`publish failed: ${publish.status}`);
```
```python Python theme={null}
requests.post(
f"https://api.semji.com/v1/contents/{content_id}/publish",
headers=headers,
json={"url": cms_public_url},
).raise_for_status()
```
```bash cURL theme={null}
curl -X POST https://api.semji.com/v1/contents/$CONTENT_ID/publish \
-H "Authorization: Bearer $SEMJI_API_KEY" \
-H "Content-Type: application/json" \
-d '{"url": "https://www.example.com/blog/choose-a-crm"}'
```
The request body is optional:
* `url` *(optional)* — the public URL where the article is now live. If omitted, Semji reuses the URL of the associated page. Pass it explicitly when you're publishing a **new** page or when the CMS slug differs from the original page URL.
* `publishedAt` *(optional, ISO 8601)* — the publication date recorded in Semji, the same one an author picks in the editor. If omitted, the current server time is used. Pass it when the publication is detected with a delay — e.g. your poll loop discovers an article that went live earlier — so performance tracking starts from the real publication date.
The moment this call is processed is recorded separately as `markedAsPublishedAt`. Semji sets it, it cannot be sent in the body, and it is the field to filter on when you need to detect publications.
If you omit `url` **and** the associated page has no URL, the call fails with `422 unprocessable_entity`. This is the typical case for contents created in Semji without a `pageId` — their auto-created page starts with an empty URL. When in doubt, pass `url` explicitly.
Once this call returns, the draft transitions from *Sent to CMS* to the system *published* status.
## Putting it all together
A minimal worker that polls every 10 minutes for both transitions:
```typescript sync-drafts.ts expandable theme={null}
const API = "https://api.semji.com/v1";
const HEADERS = {
Authorization: `Bearer ${process.env.SEMJI_API_KEY}`,
"Content-Type": "application/json",
};
const WORKSPACE_ID = process.env.WORKSPACE_ID;
// Implement these against your CMS and storage:
declare function pushToCms(content: { htmlSanitized: string | null }): Promise;
declare function rememberCmsRecord(contentId: string, cmsRecordId: string): Promise;
declare function lookupCmsRecord(contentId: string): Promise;
declare function fetchCmsState(cmsRecordId: string): Promise<{ isPublic: boolean; publicUrl: string }>;
class ApiError extends Error {
constructor(readonly status: number, message: string) {
super(message);
}
}
async function api(path: string, init: RequestInit = {}) {
const response = await fetch(`${API}${path}`, { ...init, headers: HEADERS });
if (!response.ok) {
throw new ApiError(response.status, `${init.method ?? "GET"} ${path} → ${response.status}`);
}
return response.json();
}
// --- status lookup -----------------------------------------------------------
async function loadStatusIds() {
const { data: statuses } = await api(`/workspaces/${WORKSPACE_ID}/content-statuses`);
const byLabel = new Map(statuses.map((s) => [s.label.toLowerCase(), s.id]));
return { readyId: byLabel.get("ready to publish"), sentId: byLabel.get("sent to cms") };
}
// --- helpers -----------------------------------------------------------------
async function listByStatus(statusId: string) {
const drafts = [];
for (let page = 1; ; page++) {
const query = new URLSearchParams({
"contentStatusId[]": statusId,
sort: "-updatedAt",
limit: "100",
page: String(page),
});
const { data, pagination } = await api(`/workspaces/${WORKSPACE_ID}/contents?${query}`);
drafts.push(...data);
if (!pagination.hasMore) return drafts;
}
}
async function transitionTo(contentId: string, statusId: string) {
for (let attempt = 1; attempt <= 3; attempt++) {
const { version } = await api(`/contents/${contentId}`);
try {
await api(`/contents/${contentId}`, {
method: "PUT",
body: JSON.stringify({ contentStatusId: statusId, version }),
});
return;
} catch (error) {
// 409: someone saved the draft between our GET and PUT — refetch and retry
if (!(error instanceof ApiError) || error.status !== 409 || attempt === 3) throw error;
}
}
}
// --- step 2 & 3: ready to publish → sent to CMS ------------------------------
async function pushReadyDrafts(readyId: string, sentId: string) {
for (const draft of await listByStatus(readyId)) {
const content = await api(`/contents/${draft.id}`);
let cmsRecordId: string;
try {
cmsRecordId = await pushToCms(content); // push htmlSanitized, not html
} catch (error) {
console.error(`CMS push failed for ${draft.id}:`, error);
continue; // stays in "ready to publish" — retried next tick
}
await rememberCmsRecord(content.id, cmsRecordId);
await transitionTo(content.id, sentId);
}
}
// --- step 4: sent to CMS → published -----------------------------------------
async function finalizePublished(sentId: string) {
for (const draft of await listByStatus(sentId)) {
const cmsRecordId = await lookupCmsRecord(draft.id);
const cmsState = await fetchCmsState(cmsRecordId);
if (!cmsState.isPublic) continue;
await api(`/contents/${draft.id}/publish`, {
method: "POST",
body: JSON.stringify({ url: cmsState.publicUrl }),
});
}
}
// --- main loop ---------------------------------------------------------------
while (true) {
const { readyId, sentId } = await loadStatusIds();
await pushReadyDrafts(readyId, sentId);
await finalizePublished(sentId);
await new Promise((resolve) => setTimeout(resolve, 600_000)); // 10 minutes
}
```
```python sync_drafts.py expandable theme={null}
import os
import time
import requests
API = "https://api.semji.com/v1"
HEADERS = {"Authorization": f"Bearer {os.environ['SEMJI_API_KEY']}"}
WORKSPACE_ID = os.environ["WORKSPACE_ID"]
# --- status lookup -----------------------------------------------------------
def load_status_ids():
statuses = requests.get(
f"{API}/workspaces/{WORKSPACE_ID}/content-statuses", headers=HEADERS,
).json()["data"]
by_label = {s["label"].lower(): s["id"] for s in statuses}
return by_label["ready to publish"], by_label["sent to cms"]
# --- helpers -----------------------------------------------------------------
def list_by_status(status_id):
drafts, page = [], 1
while True:
response = requests.get(
f"{API}/workspaces/{WORKSPACE_ID}/contents",
headers=HEADERS,
params={
"contentStatusId[]": status_id,
"sort": "-updatedAt",
"limit": 100,
"page": page,
},
).json()
drafts += response["data"]
if not response["pagination"]["hasMore"]:
return drafts
page += 1
def transition_to(content_id, status_id):
for attempt in range(3):
content = requests.get(f"{API}/contents/{content_id}", headers=HEADERS).json()
response = requests.put(
f"{API}/contents/{content_id}",
headers=HEADERS,
json={"contentStatusId": status_id, "version": content["version"]},
)
if response.status_code != 409:
response.raise_for_status()
return
# 409: someone saved the draft between our GET and PUT — refetch and retry
raise RuntimeError(f"version conflict persisted for {content_id}")
# --- step 2 & 3: ready to publish → sent to CMS ------------------------------
def push_ready_drafts(ready_id, sent_id):
for draft in list_by_status(ready_id):
content = requests.get(f"{API}/contents/{draft['id']}", headers=HEADERS).json()
try:
cms_record_id = push_to_cms(content) # push htmlSanitized, not html
except Exception as e:
print(f"CMS push failed for {draft['id']}: {e}")
continue # stays in "ready to publish" — retried next tick
remember_cms_record(content["id"], cms_record_id) # your storage
transition_to(content["id"], sent_id)
# --- step 4: sent to CMS → published -----------------------------------------
def finalize_published(sent_id):
for draft in list_by_status(sent_id):
cms_record_id = lookup_cms_record(draft["id"]) # your storage
cms_state = fetch_cms_state(cms_record_id) # your CMS client
if not cms_state["is_public"]:
continue
requests.post(
f"{API}/contents/{draft['id']}/publish",
headers=HEADERS,
json={"url": cms_state["public_url"]},
).raise_for_status()
# --- main loop ---------------------------------------------------------------
def run_once():
ready_id, sent_id = load_status_ids()
push_ready_drafts(ready_id, sent_id)
finalize_published(sent_id)
if __name__ == "__main__":
while True:
run_once()
time.sleep(600) # 10 minutes
```
If your CMS supports webhooks, replace `finalizePublished` with a webhook handler that calls `POST /v1/contents/{contentId}/publish` directly when it receives a "post published" event.
## Push-based alternative with webhooks
The main flow assumes **your CMS decides** when an article goes live. Sometimes it's the other way around: your pages already exist in Semji with their URLs (you optimize existing content, or you create the page in the CMS first), and your editors want to drive publication **from Semji** by clicking **Mark as published**. In that scenario you don't need polling or custom statuses at all — Semji notifies you.
| | Pull (polling worker) | Push (webhook) |
| - | - | - |
| Source of truth for publication | Your CMS | Semji (*Mark as published*) |
| Publication URL | Discovered after the CMS publishes | Already known (existing pages) |
| Latency | Up to one polling interval | Seconds |
| Custom statuses needed | Two | None |
| You host | A scheduled worker | A public HTTPS endpoint |
Semji fires a `content_published` webhook when an editor clicks **Mark as published**. Configure it in **Settings > General > Add a Webhook**, then your endpoint creates or updates the article in the CMS. For the full setup, the payload, the security notes, and ready-made Make / N8n templates, see the [Content published webhook](/integrations/content-published-webhook) page.
### A minimal webhook handler
```typescript webhook-handler.ts expandable theme={null}
import express from "express";
const API = "https://api.semji.com/v1";
const HEADERS = { Authorization: `Bearer ${process.env.SEMJI_API_KEY}` };
// Implement against your CMS — create or update by URL (idempotent)
declare function upsertCmsArticle(article: {
title: string | null;
html: string | null;
metaDescription: string | null;
url: string;
}): Promise;
const app = express();
app.use(express.json());
app.post("/webhooks/semji", (req, res) => {
res.sendStatus(204); // ack immediately — Semji does not retry failed deliveries
if (req.body?.event_type !== "content_published") return;
handleContentPublished(req.body.data.id).catch(console.error);
});
async function handleContentPublished(contentId: string) {
// Re-fetch with your API key — the webhook payload itself is not signed
const response = await fetch(`${API}/contents/${contentId}`, { headers: HEADERS });
if (!response.ok) return;
const content = await response.json();
if (!content.publishedAt) return;
await upsertCmsArticle({
title: content.title,
html: content.htmlSanitized,
metaDescription: content.metaDescription,
url: content.page.url,
});
}
app.listen(3000);
```
```python webhook_handler.py expandable theme={null}
import os
import threading
import requests
from flask import Flask, request
API = "https://api.semji.com/v1"
HEADERS = {"Authorization": f"Bearer {os.environ['SEMJI_API_KEY']}"}
app = Flask(__name__)
@app.post("/webhooks/semji")
def semji_webhook():
event = request.get_json(silent=True) or {}
if event.get("event_type") == "content_published":
threading.Thread(
target=handle_content_published, args=(event["data"]["id"],)
).start()
return "", 204 # ack immediately — Semji does not retry failed deliveries
def handle_content_published(content_id):
# Re-fetch with your API key — the webhook payload itself is not signed
response = requests.get(f"{API}/contents/{content_id}", headers=HEADERS)
if not response.ok:
return
content = response.json()
if not content["publishedAt"]:
return
upsert_cms_article( # your CMS client — create or update by URL (idempotent)
title=content["title"],
html=content["htmlSanitized"],
meta_description=content["metaDescription"],
url=content["page"]["url"],
)
```
Since deliveries are not retried, add a safety net: periodically list recently published contents with [`GET /v1/workspaces/{workspaceId}/contents?markedAsPublishedAt[after]=…`](/api-reference/contents/list-contents-in-a-workspace) and reconcile any article your endpoint missed while it was down.
Filter on `markedAsPublishedAt`, the timestamp of the publish action, and not on `publishedAt`. The latter is the date an author declares in the editor: it has day granularity and can be back or forward dated, which makes it unfit for an incremental window.
## Reference
* [List content statuses](/api-reference/workspaces/list-content-statuses)
* [List contents in a workspace](/api-reference/contents/list-contents-in-a-workspace)
* [Get content details](/api-reference/contents/get-content-details)
* [Update a content](/api-reference/contents/update-a-content)
* [Mark a content as published](/api-reference/contents/mark-a-content-as-published)
* [Rate limits](/api-reference/rate-limits)
* [Content published webhook](/integrations/content-published-webhook)
# Content published webhook
Source: https://help.semji.com/integrations/content-published-webhook
How the content_published webhook notifies your endpoint when an editor marks a content as published in Semji, with Make and N8n templates.
When an editor clicks **Mark as published** in Semji, Semji sends a
`content_published` webhook to the URL you configured. Use it to push the
published article to your CMS, or to trigger downstream automations
(dashboards, tasks, notifications) — no polling, no copy-paste.
`content_published` fires **after** publication (the editor decided the content
is live). It is separate from the [Send to CMS webhook](/integrations/send-to-cms-webhook)
(`content_staged`), which pushes a **draft** to your CMS *before* publication.
Both can be configured on the same workspace.
## Prerequisites
* An HTTPS endpoint reachable from the public internet — either your own, or a
scenario URL from a no-code platform (Make, Zapier, N8n).
* A workspace where you can reach **Settings** (to add the webhook).
## How it works
In the app, go to **Settings > General**, click **Add a Webhook**, and paste
your endpoint (or automation scenario) URL.
They fill in the publication URL and date (backdating works, in the app and
via the API's `publishedAt`).
A single `POST` with the content payload lands on your endpoint. Respond with
a `2xx` immediately and process asynchronously.
## The payload Semji sends
```json title="content_published payload" theme={null}
{
"event_type": "content_published",
"occurred_at": "2026-06-10T14:32:05+00:00",
"data": {
"id": "7c4a1f08b29d",
"title": "How to choose a CRM in 2026",
"html": "
How to choose a CRM in 2026
…
",
"meta_description": "A practical guide to picking the right CRM…",
"content_score": 82,
"words_count": 1450,
"published_at": "2026-06-10T14:32:04+00:00",
"published_by": { "id": "f2a81c05d943", "first_name": "Jane", "last_name": "Doe", "email": "jane@example.com" },
"content_status": { "id": "41f8a2c5e7d3", "label": "published", "color": "#10b981" },
"page": {
"id": "5e8d203c7f1a",
"url": "https://example.com/blog/choose-a-crm",
"is_existing_content": true,
"last_status_code": 200
},
"page_focus_keyword": { "keyword": "best crm for small business", "search_volume": 5400, "position": 8 },
"workspace": { "id": "89b0f07aade2", "name": "Acme Blog", "website_url": "https://example.com" },
"organization": { "id": "c61d3e84f207", "name": "Acme" }
}
}
```
Always `content_published` for this webhook.
The published content and its context: `title`, sanitized `html`, plain `text`,
`meta_description`, `content_score`, `words_count`, `published_at`,
`published_by`, `content_status`, `page` (with the live `url`),
`page_focus_keyword` (with `search_volume`), plus `workspace` and `organization`.
IDs are 12-char public IDs.
Three things to know:
* `data.html` is **already sanitized** — editor annotations are stripped, it is
equivalent to the API's `htmlSanitized` field. Push it to your CMS as-is.
* `data.id` is the content ID, directly usable with
[`GET /v1/contents/{contentId}`](/api-reference/contents/get-content-details).
* Delivery is a **single POST** — no signature, no retry on failure. Respond
`2xx` immediately and process asynchronously.
The webhook is **not signed**: anyone who discovers your endpoint URL could
forge a payload. Treat it as a **trigger** — re-fetch the content by ID with
your API key before touching your CMS, and drop the event if the content
doesn't exist or isn't published.
## No-code templates
Prefer not to write code? Import one of these ready-made scenarios and point it
at WordPress (adapt the CMS step for another platform):
A Make scenario that receives the webhook and creates the post in WordPress.
An N8n workflow with a POST webhook trigger that routes the content to WordPress.
The scenario URL these tools give you is what you paste into **Settings > General > Add a Webhook**.
## Use cases
* Publish or update the article in your CMS (WordPress, Contentful, Webflow…).
* Auto-populate a Google Sheets dashboard with the SEO metrics.
* Create a follow-up task (Asana, Jira) for the marketing team.
* Notify a Slack or Teams channel on publication.
* Cross-post to social (X, LinkedIn).
## Troubleshooting
Check the webhook URL in **Settings > General**, and that an editor actually
clicked **Mark as published** (the event only fires on publication). The URL
must be a public HTTPS endpoint reachable from Semji.
Delivery is a single unsigned POST — treat it as a trigger and re-fetch the
content with [`GET /v1/contents/{contentId}`](/api-reference/contents/get-content-details)
using your API key before writing to your CMS.
## Related
* [Send to CMS webhook](/integrations/send-to-cms-webhook) — push a **draft** to
your CMS before publication (`content_staged`).
* [Sync drafts to your CMS](/guides/sync-drafts-to-cms) — the pull-based
publishing flow, and when to prefer it over this webhook.
* [Authentication](/api-reference/authentication) — API keys for re-fetching content.
# Webhooks
Source: https://help.semji.com/integrations/overview
Semji's webhook events: get notified when a draft is staged for review or when it's published, so you can push content to your CMS or trigger downstream automations.
The `content_staged` webhook: Semji pushes a draft to your CMS endpoint before publication, and your endpoint responds with a review link.
The `content_published` webhook: Semji notifies your endpoint when an editor marks a content as published.
# Send to CMS webhook
Source: https://help.semji.com/integrations/send-to-cms-webhook
The content_staged webhook contract: how Semji pushes a draft to your CMS endpoint before publication and how your endpoint responds.
When an editor clicks **Send to CMS** in the Semji editor, Semji sends the draft
to your endpoint through a `content_staged` webhook. Your endpoint decides where
the content lands in your CMS and returns a review link. This page is the
**exchange contract** — everything you need to implement the receiving side
without access to Semji's code.
`content_staged` is separate from `content_published` (the event that fires
when a content is *marked as published*). A `content_staged` send happens
**before** publication: the content stays a draft in Semji, and your CMS
holds it for review. The two can be configured independently on the same
workspace.
## Prerequisites
* An HTTPS endpoint, reachable from the public internet, that accepts a `POST`
with a JSON body and replies in JSON.
* A `content_staged` integration configured for your workspace (name + endpoint
URL) by a **workspace owner** under **Settings**, and enabled.
* The ability to call back to `api.semji.com` if you answer asynchronously.
## How it works
A JSON payload carrying the content, an `idempotency_key`, and a `callback`
block is sent to the URL you configured for the `content_staged` event.
Either **synchronously** — return the result in the HTTP response
(`completed` or `failed`) — or, if you need more time, return `accepted`
and finish later through the callback.
When the work is done, `POST` the outcome to the `callback.url` from the
payload, authenticated with the `callback.token`.
## The request Semji sends
Semji issues a single `POST` (with `Content-Type: application/json`) to your
configured URL. The request times out after **10 seconds** — see
[responding](#responding-to-the-request).
```json title="Outbound payload" theme={null}
{
"event_type": "content_staged",
"occurred_at": "2026-07-27T09:25:36+00:00",
"idempotency_key": "7c4a1f08b29d",
"content_version": 1,
"data": {
"title": "How to brew better espresso",
"meta_description": "A practical guide to dialing in your espresso at home.",
"html": "
…sanitized content…
",
"text": "…plain text version…",
"content_score": 0.82,
"words_count": 640,
"page": {
"url": "https://your-site.example.com/blog/better-espresso",
"is_existing_content": false
},
"workspace": {
"id": "bc94dd0702c5",
"name": "Acme",
"website_url": "https://your-site.example.com"
},
"organization": { "id": "84b83bbca1c2", "name": "Acme Inc." }
},
"callback": {
"url": "https://api.semji.com/webhooks/calls/7c4a1f08b29d/callback",
"token": "cbk_9f2c…",
"expires_at": "2026-07-28T09:25:36+00:00"
}
}
```
Always `content_staged` for this webhook.
Stable 12-char identifier of this send. If you receive the same key twice (a
retry), do not create a second draft — return the result you already produced.
Version of the content at send time. A later send of the same content carries a
higher version — the latest send wins.
The content itself: `title`, `meta_description`, sanitized `html`, plain `text`,
`content_score`, `words_count`, plus `page`, `workspace` and `organization`
context. IDs are 12-char public IDs.
`url` to POST the async result to, a one-shot `token` (see
[the callback](#the-async-callback)), and `expires_at` — the callback is
rejected after this time (24 hours after the send).
## Responding to the request
Reply with **HTTP 2xx** as soon as you have received and understood the webhook,
and describe the outcome in a JSON body. The HTTP status reflects transport, the
`status` field reflects the business outcome — a non-2xx response is read as your
endpoint being unreachable, not as a business failure. There is **one result
format** everywhere (sync response, callback, and the integration test):
`completed`, `failed`, or `accepted`.
Required when `status` is `completed`. Must contain `cms_id` **and at least one**
of `preview_url` / `back_office_url`.
Your CMS's identifier for the created/updated entry.
Public preview link an editor can open to review the content.
Link to the entry in your CMS admin.
Optional human-readable reason when `status` is `failed`.
### Synchronous — you finish within 10 seconds
Return the terminal result directly in the HTTP response:
```json title="200 — completed" theme={null}
{
"status": "completed",
"result": {
"cms_id": "42",
"preview_url": "https://your-site.example.com/preview/42",
"back_office_url": "https://your-cms.example.com/admin/posts/42"
}
}
```
```json title="200 — failed" theme={null}
{ "status": "failed", "error": "Category \"blog\" does not exist" }
```
A `completed` response **without** `cms_id`, or without any URL, is a contract
violation — Semji records the send as failed.
### Asynchronous — you need more time
If your pipeline can't finish within the 10-second window (moderation, scheduled
jobs, a no-code flow…), acknowledge immediately and finish later:
```json title="200 — accepted" theme={null}
{ "status": "accepted" }
```
The content stays in a *loading* state in Semji until you post the result to the
callback. If no callback arrives within **24 hours**, the send is marked failed.
## The async callback
Post the terminal result to the `callback.url` from the payload (of the form
`https://api.semji.com/webhooks/calls/{publicId}/callback`), with the
`callback.token` as a Bearer token.
```typescript callback.ts theme={null}
await fetch(callback.url, {
method: "POST",
headers: {
Authorization: `Bearer ${callback.token}`,
"Content-Type": "application/json",
},
body: JSON.stringify({
status: "completed",
result: {
cms_id: "42",
preview_url: "https://your-site.example.com/preview/42",
back_office_url: "https://your-cms.example.com/admin/posts/42",
},
}),
});
```
```python callback.py theme={null}
import requests
requests.post(
callback["url"],
headers={"Authorization": f"Bearer {callback['token']}"},
json={
"status": "completed",
"result": {
"cms_id": "42",
"preview_url": "https://your-site.example.com/preview/42",
"back_office_url": "https://your-cms.example.com/admin/posts/42",
},
},
)
```
```bash callback.sh theme={null}
curl -X POST "https://api.semji.com/webhooks/calls/7c4a1f08b29d/callback" \
-H "Authorization: Bearer cbk_9f2c…" \
-H "Content-Type: application/json" \
-d '{"status":"completed","result":{"cms_id":"42","preview_url":"https://your-site.example.com/preview/42"}}'
```
The body is the same result format as the sync response. Only terminal outcomes
are accepted here — `completed` or `failed`; a body with `accepted` is rejected.
### Response codes
| Code | Meaning |
| - | - |
| `200` | Result accepted. Also returned on an idempotent replay of an already-finalized call (no further effect). |
| `400` | Body doesn't respect the contract (e.g. `completed` without `cms_id`, or `accepted`). The call stays open — fix and re-post. |
| `401` | Missing or invalid token. |
| `404` | Unknown call. |
| `410` | The callback expired (more than 24 hours after the send). |
| `429` | Too many requests — slow down and retry. |
**If your callback POST times out without a response, re-post it unchanged.**
The token is single-use per outcome but replays are **idempotent**: a repeat of
the same call returns `200` with no side effect, so you never risk a double
handling.
## Idempotency
Both directions are safe to retry:
* **Semji → you**: the same `idempotency_key` means the same send. Don't create a
second draft — return the result you already produced.
* **You → Semji**: replaying the callback for an already-finalized call returns
`200` with no effect.
A **new send of the same content** (a re-click of *Send to CMS*) carries a new
`idempotency_key` and a higher `content_version` — the latest send wins, and the
callback of a superseded send no longer changes the content's state.
## No-code example (Make / Zapier)
1. **Webhook** module receives the `content_staged` POST. Return `{"status":"accepted"}` immediately so the scenario doesn't hit the 10-second timeout.
2. Map `data.title`, `data.html`, `data.meta_description` to your CMS "create entry" module.
3. **HTTP** module POSTs the callback: URL = `{{callback.url}}`, header `Authorization: Bearer {{callback.token}}`, body `{"status":"completed","result":{"cms_id":"{{cms_id}}","preview_url":"{{preview_url}}"}}`.
## Testing your endpoint
A workspace owner can test the integration from **Settings** before going live:
Semji sends a sample `content_staged` payload to your URL and shows the parsed
verdict (`received`, `sent`, or `error`). A `sent` verdict means your endpoint
answered `accepted` — the test flips to `received` once your callback arrives.
## Troubleshooting
You answered `accepted` but no callback reached Semji. Post the result to the
`callback.url`; if nothing arrives within 24 hours the send is marked failed.
The `Authorization` header must be `Bearer ` using the exact
`callback.token` from the payload of that send. Tokens are per-send.
The callback expired — more than 24 hours passed since the send. Trigger a new
send from the editor to get a fresh callback.
A `completed` result must include `cms_id` **and** at least one of
`preview_url` / `back_office_url`. A body with `accepted` is not valid on the
callback — only `completed` or `failed`.
## Related
* [Sync drafts to your CMS](/guides/sync-drafts-to-cms) — the pull-based
alternative and the `content_published` webhook.
* [CMS integrations overview](/integrations/overview) — connect a CMS through MCP
or the REST API.
* [Authentication](/api-reference/authentication) — API keys for the REST API.
# Configure Semji MCP server toolsets and read-only scope
Source: https://help.semji.com/mcp/configuration
Scope the Semji MCP server URL to specific toolsets like planning, content-generation, and knowledge-base, with an optional read-only mode.
The Semji MCP server exposes a growing catalogue of tools. You can scope a
connection to just the toolsets you need — and optionally make it read-only —
directly from the server URL. This keeps the assistant's tool list focused and
lets you hand out narrower connections for governance.
The scope lives in the URL, so it is read on every request. To change scope,
update the connector URL and reconnect (see [Connect to Semji](/mcp/connecting)).
You can also register several connectors, each with a different scope.
## Build your URL
## Query parameters
| Param | Values | Default | Behaviour |
| - | - | - | - |
| `toolsets` | CSV of `planning`, `content-generation`, `content`, `geo`, `seo`, `ideas`, `brand-voice`, `editor`, `agents`, `settings`, `knowledge-base`, or `all` | `all` (every toolset) | Only the tools of the listed toolsets appear in the tool list and are callable. Unknown names are ignored. A bare URL, an empty value, and `all` are equivalent — every toolset is exposed (the default). |
| `read_only` | `true` / `false` | `false` | When `true`, every write tool is removed and refused. Orthogonal to `toolsets`. Any value other than `true` means `false`. |
The URL can only restrict access — it never grants more than your Semji account
already allows. Identity, organization, and permissions come from sign-in, not
from the URL.
## Examples
```text Default (all toolsets) theme={null}
https://mcp.semji.com/mcp
```
```text GEO + SEO analytics theme={null}
https://mcp.semji.com/mcp?toolsets=geo,seo
```
```text Everything, read-only theme={null}
https://mcp.semji.com/mcp?toolsets=all&read_only=true
```
Changing scope means updating the connector URL and reconnecting. Connections
do not re-prompt on their own. You can keep several connectors side by side,
each scoped differently.
Use the URL above wherever [Connect to Semji](/mcp/connecting) tells you to paste
`https://mcp.semji.com/mcp` — for example in Claude Code:
```bash theme={null}
claude mcp add --transport http semji "https://mcp.semji.com/mcp?toolsets=geo,seo"
```
# Connect to Semji
Source: https://help.semji.com/mcp/connecting
Add the Semji MCP server to Claude and any other MCP-compatible assistant.
The Semji MCP server is hosted at:
```
https://mcp.semji.com/mcp
```
The first time you connect, your assistant opens a browser window to sign in to Semji. If your account belongs to more than one organization, you then choose which organization to grant access to. Access is scoped to that organization and to your existing workspace permissions. You need a Semji account with access to at least one workspace.
Semji is not (yet) available as a one-click app inside Claude or ChatGPT. You
add it manually as a **custom MCP server** using the URL above. The steps
below cover that.
## Claude
### Claude Code (CLI)
Add the server, then authenticate from inside Claude Code:
```bash theme={null}
claude mcp add --transport http semji https://mcp.semji.com/mcp
```
Run `/mcp` in Claude Code and follow the browser sign-in. Once it shows
`connected`, you can start prompting.
### Claude Desktop and claude.ai
Add it as a custom connector:
Go to **Settings → Connectors** and click **Add custom connector**.
Paste `https://mcp.semji.com/mcp` and confirm with **Add**.
Open the new connector, click **Connect**, and sign in to Semji in the
browser window that opens.
Custom connectors are available on Free, Pro, Max, Team, and Enterprise plans
(Free is limited to one custom connector). Claude reaches the server from
Anthropic's cloud rather than your machine — this works because
`mcp.semji.com` is publicly reachable.
## Other MCP clients
Most MCP-compatible tools (Cursor, VS Code, Windsurf, Zed, ChatGPT custom
connectors, and others) let you register a server in a JSON config. Use one of
the two patterns below depending on what your client supports.
```json Remote (HTTP) — preferred theme={null}
{
"mcpServers": {
"semji": {
"type": "http",
"url": "https://mcp.semji.com/mcp"
}
}
}
```
```json Local bridge (stdio-only clients) theme={null}
{
"mcpServers": {
"semji": {
"command": "npx",
"args": ["-y", "mcp-remote@latest", "https://mcp.semji.com/mcp"]
}
}
}
```
Use the **remote (HTTP)** form if your client can talk to remote MCP servers
directly. If your client only supports local (stdio) servers, the **local
bridge** uses [`mcp-remote`](https://www.npmjs.com/package/mcp-remote) to forward
the connection and handle the browser sign-in for you (Node.js required).
## Troubleshooting
Trigger the auth flow explicitly: in Claude Code run `/mcp`, in other clients
re-open or reconnect the server. With the local bridge, the browser opens on
first use — make sure no other process is holding the redirect port and that
pop-ups aren't blocked.
Your session expired or was never completed. Reconnect and sign in again. In
Claude Code, `/mcp` lets you re-authenticate an existing server.
Custom connectors in Claude and ChatGPT connect from the vendor's cloud, so
the server must be reachable over the public internet — `mcp.semji.com` is.
If you are behind a corporate proxy or VPN that blocks it, the local bridge
(which connects from your machine) is the workaround.
Make sure Node.js is installed so `npx` can run, and keep `mcp-remote`
up to date (`mcp-remote@latest`, version 0.1.16 or newer). Restart the client
after editing its config file.
The assistant is scoped to the Semji account and the organization you picked
when signing in. To switch organization (or account), disconnect the server
and reconnect, then sign in again and choose the other organization.
# Semji MCP server
Source: https://help.semji.com/mcp/overview
Connect your AI assistant to Semji and drive your SEO and GEO content workflow in plain language.
The Semji MCP server connects any MCP-compatible AI assistant — such as Claude — directly to your Semji workspace. Ask in plain language and the assistant works on your real content: it reads your planning, runs analyses, generates drafts, and publishes, all scoped securely to your account.
No glue code, no exports. You stay in your assistant, the work happens in Semji.
## What you can do
Explore and filter your content pipeline, create drafts in bulk from a list
of keywords or URLs, organize them into folders, and set owners, statuses,
and due dates.
Set a focus keyword on a piece of content, run the analysis, and get
optimization recommendations for Google Search as well as AI answers
(Google AI Overview and ChatGPT).
Launch AI generation or optimization on one or many drafts, follow progress,
review the result, and publish when you are happy with it.
Pull in your workspaces, team, brand voices, and account status (including
remaining credits) so the assistant acts with the right context.
The assistant only ever sees and changes data in the Semji account you sign in
with. Scope follows your existing workspace permissions.
## Example prompts
Once connected, talk to your assistant the way you would to a teammate:
* *"List the drafts in my Spanish market workspace that don't have a focus keyword yet."*
* *"Create drafts for these 10 keywords in my US market workspace and start the SEO analysis on each."*
* *"Run the SEO and AI-visibility analysis on my draft about 'content marketing tools' and summarize what I should improve."*
* *"Generate an optimized version of these three drafts, then publish them once I approve."*
* *"Publish my approved article in Semji, then adapt it into a LinkedIn post and an X thread and schedule them on my social channels."*
* *"Sort my unsorted drafts into folders by topic and assign each to the right writer."*
* *"How much AI Writing credit do I have left?"*
## Next step
Add the Semji MCP server to Claude or any other MCP-compatible assistant.
# Quickstart
Source: https://help.semji.com/quickstart
Create your API key, retrieve your workspace, import a page, and optimize it with Atomic Content — all from the command line.
This guide walks you through the four steps to go from zero to an AI-optimized content draft using the Semji API.
You need a Semji account to follow this guide. Sign up or log in at [app.semji.com](https://app.semji.com).
## 1. Create your API key
Log in to [app.semji.com](https://app.semji.com), then go to **Settings > Organization > API Keys**.
Click **New API key**, give it a name (e.g. `quickstart`), and click **Create**.
Your key is shown once. Copy it now — you won't be able to see it again. All keys start with `sk_`.
Treat your API key like a password. Don't commit it to source control or include it in client-side code.
Export it in your terminal to use it in the commands below:
```bash theme={null}
export SEMJI_API_KEY="sk_your_api_key_here"
```
TypeScript examples read exported values with `process.env`. Python examples read them with `os.environ[...]`.
## 2. Test your key
Call `GET /v1/me` to verify your key works and see your organization:
```typescript TypeScript theme={null}
const response = await fetch("https://api.semji.com/v1/me", {
headers: { Authorization: `Bearer ${process.env.SEMJI_API_KEY}` },
});
console.log(await response.json());
```
```python Python theme={null}
import os
import requests
response = requests.get(
"https://api.semji.com/v1/me",
headers={"Authorization": f"Bearer {os.environ['SEMJI_API_KEY']}"},
)
print(response.json())
```
```bash cURL theme={null}
curl https://api.semji.com/v1/me \
-H "Authorization: Bearer $SEMJI_API_KEY"
```
You should get back your user profile and organization:
```json theme={null}
{
"id": "df286a001943",
"firstName": "Jane",
"lastName": "Smith",
"email": "jane@example.com",
"createdAt": "2024-03-15T10:30:00+00:00",
"jobTitle": "Marketing Manager",
"languageCode": "en",
"profileImageUrl": null,
"organization": {
"id": "89b0f07aade2",
"name": "Example Corp",
"createdAt": "2024-01-10T08:00:00+00:00",
"brandName": null,
"brandImageUrl": null,
"credits": {
"analysis": 47,
"aiWriting": 12,
"contentIdeasSearches": 5
},
"usersCount": 3,
"workspacesCount": 2
}
}
```
## 3. Get your workspace
A workspace represents one website in Semji. List your workspaces to grab the `id` you'll use in the next steps:
```typescript TypeScript theme={null}
const response = await fetch("https://api.semji.com/v1/workspaces", {
headers: { Authorization: `Bearer ${process.env.SEMJI_API_KEY}` },
});
const { data } = await response.json();
console.log(data[0].id, data[0].name);
```
```python Python theme={null}
import os
import requests
response = requests.get(
"https://api.semji.com/v1/workspaces",
headers={"Authorization": f"Bearer {os.environ['SEMJI_API_KEY']}"},
)
workspaces = response.json()["data"]
print(workspaces[0]["id"], workspaces[0]["name"])
```
```bash cURL theme={null}
curl https://api.semji.com/v1/workspaces \
-H "Authorization: Bearer $SEMJI_API_KEY"
```
Save your workspace ID:
```bash theme={null}
export WORKSPACE_ID="6c629e33a9a6"
```
## 4. Import a page and optimize it
### Import the page
Import a URL into your workspace. You can optionally attach a focus keyword right away:
```typescript TypeScript theme={null}
const response = await fetch(
`https://api.semji.com/v1/workspaces/${process.env.WORKSPACE_ID}/pages`,
{
method: "POST",
headers: {
Authorization: `Bearer ${process.env.SEMJI_API_KEY}`,
"Content-Type": "application/json",
},
body: JSON.stringify({
url: "https://example.com/blog/my-article",
focusKeyword: "content marketing strategy",
}),
}
);
const page = await response.json();
console.log(page.id);
```
```python Python theme={null}
import os
import requests
response = requests.post(
f"https://api.semji.com/v1/workspaces/{os.environ['WORKSPACE_ID']}/pages",
headers={
"Authorization": f"Bearer {os.environ['SEMJI_API_KEY']}",
"Content-Type": "application/json",
},
json={
"url": "https://example.com/blog/my-article",
"focusKeyword": "content marketing strategy",
},
)
page = response.json()
print(page["id"])
```
```bash cURL theme={null}
curl -X POST "https://api.semji.com/v1/workspaces/$WORKSPACE_ID/pages" \
-H "Authorization: Bearer $SEMJI_API_KEY" \
-H "Content-Type: application/json" \
-d '{
"url": "https://example.com/blog/my-article",
"focusKeyword": "content marketing strategy"
}'
```
The response returns the page with its `id` and crawled metadata (title, word count, etc.). Save the page ID for the next step:
```bash theme={null}
export PAGE_ID="1b81be0eb082"
```
### Create a content draft
Create a content linked to the page you just imported:
```typescript TypeScript theme={null}
const contentRes = await fetch(
`https://api.semji.com/v1/workspaces/${process.env.WORKSPACE_ID}/contents`,
{
method: "POST",
headers: {
Authorization: `Bearer ${process.env.SEMJI_API_KEY}`,
"Content-Type": "application/json",
},
body: JSON.stringify({
title: "Content Marketing Strategy for 2025",
pageId: process.env.PAGE_ID,
}),
}
);
const content = await contentRes.json();
console.log(content.id);
```
```python Python theme={null}
import os
import requests
response = requests.post(
f"https://api.semji.com/v1/workspaces/{os.environ['WORKSPACE_ID']}/contents",
headers={
"Authorization": f"Bearer {os.environ['SEMJI_API_KEY']}",
"Content-Type": "application/json",
},
json={
"title": "Content Marketing Strategy for 2025",
"pageId": os.environ["PAGE_ID"],
},
)
content = response.json()
print(content["id"])
```
```bash cURL theme={null}
curl -X POST "https://api.semji.com/v1/workspaces/$WORKSPACE_ID/contents" \
-H "Authorization: Bearer $SEMJI_API_KEY" \
-H "Content-Type: application/json" \
-d "{
\"title\": \"Content Marketing Strategy for 2025\",
\"pageId\": \"$PAGE_ID\"
}"
```
Save the content ID:
```bash theme={null}
export CONTENT_ID="3a89fc29d1f3"
```
### Analyze the focus keyword
Before generating content, the focus keyword needs a completed SEO analysis. Trigger it with `POST /v1/keywords/:id/analyze` using the keyword ID returned during page import:
```bash theme={null}
export KEYWORD_ID="b211968d8d46"
```
```typescript TypeScript theme={null}
await fetch(
`https://api.semji.com/v1/keywords/${process.env.KEYWORD_ID}/analyze`,
{
method: "POST",
headers: { Authorization: `Bearer ${process.env.SEMJI_API_KEY}` },
}
);
```
```python Python theme={null}
import os
import requests
requests.post(
f"https://api.semji.com/v1/keywords/{os.environ['KEYWORD_ID']}/analyze",
headers={"Authorization": f"Bearer {os.environ['SEMJI_API_KEY']}"},
)
```
```bash cURL theme={null}
curl -X POST "https://api.semji.com/v1/keywords/$KEYWORD_ID/analyze" \
-H "Authorization: Bearer $SEMJI_API_KEY"
```
Poll `GET /v1/keywords/:id` until `analysisStatus` reaches `success`:
```typescript TypeScript theme={null}
while (true) {
const res = await fetch(
`https://api.semji.com/v1/keywords/${process.env.KEYWORD_ID}`,
{ headers: { Authorization: `Bearer ${process.env.SEMJI_API_KEY}` } }
);
const kw = await res.json();
console.log(`Analysis: ${kw.analysisStatus}`);
if (["success", "failed"].includes(kw.analysisStatus)) break;
await new Promise((r) => setTimeout(r, 5000));
}
```
```python Python theme={null}
import os
import time
import requests
while True:
kw = requests.get(
f"https://api.semji.com/v1/keywords/{os.environ['KEYWORD_ID']}",
headers={"Authorization": f"Bearer {os.environ['SEMJI_API_KEY']}"},
).json()
print(f"Analysis: {kw['analysisStatus']}")
if kw["analysisStatus"] in ("success", "failed"):
break
time.sleep(5)
```
```bash cURL theme={null}
curl "https://api.semji.com/v1/keywords/$KEYWORD_ID" \
-H "Authorization: Bearer $SEMJI_API_KEY"
```
The analysis typically completes within 30 to 90 seconds.
### Launch Atomic Content
Trigger an AI content generation on the draft. Use `replace` to generate from scratch or `optimize` to rewrite existing content:
```typescript TypeScript theme={null}
await fetch(
`https://api.semji.com/v1/contents/${process.env.CONTENT_ID}/atomic`,
{
method: "POST",
headers: {
Authorization: `Bearer ${process.env.SEMJI_API_KEY}`,
"Content-Type": "application/json",
},
body: JSON.stringify({ type: "replace" }),
}
);
```
```python Python theme={null}
import os
import requests
requests.post(
f"https://api.semji.com/v1/contents/{os.environ['CONTENT_ID']}/atomic",
headers={
"Authorization": f"Bearer {os.environ['SEMJI_API_KEY']}",
"Content-Type": "application/json",
},
json={"type": "replace"},
)
```
```bash cURL theme={null}
curl -X POST "https://api.semji.com/v1/contents/$CONTENT_ID/atomic" \
-H "Authorization: Bearer $SEMJI_API_KEY" \
-H "Content-Type: application/json" \
-d '{ "type": "replace" }'
```
### Poll for completion
The generation runs asynchronously. Poll `GET /v1/contents/:id/generation` until the status reaches `review`:
```typescript TypeScript theme={null}
while (true) {
const res = await fetch(
`https://api.semji.com/v1/contents/${process.env.CONTENT_ID}/generation`,
{ headers: { Authorization: `Bearer ${process.env.SEMJI_API_KEY}` } }
);
const { status } = await res.json();
console.log(`Status: ${status}`);
if (["review", "failed", "cancelled"].includes(status)) break;
await new Promise((r) => setTimeout(r, 5000));
}
```
```python Python theme={null}
import os
import time
import requests
while True:
status = requests.get(
f"https://api.semji.com/v1/contents/{os.environ['CONTENT_ID']}/generation",
headers={"Authorization": f"Bearer {os.environ['SEMJI_API_KEY']}"},
).json()
print(f"Status: {status['status']}")
if status["status"] in ("review", "failed", "cancelled"):
break
time.sleep(5)
```
```bash cURL theme={null}
curl "https://api.semji.com/v1/contents/$CONTENT_ID/generation" \
-H "Authorization: Bearer $SEMJI_API_KEY"
```
Possible statuses: `queued` → `pending` → `review` → `success` (after confirm) or `failed` / `cancelled`.
### Confirm the draft
Once the status is `review`, confirm the generation to apply it to your content:
```typescript TypeScript theme={null}
await fetch(
`https://api.semji.com/v1/contents/${process.env.CONTENT_ID}/generation/confirm`,
{
method: "POST",
headers: { Authorization: `Bearer ${process.env.SEMJI_API_KEY}` },
}
);
```
```python Python theme={null}
import os
import requests
requests.post(
f"https://api.semji.com/v1/contents/{os.environ['CONTENT_ID']}/generation/confirm",
headers={"Authorization": f"Bearer {os.environ['SEMJI_API_KEY']}"},
)
```
```bash cURL theme={null}
curl -X POST "https://api.semji.com/v1/contents/$CONTENT_ID/generation/confirm" \
-H "Authorization: Bearer $SEMJI_API_KEY"
```
Your content is now optimized. Open it in the [Semji editor](https://app.semji.com) to review and publish.
## What's next?
Explore all available endpoints.
Rate limits, error handling, and key management.
# Authentication
Source: https://help.semji.com/api-reference/authentication
Generate a Semji API key from Settings, send it as a Bearer token on every request, and handle 401 Unauthorized and 403 Forbidden errors in your integration.
Every request to the Semji API must include a valid API key in the `Authorization` header. The API uses HTTP Bearer authentication — there are no sessions, cookies, or OAuth flows. This page explains how to generate a key, attach it to requests, and handle authentication errors.
## Generating an API key
API keys are created in the Semji app. Go to [**Settings > Organization > API Keys**](https://app.semji.com) and click **Create API Key**. Give the key a descriptive name (for example, the name of the integration or tool that will use it) so you can identify and revoke it later.
Each key:
* Begins with `sk_`
* Is scoped to the **user and organization** that created it — it has the same permissions as that user
* Is shown only once at creation time; copy and store it securely before closing the dialog
Never commit API keys to source control. Store them in environment variables or a secrets manager such as AWS Secrets Manager, HashiCorp Vault, or your CI/CD platform's secret store. If a key is accidentally exposed, revoke it immediately from **Settings > Organization > API Keys** and generate a new one.
## Sending the API key
Include the key in the `Authorization` header of every request:
```
Authorization: Bearer sk_your_api_key_here
```
The header value must start with `Bearer sk_` exactly. Any other format — including a bare token without `Bearer`, or a key that doesn't start with `sk_` — will be rejected with `401 Unauthorized`.
```typescript title="TypeScript" theme={null}
const apiKey = process.env.SEMJI_API_KEY;
async function semjiGet(path: string) {
const response = await fetch(`https://api.semji.com/v1${path}`, {
headers: {
Authorization: `Bearer ${apiKey}`,
},
});
if (!response.ok) {
const error = await response.json();
throw new Error(`${response.status}: ${error.error.message}`);
}
return response.json();
}
const user = await semjiGet("/me");
console.log(user.email);
```
```python title="Python" theme={null}
import os
import requests
api_key = os.environ["SEMJI_API_KEY"]
def semji_get(path: str) -> dict:
response = requests.get(
f"https://api.semji.com/v1{path}",
headers={"Authorization": f"Bearer {api_key}"},
)
response.raise_for_status()
return response.json()
user = semji_get("/me")
print(user["email"])
```
```bash title="cURL" theme={null}
curl https://api.semji.com/v1/me \
-H "Authorization: Bearer sk_your_api_key_here"
```
## Verifying your key
Call `GET /v1/me` to confirm your key is valid and inspect the associated user and organization:
```bash title="cURL" theme={null}
curl https://api.semji.com/v1/me \
-H "Authorization: Bearer sk_your_api_key_here"
```
```json title="200 OK" theme={null}
{
"id": "usr_01hx9z3k4m5n6p7q8r9s0t1u",
"firstName": "Alice",
"lastName": "Martin",
"email": "alice@example.com",
"profileImageUrl": null,
"jobTitle": "SEO Lead",
"languageCode": "en",
"organization": {
"id": "org_01hx9z3k4m5n6p7q8r9s0t2v",
"name": "Example Corp",
"createdAt": "2024-01-10T08:00:00Z",
"brandName": null,
"brandImageUrl": null,
"credits": {
"analysis": 47,
"aiWriting": 12,
"contentIdeasSearches": 5
},
"usersCount": 3,
"workspacesCount": 2
},
"createdAt": "2024-03-15T09:12:00Z"
}
```
## Authentication errors
### 401 Unauthorized
Returned when the `Authorization` header is missing, malformed, or contains an invalid or revoked key.
```json title="401 Unauthorized" theme={null}
{
"error": {
"code": "unauthorized",
"message": "A valid API key is required. Use Authorization: Bearer sk_xxx."
}
}
```
**What to check:**
* The header name is `Authorization` (capitalized correctly)
* The value starts with `Bearer ` (note the trailing space) followed by your full key
* The key starts with `sk_` and has not been revoked
* You're not accidentally including extra whitespace or newline characters
### 403 Forbidden
Returned when your key is valid but the authenticated user does not have permission to access the requested resource. This happens if, for example, you request a workspace that your user is not a member of.
```json title="403 Forbidden" theme={null}
{
"error": {
"code": "forbidden",
"message": "You do not have access to this resource."
}
}
```
A `403` is not a key problem — the key itself is recognized. You need to use a key belonging to a user with access to the resource, or ask a workspace admin to grant your user the required permissions.
# Get brand voice details
Source: https://help.semji.com/api-reference/brand-voices/get-brand-voice-details
/api-reference/openapi.json get /v1/brand-voices/{brandVoiceId}
Returns details of a brand voice.
# List brand voices
Source: https://help.semji.com/api-reference/brand-voices/list-brand-voices
/api-reference/openapi.json get /v1/workspaces/{workspaceId}/brand-voices
Returns all brand voices configured for a workspace. Use the brand voice ID in POST /v1/contents/:contentId/atomic settings.
# Cancel a generation
Source: https://help.semji.com/api-reference/content-generations/cancel-a-generation
/api-reference/openapi.json post /v1/contents/{contentId}/generation/cancel
Cancels a generation that is queued, pending, or awaiting review.
# Confirm a generation
Source: https://help.semji.com/api-reference/content-generations/confirm-a-generation
/api-reference/openapi.json post /v1/contents/{contentId}/generation/confirm
Confirms and accepts the generated content. The draft is updated with the generation result. Requires status = "review".
# Get generation status
Source: https://help.semji.com/api-reference/content-generations/get-generation-status
/api-reference/openapi.json get /v1/contents/{contentId}/generation
Returns the current status of the Atomic Content generation attached to a content. Poll this endpoint to track progress.
# Delete a content idea search
Source: https://help.semji.com/api-reference/content-ideas/delete-a-content-idea-search
/api-reference/openapi.json delete /v1/content-idea-searches/{contentIdeaSearchId}
Deletes a content idea search and all of its content ideas.
# Get a content idea search
Source: https://help.semji.com/api-reference/content-ideas/get-a-content-idea-search
/api-reference/openapi.json get /v1/content-idea-searches/{contentIdeaSearchId}
Returns a content idea search and its processing status (pending → success / failed). Use it to poll an asynchronous search started with POST.
# List content ideas of a search
Source: https://help.semji.com/api-reference/content-ideas/list-content-ideas-of-a-search
/api-reference/openapi.json get /v1/content-idea-searches/{contentIdeaSearchId}/content-ideas
Returns a paginated list of the content ideas produced by a completed search. Each idea carries its keyword, URL, search volume, keyword difficulty, estimated traffic, relevance and the workspace's own ranking on the keyword. Supports filtering (keyword, title, url, type, keywordBrand, and gte/lte ranges on searchVolume, keywordDifficulty, urlEstimatedTraffic, similarityScore) and sorting.
# Start a content idea search
Source: https://help.semji.com/api-reference/content-ideas/start-a-content-idea-search
/api-reference/openapi.json post /v1/workspaces/{workspaceId}/content-idea-searches
Launches an asynchronous Content Ideas search for a keyword in the workspace. Consumes one content-ideas-searches credit. Returns immediately with the search id and status 'pending' — poll GET /v1/content-idea-searches/:contentIdeaSearchId until status is 'success', then read the results with GET /v1/content-idea-searches/:contentIdeaSearchId/content-ideas.
# Create a content
Source: https://help.semji.com/api-reference/contents/create-a-content
/api-reference/openapi.json post /v1/workspaces/{workspaceId}/contents
Creates a new content draft in the workspace. Pass pageId to attach the draft to an existing imported page, or omit it to create a blank draft (editorial brief with no URL) — in that case an empty page is auto-created and returned in the response.
# Delete a content
Source: https://help.semji.com/api-reference/contents/delete-a-content
/api-reference/openapi.json delete /v1/contents/{contentId}
Permanently deletes a content. This action cannot be undone.
# Generate Atomic Content
Source: https://help.semji.com/api-reference/contents/generate-atomic-content
/api-reference/openapi.json post /v1/contents/{contentId}/atomic
Launches an AI content generation on the draft. The keyword must have a completed SEO analysis. Poll GET /v1/contents/:contentId/generation to track progress.
# Get content details
Source: https://help.semji.com/api-reference/contents/get-content-details
/api-reference/openapi.json get /v1/contents/{contentId}
Returns full details of a content, including HTML body, version, and embedded relations.
# List contents for a page
Source: https://help.semji.com/api-reference/contents/list-contents-for-a-page
/api-reference/openapi.json get /v1/pages/{pageId}/contents
Returns all content versions associated with a specific page.
# List contents in a workspace
Source: https://help.semji.com/api-reference/contents/list-contents-in-a-workspace
/api-reference/openapi.json get /v1/workspaces/{workspaceId}/contents
Returns a paginated list of contents. Supports filtering by status, assignee, folder, due date, and text search.
# Mark a content as published
Source: https://help.semji.com/api-reference/contents/mark-a-content-as-published
/api-reference/openapi.json post /v1/contents/{contentId}/publish
Marks the content as published in Semji. Call this endpoint after the content has been published on your CMS. If no URL is provided, the associated page URL is used. If no publication date is provided, the current server time is used.
# Update a content
Source: https://help.semji.com/api-reference/contents/update-a-content
/api-reference/openapi.json put /v1/contents/{contentId}
Updates a content. The version field is required for optimistic locking.
# List credit usages
Source: https://help.semji.com/api-reference/credit-usages/list-credit-usages
/api-reference/openapi.json get /v1/credit-usages
Returns the credit consumption history for the organization, paginated. Each entry details a credit consumed with its context.
# Errors
Source: https://help.semji.com/api-reference/errors
Full reference for Semji API error codes, HTTP status codes, error response format, and handling strategies including retries and validation errors.
When a request cannot be completed, the Semji API returns a JSON error object alongside an appropriate HTTP status code. All errors follow the same structure, making them straightforward to handle in code. This page documents every error code the API can return, explains what triggers each one, and provides guidance on how to respond.
## Error response format
Every error response — regardless of cause or status code — uses the following shape:
```json theme={null}
{
"error": {
"code": "string",
"message": "string"
}
}
```
A stable, machine-readable string identifying the error type. Use this field in your error-handling logic — it will not change between API versions.
A human-readable explanation of the error. For `validation_error` responses, this describes the specific field that failed validation. Useful for debugging but not guaranteed to be stable across releases.
## Error codes reference
| HTTP status | `error.code` | Meaning |
| - | - | - |
| 400 | `bad_request` | The request was malformed or a required field is missing |
| 401 | `unauthorized` | API key is missing, invalid, or revoked |
| 403 | `forbidden` | Authenticated but not permitted to access this resource |
| 404 | `not_found` | The resource does not exist |
| 409 | `conflict` | Request conflicts with current state, e.g. version mismatch |
| 422 | `validation_error` | Request body failed schema validation |
| 429 | `rate_limited` | Too many requests — hourly or burst limit exceeded |
| 500 | `internal_error` | Unexpected server error |
| 502 | `bad_gateway` | The upstream service returned an error |
| 503 | `service_unavailable` | Service temporarily unavailable |
***
## Detailed error reference
Returned when the request is structurally malformed — for example, a required query parameter is missing, a path parameter cannot be parsed, or the request body is not valid JSON.
```json title="Example response" theme={null}
{
"error": {
"code": "bad_request",
"message": "The request was invalid."
}
}
```
**How to handle:** Inspect the `message` field for details on what is wrong. Check that all required parameters are present and that your request body is valid JSON with the correct `Content-Type: application/json` header.
Returned when the `Authorization` header is absent, does not begin with `Bearer sk_`, or contains a key that is invalid or has been revoked.
```json title="Example response" theme={null}
{
"error": {
"code": "unauthorized",
"message": "A valid API key is required. Use Authorization: Bearer sk_xxx."
}
}
```
**How to handle:** Verify that your `Authorization` header is formatted correctly (`Bearer sk_...`), that the key has not been revoked in **Settings > Organization > API Keys**, and that you are not accidentally including extra whitespace or newline characters in the header value. See [Authentication](/api-reference/authentication) for details.
Returned when the API key is valid but the authenticated user does not have permission to access the requested resource. Common causes: accessing a workspace the user is not a member of, or attempting an admin-only action with a Member-role key.
```json title="Example response" theme={null}
{
"error": {
"code": "forbidden",
"message": "You do not have access to this resource."
}
}
```
**How to handle:** Confirm that the user associated with your API key has the required role in the workspace or organization. To check your current user and role, call `GET /v1/me` and `GET /v1/users`.
Returned when the resource identified by the URL or a path parameter does not exist, or the authenticated user cannot see it.
```json title="Example response" theme={null}
{
"error": {
"code": "not_found",
"message": "The requested resource was not found."
}
}
```
**How to handle:** Double-check the ID in your request path. Note that resources in workspaces you don't have access to also return `404` rather than `403`, to avoid leaking information about what exists.
Returned when the request conflicts with the current state of the resource. The most common cause is an **optimistic locking conflict** on content updates: the `version` field you submitted does not match the current version on the server, meaning another client updated the resource since you last fetched it.
```json title="Example response" theme={null}
{
"error": {
"code": "conflict",
"message": "The request conflicts with the current state."
}
}
```
**How to handle:** Re-fetch the resource to get the latest `version` value, apply your changes to the fresh copy, and retry the update with the new `version`.
Returned when the request body is structurally valid JSON but fails schema validation — for example, an enum field contains an unrecognized value, a required field is `null`, or a string exceeds its maximum length. The `message` field names the specific field that failed.
```json title="Example response" theme={null}
{
"error": {
"code": "validation_error",
"message": "title: String must contain at least 1 character(s)"
}
}
```
**How to handle:** Read the `message` to identify the offending field and correct the value in your request. Do not retry without fixing the input — the same request will fail again.
Returned when you exceed the rate limit for your API key — either 1,000 requests per rolling hour or 20 requests per second. The response includes a `Retry-After` header indicating how many seconds to wait.
```json title="Example response" theme={null}
{
"error": {
"code": "rate_limited",
"message": "Too many requests. Please try again later."
}
}
```
**How to handle:** Wait at least the number of seconds in the `Retry-After` header before retrying. Use exponential backoff with jitter for repeated 429s. See [Rate Limits](/api-reference/rate-limits) for full retry guidance.
Returned when an unexpected error occurs on the server. This is not caused by your request.
```json title="Example response" theme={null}
{
"error": {
"code": "internal_error",
"message": "An internal error occurred."
}
}
```
**How to handle:** Retry the request using exponential backoff. If the error persists, contact Semji support.
Returned when the Semji gateway successfully received your request but the upstream service returned an error. This is typically a transient infrastructure issue.
```json title="Example response" theme={null}
{
"error": {
"code": "bad_gateway",
"message": "The upstream service returned an error."
}
}
```
**How to handle:** Retry with exponential backoff. A `502` is not caused by your request and will usually resolve within seconds.
Returned when the API is temporarily unavailable, typically due to planned maintenance or an unexpected outage.
```json title="Example response" theme={null}
{
"error": {
"code": "service_unavailable",
"message": "The service is temporarily unavailable."
}
}
```
**How to handle:** Retry after a short delay. Check the Semji status page for any active incidents.
## Handling errors in code
The following pattern covers the most important cases — retry on transient server errors, respect rate limit headers, and surface actionable messages for client errors:
```typescript title="TypeScript" theme={null}
const RETRYABLE_STATUSES = new Set([429, 500, 502, 503]);
async function semjiRequest(method: string, path: string, body?: unknown) {
const url = `https://api.semji.com/v1${path}`;
for (let attempt = 0; attempt < 5; attempt++) {
const response = await fetch(url, {
method,
headers: {
Authorization: `Bearer ${process.env.SEMJI_API_KEY}`,
"Content-Type": "application/json",
},
body: body ? JSON.stringify(body) : undefined,
});
if (RETRYABLE_STATUSES.has(response.status)) {
const retryAfter = parseInt(response.headers.get("Retry-After") ?? "2", 10);
const wait = (retryAfter + Math.random()) * 1000;
await new Promise((r) => setTimeout(r, wait));
continue;
}
if (!response.ok) {
const { error } = await response.json();
throw new Error(`[${error.code}] ${error.message}`);
}
return response.json();
}
throw new Error("Request failed after 5 retries");
}
```
```python title="Python" theme={null}
import time
import random
import requests
RETRYABLE_STATUSES = {429, 500, 502, 503}
def semji_request(method: str, path: str, **kwargs) -> dict:
url = f"https://api.semji.com/v1{path}"
headers = {"Authorization": f"Bearer {API_KEY}"}
for attempt in range(5):
response = requests.request(method, url, headers=headers, **kwargs)
if response.status_code in RETRYABLE_STATUSES:
retry_after = int(response.headers.get("Retry-After", 2 ** attempt))
time.sleep(retry_after + random.uniform(0, 1))
continue
if not response.ok:
error = response.json()["error"]
raise ValueError(f"[{error['code']}] {error['message']}")
return response.json()
raise RuntimeError("Request failed after 5 retries")
```
**Key rules:**
* **Retry** on `429`, `500`, `502`, and `503` using exponential backoff
* **Do not retry** on `400`, `401`, `403`, `404`, `409`, or `422` — these indicate a problem with the request that must be fixed first
* **Re-fetch then retry** on `409` — get the latest resource version before submitting your update again
* **Check `error.message`** on `422` to identify which field failed validation
# Create a folder
Source: https://help.semji.com/api-reference/folders/create-a-folder
/api-reference/openapi.json post /v1/workspaces/{workspaceId}/folders
Creates a new folder in the workspace.
# Delete a folder
Source: https://help.semji.com/api-reference/folders/delete-a-folder
/api-reference/openapi.json delete /v1/folders/{folderId}
Deletes a folder. Contents inside the folder are not deleted — they become unorganized.
# List folders
Source: https://help.semji.com/api-reference/folders/list-folders
/api-reference/openapi.json get /v1/workspaces/{workspaceId}/folders
Returns all folders in a workspace as a flat list. Use parentFolderId to reconstruct the tree.
# Update a folder
Source: https://help.semji.com/api-reference/folders/update-a-folder
/api-reference/openapi.json put /v1/folders/{folderId}
Updates a folder name or parent. Returns the updated folder.
# Add a keyword to a page
Source: https://help.semji.com/api-reference/keywords/add-a-keyword-to-a-page
/api-reference/openapi.json post /v1/pages/{pageId}/keywords
Associates a keyword with a page. Creates the keyword if it does not exist.
# Generate keyword analysis report
Source: https://help.semji.com/api-reference/keywords/generate-keyword-analysis-report
/api-reference/openapi.json post /v1/keywords/{keywordId}/report
Returns an analysis report for the keyword, scoring the provided content against each surface. The report contains the data computed by the keyword analysis — an overall score, typed recommendations (each with its own sub-score and supporting data), and surface-specific context: SERP competitors for Google Search (`googleSearch`); cited sources, mentioned brands, and the markdown preview of the AI response for Google AI Overview (`googleAiOverview`). Provide either `contentId` (by reference) or `title` + `html` (by value), not both.
# Get keyword details
Source: https://help.semji.com/api-reference/keywords/get-keyword-details
/api-reference/openapi.json get /v1/keywords/{keywordId}
Returns full details of a keyword, including analysis status and focus prompt.
# Launch keyword analysis
Source: https://help.semji.com/api-reference/keywords/launch-keyword-analysis
/api-reference/openapi.json post /v1/keywords/{keywordId}/analyze
Triggers an asynchronous analysis on a keyword (Google Search organic SERP scrape, recommendations computation). Poll GET /v1/keywords/:keywordId to track progress via analysisStatus.
# List keywords for a page
Source: https://help.semji.com/api-reference/keywords/list-keywords-for-a-page
/api-reference/openapi.json get /v1/pages/{pageId}/keywords
Returns all keywords associated with a page. Not paginated (pages rarely have more than 50 keywords).
# Update a keyword
Source: https://help.semji.com/api-reference/keywords/update-a-keyword
/api-reference/openapi.json put /v1/keywords/{keywordId}
Updates a keyword (e.g. set or remove the focus GEO prompt).
# Get knowledge document details
Source: https://help.semji.com/api-reference/knowledge-documents/get-knowledge-document-details
/api-reference/openapi.json get /v1/knowledge-documents/{knowledgeDocumentId}
Returns details of a knowledge document.
# List knowledge documents
Source: https://help.semji.com/api-reference/knowledge-documents/list-knowledge-documents
/api-reference/openapi.json get /v1/workspaces/{workspaceId}/knowledge-documents
Returns all knowledge documents in a workspace. Enable knowledge sources in POST /v1/contents/:contentId/atomic settings.
# Get authenticated user
Source: https://help.semji.com/api-reference/me/get-authenticated-user
/api-reference/openapi.json get /v1/me
Returns the user authenticated by the API key, with the linked organization embedded.
# Semji API overview
Source: https://help.semji.com/api-reference/overview
Introduction to the Semji REST API v1 — base URL, authentication, response format, rate limits, and the full list of available resources.
The Semji API is a REST API that lets you integrate Semji's AI-powered content marketing platform into your own tools and workflows. Every endpoint returns JSON, requires a Bearer API key, and lives under `https://api.semji.com/v1/`. This page explains the fundamentals before you make your first request.
## Base URL
All API v1 endpoints share the following base URL:
```
https://api.semji.com/v1
```
There is no version negotiation via headers — the version is part of the path. Every endpoint documented in this reference is prefixed with `/v1/`.
## Your first API call
The quickest way to verify your API key is to fetch your own user record. Replace `sk_...` with your actual key:
```bash title="cURL" theme={null}
curl https://api.semji.com/v1/me \
-H "Authorization: Bearer sk_your_api_key_here"
```
A successful response looks like this:
```json title="200 OK" theme={null}
{
"id": "usr_01hx9z3k4m5n6p7q8r9s0t1u",
"firstName": "Alice",
"lastName": "Martin",
"email": "alice@example.com",
"profileImageUrl": null,
"jobTitle": "SEO Lead",
"languageCode": "en",
"organization": {
"id": "org_01hx9z3k4m5n6p7q8r9s0t2v",
"name": "Example Corp",
"createdAt": "2024-01-10T08:00:00Z",
"brandName": null,
"brandImageUrl": null,
"credits": {
"analysis": 47,
"aiWriting": 12,
"contentIdeasSearches": 5
},
"usersCount": 3,
"workspacesCount": 2
},
"createdAt": "2024-03-15T09:12:00Z"
}
```
Generate your API key in the Semji app at [Settings > Organization > API Keys](https://app.semji.com). See [Authentication](/api-reference/authentication) for full details.
## Authentication
Every request must include an `Authorization` header with a Bearer token:
```
Authorization: Bearer sk_your_api_key_here
```
API keys begin with `sk_`. A missing or malformed key returns `401 Unauthorized`. A valid key without access to the requested resource returns `403 Forbidden`. See the [Authentication guide](/api-reference/authentication) for code examples in Python, Node.js, and more.
## Response format
All responses use `Content-Type: application/json`.
**Single resources** are returned as a flat JSON object:
```json theme={null}
{
"id": "...",
"name": "..."
}
```
**Collections** are wrapped in a standard pagination envelope:
```json theme={null}
{
"data": [
{ "id": "...", "name": "..." }
],
"pagination": {
"total": 84,
"page": 1,
"limit": 25,
"hasMore": true
}
}
```
Use the `page` and `limit` query parameters to paginate. `limit` accepts values from 1 to 100 and defaults to 25.
## Error format
All errors follow the same shape regardless of status code:
```json theme={null}
{
"error": {
"code": "not_found",
"message": "The requested resource was not found."
}
}
```
The `code` field is a stable machine-readable string you can match in code. The `message` field is a human-readable description, useful for debugging. See the [Errors reference](/api-reference/errors) for the full list of codes and HTTP status codes.
## Rate limits
Each API key is limited to **1,000 requests per hour** on a rolling window, with a burst limit of **20 requests per second**. Every response includes `X-RateLimit-Limit`, `X-RateLimit-Remaining`, and `X-RateLimit-Reset` headers. Exceeding the limit returns `429 Too Many Requests`. See [Rate Limits](/api-reference/rate-limits) for details and retry guidance.
## Resources
The API exposes the following resource groups. Click any card to go to the endpoint reference.
Retrieve the authenticated user and their organization, and list members of your organization with their roles.
List and inspect the websites you track in Semji. Each workspace contains pages, contents, keywords, and workflow configuration.
Import URLs into a workspace, trigger crawls to fetch metadata, and associate focus keywords for SEO analysis.
Create and manage SEO content drafts, track their Content Score (0–100), and generate full articles with Atomic Content AI.
Analyze search terms to get SERP-based recommendations: topics, questions, search intents, and links to add.
Analyze questions asked to AI engines (ChatGPT, Google AI Overviews) to get GEO recommendations and AI citation data.
Configure editorial identities that Atomic Content uses to match your writing style, tone, and brand guidelines.
Upload reference materials that the AI draws from during content generation to produce more accurate, brand-aligned output.
Track the status of Atomic Content AI generation jobs, confirm generated drafts, or cancel them.
View your organization's credit consumption history across keyword analyses, AI generation, and content ideas.
# Crawl a page
Source: https://help.semji.com/api-reference/pages/crawl-a-page
/api-reference/openapi.json post /v1/pages/{pageId}/crawl
Triggers an asynchronous crawl to refresh the page metadata (title, meta description, etc.). Poll GET /v1/pages/:pageId to see updated data.
# Delete a page
Source: https://help.semji.com/api-reference/pages/delete-a-page
/api-reference/openapi.json delete /v1/pages/{pageId}
Deletes a page and its associated contents.
# Get page details
Source: https://help.semji.com/api-reference/pages/get-page-details
/api-reference/openapi.json get /v1/pages/{pageId}
Returns full details of a page, including its focus keyword.
# Import a page
Source: https://help.semji.com/api-reference/pages/import-a-page
/api-reference/openapi.json post /v1/workspaces/{workspaceId}/pages
Imports an existing URL into the workspace (crawls it to extract title, meta description, etc.). Use this for pages you already have online and want to track. Optionally sets a URL category and focus keyword. To create a new editorial draft that does not yet have a URL, use POST /v1/workspaces/:workspaceId/contents instead.
# List pages in a workspace
Source: https://help.semji.com/api-reference/pages/list-pages-in-a-workspace
/api-reference/openapi.json get /v1/workspaces/{workspaceId}/pages
Returns a paginated list of tracked pages in the workspace. Supports text search, category filtering, and sorting.
# Update a page
Source: https://help.semji.com/api-reference/pages/update-a-page
/api-reference/openapi.json put /v1/pages/{pageId}
Updates a page focus keyword and/or URL category. The URL category cannot currently be unset once assigned.
# Create a prompt
Source: https://help.semji.com/api-reference/prompts/create-a-prompt
/api-reference/openapi.json post /v1/keywords/{keywordId}/prompts
Creates a GEO prompt for a keyword.
# Generate prompt analysis report
Source: https://help.semji.com/api-reference/prompts/generate-prompt-analysis-report
/api-reference/openapi.json post /v1/prompts/{promptId}/report
Returns an analysis report for the prompt, scoring the provided content against ChatGPT. The report contains the data computed by the prompt analysis — an overall score, typed recommendations (each with its own sub-score and supporting data), the cited sources, the mentioned brands, and the markdown preview of ChatGPT's response. Provide either `contentId` (by reference) or `title` + `html` (by value), not both.
# Get prompt details
Source: https://help.semji.com/api-reference/prompts/get-prompt-details
/api-reference/openapi.json get /v1/prompts/{promptId}
Returns details of a prompt. Useful for polling analysisStatus after launching a GEO analysis.
# Launch prompt analysis
Source: https://help.semji.com/api-reference/prompts/launch-prompt-analysis
/api-reference/openapi.json post /v1/prompts/{promptId}/analyze
Triggers an asynchronous analysis on a prompt (ChatGPT). The parent keyword must have a completed keyword analysis. Poll GET /v1/prompts/:promptId to track progress.
# List prompts for a keyword
Source: https://help.semji.com/api-reference/prompts/list-prompts-for-a-keyword
/api-reference/openapi.json get /v1/keywords/{keywordId}/prompts
Returns GEO prompts associated with a keyword.
# Rate Limits
Source: https://help.semji.com/api-reference/rate-limits
Understand Semji API rate limits, how to read rate limit response headers, handle 429 errors, and implement exponential backoff in your integration.
The Semji API enforces rate limits to ensure fair usage and stable performance for all customers. Understanding these limits and building retry logic into your integration will prevent disruptions in production. This page explains the limits in place, the response headers you can use to track your usage, and recommended strategies for handling errors gracefully.
## Limits
Two rate limits apply to every API key simultaneously:
| Limit | Window | Maximum |
| - | - | - |
| Hourly | 1 hour (rolling) | 1,000 requests |
| Burst | 1 second | 20 requests |
Both limits are enforced per API key. The hourly limit is a rolling window — it tracks requests over the past 60 minutes, not a fixed clock-hour boundary. The burst limit prevents sudden spikes that could affect service reliability even when your hourly budget is healthy.
Health check (`/health`), OpenAPI spec (`/openapi.json`), and documentation (`/docs`) endpoints are excluded from rate limiting.
## Rate limit headers
Every API response includes the following headers reflecting your current hourly limit status:
The maximum number of requests allowed per hour for this API key.
The number of requests remaining in the current rolling hour window.
The number of seconds until the oldest request in the rolling window falls out and your remaining count increases.
You can inspect these headers with curl using the `-i` flag:
```bash title="Inspect rate limit headers" theme={null}
curl -i https://api.semji.com/v1/me \
-H "Authorization: Bearer sk_your_api_key_here"
```
```text title="Response headers (excerpt)" theme={null}
HTTP/2 200
x-ratelimit-limit: 1000
x-ratelimit-remaining: 847
x-ratelimit-reset: 1823
content-type: application/json
```
## When the limit is exceeded
When you exceed either limit, the API responds with `429 Too Many Requests`. The response body follows the standard error format:
```json title="429 Too Many Requests" theme={null}
{
"error": {
"code": "rate_limited",
"message": "Too many requests. Please try again later."
}
}
```
On a `429`, the response also includes a `Retry-After` header indicating the number of seconds to wait before retrying.
## Handling 429 errors
### Exponential backoff
The recommended approach is exponential backoff with jitter. Wait progressively longer between retries, and add a small random delay to avoid synchronized retry storms across multiple workers:
```typescript title="TypeScript" theme={null}
const apiKey = process.env.SEMJI_API_KEY;
async function semjiGet(path: string, maxRetries = 5) {
const url = `https://api.semji.com/v1${path}`;
for (let attempt = 0; attempt < maxRetries; attempt++) {
const response = await fetch(url, {
headers: { Authorization: `Bearer ${apiKey}` },
});
if (response.status === 429) {
const retryAfter = parseInt(response.headers.get("Retry-After") ?? "2", 10);
const jitter = Math.random();
const wait = (retryAfter + jitter) * 1000;
console.log(`Rate limited. Retrying in ${(wait / 1000).toFixed(1)}s`);
await new Promise((resolve) => setTimeout(resolve, wait));
continue;
}
if (!response.ok) {
const error = await response.json();
throw new Error(`${response.status}: ${error.error.message}`);
}
return response.json();
}
throw new Error(`Exceeded ${maxRetries} retries for ${path}`);
}
```
```python title="Python" theme={null}
import os
import time
import random
import requests
api_key = os.environ["SEMJI_API_KEY"]
def semji_get(path: str, max_retries: int = 5) -> dict:
url = f"https://api.semji.com/v1{path}"
headers = {"Authorization": f"Bearer {api_key}"}
for attempt in range(max_retries):
response = requests.get(url, headers=headers)
if response.status_code == 429:
retry_after = int(response.headers.get("Retry-After", 2 ** attempt))
jitter = random.uniform(0, 1)
wait = retry_after + jitter
print(f"Rate limited. Retrying in {wait:.1f}s (attempt {attempt + 1})")
time.sleep(wait)
continue
response.raise_for_status()
return response.json()
raise RuntimeError(f"Exceeded {max_retries} retries for {path}")
```
### Proactively monitoring your budget
Instead of waiting for a `429`, read the `X-RateLimit-Remaining` header on each response and slow down when your budget runs low:
```python title="Proactive throttling (Python)" theme={null}
import time
import requests
def semji_get_with_throttle(session: requests.Session, url: str) -> dict:
response = session.get(url)
response.raise_for_status()
remaining = int(response.headers.get("X-RateLimit-Remaining", 1000))
reset_in = int(response.headers.get("X-RateLimit-Reset", 0))
# Slow down when fewer than 50 requests remain
if remaining < 50 and reset_in > 0:
sleep_time = reset_in / max(remaining, 1)
time.sleep(min(sleep_time, 5)) # Cap at 5s between requests
return response.json()
```
## Best practices
Content generation jobs (`/v1/content-generations`) are asynchronous. Poll their status with a reasonable interval — every 5–10 seconds is sufficient. Polling every second wastes your request budget without providing faster results.
**Cache responses where possible.** Resources like workspaces, brand voices, and knowledge documents rarely change. Cache their IDs and names for the duration of your session rather than fetching them on every run.
**Use pagination efficiently.** Fetch only the pages you need. Use the maximum `limit=100` when you need to process all items in a collection, rather than making many small requests.
**Batch reads before writes.** If your workflow reads several resources before creating or updating one, perform all the reads first. This groups your writes into a smaller time window and leaves more headroom for subsequent operations.
**Avoid retrying 4xx errors other than 429.** Errors in the `400`–`428` range indicate a problem with the request itself (bad input, missing permissions, not found). Retrying them will not help and only wastes your quota. Fix the request and then retry.
# List organization members
Source: https://help.semji.com/api-reference/users/list-organization-members
/api-reference/openapi.json get /v1/users
Returns all members of the organization linked to the API key, with their role.
# Get workspace details
Source: https://help.semji.com/api-reference/workspaces/get-workspace-details
/api-reference/openapi.json get /v1/workspaces/{workspaceId}
Returns details of a specific workspace.
# List content statuses
Source: https://help.semji.com/api-reference/workspaces/list-content-statuses
/api-reference/openapi.json get /v1/workspaces/{workspaceId}/content-statuses
Returns all content statuses for a workspace, ordered by position. Includes system statuses ("to do", "published") which are read-only.
# List workspace members
Source: https://help.semji.com/api-reference/workspaces/list-workspace-members
/api-reference/openapi.json get /v1/workspaces/{workspaceId}/users
Returns all members of a workspace with their role.
# List workspaces
Source: https://help.semji.com/api-reference/workspaces/list-workspaces
/api-reference/openapi.json get /v1/workspaces
Returns all workspaces in the organization accessible to the authenticated user.
# Semji API & MCP Documentation
Source: https://help.semji.com/developers/overview
Integrate Semji into your workflows through the REST API, or let Claude, ChatGPT, or any AI assistant drive your workspace via the MCP server.
Semji helps you scale your organic and AI visibility. This documentation covers everything you need to integrate Semji into your workflows, whether you prefer calling the REST API directly or letting Claude, ChatGPT, or any AI assistant drive your workspace through the MCP server.
Set up your first workspace, import a page, and make your first API call in minutes.
Explore all REST endpoints — workspaces, pages, keywords, contents, and more.
Connect Claude, ChatGPT, or any AI assistant to Semji with natural language.
## Authentication
All API requests require a Bearer API key. Generate one from **Settings > Organization > API Keys** in the Semji app.
```http theme={null}
Authorization: Bearer sk_your_api_key_here
```
See the [Authentication guide](/api-reference/authentication) for detailed instructions on generating keys, rate limits, and error handling.
## Built for AI agents
This documentation is designed to be easily consumed by AI tools like Claude, ChatGPT, or any LLM-powered agent.
* **llms.txt** — A machine-readable index of the entire documentation is available at [`/llms.txt`](https://help.semji.com/llms.txt) and [`/llms-full.txt`](https://help.semji.com/llms-full.txt), following the [llms.txt standard](https://llmstxt.org).
* **Copy as context** — Every page has a **Copy page** button that copies the content as Markdown, ready to paste into your favorite AI assistant.
* **[MCP server](/mcp/overview)** — Connect your AI assistant directly to Semji and interact with your workspace using natural language.
# Semji API guides overview
Source: https://help.semji.com/guides/overview
End-to-end guides that combine several Semji API endpoints: sync drafts to your CMS and get SEO and GEO recommendations from a keyword.
These guides walk you through complete workflows that combine several Semji API endpoints. Each one assumes you've already followed the [Quickstart](/quickstart) — you have an API key, you know your workspace ID, and you've made at least one successful call.
Poll Semji for drafts ready to publish, push their sanitized HTML to your CMS, then mark them as published — or let Semji drive the sync with webhooks.
Create a draft from a focus keyword, launch the keyword analysis, and retrieve typed SEO and GEO recommendations.
# Get SEO & GEO recommendations from a keyword
Source: https://help.semji.com/guides/seo-geo-recommendations
Create a draft from a focus keyword, run a keyword analysis, and pull back the typed SEO (Google Search) and GEO (Google AI Overview) recommendations.
This guide shows you how to go from a single keyword to a complete brief of SEO and GEO recommendations. The flow uses four endpoints:
1. **Create a draft content** in your editorial planning.
2. **Add the focus keyword** to the draft's page and set it as the focus keyword.
3. **Launch the keyword analysis** asynchronously.
4. **Generate the analysis report** to retrieve typed recommendations.
The same flow powers the *New content* button in the Semji app.
## Prerequisites
* An API key. See [Authentication](/api-reference/authentication).
* The **workspace ID** you want to plan content in. Get it from [`GET /v1/workspaces`](/api-reference/workspaces/list-workspaces).
* A focus keyword you want recommendations for (e.g. `best crm for small business`).
## 1. Create a draft content
Call [`POST /v1/workspaces/{workspaceId}/contents`](/api-reference/contents/create-a-content) without a `pageId` — Semji will auto-create a blank page to host the draft. You only need a `title` to get started.
```typescript TypeScript theme={null}
const API = "https://api.semji.com/v1";
const HEADERS = {
Authorization: `Bearer ${process.env.SEMJI_API_KEY}`,
"Content-Type": "application/json",
};
const WORKSPACE_ID = process.env.WORKSPACE_ID;
const content = await (
await fetch(`${API}/workspaces/${WORKSPACE_ID}/contents`, {
method: "POST",
headers: HEADERS,
body: JSON.stringify({ title: "Best CRM for small business" }),
})
).json();
const contentId = content.id;
const pageId = content.page.id;
```
```python Python theme={null}
import os, requests
API = "https://api.semji.com/v1"
HEADERS = {"Authorization": f"Bearer {os.environ['SEMJI_API_KEY']}"}
WORKSPACE_ID = os.environ["WORKSPACE_ID"]
content = requests.post(
f"{API}/workspaces/{WORKSPACE_ID}/contents",
headers=HEADERS,
json={"title": "Best CRM for small business"},
).json()
content_id = content["id"]
page_id = content["page"]["id"]
```
```bash cURL theme={null}
curl -X POST https://api.semji.com/v1/workspaces/$WORKSPACE_ID/contents \
-H "Authorization: Bearer $SEMJI_API_KEY" \
-H "Content-Type: application/json" \
-d '{"title": "Best CRM for small business"}'
```
A successful response includes both the new content ID and the auto-created page ID:
```json title="201 Created (excerpt)" theme={null}
{
"id": "7c4a1f08b29d",
"title": "Best CRM for small business",
"page": { "id": "5e8d203c7f1a", "url": null },
"contentStatus": { "id": "b3d51e92c804", "label": "to do" },
"version": 1
}
```
Keep both `content.id` and `page.id` — you'll use them in the next steps.
## 2. Attach the focus keyword
Adding a focus keyword is a two-step operation:
1. Add the keyword to the page with [`POST /v1/pages/{pageId}/keywords`](/api-reference/keywords/add-a-keyword-to-a-page).
2. Mark it as the page's focus keyword with [`PUT /v1/pages/{pageId}`](/api-reference/pages/update-a-page).
```typescript TypeScript theme={null}
// 1. Create the keyword on the page
const keyword = await (
await fetch(`${API}/pages/${pageId}/keywords`, {
method: "POST",
headers: HEADERS,
body: JSON.stringify({ keyword: "best crm for small business" }),
})
).json();
const keywordId = keyword.id;
// 2. Set it as the page's focus keyword
const update = await fetch(`${API}/pages/${pageId}`, {
method: "PUT",
headers: HEADERS,
body: JSON.stringify({ focusKeywordId: keywordId }),
});
if (!update.ok) throw new Error(`PUT failed: ${update.status}`);
```
```python Python theme={null}
keyword = requests.post(
f"{API}/pages/{page_id}/keywords",
headers=HEADERS,
json={"keyword": "best crm for small business"},
).json()
keyword_id = keyword["id"]
requests.put(
f"{API}/pages/{page_id}",
headers=HEADERS,
json={"focusKeywordId": keyword_id},
).raise_for_status()
```
```bash cURL theme={null}
# 1. Create the keyword on the page
KEYWORD=$(curl -X POST https://api.semji.com/v1/pages/$PAGE_ID/keywords \
-H "Authorization: Bearer $SEMJI_API_KEY" \
-H "Content-Type: application/json" \
-d '{"keyword": "best crm for small business"}')
KEYWORD_ID=$(echo $KEYWORD | jq -r .id)
# 2. Set it as the page's focus keyword
curl -X PUT https://api.semji.com/v1/pages/$PAGE_ID \
-H "Authorization: Bearer $SEMJI_API_KEY" \
-H "Content-Type: application/json" \
-d "{\"focusKeywordId\": \"$KEYWORD_ID\"}"
```
If the keyword already exists in the workspace, `POST /v1/pages/{pageId}/keywords` reuses it instead of creating a duplicate.
## 3. Launch the keyword analysis
Recommendations are not computed on demand — you have to launch an asynchronous analysis with [`POST /v1/keywords/{keywordId}/analyze`](/api-reference/keywords/launch-keyword-analysis). The analysis scrapes the Google SERP, runs the GEO/AI Overview probe, and stores the typed recommendations on the keyword.
```typescript TypeScript theme={null}
const analyze = await fetch(`${API}/keywords/${keywordId}/analyze`, {
method: "POST",
headers: HEADERS,
});
if (!analyze.ok) throw new Error(`analyze failed: ${analyze.status}`);
```
```python Python theme={null}
requests.post(
f"{API}/keywords/{keyword_id}/analyze", headers=HEADERS,
).raise_for_status()
```
```bash cURL theme={null}
curl -X POST https://api.semji.com/v1/keywords/$KEYWORD_ID/analyze \
-H "Authorization: Bearer $SEMJI_API_KEY"
```
The endpoint returns `202 Accepted` immediately and the analysis runs in the background. Poll [`GET /v1/keywords/{keywordId}`](/api-reference/keywords/get-keyword-details) until `analysisStatus` is `"success"`:
```typescript Polling loop (TypeScript) theme={null}
while (true) {
const keyword = await (
await fetch(`${API}/keywords/${keywordId}`, { headers: HEADERS })
).json();
if (keyword.analysisStatus === "success") break;
if (keyword.analysisStatus === "failed") throw new Error("Keyword analysis failed");
await new Promise((resolve) => setTimeout(resolve, 5_000));
}
```
```python Polling loop (Python) theme={null}
import time
while True:
keyword = requests.get(f"{API}/keywords/{keyword_id}", headers=HEADERS).json()
if keyword["analysisStatus"] == "success":
break
if keyword["analysisStatus"] == "failed":
raise RuntimeError("Keyword analysis failed")
time.sleep(5)
```
`analysisStatus` transitions through `queued` → `pending` → `success` (or `failed`). Most analyses complete within 30 seconds.
Each analysis consumes one **analysis credit** from your organization's balance. Check available credits with [`GET /v1/me`](/api-reference/me/get-authenticated-user) (look at `organization.credits.analysis`).
## 4. Retrieve the SEO & GEO recommendations
Once the analysis is `success`, call [`POST /v1/keywords/{keywordId}/report`](/api-reference/keywords/generate-keyword-analysis-report) to score a content draft against the analysis and pull the typed recommendations.
You have two ways to score:
* **By reference** — pass `contentId` and Semji uses the draft's current `title` + `html`.
* **By value** — pass `title` and `html` inline (useful for previewing recommendations against arbitrary text).
```typescript TypeScript theme={null}
const report = await (
await fetch(`${API}/keywords/${keywordId}/report`, {
method: "POST",
headers: HEADERS,
body: JSON.stringify({ contentId }),
})
).json();
```
```python Python theme={null}
report = requests.post(
f"{API}/keywords/{keyword_id}/report",
headers=HEADERS,
json={"contentId": content_id},
).json()
```
```bash cURL theme={null}
curl -X POST https://api.semji.com/v1/keywords/$KEYWORD_ID/report \
-H "Authorization: Bearer $SEMJI_API_KEY" \
-H "Content-Type: application/json" \
-d "{\"contentId\": \"$CONTENT_ID\"}"
```
The response contains two top-level surfaces:
* `googleSearch` — classic SEO recommendations from the SERP (topics, questions, search intents, internal links to add, SERP competitors).
* `googleAiOverview` — GEO recommendations from the AI Overview answer (topics to cover for citation, cited sources, mentioned brands, markdown preview of the LLM answer).
```json title="200 OK (excerpt)" theme={null}
{
"googleSearch": {
"score": 0.42,
"recommendations": {
"topicsSuggestion": { "score": 0.55, "items": [{ "topic": "pricing", "...": "..." }] },
"questionsSuggestion": { "score": 0.30, "items": [{ "question": "Which CRM is free?" }] }
},
"competitors": [{ "domain": "hubspot.com", "position": 1 }]
},
"googleAiOverview": {
"score": 0.31,
"recommendations": {
"geoTopicsSuggestion": { "score": 0.31, "items": [{ "topic": "integration with email" }] }
},
"sources": [{ "domain": "salesforce.com", "position": 1 }],
"brands": [{ "name": "HubSpot", "count": 4, "category": "software" }],
"preview": "## Best CRM for small business…"
}
}
```
Each `*Suggestion` block carries its own `score` (0.0 – 1.0) and a list of `items` you can render in your brief. The top-level `score` on each surface is the overall match between the content and the recommendations.
Re-call the report endpoint as the draft evolves — the recommendations are fixed (until you re-run the analysis), but the scores change as the `html` improves.
## Putting it all together
```typescript recommendations-from-keyword.ts expandable theme={null}
const API = "https://api.semji.com/v1";
const HEADERS = {
Authorization: `Bearer ${process.env.SEMJI_API_KEY}`,
"Content-Type": "application/json",
};
const WORKSPACE_ID = process.env.WORKSPACE_ID;
async function api(path: string, init: RequestInit = {}) {
const response = await fetch(`${API}${path}`, { ...init, headers: HEADERS });
if (!response.ok) {
throw new Error(`${init.method ?? "GET"} ${path} → ${response.status}`);
}
return response.json();
}
async function createDraft(title: string) {
return api(`/workspaces/${WORKSPACE_ID}/contents`, {
method: "POST",
body: JSON.stringify({ title }),
});
}
async function setFocusKeyword(pageId: string, keyword: string) {
const created = await api(`/pages/${pageId}/keywords`, {
method: "POST",
body: JSON.stringify({ keyword }),
});
await api(`/pages/${pageId}`, {
method: "PUT",
body: JSON.stringify({ focusKeywordId: created.id }),
});
return created.id;
}
async function analyzeAndWait(keywordId: string) {
await api(`/keywords/${keywordId}/analyze`, { method: "POST" });
while (true) {
const keyword = await api(`/keywords/${keywordId}`);
if (keyword.analysisStatus === "success") return;
if (keyword.analysisStatus === "failed") throw new Error("Keyword analysis failed");
await new Promise((resolve) => setTimeout(resolve, 5_000));
}
}
async function getReport(keywordId: string, contentId: string) {
return api(`/keywords/${keywordId}/report`, {
method: "POST",
body: JSON.stringify({ contentId }),
});
}
async function recommendationsFor(keyword: string) {
const draft = await createDraft(keyword.charAt(0).toUpperCase() + keyword.slice(1));
const keywordId = await setFocusKeyword(draft.page.id, keyword);
await analyzeAndWait(keywordId);
return getReport(keywordId, draft.id);
}
const report = await recommendationsFor("best crm for small business");
console.log("SEO score:", report.googleSearch.score);
console.log("GEO score:", report.googleAiOverview.score);
```
```python recommendations_from_keyword.py expandable theme={null}
import os
import time
import requests
API = "https://api.semji.com/v1"
HEADERS = {"Authorization": f"Bearer {os.environ['SEMJI_API_KEY']}"}
WORKSPACE_ID = os.environ["WORKSPACE_ID"]
def create_draft(title):
return requests.post(
f"{API}/workspaces/{WORKSPACE_ID}/contents",
headers=HEADERS, json={"title": title},
).json()
def set_focus_keyword(page_id, keyword):
kw = requests.post(
f"{API}/pages/{page_id}/keywords",
headers=HEADERS, json={"keyword": keyword},
).json()
requests.put(
f"{API}/pages/{page_id}",
headers=HEADERS, json={"focusKeywordId": kw["id"]},
).raise_for_status()
return kw["id"]
def analyze_and_wait(keyword_id):
requests.post(f"{API}/keywords/{keyword_id}/analyze", headers=HEADERS).raise_for_status()
while True:
kw = requests.get(f"{API}/keywords/{keyword_id}", headers=HEADERS).json()
if kw["analysisStatus"] == "success":
return
if kw["analysisStatus"] == "failed":
raise RuntimeError("Keyword analysis failed")
time.sleep(5)
def get_report(keyword_id, content_id):
return requests.post(
f"{API}/keywords/{keyword_id}/report",
headers=HEADERS, json={"contentId": content_id},
).json()
def recommendations_for(keyword):
draft = create_draft(title=keyword.capitalize())
keyword_id = set_focus_keyword(draft["page"]["id"], keyword)
analyze_and_wait(keyword_id)
return get_report(keyword_id, draft["id"])
if __name__ == "__main__":
report = recommendations_for("best crm for small business")
print("SEO score:", report["googleSearch"]["score"])
print("GEO score:", report["googleAiOverview"]["score"])
```
## Reference
* [Create a content](/api-reference/contents/create-a-content)
* [Add a keyword to a page](/api-reference/keywords/add-a-keyword-to-a-page)
* [Update a page](/api-reference/pages/update-a-page)
* [Launch keyword analysis](/api-reference/keywords/launch-keyword-analysis)
* [Get keyword details](/api-reference/keywords/get-keyword-details)
* [Generate keyword analysis report](/api-reference/keywords/generate-keyword-analysis-report)
# Sync drafts to your CMS
Source: https://help.semji.com/guides/sync-drafts-to-cms
Poll Semji for drafts ready to publish, push them to your CMS, then mark them as published in Semji, with a push-based webhook alternative.
This guide shows you how to build a one-way sync from Semji to your CMS (WordPress, Contentful, Webflow, a custom backend, etc.). The flow runs on a schedule — for example every 10 minutes — and uses four endpoints:
1. **List drafts** with a custom workflow status (e.g. *Ready to publish*).
2. **Fetch the full content** (title, sanitized HTML, meta description) for each draft.
3. **Push to the CMS** and immediately transition the draft to a second custom status (e.g. *Sent to CMS*).
4. **Mark each content as published** in Semji once the CMS confirms the article is live.
This main flow is **pull-based**: your worker polls Semji because no webhook fires on custom workflow status changes. Semji *does* fire a webhook when a content is **marked as published** — if your editors manage publication from Semji, see the [push-based alternative](#push-based-alternative-with-webhooks) below.
## Why two custom statuses?
Between *"the editor approved the draft"* and *"the article is live on the public site"*, the article can sit in the CMS for hours or days — review, scheduled publication, legal moderation… You need a status that means **"already handed over to the CMS, don't push it again"** while you wait.
| Stage | Semji status | Set by | Purpose |
| - | - | - | - |
| Editorially approved, ready to push | `Ready to publish` (custom) | Editor, in the app | Signals the worker to pick it up |
| Pushed to the CMS, awaiting publication | `Sent to CMS` (custom) | Worker, right after the CMS accepts it | Prevents re-pushing on the next poll |
| Live on the CMS | `published` (system) | Worker, via `POST /contents/{contentId}/publish` | Records the final URL and `publishedAt` |
Skipping the intermediate status causes one of two bugs:
* **Marking as published right after the push** — `publishedAt` is wrong (the CMS may schedule for next week) and the URL may still change (slug under review).
* **Leaving the draft in *Ready to publish*** — the next poll re-pushes the same article, creating duplicates in the CMS.
## Prerequisites
* An API key with access to the workspace. See [Authentication](/api-reference/authentication).
* The **workspace ID** you want to sync from. Get it from [`GET /v1/workspaces`](/api-reference/workspaces/list-workspaces).
* Two custom workflow statuses: *Ready to publish* and *Sent to CMS*.
## 1. Create the two custom statuses
Workflow statuses are configured per workspace in the Semji app under **Settings > Workflow**. Create two non-system statuses:
* *Ready to publish* — editors move drafts here when they're approved.
* *Sent to CMS* — the worker moves drafts here right after the CMS accepts them.
List every status (with its ID) via the API:
```typescript TypeScript theme={null}
const API = "https://api.semji.com/v1";
const HEADERS = { Authorization: `Bearer ${process.env.SEMJI_API_KEY}` };
const WORKSPACE_ID = process.env.WORKSPACE_ID;
const response = await fetch(
`${API}/workspaces/${WORKSPACE_ID}/content-statuses`,
{ headers: HEADERS },
);
const { data: statuses } = await response.json();
const byLabel = new Map(
statuses.map((status) => [status.label.toLowerCase(), status.id]),
);
const READY_ID = byLabel.get("ready to publish");
const SENT_ID = byLabel.get("sent to cms");
```
```python Python theme={null}
import os, requests
WORKSPACE_ID = os.environ["WORKSPACE_ID"]
headers = {"Authorization": f"Bearer {os.environ['SEMJI_API_KEY']}"}
statuses = requests.get(
f"https://api.semji.com/v1/workspaces/{WORKSPACE_ID}/content-statuses",
headers=headers,
).json()["data"]
by_label = {s["label"].lower(): s["id"] for s in statuses}
READY_ID = by_label["ready to publish"]
SENT_ID = by_label["sent to cms"]
```
```bash cURL theme={null}
curl https://api.semji.com/v1/workspaces/$WORKSPACE_ID/content-statuses \
-H "Authorization: Bearer $SEMJI_API_KEY"
```
A successful response looks like this:
```json title="200 OK" theme={null}
{
"data": [
{ "id": "b3d51e92c804", "label": "to do", "isReadOnly": true, "position": 1, "color": "#9ca3af" },
{ "id": "29f7c6a1d05e", "label": "in progress", "isReadOnly": false, "position": 2, "color": "#3498db" },
{ "id": "8a1c4e6f02b9", "label": "ready to publish", "isReadOnly": false, "position": 3, "color": "#f59e0b" },
{ "id": "d6e90b37a512", "label": "sent to cms", "isReadOnly": false, "position": 4, "color": "#8b5cf6" },
{ "id": "41f8a2c5e7d3", "label": "published", "isReadOnly": true, "position": 5, "color": "#10b981" }
]
}
```
System statuses (`to do`, `published`) have `isReadOnly: true` and can't be renamed or deleted. Cache both custom IDs — you'll use them in the next steps.
See [List content statuses](/api-reference/workspaces/list-content-statuses) for the full schema.
## 2. Poll for drafts ready to publish
Call [`GET /v1/workspaces/{workspaceId}/contents`](/api-reference/contents/list-contents-in-a-workspace) filtered on the *Ready to publish* status:
```typescript TypeScript theme={null}
const query = new URLSearchParams({
"contentStatusId[]": READY_ID,
sort: "-updatedAt",
limit: "100",
});
const { data: drafts, pagination } = await (
await fetch(`${API}/workspaces/${WORKSPACE_ID}/contents?${query}`, {
headers: HEADERS,
})
).json();
```
```python Python theme={null}
response = requests.get(
f"https://api.semji.com/v1/workspaces/{WORKSPACE_ID}/contents",
headers=headers,
params={"contentStatusId[]": READY_ID, "sort": "-updatedAt", "limit": 100},
).json()
drafts, pagination = response["data"], response["pagination"]
```
```bash cURL theme={null}
curl "https://api.semji.com/v1/workspaces/$WORKSPACE_ID/contents?contentStatusId[]=$READY_ID&sort=-updatedAt&limit=100" \
-H "Authorization: Bearer $SEMJI_API_KEY"
```
The collection endpoint returns lightweight content records (no HTML body). You fetch the body in the next step.
The response is **paginated**: `limit` caps at 100 (default 25), and the envelope carries a `pagination` object (`total`, `page`, `limit`, `hasMore`). If `hasMore` is `true`, request the next page with `?page=2`, and so on — the full worker below does this. Don't assume one page is enough: a backlog (worker downtime, a bulk editorial approval) can easily exceed 100 drafts.
Each API key is limited to **1,000 requests per hour** with a burst of 20/s. Polling every 10 minutes (= 6/hour) leaves plenty of headroom even for hundreds of drafts per poll. See [Rate limits](/api-reference/rate-limits).
## 3. Push to the CMS and transition to *Sent to CMS*
For each draft, fetch the full body with [`GET /v1/contents/{contentId}`](/api-reference/contents/get-content-details), push it to your CMS, then **immediately** transition the draft to *Sent to CMS* with [`PUT /v1/contents/{contentId}`](/api-reference/contents/update-a-content).
```typescript TypeScript theme={null}
const content = await (
await fetch(`${API}/contents/${draft.id}`, { headers: HEADERS })
).json();
// Push title, htmlSanitized, metaDescription to the CMS (throws on failure)
const cmsRecordId = await pushToCms(content);
// Mark as handed over so the next poll skips it
const update = await fetch(`${API}/contents/${content.id}`, {
method: "PUT",
headers: { ...HEADERS, "Content-Type": "application/json" },
body: JSON.stringify({ contentStatusId: SENT_ID, version: content.version }),
});
if (!update.ok) throw new Error(`PUT failed: ${update.status}`);
```
```python Python theme={null}
content = requests.get(
f"https://api.semji.com/v1/contents/{draft['id']}",
headers=headers,
).json()
# Push title, htmlSanitized, metaDescription to the CMS (raises on failure)
cms_record_id = push_to_cms(content)
# Mark as handed over so the next poll skips it
requests.put(
f"https://api.semji.com/v1/contents/{content['id']}",
headers=headers,
json={"contentStatusId": SENT_ID, "version": content["version"]},
).raise_for_status()
```
```bash cURL theme={null}
# Fetch the body
CONTENT=$(curl -s https://api.semji.com/v1/contents/$CONTENT_ID \
-H "Authorization: Bearer $SEMJI_API_KEY")
VERSION=$(echo "$CONTENT" | jq -r .version)
# (… push title, htmlSanitized, metaDescription to your CMS …)
# Transition to "Sent to CMS"
curl -X PUT https://api.semji.com/v1/contents/$CONTENT_ID \
-H "Authorization: Bearer $SEMJI_API_KEY" \
-H "Content-Type: application/json" \
-d "{\"contentStatusId\": \"$SENT_ID\", \"version\": $VERSION}"
```
A few important details:
* **Push `htmlSanitized`, not `html`.** The `html` field is the body as authored in the Semji editor and may contain editor-only markers (comments, fact-check annotations). `htmlSanitized` is the same body with all annotations stripped — that's the one that is safe to publish externally.
* **`version` is required on every update**, even when you only change the status. Reuse the `version` from your `GET`. If anything modified the content between your `GET` and your `PUT` (an editor saving, for instance), the API returns `409 Conflict`. A 409 doesn't mean your transition is invalid — refetch to get the fresh `version` and retry the same update.
* **Transition only on CMS success.** If the CMS call fails, leave the draft in *Ready to publish* and the next poll will retry it.
* **Persist the CMS record ID** (e.g. WordPress post ID) on your side, keyed by Semji `content.id`. You'll need it in step 4 to know when the article goes live.
```json title="GET /v1/contents/{contentId} (excerpt)" theme={null}
{
"id": "7c4a1f08b29d",
"title": "How to choose a CRM in 2026",
"html": "
How to choose a CRM in 2026
…
",
"htmlSanitized": "
How to choose a CRM in 2026
…
",
"metaDescription": "A practical guide to picking the right CRM…",
"page": { "id": "5e8d203c7f1a", "url": "https://example.com/blog/choose-a-crm" },
"contentStatus": { "id": "8a1c4e6f02b9", "label": "ready to publish" },
"version": 7
}
```
## 4. Mark as published when the CMS goes live
The CMS publication can happen seconds or days after the push. You need a separate trigger that fires when the article actually goes live. Pick the option that fits your CMS:
* **CMS webhook** *(recommended when available)* — WordPress, Contentful, Webflow, and most modern CMSes can fire a webhook on publish. Wire it to a small endpoint that looks up the Semji `content.id` from the CMS record ID and calls Semji.
* **Second poll loop** — every 10 min, list all your *Sent to CMS* drafts, check each one against the CMS API to see if it's now public, and mark the ones that are.
In both cases, the call is the same: [`POST /v1/contents/{contentId}/publish`](/api-reference/contents/mark-a-content-as-published).
```typescript TypeScript theme={null}
const publish = await fetch(`${API}/contents/${contentId}/publish`, {
method: "POST",
headers: { ...HEADERS, "Content-Type": "application/json" },
body: JSON.stringify({ url: cmsPublicUrl }),
});
if (!publish.ok) throw new Error(`publish failed: ${publish.status}`);
```
```python Python theme={null}
requests.post(
f"https://api.semji.com/v1/contents/{content_id}/publish",
headers=headers,
json={"url": cms_public_url},
).raise_for_status()
```
```bash cURL theme={null}
curl -X POST https://api.semji.com/v1/contents/$CONTENT_ID/publish \
-H "Authorization: Bearer $SEMJI_API_KEY" \
-H "Content-Type: application/json" \
-d '{"url": "https://www.example.com/blog/choose-a-crm"}'
```
The request body is optional:
* `url` *(optional)* — the public URL where the article is now live. If omitted, Semji reuses the URL of the associated page. Pass it explicitly when you're publishing a **new** page or when the CMS slug differs from the original page URL.
* `publishedAt` *(optional, ISO 8601)* — the publication date recorded in Semji, the same one an author picks in the editor. If omitted, the current server time is used. Pass it when the publication is detected with a delay — e.g. your poll loop discovers an article that went live earlier — so performance tracking starts from the real publication date.
The moment this call is processed is recorded separately as `markedAsPublishedAt`. Semji sets it, it cannot be sent in the body, and it is the field to filter on when you need to detect publications.
If you omit `url` **and** the associated page has no URL, the call fails with `422 unprocessable_entity`. This is the typical case for contents created in Semji without a `pageId` — their auto-created page starts with an empty URL. When in doubt, pass `url` explicitly.
Once this call returns, the draft transitions from *Sent to CMS* to the system *published* status.
## Putting it all together
A minimal worker that polls every 10 minutes for both transitions:
```typescript sync-drafts.ts expandable theme={null}
const API = "https://api.semji.com/v1";
const HEADERS = {
Authorization: `Bearer ${process.env.SEMJI_API_KEY}`,
"Content-Type": "application/json",
};
const WORKSPACE_ID = process.env.WORKSPACE_ID;
// Implement these against your CMS and storage:
declare function pushToCms(content: { htmlSanitized: string | null }): Promise;
declare function rememberCmsRecord(contentId: string, cmsRecordId: string): Promise;
declare function lookupCmsRecord(contentId: string): Promise;
declare function fetchCmsState(cmsRecordId: string): Promise<{ isPublic: boolean; publicUrl: string }>;
class ApiError extends Error {
constructor(readonly status: number, message: string) {
super(message);
}
}
async function api(path: string, init: RequestInit = {}) {
const response = await fetch(`${API}${path}`, { ...init, headers: HEADERS });
if (!response.ok) {
throw new ApiError(response.status, `${init.method ?? "GET"} ${path} → ${response.status}`);
}
return response.json();
}
// --- status lookup -----------------------------------------------------------
async function loadStatusIds() {
const { data: statuses } = await api(`/workspaces/${WORKSPACE_ID}/content-statuses`);
const byLabel = new Map(statuses.map((s) => [s.label.toLowerCase(), s.id]));
return { readyId: byLabel.get("ready to publish"), sentId: byLabel.get("sent to cms") };
}
// --- helpers -----------------------------------------------------------------
async function listByStatus(statusId: string) {
const drafts = [];
for (let page = 1; ; page++) {
const query = new URLSearchParams({
"contentStatusId[]": statusId,
sort: "-updatedAt",
limit: "100",
page: String(page),
});
const { data, pagination } = await api(`/workspaces/${WORKSPACE_ID}/contents?${query}`);
drafts.push(...data);
if (!pagination.hasMore) return drafts;
}
}
async function transitionTo(contentId: string, statusId: string) {
for (let attempt = 1; attempt <= 3; attempt++) {
const { version } = await api(`/contents/${contentId}`);
try {
await api(`/contents/${contentId}`, {
method: "PUT",
body: JSON.stringify({ contentStatusId: statusId, version }),
});
return;
} catch (error) {
// 409: someone saved the draft between our GET and PUT — refetch and retry
if (!(error instanceof ApiError) || error.status !== 409 || attempt === 3) throw error;
}
}
}
// --- step 2 & 3: ready to publish → sent to CMS ------------------------------
async function pushReadyDrafts(readyId: string, sentId: string) {
for (const draft of await listByStatus(readyId)) {
const content = await api(`/contents/${draft.id}`);
let cmsRecordId: string;
try {
cmsRecordId = await pushToCms(content); // push htmlSanitized, not html
} catch (error) {
console.error(`CMS push failed for ${draft.id}:`, error);
continue; // stays in "ready to publish" — retried next tick
}
await rememberCmsRecord(content.id, cmsRecordId);
await transitionTo(content.id, sentId);
}
}
// --- step 4: sent to CMS → published -----------------------------------------
async function finalizePublished(sentId: string) {
for (const draft of await listByStatus(sentId)) {
const cmsRecordId = await lookupCmsRecord(draft.id);
const cmsState = await fetchCmsState(cmsRecordId);
if (!cmsState.isPublic) continue;
await api(`/contents/${draft.id}/publish`, {
method: "POST",
body: JSON.stringify({ url: cmsState.publicUrl }),
});
}
}
// --- main loop ---------------------------------------------------------------
while (true) {
const { readyId, sentId } = await loadStatusIds();
await pushReadyDrafts(readyId, sentId);
await finalizePublished(sentId);
await new Promise((resolve) => setTimeout(resolve, 600_000)); // 10 minutes
}
```
```python sync_drafts.py expandable theme={null}
import os
import time
import requests
API = "https://api.semji.com/v1"
HEADERS = {"Authorization": f"Bearer {os.environ['SEMJI_API_KEY']}"}
WORKSPACE_ID = os.environ["WORKSPACE_ID"]
# --- status lookup -----------------------------------------------------------
def load_status_ids():
statuses = requests.get(
f"{API}/workspaces/{WORKSPACE_ID}/content-statuses", headers=HEADERS,
).json()["data"]
by_label = {s["label"].lower(): s["id"] for s in statuses}
return by_label["ready to publish"], by_label["sent to cms"]
# --- helpers -----------------------------------------------------------------
def list_by_status(status_id):
drafts, page = [], 1
while True:
response = requests.get(
f"{API}/workspaces/{WORKSPACE_ID}/contents",
headers=HEADERS,
params={
"contentStatusId[]": status_id,
"sort": "-updatedAt",
"limit": 100,
"page": page,
},
).json()
drafts += response["data"]
if not response["pagination"]["hasMore"]:
return drafts
page += 1
def transition_to(content_id, status_id):
for attempt in range(3):
content = requests.get(f"{API}/contents/{content_id}", headers=HEADERS).json()
response = requests.put(
f"{API}/contents/{content_id}",
headers=HEADERS,
json={"contentStatusId": status_id, "version": content["version"]},
)
if response.status_code != 409:
response.raise_for_status()
return
# 409: someone saved the draft between our GET and PUT — refetch and retry
raise RuntimeError(f"version conflict persisted for {content_id}")
# --- step 2 & 3: ready to publish → sent to CMS ------------------------------
def push_ready_drafts(ready_id, sent_id):
for draft in list_by_status(ready_id):
content = requests.get(f"{API}/contents/{draft['id']}", headers=HEADERS).json()
try:
cms_record_id = push_to_cms(content) # push htmlSanitized, not html
except Exception as e:
print(f"CMS push failed for {draft['id']}: {e}")
continue # stays in "ready to publish" — retried next tick
remember_cms_record(content["id"], cms_record_id) # your storage
transition_to(content["id"], sent_id)
# --- step 4: sent to CMS → published -----------------------------------------
def finalize_published(sent_id):
for draft in list_by_status(sent_id):
cms_record_id = lookup_cms_record(draft["id"]) # your storage
cms_state = fetch_cms_state(cms_record_id) # your CMS client
if not cms_state["is_public"]:
continue
requests.post(
f"{API}/contents/{draft['id']}/publish",
headers=HEADERS,
json={"url": cms_state["public_url"]},
).raise_for_status()
# --- main loop ---------------------------------------------------------------
def run_once():
ready_id, sent_id = load_status_ids()
push_ready_drafts(ready_id, sent_id)
finalize_published(sent_id)
if __name__ == "__main__":
while True:
run_once()
time.sleep(600) # 10 minutes
```
If your CMS supports webhooks, replace `finalizePublished` with a webhook handler that calls `POST /v1/contents/{contentId}/publish` directly when it receives a "post published" event.
## Push-based alternative with webhooks
The main flow assumes **your CMS decides** when an article goes live. Sometimes it's the other way around: your pages already exist in Semji with their URLs (you optimize existing content, or you create the page in the CMS first), and your editors want to drive publication **from Semji** by clicking **Mark as published**. In that scenario you don't need polling or custom statuses at all — Semji notifies you.
| | Pull (polling worker) | Push (webhook) |
| - | - | - |
| Source of truth for publication | Your CMS | Semji (*Mark as published*) |
| Publication URL | Discovered after the CMS publishes | Already known (existing pages) |
| Latency | Up to one polling interval | Seconds |
| Custom statuses needed | Two | None |
| You host | A scheduled worker | A public HTTPS endpoint |
Semji fires a `content_published` webhook when an editor clicks **Mark as published**. Configure it in **Settings > General > Add a Webhook**, then your endpoint creates or updates the article in the CMS. For the full setup, the payload, the security notes, and ready-made Make / N8n templates, see the [Content published webhook](/integrations/content-published-webhook) page.
### A minimal webhook handler
```typescript webhook-handler.ts expandable theme={null}
import express from "express";
const API = "https://api.semji.com/v1";
const HEADERS = { Authorization: `Bearer ${process.env.SEMJI_API_KEY}` };
// Implement against your CMS — create or update by URL (idempotent)
declare function upsertCmsArticle(article: {
title: string | null;
html: string | null;
metaDescription: string | null;
url: string;
}): Promise;
const app = express();
app.use(express.json());
app.post("/webhooks/semji", (req, res) => {
res.sendStatus(204); // ack immediately — Semji does not retry failed deliveries
if (req.body?.event_type !== "content_published") return;
handleContentPublished(req.body.data.id).catch(console.error);
});
async function handleContentPublished(contentId: string) {
// Re-fetch with your API key — the webhook payload itself is not signed
const response = await fetch(`${API}/contents/${contentId}`, { headers: HEADERS });
if (!response.ok) return;
const content = await response.json();
if (!content.publishedAt) return;
await upsertCmsArticle({
title: content.title,
html: content.htmlSanitized,
metaDescription: content.metaDescription,
url: content.page.url,
});
}
app.listen(3000);
```
```python webhook_handler.py expandable theme={null}
import os
import threading
import requests
from flask import Flask, request
API = "https://api.semji.com/v1"
HEADERS = {"Authorization": f"Bearer {os.environ['SEMJI_API_KEY']}"}
app = Flask(__name__)
@app.post("/webhooks/semji")
def semji_webhook():
event = request.get_json(silent=True) or {}
if event.get("event_type") == "content_published":
threading.Thread(
target=handle_content_published, args=(event["data"]["id"],)
).start()
return "", 204 # ack immediately — Semji does not retry failed deliveries
def handle_content_published(content_id):
# Re-fetch with your API key — the webhook payload itself is not signed
response = requests.get(f"{API}/contents/{content_id}", headers=HEADERS)
if not response.ok:
return
content = response.json()
if not content["publishedAt"]:
return
upsert_cms_article( # your CMS client — create or update by URL (idempotent)
title=content["title"],
html=content["htmlSanitized"],
meta_description=content["metaDescription"],
url=content["page"]["url"],
)
```
Since deliveries are not retried, add a safety net: periodically list recently published contents with [`GET /v1/workspaces/{workspaceId}/contents?markedAsPublishedAt[after]=…`](/api-reference/contents/list-contents-in-a-workspace) and reconcile any article your endpoint missed while it was down.
Filter on `markedAsPublishedAt`, the timestamp of the publish action, and not on `publishedAt`. The latter is the date an author declares in the editor: it has day granularity and can be back or forward dated, which makes it unfit for an incremental window.
## Reference
* [List content statuses](/api-reference/workspaces/list-content-statuses)
* [List contents in a workspace](/api-reference/contents/list-contents-in-a-workspace)
* [Get content details](/api-reference/contents/get-content-details)
* [Update a content](/api-reference/contents/update-a-content)
* [Mark a content as published](/api-reference/contents/mark-a-content-as-published)
* [Rate limits](/api-reference/rate-limits)
* [Content published webhook](/integrations/content-published-webhook)
# Content published webhook
Source: https://help.semji.com/integrations/content-published-webhook
How the content_published webhook notifies your endpoint when an editor marks a content as published in Semji, with Make and N8n templates.
When an editor clicks **Mark as published** in Semji, Semji sends a
`content_published` webhook to the URL you configured. Use it to push the
published article to your CMS, or to trigger downstream automations
(dashboards, tasks, notifications) — no polling, no copy-paste.
`content_published` fires **after** publication (the editor decided the content
is live). It is separate from the [Send to CMS webhook](/integrations/send-to-cms-webhook)
(`content_staged`), which pushes a **draft** to your CMS *before* publication.
Both can be configured on the same workspace.
## Prerequisites
* An HTTPS endpoint reachable from the public internet — either your own, or a
scenario URL from a no-code platform (Make, Zapier, N8n).
* A workspace where you can reach **Settings** (to add the webhook).
## How it works
In the app, go to **Settings > General**, click **Add a Webhook**, and paste
your endpoint (or automation scenario) URL.
They fill in the publication URL and date (backdating works, in the app and
via the API's `publishedAt`).
A single `POST` with the content payload lands on your endpoint. Respond with
a `2xx` immediately and process asynchronously.
## The payload Semji sends
```json title="content_published payload" theme={null}
{
"event_type": "content_published",
"occurred_at": "2026-06-10T14:32:05+00:00",
"data": {
"id": "7c4a1f08b29d",
"title": "How to choose a CRM in 2026",
"html": "
How to choose a CRM in 2026
…
",
"meta_description": "A practical guide to picking the right CRM…",
"content_score": 82,
"words_count": 1450,
"published_at": "2026-06-10T14:32:04+00:00",
"published_by": { "id": "f2a81c05d943", "first_name": "Jane", "last_name": "Doe", "email": "jane@example.com" },
"content_status": { "id": "41f8a2c5e7d3", "label": "published", "color": "#10b981" },
"page": {
"id": "5e8d203c7f1a",
"url": "https://example.com/blog/choose-a-crm",
"is_existing_content": true,
"last_status_code": 200
},
"page_focus_keyword": { "keyword": "best crm for small business", "search_volume": 5400, "position": 8 },
"workspace": { "id": "89b0f07aade2", "name": "Acme Blog", "website_url": "https://example.com" },
"organization": { "id": "c61d3e84f207", "name": "Acme" }
}
}
```
Always `content_published` for this webhook.
The published content and its context: `title`, sanitized `html`, plain `text`,
`meta_description`, `content_score`, `words_count`, `published_at`,
`published_by`, `content_status`, `page` (with the live `url`),
`page_focus_keyword` (with `search_volume`), plus `workspace` and `organization`.
IDs are 12-char public IDs.
Three things to know:
* `data.html` is **already sanitized** — editor annotations are stripped, it is
equivalent to the API's `htmlSanitized` field. Push it to your CMS as-is.
* `data.id` is the content ID, directly usable with
[`GET /v1/contents/{contentId}`](/api-reference/contents/get-content-details).
* Delivery is a **single POST** — no signature, no retry on failure. Respond
`2xx` immediately and process asynchronously.
The webhook is **not signed**: anyone who discovers your endpoint URL could
forge a payload. Treat it as a **trigger** — re-fetch the content by ID with
your API key before touching your CMS, and drop the event if the content
doesn't exist or isn't published.
## No-code templates
Prefer not to write code? Import one of these ready-made scenarios and point it
at WordPress (adapt the CMS step for another platform):
A Make scenario that receives the webhook and creates the post in WordPress.
An N8n workflow with a POST webhook trigger that routes the content to WordPress.
The scenario URL these tools give you is what you paste into **Settings > General > Add a Webhook**.
## Use cases
* Publish or update the article in your CMS (WordPress, Contentful, Webflow…).
* Auto-populate a Google Sheets dashboard with the SEO metrics.
* Create a follow-up task (Asana, Jira) for the marketing team.
* Notify a Slack or Teams channel on publication.
* Cross-post to social (X, LinkedIn).
## Troubleshooting
Check the webhook URL in **Settings > General**, and that an editor actually
clicked **Mark as published** (the event only fires on publication). The URL
must be a public HTTPS endpoint reachable from Semji.
Delivery is a single unsigned POST — treat it as a trigger and re-fetch the
content with [`GET /v1/contents/{contentId}`](/api-reference/contents/get-content-details)
using your API key before writing to your CMS.
## Related
* [Send to CMS webhook](/integrations/send-to-cms-webhook) — push a **draft** to
your CMS before publication (`content_staged`).
* [Sync drafts to your CMS](/guides/sync-drafts-to-cms) — the pull-based
publishing flow, and when to prefer it over this webhook.
* [Authentication](/api-reference/authentication) — API keys for re-fetching content.
# Webhooks
Source: https://help.semji.com/integrations/overview
Semji's webhook events: get notified when a draft is staged for review or when it's published, so you can push content to your CMS or trigger downstream automations.
The `content_staged` webhook: Semji pushes a draft to your CMS endpoint before publication, and your endpoint responds with a review link.
The `content_published` webhook: Semji notifies your endpoint when an editor marks a content as published.
# Send to CMS webhook
Source: https://help.semji.com/integrations/send-to-cms-webhook
The content_staged webhook contract: how Semji pushes a draft to your CMS endpoint before publication and how your endpoint responds.
When an editor clicks **Send to CMS** in the Semji editor, Semji sends the draft
to your endpoint through a `content_staged` webhook. Your endpoint decides where
the content lands in your CMS and returns a review link. This page is the
**exchange contract** — everything you need to implement the receiving side
without access to Semji's code.
`content_staged` is separate from `content_published` (the event that fires
when a content is *marked as published*). A `content_staged` send happens
**before** publication: the content stays a draft in Semji, and your CMS
holds it for review. The two can be configured independently on the same
workspace.
## Prerequisites
* An HTTPS endpoint, reachable from the public internet, that accepts a `POST`
with a JSON body and replies in JSON.
* A `content_staged` integration configured for your workspace (name + endpoint
URL) by a **workspace owner** under **Settings**, and enabled.
* The ability to call back to `api.semji.com` if you answer asynchronously.
## How it works
A JSON payload carrying the content, an `idempotency_key`, and a `callback`
block is sent to the URL you configured for the `content_staged` event.
Either **synchronously** — return the result in the HTTP response
(`completed` or `failed`) — or, if you need more time, return `accepted`
and finish later through the callback.
When the work is done, `POST` the outcome to the `callback.url` from the
payload, authenticated with the `callback.token`.
## The request Semji sends
Semji issues a single `POST` (with `Content-Type: application/json`) to your
configured URL. The request times out after **10 seconds** — see
[responding](#responding-to-the-request).
```json title="Outbound payload" theme={null}
{
"event_type": "content_staged",
"occurred_at": "2026-07-27T09:25:36+00:00",
"idempotency_key": "7c4a1f08b29d",
"content_version": 1,
"data": {
"title": "How to brew better espresso",
"meta_description": "A practical guide to dialing in your espresso at home.",
"html": "
…sanitized content…
",
"text": "…plain text version…",
"content_score": 0.82,
"words_count": 640,
"page": {
"url": "https://your-site.example.com/blog/better-espresso",
"is_existing_content": false
},
"workspace": {
"id": "bc94dd0702c5",
"name": "Acme",
"website_url": "https://your-site.example.com"
},
"organization": { "id": "84b83bbca1c2", "name": "Acme Inc." }
},
"callback": {
"url": "https://api.semji.com/webhooks/calls/7c4a1f08b29d/callback",
"token": "cbk_9f2c…",
"expires_at": "2026-07-28T09:25:36+00:00"
}
}
```
Always `content_staged` for this webhook.
Stable 12-char identifier of this send. If you receive the same key twice (a
retry), do not create a second draft — return the result you already produced.
Version of the content at send time. A later send of the same content carries a
higher version — the latest send wins.
The content itself: `title`, `meta_description`, sanitized `html`, plain `text`,
`content_score`, `words_count`, plus `page`, `workspace` and `organization`
context. IDs are 12-char public IDs.
`url` to POST the async result to, a one-shot `token` (see
[the callback](#the-async-callback)), and `expires_at` — the callback is
rejected after this time (24 hours after the send).
## Responding to the request
Reply with **HTTP 2xx** as soon as you have received and understood the webhook,
and describe the outcome in a JSON body. The HTTP status reflects transport, the
`status` field reflects the business outcome — a non-2xx response is read as your
endpoint being unreachable, not as a business failure. There is **one result
format** everywhere (sync response, callback, and the integration test):
`completed`, `failed`, or `accepted`.
Required when `status` is `completed`. Must contain `cms_id` **and at least one**
of `preview_url` / `back_office_url`.
Your CMS's identifier for the created/updated entry.
Public preview link an editor can open to review the content.
Link to the entry in your CMS admin.
Optional human-readable reason when `status` is `failed`.
### Synchronous — you finish within 10 seconds
Return the terminal result directly in the HTTP response:
```json title="200 — completed" theme={null}
{
"status": "completed",
"result": {
"cms_id": "42",
"preview_url": "https://your-site.example.com/preview/42",
"back_office_url": "https://your-cms.example.com/admin/posts/42"
}
}
```
```json title="200 — failed" theme={null}
{ "status": "failed", "error": "Category \"blog\" does not exist" }
```
A `completed` response **without** `cms_id`, or without any URL, is a contract
violation — Semji records the send as failed.
### Asynchronous — you need more time
If your pipeline can't finish within the 10-second window (moderation, scheduled
jobs, a no-code flow…), acknowledge immediately and finish later:
```json title="200 — accepted" theme={null}
{ "status": "accepted" }
```
The content stays in a *loading* state in Semji until you post the result to the
callback. If no callback arrives within **24 hours**, the send is marked failed.
## The async callback
Post the terminal result to the `callback.url` from the payload (of the form
`https://api.semji.com/webhooks/calls/{publicId}/callback`), with the
`callback.token` as a Bearer token.
```typescript callback.ts theme={null}
await fetch(callback.url, {
method: "POST",
headers: {
Authorization: `Bearer ${callback.token}`,
"Content-Type": "application/json",
},
body: JSON.stringify({
status: "completed",
result: {
cms_id: "42",
preview_url: "https://your-site.example.com/preview/42",
back_office_url: "https://your-cms.example.com/admin/posts/42",
},
}),
});
```
```python callback.py theme={null}
import requests
requests.post(
callback["url"],
headers={"Authorization": f"Bearer {callback['token']}"},
json={
"status": "completed",
"result": {
"cms_id": "42",
"preview_url": "https://your-site.example.com/preview/42",
"back_office_url": "https://your-cms.example.com/admin/posts/42",
},
},
)
```
```bash callback.sh theme={null}
curl -X POST "https://api.semji.com/webhooks/calls/7c4a1f08b29d/callback" \
-H "Authorization: Bearer cbk_9f2c…" \
-H "Content-Type: application/json" \
-d '{"status":"completed","result":{"cms_id":"42","preview_url":"https://your-site.example.com/preview/42"}}'
```
The body is the same result format as the sync response. Only terminal outcomes
are accepted here — `completed` or `failed`; a body with `accepted` is rejected.
### Response codes
| Code | Meaning |
| - | - |
| `200` | Result accepted. Also returned on an idempotent replay of an already-finalized call (no further effect). |
| `400` | Body doesn't respect the contract (e.g. `completed` without `cms_id`, or `accepted`). The call stays open — fix and re-post. |
| `401` | Missing or invalid token. |
| `404` | Unknown call. |
| `410` | The callback expired (more than 24 hours after the send). |
| `429` | Too many requests — slow down and retry. |
**If your callback POST times out without a response, re-post it unchanged.**
The token is single-use per outcome but replays are **idempotent**: a repeat of
the same call returns `200` with no side effect, so you never risk a double
handling.
## Idempotency
Both directions are safe to retry:
* **Semji → you**: the same `idempotency_key` means the same send. Don't create a
second draft — return the result you already produced.
* **You → Semji**: replaying the callback for an already-finalized call returns
`200` with no effect.
A **new send of the same content** (a re-click of *Send to CMS*) carries a new
`idempotency_key` and a higher `content_version` — the latest send wins, and the
callback of a superseded send no longer changes the content's state.
## No-code example (Make / Zapier)
1. **Webhook** module receives the `content_staged` POST. Return `{"status":"accepted"}` immediately so the scenario doesn't hit the 10-second timeout.
2. Map `data.title`, `data.html`, `data.meta_description` to your CMS "create entry" module.
3. **HTTP** module POSTs the callback: URL = `{{callback.url}}`, header `Authorization: Bearer {{callback.token}}`, body `{"status":"completed","result":{"cms_id":"{{cms_id}}","preview_url":"{{preview_url}}"}}`.
## Testing your endpoint
A workspace owner can test the integration from **Settings** before going live:
Semji sends a sample `content_staged` payload to your URL and shows the parsed
verdict (`received`, `sent`, or `error`). A `sent` verdict means your endpoint
answered `accepted` — the test flips to `received` once your callback arrives.
## Troubleshooting
You answered `accepted` but no callback reached Semji. Post the result to the
`callback.url`; if nothing arrives within 24 hours the send is marked failed.
The `Authorization` header must be `Bearer ` using the exact
`callback.token` from the payload of that send. Tokens are per-send.
The callback expired — more than 24 hours passed since the send. Trigger a new
send from the editor to get a fresh callback.
A `completed` result must include `cms_id` **and** at least one of
`preview_url` / `back_office_url`. A body with `accepted` is not valid on the
callback — only `completed` or `failed`.
## Related
* [Sync drafts to your CMS](/guides/sync-drafts-to-cms) — the pull-based
alternative and the `content_published` webhook.
* [CMS integrations overview](/integrations/overview) — connect a CMS through MCP
or the REST API.
* [Authentication](/api-reference/authentication) — API keys for the REST API.
# Configure Semji MCP server toolsets and read-only scope
Source: https://help.semji.com/mcp/configuration
Scope the Semji MCP server URL to specific toolsets like planning, content-generation, and knowledge-base, with an optional read-only mode.
The Semji MCP server exposes a growing catalogue of tools. You can scope a
connection to just the toolsets you need — and optionally make it read-only —
directly from the server URL. This keeps the assistant's tool list focused and
lets you hand out narrower connections for governance.
The scope lives in the URL, so it is read on every request. To change scope,
update the connector URL and reconnect (see [Connect to Semji](/mcp/connecting)).
You can also register several connectors, each with a different scope.
## Build your URL
## Query parameters
| Param | Values | Default | Behaviour |
| - | - | - | - |
| `toolsets` | CSV of `planning`, `content-generation`, `content`, `geo`, `seo`, `ideas`, `brand-voice`, `editor`, `agents`, `settings`, `knowledge-base`, or `all` | `all` (every toolset) | Only the tools of the listed toolsets appear in the tool list and are callable. Unknown names are ignored. A bare URL, an empty value, and `all` are equivalent — every toolset is exposed (the default). |
| `read_only` | `true` / `false` | `false` | When `true`, every write tool is removed and refused. Orthogonal to `toolsets`. Any value other than `true` means `false`. |
The URL can only restrict access — it never grants more than your Semji account
already allows. Identity, organization, and permissions come from sign-in, not
from the URL.
## Examples
```text Default (all toolsets) theme={null}
https://mcp.semji.com/mcp
```
```text GEO + SEO analytics theme={null}
https://mcp.semji.com/mcp?toolsets=geo,seo
```
```text Everything, read-only theme={null}
https://mcp.semji.com/mcp?toolsets=all&read_only=true
```
Changing scope means updating the connector URL and reconnecting. Connections
do not re-prompt on their own. You can keep several connectors side by side,
each scoped differently.
Use the URL above wherever [Connect to Semji](/mcp/connecting) tells you to paste
`https://mcp.semji.com/mcp` — for example in Claude Code:
```bash theme={null}
claude mcp add --transport http semji "https://mcp.semji.com/mcp?toolsets=geo,seo"
```
# Connect to Semji
Source: https://help.semji.com/mcp/connecting
Add the Semji MCP server to Claude and any other MCP-compatible assistant.
The Semji MCP server is hosted at:
```
https://mcp.semji.com/mcp
```
The first time you connect, your assistant opens a browser window to sign in to Semji. If your account belongs to more than one organization, you then choose which organization to grant access to. Access is scoped to that organization and to your existing workspace permissions. You need a Semji account with access to at least one workspace.
Semji is not (yet) available as a one-click app inside Claude or ChatGPT. You
add it manually as a **custom MCP server** using the URL above. The steps
below cover that.
## Claude
### Claude Code (CLI)
Add the server, then authenticate from inside Claude Code:
```bash theme={null}
claude mcp add --transport http semji https://mcp.semji.com/mcp
```
Run `/mcp` in Claude Code and follow the browser sign-in. Once it shows
`connected`, you can start prompting.
### Claude Desktop and claude.ai
Add it as a custom connector:
Go to **Settings → Connectors** and click **Add custom connector**.
Paste `https://mcp.semji.com/mcp` and confirm with **Add**.
Open the new connector, click **Connect**, and sign in to Semji in the
browser window that opens.
Custom connectors are available on Free, Pro, Max, Team, and Enterprise plans
(Free is limited to one custom connector). Claude reaches the server from
Anthropic's cloud rather than your machine — this works because
`mcp.semji.com` is publicly reachable.
## Other MCP clients
Most MCP-compatible tools (Cursor, VS Code, Windsurf, Zed, ChatGPT custom
connectors, and others) let you register a server in a JSON config. Use one of
the two patterns below depending on what your client supports.
```json Remote (HTTP) — preferred theme={null}
{
"mcpServers": {
"semji": {
"type": "http",
"url": "https://mcp.semji.com/mcp"
}
}
}
```
```json Local bridge (stdio-only clients) theme={null}
{
"mcpServers": {
"semji": {
"command": "npx",
"args": ["-y", "mcp-remote@latest", "https://mcp.semji.com/mcp"]
}
}
}
```
Use the **remote (HTTP)** form if your client can talk to remote MCP servers
directly. If your client only supports local (stdio) servers, the **local
bridge** uses [`mcp-remote`](https://www.npmjs.com/package/mcp-remote) to forward
the connection and handle the browser sign-in for you (Node.js required).
## Troubleshooting
Trigger the auth flow explicitly: in Claude Code run `/mcp`, in other clients
re-open or reconnect the server. With the local bridge, the browser opens on
first use — make sure no other process is holding the redirect port and that
pop-ups aren't blocked.
Your session expired or was never completed. Reconnect and sign in again. In
Claude Code, `/mcp` lets you re-authenticate an existing server.
Custom connectors in Claude and ChatGPT connect from the vendor's cloud, so
the server must be reachable over the public internet — `mcp.semji.com` is.
If you are behind a corporate proxy or VPN that blocks it, the local bridge
(which connects from your machine) is the workaround.
Make sure Node.js is installed so `npx` can run, and keep `mcp-remote`
up to date (`mcp-remote@latest`, version 0.1.16 or newer). Restart the client
after editing its config file.
The assistant is scoped to the Semji account and the organization you picked
when signing in. To switch organization (or account), disconnect the server
and reconnect, then sign in again and choose the other organization.
# Semji MCP server
Source: https://help.semji.com/mcp/overview
Connect your AI assistant to Semji and drive your SEO and GEO content workflow in plain language.
The Semji MCP server connects any MCP-compatible AI assistant — such as Claude — directly to your Semji workspace. Ask in plain language and the assistant works on your real content: it reads your planning, runs analyses, generates drafts, and publishes, all scoped securely to your account.
No glue code, no exports. You stay in your assistant, the work happens in Semji.
## What you can do
Explore and filter your content pipeline, create drafts in bulk from a list
of keywords or URLs, organize them into folders, and set owners, statuses,
and due dates.
Set a focus keyword on a piece of content, run the analysis, and get
optimization recommendations for Google Search as well as AI answers
(Google AI Overview and ChatGPT).
Launch AI generation or optimization on one or many drafts, follow progress,
review the result, and publish when you are happy with it.
Pull in your workspaces, team, brand voices, and account status (including
remaining credits) so the assistant acts with the right context.
The assistant only ever sees and changes data in the Semji account you sign in
with. Scope follows your existing workspace permissions.
## Example prompts
Once connected, talk to your assistant the way you would to a teammate:
* *"List the drafts in my Spanish market workspace that don't have a focus keyword yet."*
* *"Create drafts for these 10 keywords in my US market workspace and start the SEO analysis on each."*
* *"Run the SEO and AI-visibility analysis on my draft about 'content marketing tools' and summarize what I should improve."*
* *"Generate an optimized version of these three drafts, then publish them once I approve."*
* *"Publish my approved article in Semji, then adapt it into a LinkedIn post and an X thread and schedule them on my social channels."*
* *"Sort my unsorted drafts into folders by topic and assign each to the right writer."*
* *"How much AI Writing credit do I have left?"*
## Next step
Add the Semji MCP server to Claude or any other MCP-compatible assistant.
# Quickstart
Source: https://help.semji.com/quickstart
Create your API key, retrieve your workspace, import a page, and optimize it with Atomic Content — all from the command line.
This guide walks you through the four steps to go from zero to an AI-optimized content draft using the Semji API.
You need a Semji account to follow this guide. Sign up or log in at [app.semji.com](https://app.semji.com).
## 1. Create your API key
Log in to [app.semji.com](https://app.semji.com), then go to **Settings > Organization > API Keys**.
Click **New API key**, give it a name (e.g. `quickstart`), and click **Create**.
Your key is shown once. Copy it now — you won't be able to see it again. All keys start with `sk_`.
Treat your API key like a password. Don't commit it to source control or include it in client-side code.
Export it in your terminal to use it in the commands below:
```bash theme={null}
export SEMJI_API_KEY="sk_your_api_key_here"
```
TypeScript examples read exported values with `process.env`. Python examples read them with `os.environ[...]`.
## 2. Test your key
Call `GET /v1/me` to verify your key works and see your organization:
```typescript TypeScript theme={null}
const response = await fetch("https://api.semji.com/v1/me", {
headers: { Authorization: `Bearer ${process.env.SEMJI_API_KEY}` },
});
console.log(await response.json());
```
```python Python theme={null}
import os
import requests
response = requests.get(
"https://api.semji.com/v1/me",
headers={"Authorization": f"Bearer {os.environ['SEMJI_API_KEY']}"},
)
print(response.json())
```
```bash cURL theme={null}
curl https://api.semji.com/v1/me \
-H "Authorization: Bearer $SEMJI_API_KEY"
```
You should get back your user profile and organization:
```json theme={null}
{
"id": "df286a001943",
"firstName": "Jane",
"lastName": "Smith",
"email": "jane@example.com",
"createdAt": "2024-03-15T10:30:00+00:00",
"jobTitle": "Marketing Manager",
"languageCode": "en",
"profileImageUrl": null,
"organization": {
"id": "89b0f07aade2",
"name": "Example Corp",
"createdAt": "2024-01-10T08:00:00+00:00",
"brandName": null,
"brandImageUrl": null,
"credits": {
"analysis": 47,
"aiWriting": 12,
"contentIdeasSearches": 5
},
"usersCount": 3,
"workspacesCount": 2
}
}
```
## 3. Get your workspace
A workspace represents one website in Semji. List your workspaces to grab the `id` you'll use in the next steps:
```typescript TypeScript theme={null}
const response = await fetch("https://api.semji.com/v1/workspaces", {
headers: { Authorization: `Bearer ${process.env.SEMJI_API_KEY}` },
});
const { data } = await response.json();
console.log(data[0].id, data[0].name);
```
```python Python theme={null}
import os
import requests
response = requests.get(
"https://api.semji.com/v1/workspaces",
headers={"Authorization": f"Bearer {os.environ['SEMJI_API_KEY']}"},
)
workspaces = response.json()["data"]
print(workspaces[0]["id"], workspaces[0]["name"])
```
```bash cURL theme={null}
curl https://api.semji.com/v1/workspaces \
-H "Authorization: Bearer $SEMJI_API_KEY"
```
Save your workspace ID:
```bash theme={null}
export WORKSPACE_ID="6c629e33a9a6"
```
## 4. Import a page and optimize it
### Import the page
Import a URL into your workspace. You can optionally attach a focus keyword right away:
```typescript TypeScript theme={null}
const response = await fetch(
`https://api.semji.com/v1/workspaces/${process.env.WORKSPACE_ID}/pages`,
{
method: "POST",
headers: {
Authorization: `Bearer ${process.env.SEMJI_API_KEY}`,
"Content-Type": "application/json",
},
body: JSON.stringify({
url: "https://example.com/blog/my-article",
focusKeyword: "content marketing strategy",
}),
}
);
const page = await response.json();
console.log(page.id);
```
```python Python theme={null}
import os
import requests
response = requests.post(
f"https://api.semji.com/v1/workspaces/{os.environ['WORKSPACE_ID']}/pages",
headers={
"Authorization": f"Bearer {os.environ['SEMJI_API_KEY']}",
"Content-Type": "application/json",
},
json={
"url": "https://example.com/blog/my-article",
"focusKeyword": "content marketing strategy",
},
)
page = response.json()
print(page["id"])
```
```bash cURL theme={null}
curl -X POST "https://api.semji.com/v1/workspaces/$WORKSPACE_ID/pages" \
-H "Authorization: Bearer $SEMJI_API_KEY" \
-H "Content-Type: application/json" \
-d '{
"url": "https://example.com/blog/my-article",
"focusKeyword": "content marketing strategy"
}'
```
The response returns the page with its `id` and crawled metadata (title, word count, etc.). Save the page ID for the next step:
```bash theme={null}
export PAGE_ID="1b81be0eb082"
```
### Create a content draft
Create a content linked to the page you just imported:
```typescript TypeScript theme={null}
const contentRes = await fetch(
`https://api.semji.com/v1/workspaces/${process.env.WORKSPACE_ID}/contents`,
{
method: "POST",
headers: {
Authorization: `Bearer ${process.env.SEMJI_API_KEY}`,
"Content-Type": "application/json",
},
body: JSON.stringify({
title: "Content Marketing Strategy for 2025",
pageId: process.env.PAGE_ID,
}),
}
);
const content = await contentRes.json();
console.log(content.id);
```
```python Python theme={null}
import os
import requests
response = requests.post(
f"https://api.semji.com/v1/workspaces/{os.environ['WORKSPACE_ID']}/contents",
headers={
"Authorization": f"Bearer {os.environ['SEMJI_API_KEY']}",
"Content-Type": "application/json",
},
json={
"title": "Content Marketing Strategy for 2025",
"pageId": os.environ["PAGE_ID"],
},
)
content = response.json()
print(content["id"])
```
```bash cURL theme={null}
curl -X POST "https://api.semji.com/v1/workspaces/$WORKSPACE_ID/contents" \
-H "Authorization: Bearer $SEMJI_API_KEY" \
-H "Content-Type: application/json" \
-d "{
\"title\": \"Content Marketing Strategy for 2025\",
\"pageId\": \"$PAGE_ID\"
}"
```
Save the content ID:
```bash theme={null}
export CONTENT_ID="3a89fc29d1f3"
```
### Analyze the focus keyword
Before generating content, the focus keyword needs a completed SEO analysis. Trigger it with `POST /v1/keywords/:id/analyze` using the keyword ID returned during page import:
```bash theme={null}
export KEYWORD_ID="b211968d8d46"
```
```typescript TypeScript theme={null}
await fetch(
`https://api.semji.com/v1/keywords/${process.env.KEYWORD_ID}/analyze`,
{
method: "POST",
headers: { Authorization: `Bearer ${process.env.SEMJI_API_KEY}` },
}
);
```
```python Python theme={null}
import os
import requests
requests.post(
f"https://api.semji.com/v1/keywords/{os.environ['KEYWORD_ID']}/analyze",
headers={"Authorization": f"Bearer {os.environ['SEMJI_API_KEY']}"},
)
```
```bash cURL theme={null}
curl -X POST "https://api.semji.com/v1/keywords/$KEYWORD_ID/analyze" \
-H "Authorization: Bearer $SEMJI_API_KEY"
```
Poll `GET /v1/keywords/:id` until `analysisStatus` reaches `success`:
```typescript TypeScript theme={null}
while (true) {
const res = await fetch(
`https://api.semji.com/v1/keywords/${process.env.KEYWORD_ID}`,
{ headers: { Authorization: `Bearer ${process.env.SEMJI_API_KEY}` } }
);
const kw = await res.json();
console.log(`Analysis: ${kw.analysisStatus}`);
if (["success", "failed"].includes(kw.analysisStatus)) break;
await new Promise((r) => setTimeout(r, 5000));
}
```
```python Python theme={null}
import os
import time
import requests
while True:
kw = requests.get(
f"https://api.semji.com/v1/keywords/{os.environ['KEYWORD_ID']}",
headers={"Authorization": f"Bearer {os.environ['SEMJI_API_KEY']}"},
).json()
print(f"Analysis: {kw['analysisStatus']}")
if kw["analysisStatus"] in ("success", "failed"):
break
time.sleep(5)
```
```bash cURL theme={null}
curl "https://api.semji.com/v1/keywords/$KEYWORD_ID" \
-H "Authorization: Bearer $SEMJI_API_KEY"
```
The analysis typically completes within 30 to 90 seconds.
### Launch Atomic Content
Trigger an AI content generation on the draft. Use `replace` to generate from scratch or `optimize` to rewrite existing content:
```typescript TypeScript theme={null}
await fetch(
`https://api.semji.com/v1/contents/${process.env.CONTENT_ID}/atomic`,
{
method: "POST",
headers: {
Authorization: `Bearer ${process.env.SEMJI_API_KEY}`,
"Content-Type": "application/json",
},
body: JSON.stringify({ type: "replace" }),
}
);
```
```python Python theme={null}
import os
import requests
requests.post(
f"https://api.semji.com/v1/contents/{os.environ['CONTENT_ID']}/atomic",
headers={
"Authorization": f"Bearer {os.environ['SEMJI_API_KEY']}",
"Content-Type": "application/json",
},
json={"type": "replace"},
)
```
```bash cURL theme={null}
curl -X POST "https://api.semji.com/v1/contents/$CONTENT_ID/atomic" \
-H "Authorization: Bearer $SEMJI_API_KEY" \
-H "Content-Type: application/json" \
-d '{ "type": "replace" }'
```
### Poll for completion
The generation runs asynchronously. Poll `GET /v1/contents/:id/generation` until the status reaches `review`:
```typescript TypeScript theme={null}
while (true) {
const res = await fetch(
`https://api.semji.com/v1/contents/${process.env.CONTENT_ID}/generation`,
{ headers: { Authorization: `Bearer ${process.env.SEMJI_API_KEY}` } }
);
const { status } = await res.json();
console.log(`Status: ${status}`);
if (["review", "failed", "cancelled"].includes(status)) break;
await new Promise((r) => setTimeout(r, 5000));
}
```
```python Python theme={null}
import os
import time
import requests
while True:
status = requests.get(
f"https://api.semji.com/v1/contents/{os.environ['CONTENT_ID']}/generation",
headers={"Authorization": f"Bearer {os.environ['SEMJI_API_KEY']}"},
).json()
print(f"Status: {status['status']}")
if status["status"] in ("review", "failed", "cancelled"):
break
time.sleep(5)
```
```bash cURL theme={null}
curl "https://api.semji.com/v1/contents/$CONTENT_ID/generation" \
-H "Authorization: Bearer $SEMJI_API_KEY"
```
Possible statuses: `queued` → `pending` → `review` → `success` (after confirm) or `failed` / `cancelled`.
### Confirm the draft
Once the status is `review`, confirm the generation to apply it to your content:
```typescript TypeScript theme={null}
await fetch(
`https://api.semji.com/v1/contents/${process.env.CONTENT_ID}/generation/confirm`,
{
method: "POST",
headers: { Authorization: `Bearer ${process.env.SEMJI_API_KEY}` },
}
);
```
```python Python theme={null}
import os
import requests
requests.post(
f"https://api.semji.com/v1/contents/{os.environ['CONTENT_ID']}/generation/confirm",
headers={"Authorization": f"Bearer {os.environ['SEMJI_API_KEY']}"},
)
```
```bash cURL theme={null}
curl -X POST "https://api.semji.com/v1/contents/$CONTENT_ID/generation/confirm" \
-H "Authorization: Bearer $SEMJI_API_KEY"
```
Your content is now optimized. Open it in the [Semji editor](https://app.semji.com) to review and publish.
## What's next?
Explore all available endpoints.
Rate limits, error handling, and key management.